It is early morning, you stumble out of bed, and as you step into your bathroom, your bare feet hit an ice-cold, slippery tile floor. It is a harsh way to wake up. Those grout lines have seen better days, the design feels dated, and you are desperately craving a bathroom upgrade. But then you look at the quotes for a professional tile replacement, and your heart sinks. Traditional bathroom remodels can easily drain your savings.
Today’s water-resistant and fully waterproof laminate options are engineering marvels. They feature dense, moisture-repellent cores, incredibly tight click-lock joining systems, and protective wear layers that laugh in the face of puddles. In fact, many modern laminates boast an impressive 72-hour standing water resistance. This means that normal splashes from the shower or kids playing in the tub will not ruin your beautiful new floor, provided you prep the room correctly.
Choosing a water-resistant laminate DIY project over traditional tile is a game-changer for your budget and your weekend schedule. You can easily achieve the gorgeous, modern wood-look aesthetic for under $5 per square foot. Better yet, snapping these planks together saves you about 50% of the time you would normally spend mixing thin-set, laying tile, and smearing grout.
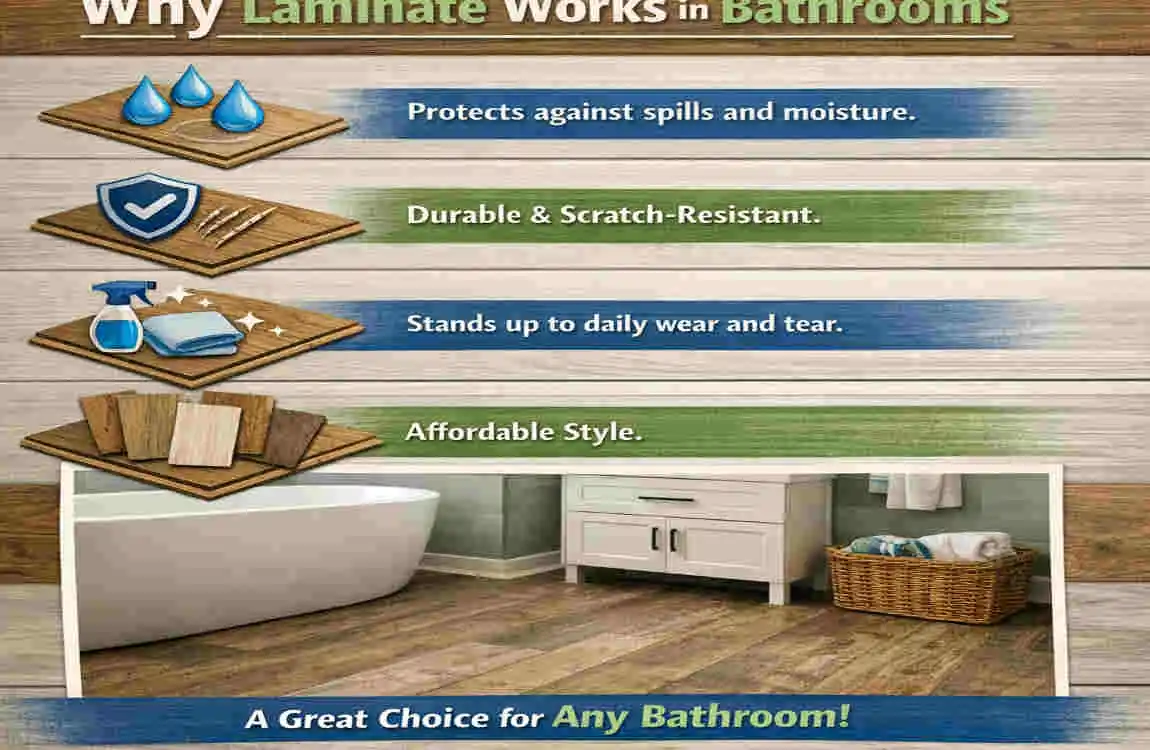
Why Laminate Works in Bathrooms
Let’s address the elephant in the room right away. Your friends, your parents, and maybe even a local contractor might tell you that putting laminate in a bathroom is a terrible idea. They are operating on outdated information.
It is vital to separate the old myths from the reality of 2026 flooring technology. Traditional laminate flooring absolutely warps when exposed to moisture. However, the flooring industry has made massive leaps forward. Today’s water-resistant versions, featuring advanced sealants and technologies like AquaGuard, are designed to withstand splashes, steam, and spills common in a bathroom environment.
The secret lies in the construction. Modern waterproof laminate flooring for the bathroom uses a high-density fiberboard (HDF) core mixed with specialized resins that prevent water absorption. On top of that, the edges of the planks are often coated in a water-repellent wax. When you lock these planks together, they create a nearly impenetrable shield against surface water.
Let’s break down the advantages in a quick comparison:
Feature The Laminate Benefit
Cost runs about $2 to $4 per square foot, compared to $10+ per square foot for decent tile.
Install Method Features a floating click-lock system. Absolutely no messy glue or mortar is needed.
Waterproofing. When paired with the right underlayment and silicone caulk, it easily lasts 20+ years.
Maintenance is incredibly easy. Just sweep and run a damp mop over it. No dirty grout lines to scrub!
Of course, there are still some considerations and potential cons you need to be aware of. The biggest risk factor remains high humidity and moisture coming from underneath the floor. If you install laminate directly over a damp concrete basement floor without a barrier, the moisture will eventually seep up and compromise the planks.
The solution to this humidity risk is simple but non-negotiable: you must use a high-quality vapor barrier and a proper waterproof underlayment. By isolating the laminate from the subfloor and sealing the perimeter correctly, you eliminate the risks associated with bathroom environments.
Tools and Materials Needed
Before we dive into how to install laminate flooring in a bathroom, you need to gather your arsenal. Having the right tools on hand will make this water-resistant laminate DIY project incredibly smooth. You don’t want to be running back and forth to the hardware store when you have a toilet sitting in your hallway.
Here is your essential checklist for the job:
The Necessary Tools:
- Circular Saw or Jigsaw: A circular saw is great for making quick, straight cuts for the ends of your rows. A jigsaw is absolutely mandatory for cutting curved lines around your toilet flange and plumbing pipes.
- Tapping Block and Pull Bar: Never hit your laminate planks directly with a hammer. A tapping block distributes the force so you don’t crush the delicate locking tongues. A pull bar is essential for pulling the final row tight against the wall.
- Rubber Mallet: Used in tandem with your tapping block.
- Spacers (8-10mm): These keep your expansion gap consistent around the perimeter of the room.
- Level and Tape Measure: For checking the subfloor and planning your layout.
- Knee Pads: Your knees will thank you later. Do not skip these!
The Essential Materials:
- Water-Resistant Laminate Planks: Buy 10% more than your square footage to account for cuts and mistakes.
- Waterproof Underlayment (6-mil+): This is your moisture barrier and acoustic padding combined.
- 100% Silicone Caulk: Do not use acrylic. You need pure silicone for a waterproof seal.
- Quarter-Round Molding or Baseboards: To cover the expansion gap.
- Plumber’s Putty and a New Wax Ring: For reinstalling your toilet.
Optional but Highly Recommended:
- Moisture Meter: To test your subfloor before laying anything down.
- Laminate Cutter: A guillotine-style cutter that snaps planks without creating sawdust.
Budget and Safety: For a standard 100-square-foot bathroom, expect to spend between $200 and $400. Always wear safety glasses and a dust mask when cutting planks, as the aluminum oxide finish can create harmful dust. Heavy-duty work gloves will also protect your hands from sharp edges on planks.
Preparation Steps
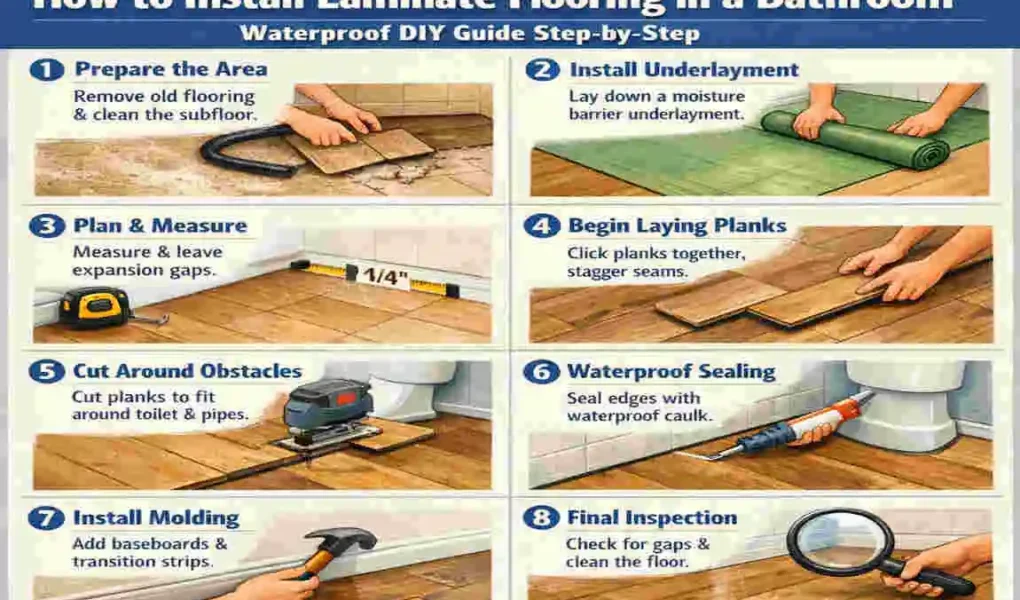
If you want to know the real secret to how to install laminate flooring in a bathroom successfully, it all comes down to the preparation. The prep work is critical for success in moist environments. If you rush this phase, your floor will fail, regardless of how waterproof the planks claim to be.
Remove the Old Flooring and Fixtures. Start with a blank canvas. Turn off the water supply to your toilet and sink. Flush the toilet to empty the tank, and use a sponge to soak up the remaining water in the bowl. Disconnect the supply line, unscrew the floor bolts, and carefully lift the toilet out of the room. Scrape away all the gross, sticky residue from the old wax ring around the flange. If you have pedestal sinks or vanities that are easy to remove, take them out too. Next, rip up your old flooring—whether it is peeling linoleum or outdated tile—down to the bare subfloor.
Inspect and Level the Subfloor. A bathroom subfloor prep for laminate requires absolute flatness. Laminate is a “floating” floor, meaning it rests on top of the subfloor without being glued or nailed down. If your subfloor has dips or bumps, the laminate will bend when you walk on it. This bending breaks the click-lock seals, allowing water to seep between the planks.
Take a long, straight piece of lumber and drag it across the floor. You are looking for any high spots or low spots. The general rule is that the floor cannot vary by more than 3/16 of an inch over a 10-foot span. Sand down high spots on wood subfloors, or use a self-leveling compound to fill in low spots on concrete. Clean all dust and debris meticulously.
Test for Moisture This is a step many DIYers skip, but you shouldn’t. Grab a moisture meter and press it into your subfloor. You are looking for a moisture reading below 12%. If your subfloor is holding more moisture than that, you need to identify the source of the dampness and let the room dry out completely before proceeding.
Acclimate Your Planks Wood composite materials expand and contract based on the temperature and humidity of their environment. Bring your boxes of laminate into the bathroom, open the ends of the boxes, and let them sit for at least 48 hours. This allows the planks to adjust to the specific microclimate of your bathroom.
Pro Tip: Fix any dripping pipes, leaky shower doors, or sweating toilet tanks right now. A waterproof floor will protect against top-down spills, but it won’t fix an underlying plumbing disaster. Addressing leaks before you lay the floor is the best way to avoid tearing it all up again later.
Step-by-Step Installation Guide
Now we arrive at the core of our project. By following this structured, numbered approach, you will master how to install laminate flooring in a bathroom like a seasoned professional. Take your time, measure twice, and don’t rush the process.
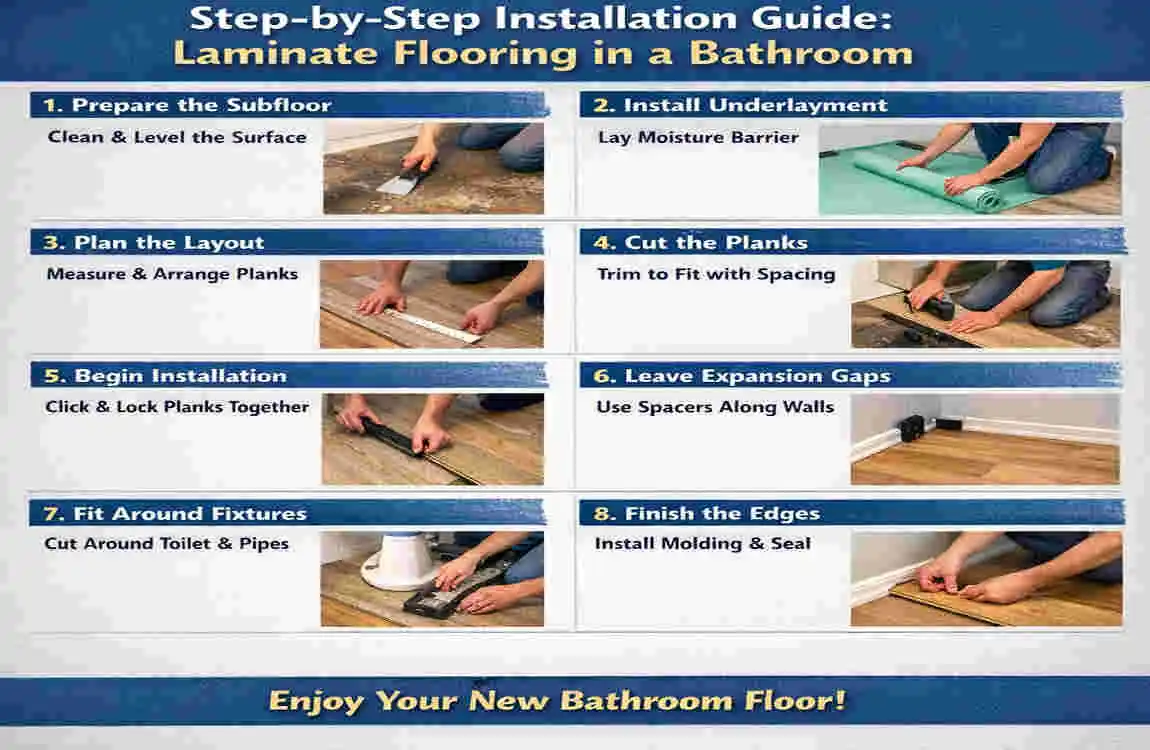
Lay the Waterproof Underlayment
Your first line of defense against subfloor moisture is the underlayment. Roll out your waterproof underlayment (ensure it is at least 6 mil thick if installing over concrete), starting at the longest wall.
Run the underlayment slightly up the walls—about an inch or two—to create a bathtub effect that protects the edges. When you roll out the second row of underlayment, make sure to overlap the seams by about 4 inches. Use the manufacturer-approved moisture-blocking tape to seal the seams together tightly.
You want to cover the entire floor, but skip placing underlayment directly over the open drain hole or the toilet flange. Use a utility knife to cut neatly around these plumbing fixtures. A smooth, flat underlayment ensures your planks will lie perfectly flat and mutes the hollow “clicking” sound when you walk on the finished floor.
Plan Your Layout
Do not just grab a plank and start snapping. Planning is crucial. You want to dry-fit your first row to see how it looks. Always start from the longest, most visible wall in the bathroom—usually the wall opposite the door.
Measure the width of your bathroom and divide it by the width of a single laminate plank. This tells you how many rows you will need. If your math shows that your very last row will be less than 2 inches wide, it will be incredibly difficult to install and will look terrible. To fix this, you need to rip (cut lengthwise) your very first row of planks so that the first and last rows are roughly the same width.
Furthermore, you need to plan to stagger your seams. The ends of the planks in one row should be at least 12 inches away from the ends in the adjacent row. Staggering creates structural stability and provides that authentic hardwood look.
Finally, place your 8-10mm plastic spacers along the walls. Laminate flooring expands and contracts. If you butt the planks tight against the drywall, they will buckle and warp when the summer humidity hits. The expansion gap is your safety valve.
Install the First Rows
It is time to start laying the floor. Take your first plank and place it against the spacers in the corner of your longest wall. Make sure the “tongue” side of the plank faces the wall, and the “groove” side faces out into the room.
When adding the second plank in the row, insert the end tongue into the end groove of the first plank at a slight 45-degree angle. Gently lower it down until it clicks flat. If it doesn’t sit perfectly flush, use your tapping block and rubber mallet to give it a light tap.
Once your first row is complete, start your second row. Remember to stagger the joint! Use a cut piece of plank (at least 12 inches long) to begin the next row. Angle the long edge of the new plank into the groove of the first row at 45 degrees. Push forward gently as you lower it to the floor.
Use your tapping block along the long edge to ensure the seam is as tight as possible. There should be zero visible gaps between the planks. For the planks at the very ends of the rows, near the walls, your tapping block won’t fit. This is where your pull bar comes in. Hook the pull bar over the end of the plank and tap the other end with your mallet to pull the joint tight.
Take your time cutting around door jambs. You can either use a jigsaw to cut the plank to fit around the frame, or better yet, use an oscillating multi-tool to undercut the wooden door frame so the laminate can slide right underneath it for a seamless look.
Cut for Fixtures and Drains
Bathrooms are notoriously tricky because of the plumbing. When you reach the toilet flange or a floor drain, you have to make custom cuts.
The easiest method is to create a paper template. Take a piece of sturdy paper or cardboard, place it around the pipe or flange, and trace the exact shape. Transfer this tracing onto your laminate plank.
Grab your jigsaw, equip it with a fine-tooth blade designed for laminate, and carefully cut out the circle. Here is a crucial detail for how to install laminate flooring in a bathroom: you must leave a 1/4-inch expansion gap between the laminate edge and the toilet flange or plumbing pipes. The flooring needs room to breathe everywhere, not just at the walls.
Once the curved cut is made, angle the plank into the previous row and lock it down.
Final Row and Edges
As you approach the final wall, you will almost certainly need to cut planks lengthwise to fit. Measure the remaining distance from the edge of your second-to-last row to the wall, subtracting your 8-10mm expansion gap.
Mark this measurement on your final planks, then use your circular saw or jigsaw to rip them to the correct width. Because you are working right up against the wall, you will definitely need your pull bar here. Lock the cut plank into the groove, hook the pull bar over the cut edge, and tap it firmly until the locking mechanism engages completely.
Remove all the plastic spacers from the perimeter of the room. Your floating floor is now fully laid out!
Reinstall the Fixtures
With the floor in place, it is time to put the bathroom back together. First, we need to address that 1/4-inch expansion gap you left around the toilet flange. Fill this gap with 100% silicone caulk. This ensures that if the toilet ever overflows, water won’t immediately rush under the laminate planks.
Apply a brand new, thick wax ring to the toilet flange. Carefully lift your toilet, align the bolts, and set it down firmly. Press down to compress the wax ring and create a watertight seal. Tighten the floor bolts (but don’t overtighten, or you might crack the porcelain!), reconnect the water supply line, and turn the valve back on. Check immediately for any leaks. Reinstall your sink vanity if you removed it.
Waterproofing and Sealing Tips
If you want to master how to install laminate flooring in a bathroom, you need to understand that the planks themselves being water-resistant is only half the battle. The edges of the room are your vulnerable points.
This is the key differentiator between a floor that lasts two years and one that lasts twenty: Silicone caulk is your best friend.
You must fill the 8-10mm expansion gap around the entire perimeter of the room with 100% silicone caulk before you install your baseboards. Many laminate manufacturers explicitly state in their warranties that installing their product in a bathroom requires perimeter sealing, and that the warranty is void if perimeter sealing is not provided.
Why pure silicone? Because acrylic caulk shrinks and cracks over time. Silicone stays permanently flexible, allowing the floor to expand and contract while maintaining an impenetrable watertight seal.
If you are installing in an extremely high-moisture bathroom—like a tiny space heavily used by teenagers who take boiling, steamy showers—consider applying a specialized laminate joint glue to the locking mechanisms as you assemble the floor. This provides an extra layer of moisture defense between the planks.
Finally, install a proper threshold transition strip at the bathroom doorway. Ensure it is tightly sealed to prevent water from migrating out of the bathroom and into your hallway, where it can damage the floors.
Common Mistakes to Avoid
Even with a great guide on how to install laminate flooring in a bathroom, DIYers occasionally trip up. Learn from others’ mistakes to ensure a flawless finish.
- No Expansion Gap: This is the number one killer of laminate floors. If you install the planks flush against the wall, as soon as humidity rises, they will expand, push against each other, and literally tent or buckle up in the middle of the room. Always leave that 8-10mm gap.
- Uneven Subfloor: If you skip the leveling step during subfloor prep, the floor will flex when walked on. This flexing acts like a hinge, eventually breaking the brittle click-lock tongues. Once the lock is broken, the planks separate, and water gets inside.
- Wrong Laminate Choice: Trying to save money by using standard, non-water-resistant laminate in a bathroom is a recipe for disaster. It will absorb humidity from the air and swell at the edges, creating raised, ugly seams.
Quick Fixes for Maintenance Mistakes:
The Mistake: The Easy Fix
Over-mopping the floor. Put away the heavy, soaking-wet string mop. Use a lightly damp microfiber mop and a pH-neutral cleaner specifically designed for laminate.
Using Steam Cleaners: Never use a steam mop on laminate. The forced heat and moisture will blast through the wear layer. Stick to dry sweeping and damp mopping.
Ignoring High Humidity: Run your bathroom exhaust fan for at least 30 minutes after every shower. Consider running a small dehumidifier post-install if your bathroom lacks ventilation.
Finishing Touches
Your floor is down, the toilet is back, and the perimeter is sealed with silicone. Now it is time to make it look pretty.
You need to cover that perimeter expansion gap. Install your baseboards or quarter-round molding around the edges of the room. Crucial rule: Nail the baseboards or molding directly to the wall, not into the floor. If you nail the molding into the laminate planks, you will pin the floor down, preventing it from floating and expanding, which leads to buckling.
Once the molding is attached to the wall, run a thin, neat bead of silicone caulk along the bottom edge where the molding meets the laminate, and another bead along the top edge where the molding meets the drywall. Caulk the corners neatly for a seamless, professional, and fully waterproofed finish.
Maintenance and Longevity
Congratulations! You have successfully learned how to install laminate flooring in a bathroom. Now, how do you keep it looking brand new?
The golden rule of water-resistant laminate is simple: wipe up standing puddles as soon as possible. While modern planks have 72-hour protection, it is always best practice not to test those limits. Keep a bath mat outside your shower or tub to catch the heavy drips.
Make it a habit to refresh caulk annually. Inspect the silicone around your toilet, bathtub, and baseboards. If you see peeling or gaps, scrape it out and reapply a fresh bead of 100% silicone.
With proper preparation, meticulous perimeter sealing, and basic common-sense maintenance, your new bathroom laminate flooring can last 15 to 25 years.
FAQs
Can I install laminate directly under a toilet? Yes, absolutely. The laminate should be installed beneath the toilet to create a seamless look. However, you must cut a hole large enough to leave a 1/4-inch expansion gap around the plumbing flange, and fill that gap with 100% silicone caulk before setting the toilet on top.
Is laminate flooring truly 100% waterproof? No flooring outside of solid tile or sheet vinyl is inherently 100% waterproof from all angles. However, high-quality 2026 laminate is highly water-resistant on the top surface. The weak points are the seams and the edges. It only achieves a “waterproof” status for your bathroom when you follow proper subfloor prep, use a vapor barrier underlayment, and meticulously caulk the perimeter.
Can I put laminate over my existing bathroom tile? Yes, but only if the tile is in perfect condition, perfectly flat, and securely attached. If the grout lines are deep, you will need to fill them in with a leveling compound first so the laminate doesn’t dip into the grooves over time.
Should I glue the planks together for safety? Standard click-lock laminate does not require glue. However, for a bathroom install, using a manufacturer-approved joint sealer or PVA glue on the locking mechanisms adds excellent insurance against top-down moisture penetration.