It’s the middle of a stormy season, and you’re standing in your kitchen, listening to that all-too-familiar drip from the ceiling. Roofing repairs and replacements can send shivers down any homeowner’s spine—not just from worry, but from the thought of those sky-high bills. Did you know that professional roofing installation can cost anywhere from $8,000 to $18,000 for an average home? It’s no wonder that more and more people are rolling up their sleeves and tackling roof projects themselves.
That’s where Ondura roofing comes in—a DIY-friendly, cost-effective, and durable solution that’s making waves in the world of home improvement. If you’re looking to save $5,000 or more and transform your roof with your own hands, you’re in the right place. Ondura’s corrugated asphalt panels are designed for easy installation, lasting performance, and a sleek look that elevates any home.
What is Ondura Roofing?
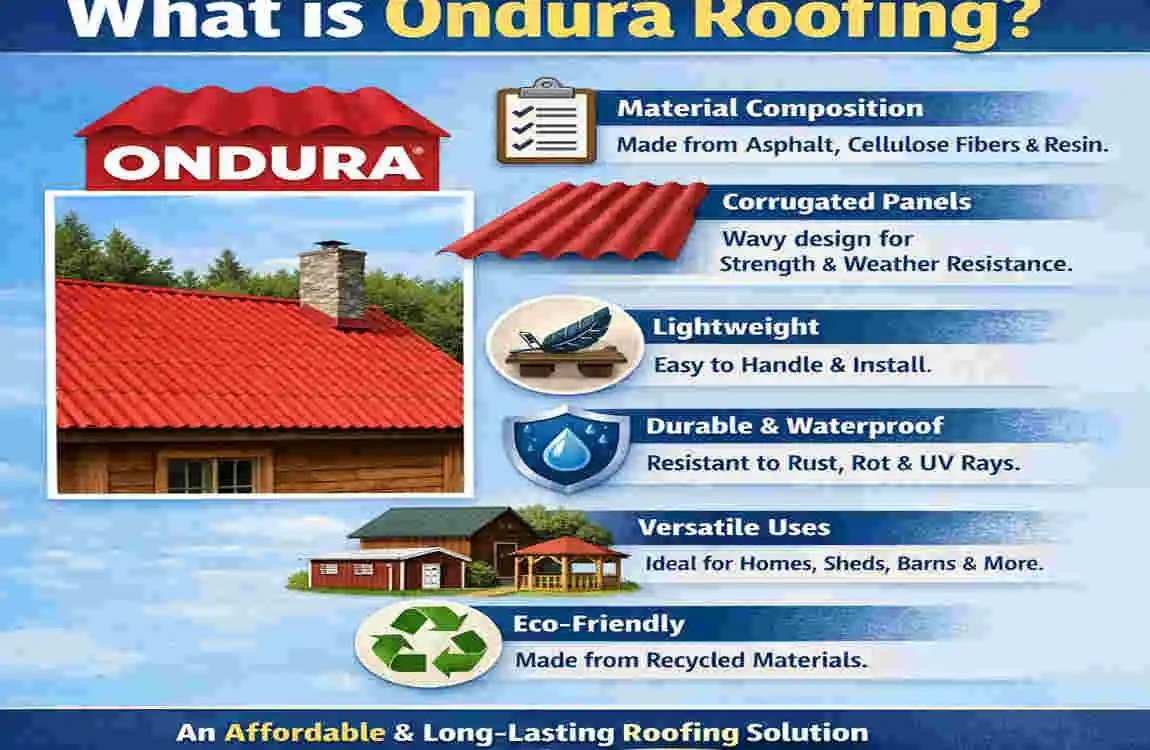
Ondura roofing is a smart, modern alternative to traditional roofing options. It’s made from corrugated asphalt-fiberglass panels that combine strength, flexibility, and weather resistance for all kinds of homes.
Composition and Sizes
Ondura panels are crafted from asphalt-impregnated cellulose fibers, reinforced with resin and bitumen. Each panel typically measures 48 inches by 79 inches and is about 0.16 inches thick, making it easy to handle, cut, and install—especially for DIY projects.
Profiles and Colors
You’ll find Ondura panels in various profiles (wave patterns) and a wide selection of colors—from classic red and brown to green, black, and even custom hues. This means you can effortlessly match your new roof to your home’s style.
Pros and Cons of Ondura Roofing
Let’s break down the key advantages and a few limitations:
Pros:
- Lightweight: Easy to carry and install without special machinery.
- Weather Resistant: Handles rain, wind, snow, and sun with minimal wear.
- Low Maintenance: No need for constant repairs or special treatments.
- Eco-Friendly: Often made from recycled materials, and panels can be recycled after use.
Cons:
- Not for Extreme Winds: In hurricane zones, extra fasteners or bracing may be necessary.
- Noise: Can be a tad noisier during heavy rain compared to traditional shingles.
Ondura vs. Other Roofing Options
Here’s a quick comparison to help you see how Ondura stacks up:
Feature Ondura Panels Metal Roofing Asphalt Shingles
Weight Light (18 lbs/panel) Medium–Heavy Medium
Lifespan 30–50 years 40–70 years 15–30 years
Cost (per sq ft) $2–$5 (DIY) $5–$12 $3–$7
Installation Easy DIY Pro recommended DIY/Pro
Maintenance Low Medium Medium
Eco-Friendliness High Variable Low
Cost Breakdown
- Ondura Panels: $20–$30 each (covers about 26 sq ft per panel)
- For a 1,000 sq ft roof: 39–40 panels = ~$800–$1,200
- Total Project Estimate: Including fasteners, underlayment, and extras, most DIY projects cost $2,000–$3,500—a fraction of the cost of pro installation!
Tools and Materials Needed for Ondura Installation
Before you climb that ladder, make sure you’ve got all the right gear. Having everything ready will save you headaches and keep your project running smoothly.
Essential Tools
- Safety Gear: Harness, non-slip gloves, goggles, a dust mask, and sturdy boots.
- Measuring Tape & Chalk Line: For accurate layouts and straight lines.
- Tin Snips or Circular Saw: To cut panels cleanly and safely.
- Drill (with bits): For fastening panels and caps.
- Ladder & Roofing Brackets: Safe access and stable footing.
- Sealant Gun: For ridge caps and flashing.
Materials Checklist
- Ondura Panels: Main roofing material.
- Ridge Caps: For covering roof peaks.
- Closure Strips: Foam or plastic strips to seal waves at eaves and ridges.
- Screws/Sealants: Ondura-specific fasteners with neoprene washers.
- Underlayment: Roofing felt or synthetic membrane for moisture protection.
Budget Table
Item Quantity (for 1,000 sq ft) Estimated Cost
Ondura Panels 40 $800–$1,200
Ridge Caps 8–10 $100–$200
Closure Strips 80–100 $80–$150
Fasteners/Sealant 400–500 $40–$60
Underlayment 10 rolls (36”x72’) $100–$200
Safety Gear (if new) 1 set $80–$200
Tools (rent/buy) Per need $50–$200
Total Estimate $1,250–$2,200
Preparation: Assessing Your Roof for Ondura
Before you start swinging a hammer, it’s crucial to prepare your workspace and ensure a safe, successful installation.
Roof Inspection Steps
- Pitch Check: Ondura panels require a minimum slope of 5:12—that’s a 5-inch rise for every 12 inches of run.
- Deck Condition: Inspect the plywood or OSB for rot, softness, or damage. Replace any bad spots.
- Existing Shingles: Ondura can be installed over a single layer of shingles if the deck is solid. Remove extra layers or damaged shingles.
Measurements
- Calculate Roof Area: Measure the length and width of each roof section. Multiply to get square footage.
- Order Extra Material: Add at least 10% more for waste, cuts, and future repairs. For a 1,000 sq ft roof, order 1,100 sq ft worth of panels and underlayment.
Permits and Safety
- Check Local Codes: Some areas require permits for roofing projects. Call your city or county office.
- Weather Forecast: Plan installation for a stretch of dry, mild days—Ondura shouldn’t be installed in rain or extreme heat/cold.
- Safety First: Set up fall protection, secure your ladder, and work with a buddy if possible.
Surface Preparation
- Remove Old Roofing (if needed): Strip off damaged shingles and nails.
- Clean Deck: Sweep away dust and debris.
- Install Underlayment: Roll out felt or synthetic membrane to protect from moisture.
Common Mistakes to Avoid
- Ignoring Pitch: A too-shallow slope can cause leaks.
- Wrong Rafter Spacing: Ondura panels need rafters or purlins no more than 24 inches apart.
- Skipping Underlayment: Never install Ondura directly on bare wood.
Preparing for DIY Ondura Roofing Installation
Here’s a quick checklist to keep you on track:
- Inspect roof pitch and decking.
- Measure accurately and order extra materials.
- Secure necessary permits.
- Plan for safe, dry weather.
- Prepare the surface with underlayment.
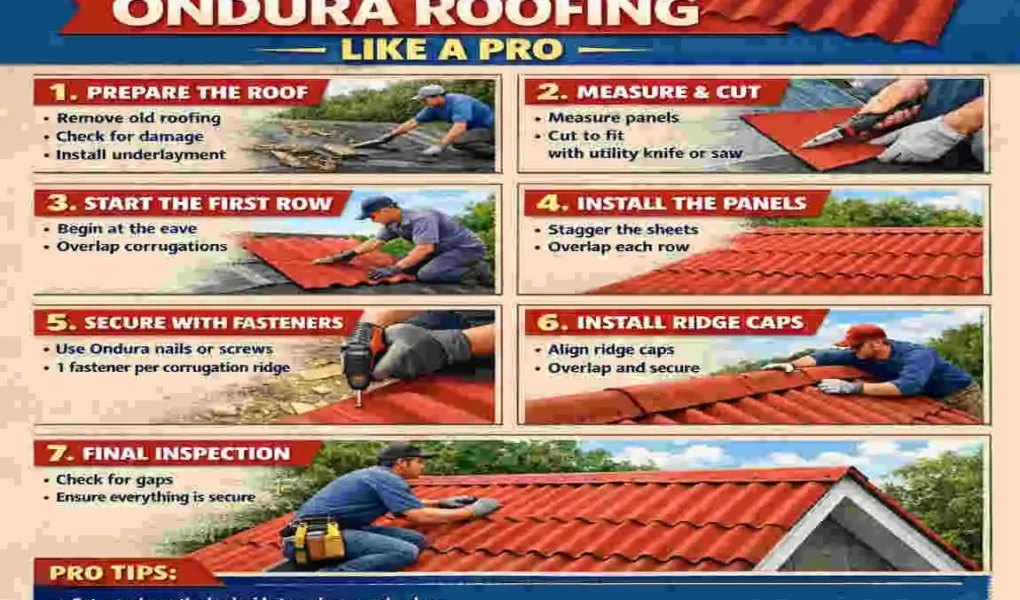
Step-by-Step Guide: How to Install Ondura Roofing
This is the heart of your project! Let’s walk through how to install Ondura roofing like a pro, one phase at a time.
Setting Up Starter Strips and Drip Edge
Start with the edges for a watertight finish:
- Drip Edge Installation: Nail a metal drip edge along all eaves and rakes (the sloped sides) of your roof. This keeps water from running under your panels and damaging the decking.
- Starter Strips: Lay Ondura starter strips (or cut a strip from a regular panel) along the eaves. These give your first row of panels a solid, straight base and help prevent wind uplift.
Installing Underlayment and Closure Strips
Moisture control and pest prevention are key:
- Underlayment: Roll out your roofing felt or synthetic membrane horizontally, starting at the eave and overlapping each row by at least 4 inches. Nail in place with cap nails, keeping the surface smooth.
- Closure Strips: Place foam or plastic closure strips along the eaves and up the gable ends where the panel waves meet the roof deck. This blocks wind-driven rain and insects.
Cutting and Laying the First Row of Panels
This step sets the tone for your entire roof:
- Marking and Cutting: Use a measuring tape and straightedge to mark panels for width or length adjustments. Cut with tin snips for small cuts or a circular saw for longer cuts (wear a dust mask).
- Panel Placement: Lay the first panel at the bottom left (or right) corner of your roof, square to the edge.
- Overlap: Each panel should overlap the previous by one corrugation on the side and at least 7 inches at the ends if you need to stack them.
- Fastening: Secure the panel using Ondura screws with neoprene washers, starting at the eave and working toward the ridge. Place screws at the top of each corrugation, about 1 inch from the edge, and every 12 inches along the panel.
Overlapping and Securing Subsequent Rows
Consistency and alignment are your friends:
- Side Laps: Overlap each new panel by one full corrugation. This prevents water infiltration at seams.
- End Laps: If your roof is longer than one panel, overlap the ends by at least 7 inches and apply a bead of roofing sealant between layers for extra protection.
- Screw Pattern: Secure each panel at every rafter or purlin (max 24” apart), and at each overlap. Always use screws with washers to prevent leaks.
- Check Alignment: Use a chalk line or straight edge to keep rows even and straight.
Installing Ridges, Hips, and Valleys
Seal the most vulnerable parts of your roof:
- Ridge Caps: Once panels reach the roof peak, install foam closures along the ridge. Place ridge caps over the closures, overlapping each cap by at least 6 inches. Screw into every corrugation with washers.
- Hip Caps: For hip roofs, use hip caps in the same fashion, ensuring a water-tight seal.
- Valleys: Flash valleys with pre-bent metal valley flashing before laying panels. Cut panels to fit and overlap into the valley by at least 12 inches. Seal all edges.
Pro Tip: Ridge and hip caps should be installed with a 2-inch overhang past the gable ends.
Finishing Touches and Flashing
Final steps for a professional look and long-lasting protection:
- Pipe Boots: Install flashing boots around vent pipes and flues, sealing with roofing-grade silicone.
- Gable Trim: Cap the gable edges with matching trim to prevent wind-driven water from getting underneath.
- Inspection: Walk the roof (carefully!) and check for missed fasteners, unsealed overlaps, or gaps. Fix as needed.
Visual Aids:
For best results, refer to Ondura’s installation diagrams and video tutorials. Take photos at each step for your own future reference or to share your success!
Pro Tips:
- Install panels in cooler temperatures to reduce expansion/contraction issues.
- Add extra fasteners in high-wind zones.
- Always wear proper safety gear—your well-being comes first!
Common Mistakes to Avoid When Installing Ondura Roofing
Even the best DIYers can make a few mistakes. Here’s how to dodge the most common Ondura roofing installation blunders:
- Improper Overlaps: Insufficient panel overlap can lead to leaks. Always follow the 7-inch end lap and 1-corrugation side lap rule.
- Wrong Screw Placement: Place screws at the top of the corrugation and use neoprene washers. Screws in the valleys can cause leaks.
- Ignoring Expansion Gaps: Ondura expands and contracts with temperature. Leave small gaps at the ends and along the ridges as recommended.
- Over-tightening Fasteners: This can crush the panel and washer, leading to premature leaks or cracks.
- Forgetting Closure Strips: Skipping these can let in wind, rain, and critters.
Fixes & Troubleshooting:
- Leaks: Re-seal overlaps and replace any stripped screws.
- Loose Panels: Add extra screws in windy areas.
- Rattling: Check for missed closure strips or loose fasteners.
Maintenance and Longevity of Your Ondura Roof
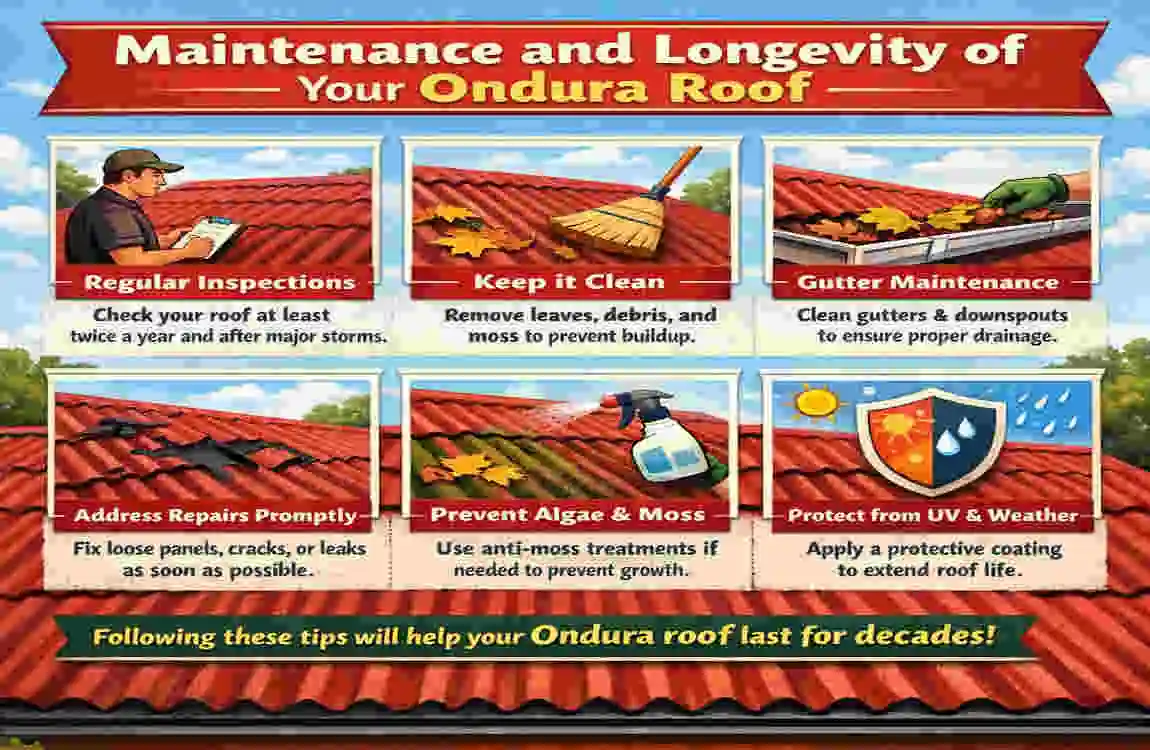
Taking care of your Ondura roof is simple and can extend its life for decades.
Post-Installation Care
- Annual Inspections: Walk your roof once a year to check for loose screws, lifted panels, or damaged flashing.
- Moss and Debris Removal: Sweep off leaves, branches, and moss with a soft broom. Avoid power washing, which can damage the surface.
- Warranty: Ondura roofs come with a 30 to 50-year warranty. Keep your purchase records and installation photos for any future claims.
Upgrades and Enhancements
- Painting: Ondura panels can be painted if you want a new look down the road.
- Solar Integration: The lightweight panels can support solar panel mounts with proper bracing.
Cost Analysis: DIY Ondura Roofing vs. Hiring Pros
Let’s break down the real savings when you install Ondura roofing yourself.
OptionCost per Sq FtTotal (1,000 sq ft)Notes
DIY Ondura $3–$6 $3,000–$6,000 Includes tools/materials
Pro Installed $8–$12 $8,000–$12,000 Labor, markup
Savings — $5,000+ —
- Labor: DIY means you pocket the labor savings.
- Waste: Careful planning reduces waste and costs.
- Tools: Rent or borrow to save even more.
ROI: Ondura’s corrugated design improves airflow, which can lower attic temps and energy bills.
FAQs: How to Install Ondura Roofing
Can I install Ondura over old shingles?
Yes, as long as there’s only one layer and the decking is solid. Remove extra layers for best results.
What’s the minimum pitch for Ondura?
5:12 is the minimum recommended pitch for proper drainage.
What tools do I need to cut Ondura panels?
Tin snips for small cuts, or a circular saw with a carbide blade for larger sections. Always wear a dust mask.
Is Ondura suitable for rainy climates?
Absolutely! The corrugated design channels water quickly, and proper overlaps prevent leaks.
Do I need special fasteners?
Yes, use Ondura screws with neoprene washers to ensure a watertight seal.
How long does Ondura roofing last?
With proper care, your roof can last 30–50 years.
Can I walk on Ondura panels?
Yes, but only when installed and secured. Always step on the supported areas above rafters.