you’re cooking in your kitchen, everything seems perfect until a heavy pot slips from your hands and lands with a thud on your pristine tile floor. You look down, and there it is—a chip or crack staring back at you, turning your once flawless floor into a glaring imperfection. Sounds familiar? You’re not alone.
Floor tiles are durable, but they’re not indestructible. Every day wear and tear, accidental impacts, or even settling foundations can cause damage to your tiles over time. Replacing an entire floor can be costly, but here’s the good news: you can fix damaged floor tiles yourself, saving both time and money. Whether it’s a hairline crack, a chipped corner, or a loose tile, this comprehensive guide will walk you through step-by-step solutions to repair your tiles like a pro.
Common Types of Floor Tile Damage
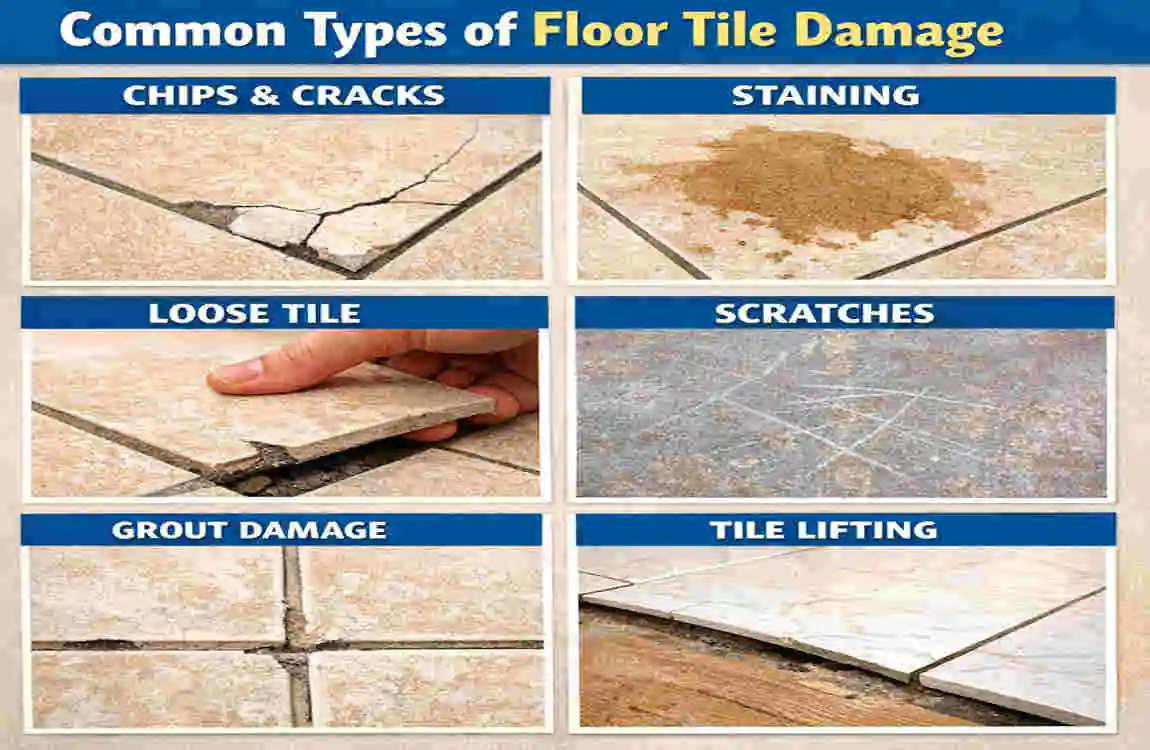
Before diving into the fixes, it’s essential to understand what kind of damage you’re dealing with. Not all tile issues are created equal—some can be repaired easily, while others might require a bit more effort. Here’s a breakdown of the most common types of floor tile damage:
Hairline Cracks
These are fine cracks that form over time, often due to the natural settling of your home or minor impacts. Although they may seem insignificant, ignoring hairline cracks can lead to bigger problems, as moisture can seep in and worsen the damage.
Chips and Gouges
Ever dropped something heavy on your floor and noticed a small chunk missing from your tile? That’s a chip or gouge. While it may not affect the structural integrity of your floor, it can still be an eyesore.
Loose or Hollow Tiles
Do you hear a hollow sound when tapping on a tile, or does one of your tiles shift slightly underfoot? This is usually caused by adhesive failure, and while the tile itself might still be intact, it can eventually crack or break if not addressed.
Grout Cracks
Sometimes what looks like a tile issue is actually a grout problem. Cracked grout can make your tiles appear damaged and allow debris or moisture to accumulate.
Stained or Worn Tiles
Over time, tiles can lose their lustre due to stains or surface wear. While this isn’t “damage” in the traditional sense, it can make your floor look old and unkempt.
Here’s a quick comparison of these damage types:
Damage Type Common Causes Severity DIY Fixable?
Hairline Crack Pressure, age, settling , Low Yes
Chip/Gouge Heavy object impact Medium Yes
Loose Tile Poor adhesive installation High Partially
Grout Crack Shrinkage, wear Low Yes
Stained/Worn Tile Spills, foot traffic , Low Yes
Tools and Materials Needed
Before starting your repair project, you’ll need to gather the right tools and materials. Here’s everything you’ll need to ensure a smooth DIY experience:
Safety Gear
- Gloves: Protect your hands from sharp edges and chemicals.
- Goggles: Prevent dust and debris from getting into your eyes.
- Dust Mask: Avoid inhaling fine particles during sanding or scraping.
Cleaning Supplies
- Rubbing Alcohol: For degreasing and cleaning damaged areas.
- Vacuum Cleaner: To remove debris and dust.
- Scraper: To clean off old grout or adhesive.
Repair Materials
- Epoxy Filler: Ideal for filling cracks and chips.
- Ceramic Wax Kit: Great for repairing gouges and chipped tiles.
- Grout: For regrouting loose or cracked areas.
Tools
- Putty Knife: For applying fillers or adhesives.
- Soldering Iron: Used to melt ceramic wax for chip repairs.
- Sandpaper: To smooth out repaired surfaces.
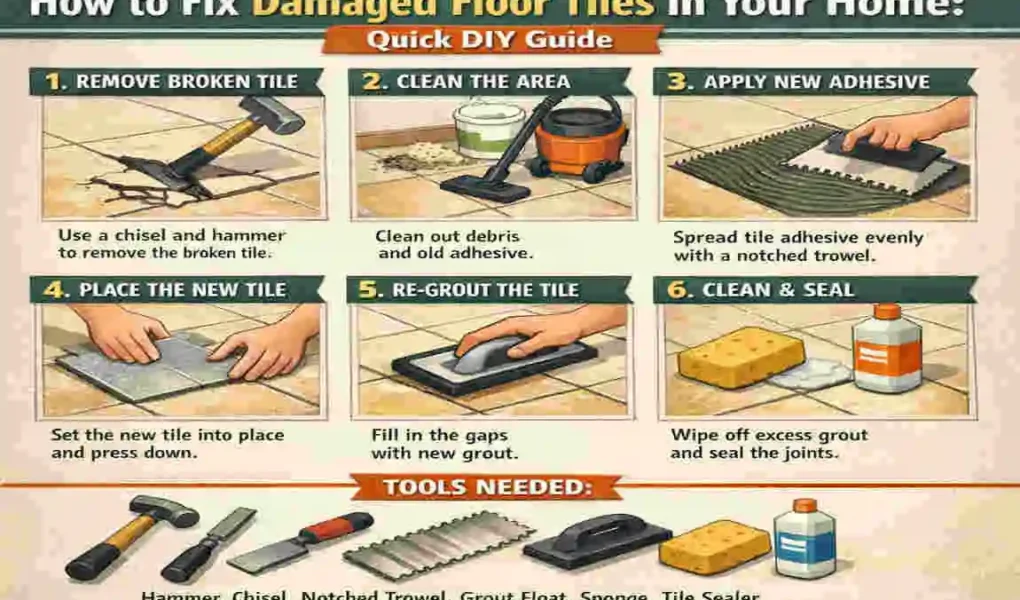
Step-by-Step DIY Guide: How to Fix Damaged Floor Tiles

Now that you’re equipped with the necessary tools and materials, let’s jump into the step-by-step process of fixing your damaged tiles. We’ll cover everything from assessing the damage to applying the final touches.
Assess the Damage
Before starting any repairs, it’s crucial to evaluate the extent of the damage. Inspect the tile for stability and use a small tool (like a screwdriver handle) to tap on it. If you hear a hollow sound, the tile might also be loose. Measure cracks or chips to determine whether they can be repaired or need replacement. This step ensures you choose the right method for fixing the damage.
Prep the Area
Preparation is key to a successful repair. Start by thoroughly cleaning the damaged tile and the surrounding area:
- Vacuum to remove dust and debris.
- Use rubbing alcohol to degrease the surface.
- Apply masking tape along the edges of adjacent tiles to protect them during the repair.
Fix Cracks Without Replacing the Tile
For Hairline Cracks
- Mix an epoxy filler according to the package instructions.
- Apply the filler into the crack using a putty knife, ensuring it fills the entire depth.
- Smooth out the surface and let it cure for the recommended time.
- Optionally, match the filler colour to the tile paint for a seamless finish.
For Wider Cracks
- Use a two-part epoxy for better durability.
- Spread the mixture evenly into the crack and allow it to dry completely.
- Sand the area lightly to ensure a smooth surface.
Repair Chips and Gouges
- Heat a ceramic wax stick using a soldering iron.
- Fill the chip or gouge with the melted wax.
- Once the wax cools, scrape off the excess with a putty knife and sand the surface.
- Apply a varnish or sealant to restore the tile’s shine.
Regrout or Replace Loose Tiles
To Regrout
- Use a grout rake to remove the old grout around the tile.
- Apply fresh grout into the gaps and smooth it with a grout float.
- Wipe away excess grout with a damp sponge.
To Replace a Loose Tile
- Carefully chisel out the damaged tile without harming the surrounding ones.
- Remove old adhesive and apply a fresh layer.
- Place the new tile, press firmly, and regrout the edges.
Finishing Touches
After completing the repairs, finish up with these steps:
- Seal the repaired areas to prevent moisture from entering.
- Clean the entire floor to remove dust and residue.
- Test the durability of your repair by gently tapping or stepping on the tile.
Prevention Tips for Lasting Tiles
To avoid future damage, follow these simple maintenance tips:
- Use rugs or mats in high-traffic areas to reduce wear.
- Seal your grout annually to prevent cracks and moisture damage.
- Avoid dropping heavy objects on tiled surfaces.
When to Call a Professional
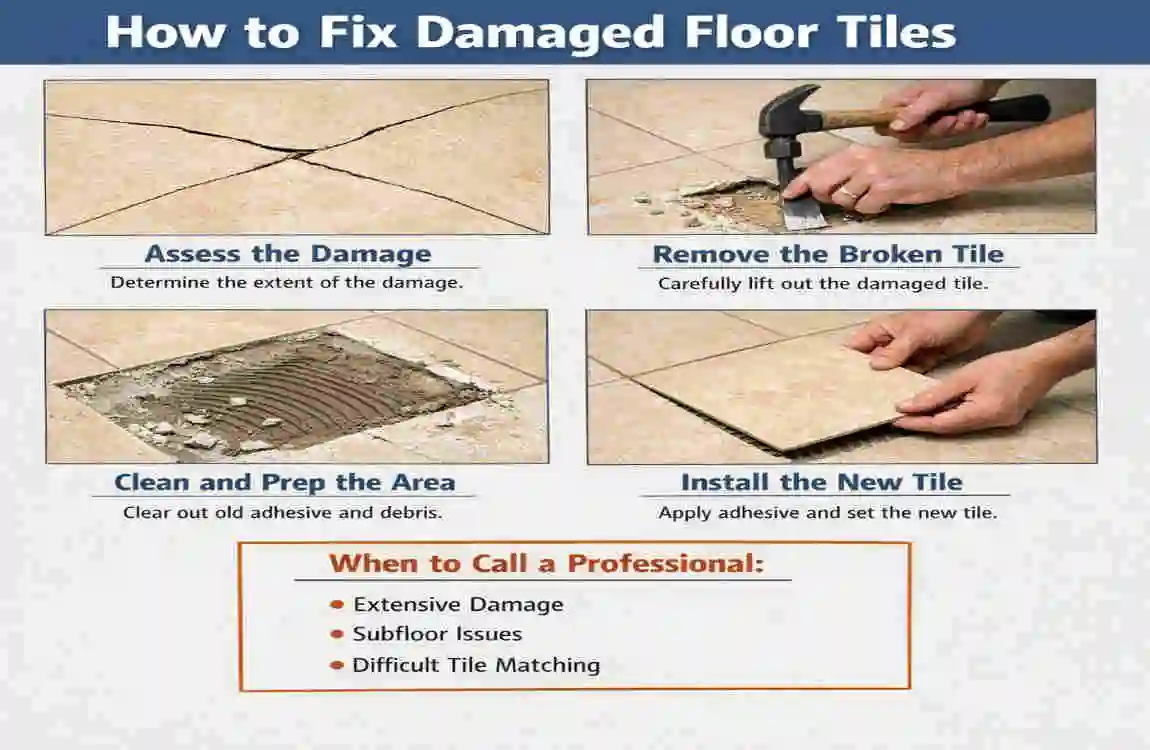
While DIY solutions work for most minor tile damages, there are times when it’s best to consult a pro. Consider calling a professional if:
- The damage is widespread or affects multiple tiles.
- The subfloor is compromised.
- You have luxury home or rare tiles that are hard to replace.
Here’s a quick cost comparison:
DIY Cost/Time Professional Cost/Time
$20-50 / 1-2 hrs $100-300+ / 1 day
FAQs
How can I quickly fix damaged floor tiles?
For small cracks or chips, use an epoxy filler or ceramic wax kit. Repairs can take as little as 30 minutes.
Can I repair cracked tiles without replacing them?
Yes, hairline cracks and minor chips can be repaired using epoxy or wax without removing the tile.
What’s the best DIY tile repair kit?
Brands like Picobello and Keramifill offer reliable kits for fixing chips and cracks.
How long will DIY tile repairs last?
When done correctly and sealed properly, repairs can last anywhere from 1 to 5 years.