Have you ever walked into your bathroom, hoping for a relaxing, spa-like shower, only to be greeted by a stubborn, white, chalky buildup on your beautiful shower walls? If you are nodding your head right now, you are definitely not alone.
This crusty white residue is incredibly frustrating. It traps everyday grime, makes your grout look dirty, and completely dulls the shine of your bathroom. You might even scrub it away, only to watch it magically reappear the moment the wall dries.
If you are tired of this endless battle, you are in the right place. Today, we are going to dive deep into how to remove calcium deposits from bathroom tiles using methods that actually work.
You do not need to spend a fortune on harsh, toxic chemicals to get your bathroom looking brand new again. In fact, some of the most effective solutions are sitting right inside your kitchen pantry right now.
What Exactly Causes Calcium Deposits?
Before we start scrubbing, it is very important to understand your enemy. Why do these white spots keep showing up on your shower walls?
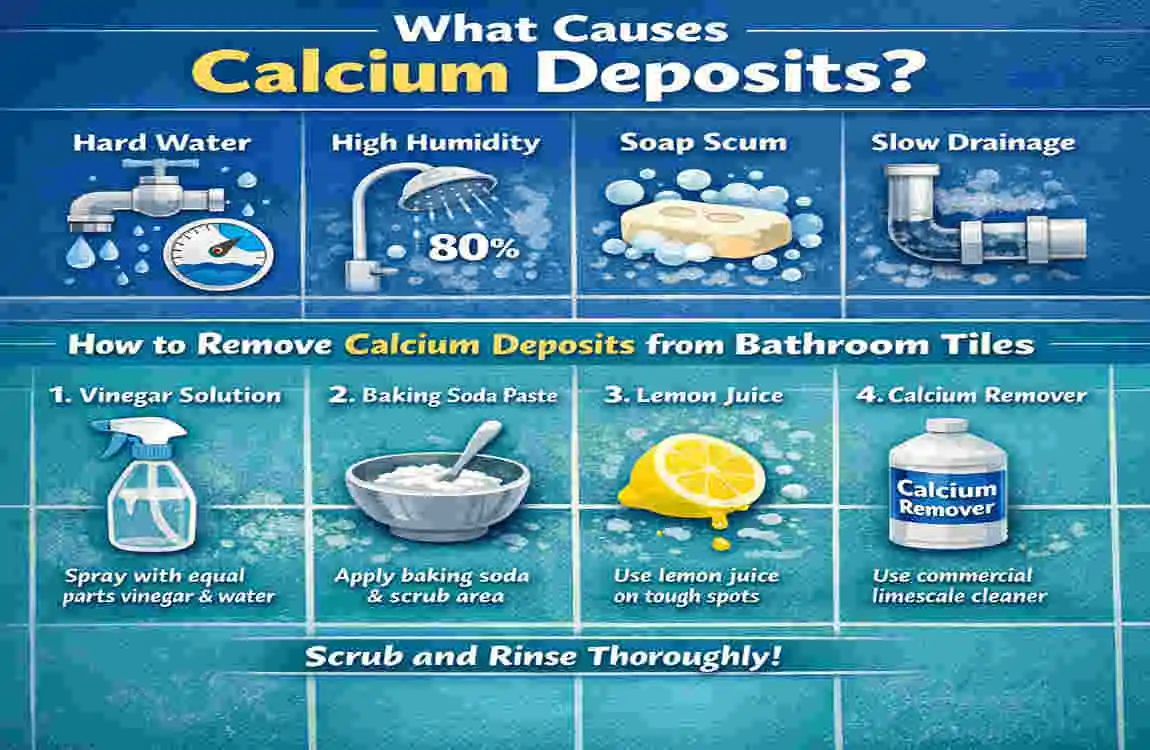
The simple answer is hard water. Hard water is simply water that carries a very high concentration of dissolved minerals. The main culprits are usually calcium carbonate and magnesium.
When you take a shower, water splashes all over your walls. Eventually, that water evaporates into the air. But here is the catch: the minerals inside the water do not evaporate. They stay right there on your walls.
Over time, layer after layer of calcium carbonate builds up. As it dries, it hardens into a tough, white scale. This scale loves to stick to porous surfaces like grout, but it also clings tightly to the smooth glaze of your ceramics.
The Role of Humidity and Environment
Several factors can speed up this annoying process. Poor ventilation in your bathroom is a massive contributor. If the steam from your shower cannot escape, the moisture sits on the walls for a much longer time.
Infrequent cleaning also plays a huge role. If you only clean your shower once a month, those minerals have weeks to bake onto the surface and form a rock-solid bond.
Furthermore, local water quality is the biggest factor of all. In many regions, especially in areas relying on groundwater like Lahore, the water is naturally incredibly hard. Every single shower leaves behind a heavy dose of minerals, making regular maintenance absolutely essential.
Soap Scum vs. Calcium Buildup
You might be wondering if that white stuff on your wall is just soap. It is very common to confuse the two, but they are quite different.
Soap scum is typically a greasy, slightly sticky film. It happens when the fatty acids in your bar soap react with the hard water. It often looks gray or yellow and feels somewhat slippery to the touch.
Calcium buildup, on the other hand, is hard, crusty, and chalky. It usually looks bright white. If you run your fingernail across it, it feels like a rough, microscopic mountain range on your smooth wall.
Understanding this difference is crucial because the way you clean them is different. While soap scum needs degreasers, calcium requires acidity to break it down.
Essential Tools and Supplies Needed
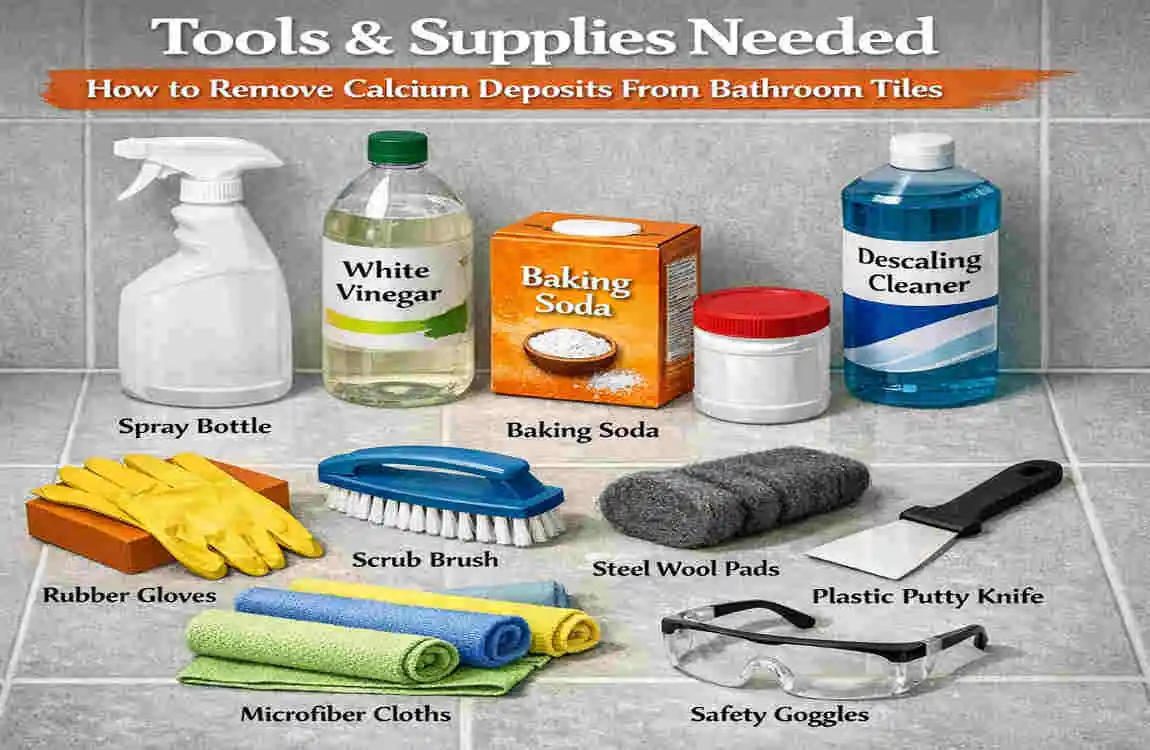
Before we jump into our cleaning methods, we need to gather our tools. The best part about DIY tile cleaning is that you do not need to buy expensive, specialized equipment.
You likely have most of these items hiding in your home already. Gathering everything beforehand will save you time and keep your cleaning momentum going.
Here is a quick breakdown of the essentials you will need for all the methods we will discuss today:
Item Purpose: Where to Get
White vinegar. Its acidity dissolves tough mineral bonds easily. Your kitchen pantry
Baking soda Acts as an excellent, mild abrasive paste base. The baking aisle at any grocery store
Lemon juice provides natural citric acid to cut through fresh stains. Your local fresh fruit market
Soft brush/toothbrush Scrubs away the buildup without scratching the glaze. Around the house
Plastic scraper Gently pops off thick, loose buildup from flat surfaces. Your local hardware shop
Microfiber cloths ensure a streak-free, lint-free wipe down at the end. Any local general store
Why We Chose These Specific Tools
We did not include any harsh wire brushes or steel wool on this list. That is intentional!
Your bathroom walls might feel tough, but their shiny outer glaze is actually quite delicate. If you use metal scrubbers, you will leave permanent, microscopic scratches. These scratches trap more dirt and minerals in the future.
A simple old toothbrush is your best friend here. It is gentle enough to protect the glaze but firm enough to get deep into the textured lines of your grout.
Similarly, microfiber cloths are highly recommended because they are incredibly absorbent. They will pick up the dissolved mineral liquid without just pushing it around the wall.
A Quick Note on Safety
Even though we are using natural ingredients, you should always protect yourself.
We highly recommend wearing a pair of rubber gloves while you work. Acidic liquids like vinegar and lemon juice can dry out your hands or sting if you have small cuts on your fingers.
Additionally, always test your chosen cleaning method on a small, hidden corner of your shower first. Wait a few minutes to ensure it does not discolor your grout or etch your specific type of material.
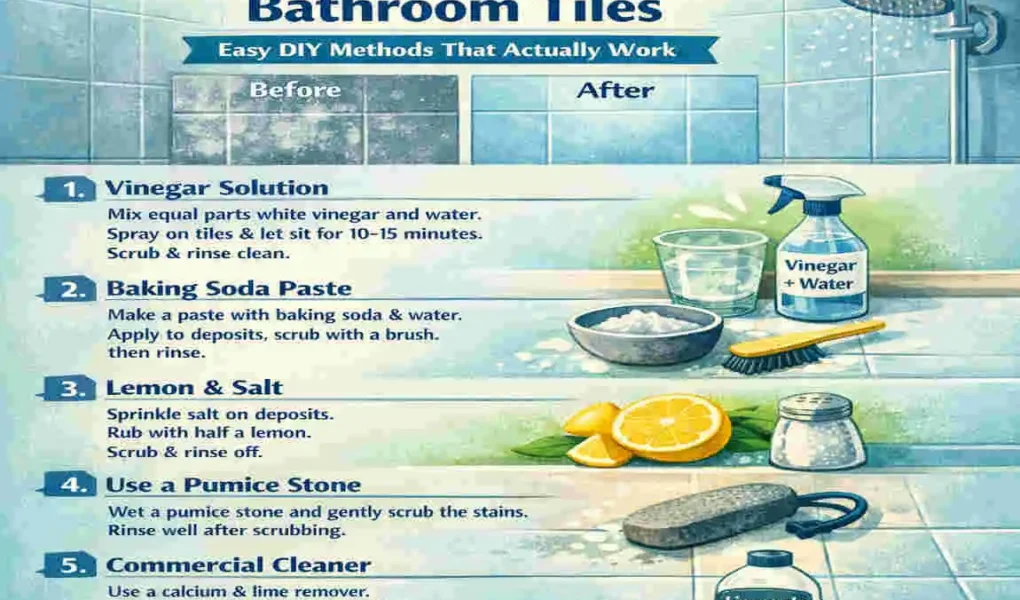
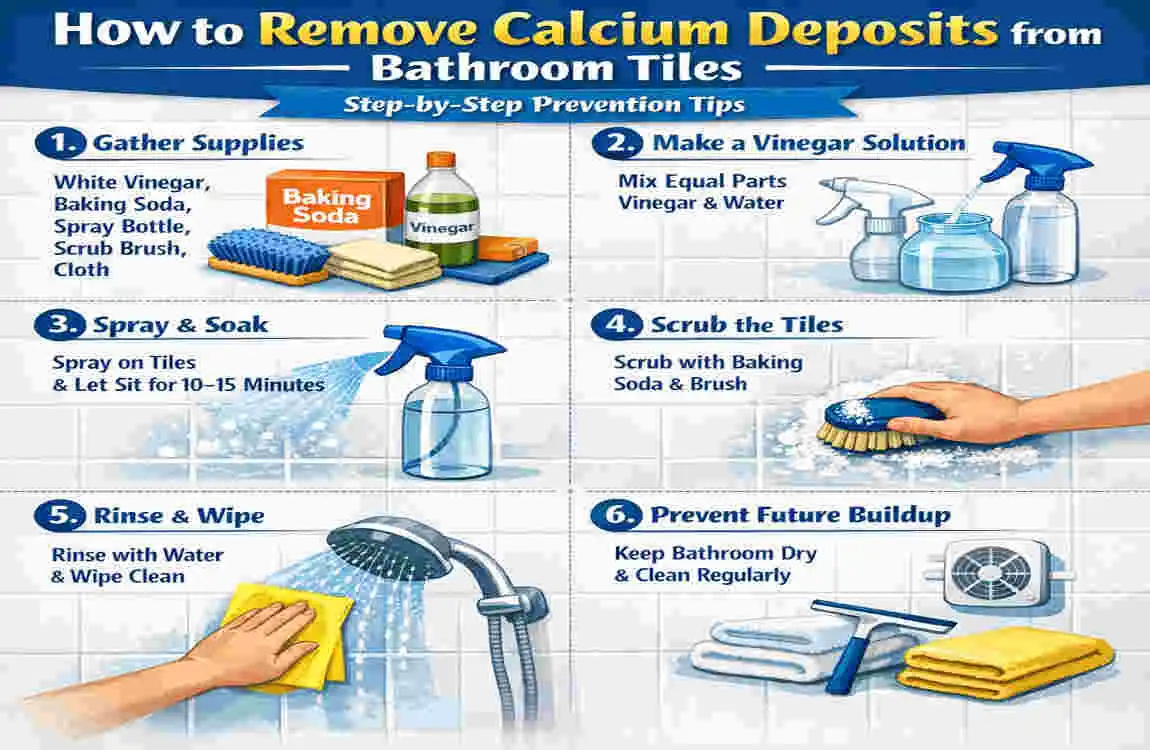
The Ultimate White Vinegar Soak
When it comes to figuring out how to remove calcium deposits from bathroom tiles, this is our absolute favorite method. It is the top DIY choice for light to moderate mineral deposits.
Why does it work so well? White vinegar contains about 5% acetic acid. This mild acid safely and naturally breaks the tough chemical bonds of the calcium carbonate. It mimics the power of professional cleaners, but completely avoids the risk of damaging your home or your lungs.
If you do this correctly, you can expect about an 80% removal rate of the stains in just one single application!
Step-by-Step Instructions
Step : Prepare Your Vinegar Spray. Grab an empty, clean spray bottle. Fill it entirely with undiluted white liquid vinegar. Do not water it down! You need the full power of the acetic acid to tackle those hard water stains on tiles.
Step : Spray Generously Spray the vinegar directly onto the affected areas. You want the wall to be dripping wet. If you are dealing with vertical walls where the liquid runs down quickly, try the paper towel trick. Soak a few paper towels in vinegar and press them flat against the sticky spots. They will cling to the wall and keep the acid directly on the stain.
Step : Let the Magic Happen. Now, you need to be patient. Let the liquid sit for at least 1 to 2 hours. If your buildup is extremely thick and has been there for months, leave the vinegar-soaked paper towels on overnight. You might even hear a tiny, faint fizzing sound. That is the sound of the acid melting the minerals away!
Step : Scrub and Scrape. Remove the paper towels. Take your soft-bristled brush or an old toothbrush and start scrubbing in gentle, circular motions. For thicker crusts that are stubbornly holding on, take your plastic scraper. Hold it at a 45-degree angle and gently push under the edge of the buildup to pop it off.
Step : Rinse and Dry Completely. Finally, turn on your shower or use a bucket to rinse the entire wall with warm water. Make sure all the loosened chalky residue is washed down the drain. Take a dry microfiber cloth and wipe the wall completely dry. Drying is a crucial step to prevent new water spots from forming immediately.
The Mighty Baking Soda Paste
Sometimes, plain liquid just isn’t enough. If you have neglected your shower for a while, you might have very thick, stubborn crusts that laugh at a simple spray.
This is where you need to bring in the heavy artillery: the baking soda paste.
This method is absolutely ideal for stubborn buildup. Baking soda provides a fantastic, mild abrasive texture. It gives you the scrubbing power you need without scratching your delicate surfaces. When you mix it with an acid, it creates a powerful fizzing action that lifts dirt right out of tight spaces.
Step-by-Step Instructions
Step : Mix Your Magic Paste. Grab a small bowl from your kitchen. Pour in about half a cup of baking soda. Slowly start adding splashes of white vinegar or fresh lemon juice.
The mixture will immediately start to bubble and fizz. Keep mixing until you form a thick, spreadable paste. It should feel like the consistency of thick toothpaste or frosting.
Step : Apply and Cover. Take a sponge or an old toothbrush and scoop up a generous amount of your paste. Smear it directly onto the heaviest white crusts.
To stop the paste from drying out too quickly on the wall, tear off a piece of kitchen plastic wrap. Press the plastic wrap right over the paste. This traps the moisture inside and forces the chemical reaction directly into the stain. Let it sit for about 15 to 30 minutes.
Step : Scrub in Circles. Peel off the plastic wrap and throw it away. Grab your soft brush. Use the gritty texture of the paste to your advantage and scrub the area in firm, small circles.
You will notice the white crust starting to break apart and mix into the paste. Pay special attention to the grout lines here, as the baking soda will naturally lift deep-set discoloration from the porous material.
Step : The Final Rinse Once the surface feels smooth, rinse the area thoroughly with warm water. You might need to use your hands or a sponge to guide the gritty baking soda down the drain so it doesn’t leave a white, powdery film behind. Dry the wall with your trusty microfiber cloth to reveal that gorgeous shine.
The Fresh Lemon Juice Scrub
If you want an incredibly fresh-smelling, eco-friendly approach for newly formed stains, look no further than the humble lemon.
Lemons are packed with natural citric acid. This acid is fantastic at cutting through light to moderate mineral scaling very quickly. Plus, it leaves your bathroom smelling like a sunny summer day, rather than a salad dressing factory!
Step-by-Step Instructions
Step : Prep Your Lemon. Take a fresh, juicy lemon and cut it right in half. To give this method a little extra scrubbing power, pour some regular table salt onto a small plate. Dip the fleshy, cut side of the lemon directly into the salt.
Step : Rub directly on the wall. Use the salted lemon half exactly like a scouring sponge. Rub it directly onto the chalky spots on your shower wall. Squeeze the lemon gently as you scrub to release those acidic juices over the stains.
The salt acts as a very mild abrasive, while the citric acid immediately starts breaking down the hard water stains on tiles.
Step : Let the Juice Sit. Once you have rubbed the entire area, step back and let the lemon juice sit on the wall for about 10 minutes. This gives the citric acid enough time to dissolve the calcium carbonate bonds.
Step : Scrub and Rinse Take a wet sponge or your soft brush and do a quick final scrub over the area to loosen any remaining bits. Finally, rinse the wall down completely with warm water and buff it dry with a microfiber towel.
A Very Important Warning About Stone
While the lemon method is wonderful, you must be careful about where you use it. This method is perfectly safe for standard porcelain or ceramic walls.
However, you must avoid using lemon juice on natural stone. If your shower is made of marble, travertine, or limestone, do not use this method. Natural stone is actually made of calcium! The citric acid in the lemon will aggressively eat into the stone, causing dull, permanent etch marks that will ruin your expensive shower. For stone, you need to use specifically formulated, pH-neutral cleaners.
Using Commercial Cleaners Like CLR
We love natural DIY tile cleaning methods. They are safe, cheap, and usually highly effective. But we also have to be realistic. Sometimes, DIY methods fall short.
If you have moved into a new house where the shower hasn’t been cleaned in ten years, vinegar might not be strong enough. The calcium might be so thick it feels like concrete.
When you face an extreme situation, it might be time to use a commercial product like CLR (Calcium, Lime, and Rust Remover) or a similar heavy-duty descaler.
Safety First: Proper Usage Rules
If you decide to go the commercial route, you must prioritize your safety. These chemicals are powerful and require respect.
Always Dilute According to the Label. Do not just pour straight CLR onto your walls. Read the back of the bottle carefully. Usually, you need to mix equal parts of the cleaner with warm water before applying it.
Ventilate the Room. Chemical cleaners release strong, potentially harmful fumes. Before you even open the bottle, turn on your bathroom exhaust fan. Open the bathroom window if you have one. Leave the bathroom door wide open to ensure fresh air is circulating.
Wear Protective Gear You must wear thick rubber gloves to protect your skin from chemical burns. It is also a very smart idea to wear safety goggles. A tiny splash of these chemicals in your eye can cause serious damage.
Never, Ever Mix Chemicals. This is the most important rule of all. Never mix a commercial cleaner like CLR with bleach, and never mix it with your DIY vinegar. Mixing these chemicals can instantly create highly toxic, life-threatening gases. Always rinse your walls completely clean of one product before you even think about trying a different one.
Apply the diluted commercial cleaner with a sponge, let it sit for exactly the amount of time the bottle recommends (usually only a few minutes), scrub gently, and rinse completely with copious amounts of cold water.
Step-by-Step Prevention Tips to Keep Tiles Sparkling
Congratulations! You have successfully learned how to remove calcium deposits from bathroom tiles. Your shower is finally looking pristine, shiny, and bright.
But let’s be honest: you do not want to do this heavy scrubbing every single month. The absolute best way to deal with clean calcium buildup is to stop it from forming in the first place.
By adding a few simple habits to your routine, you can keep your bathroom looking like a high-end spa all year round.
Daily Habits That Make a Massive Difference
- Invest in a Shower Squeegee: This is the single most effective tool for preventing water spots. Buy a cheap rubber squeegee and hang it inside your shower. After you turn off the water, spend exactly 30 seconds wiping the water down the walls and into the drain. If the water doesn’t sit on the wall, the minerals cannot dry and harden!
- Dry With a Towel: If you don’t like squeegees, keep a dedicated microfiber towel near the shower. Give the walls a quick wipe-down after you bathe. Removing the moisture removes the problem entirely.
Weekly Maintenance Tricks
- The Weekly Vinegar Spritz: Keep a spray bottle filled with a 50/50 mix of water and white vinegar in your bathroom. Once a week, spray down your shower walls after you finish bathing. You don’t even need to scrub! The light acid will gently dissolve any invisible, microscopic minerals that started forming that week.
- Use Liquid Soap Instead of Bar Soap: Remember how we talked about soap scum mixing with hard water? Bar soaps contain fatty acids that cause this sticky mess. Switching to a liquid body wash dramatically reduces the amount of greasy film left on your walls, making cleaning much easier.
Long-Term Household Solutions
- Install a Water Softener: If you own your home and constantly battle hard water, a whole-house water softening system is a fantastic investment. These systems physically remove the heavy calcium and magnesium from your water supply before it ever reaches your shower head.
- Improve Your Exhaust Fan Use: Especially in incredibly humid climates like Lahore, controlling moisture is vital. Do not just turn your exhaust fan off the second you step out of the shower. Leave the fan running for at least 20 to 30 minutes after you bathe to pull all the lingering, mineral-heavy moisture completely out of the room.
Common Mistakes to Avoid During Tile Cleaning
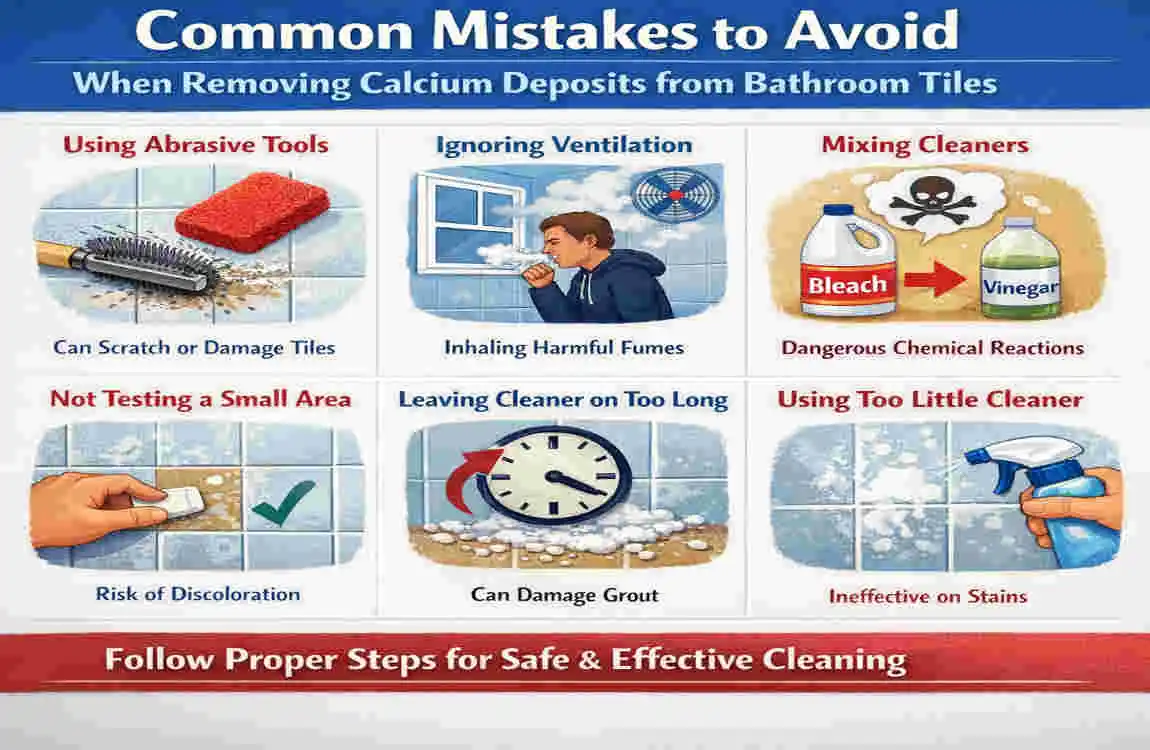
Even with the best intentions, it is very easy to make mistakes that either ruin your hard work or damage your bathroom. Keep these common pitfalls in mind the next time you decide to tackle your chores.
Mistake : Skipping the Final Rinse
Many people think that once they scrub the stains away, the job is done. But if you do not rinse the wall thoroughly with warm water, you are leaving behind a liquid film of dissolved minerals and acid. When that liquid dries, the white chalky stains will reappear! Always rinse heavily, and always dry the wall with a cloth afterward.
Mistake : Using Metal Tools or Abrasive Sponges
We cannot stress this enough. Never take a metal screwdriver, a razor blade, or a harsh wire wool sponge to your walls. Yes, it will scrape off the thick calcium fast. But it will also permanently gouge out the smooth protective glaze of your ceramics. Once the glaze is scratched, dirt and minerals will get trapped in those tiny grooves forever, making future cleaning almost impossible. Stick to plastic scrapers and soft nylon brushes.
Mistake : Over-Scrubbing or Etching Natural Marble
If you have a luxury bathroom outfitted with natural marble, limestone, or travertine, you must be incredibly cautious. As mentioned earlier, acid eats these stones alive. If you scrub these surfaces with vinegar or lemon, you will create dull, white “etch” marks that look just like hard water stains. You will think the stain is still there, so you will scrub harder, causing more irreversible damage. Always know what material your walls are made of before applying any acid.
Frequently Asked Questions (FAQs)
You likely still have a few burning questions about keeping your bathroom in top shape. Here are the answers to the most common queries we receive about hard water maintenance.
How to remove calcium deposits from bathroom tiles fast? If you are in a rush and have guests coming over, the fastest natural method is the heavy vinegar soak. Spray undiluted white vinegar onto the walls, press vinegar-soaked paper towels onto the thickest spots, and let it sit for just one to two hours. The acid works incredibly fast to loosen the bonds, allowing you to quickly wipe the grime away without spending hours scrubbing.
Does WD-40 work for removing hard water spots? You might have seen viral videos claiming that spraying WD-40 on your shower walls will magically melt away hard water. While the oils in WD-40 can sometimes penetrate and loosen mineral scales, we highly advise against using it. It leaves a very dangerous, slippery residue in your shower, creating a major slip hazard. It also leaves a sticky film that actually attracts more dust and grime in the long run. Stick to vinegar!
Are these acidic methods safe for my grout lines? Yes, but with a slight caveat. Gentle, occasional use of vinegar or lemon juice is perfectly safe for sealed grout. The baking soda paste is actually wonderful for lifting stains out of grout lines. However, if you leave pure, strong acid sitting on unsealed grout for days at a time, it can slowly begin to degrade the cement over many years. Always rinse your grout lines thoroughly with plain water after cleaning them to neutralize any leftover acid.