Have you ever looked up at your ceiling during a heavy rainstorm and prayed that a dreaded brown water spot wouldn’t suddenly appear? If you are a homeowner, you know exactly how stressful extreme weather can be. As we navigate the unpredictable and severe storms of 2026, protecting your home is more critical than ever. Did you know that properly wrapped roofs prevent up to 70% of common roof leaks? By taking the right preventative measures, you could easily save yourself over $5,000 in emergency water damage repairs this year alone.
You might be dealing with a few common pain points right now. Perhaps you are worried about potential leaks ruining your attic. Your energy bills are skyrocketing during the summer months, and you desperately need a way to keep your house cooler. Or, you might want to boost your luxury home‘s overall curb appeal and structural integrity before selling. Whatever your reason, you are in the right place.
Today, you are going to discover how to wrap a roof on a house like an absolute pro, all without hiring incredibly costly contractors.
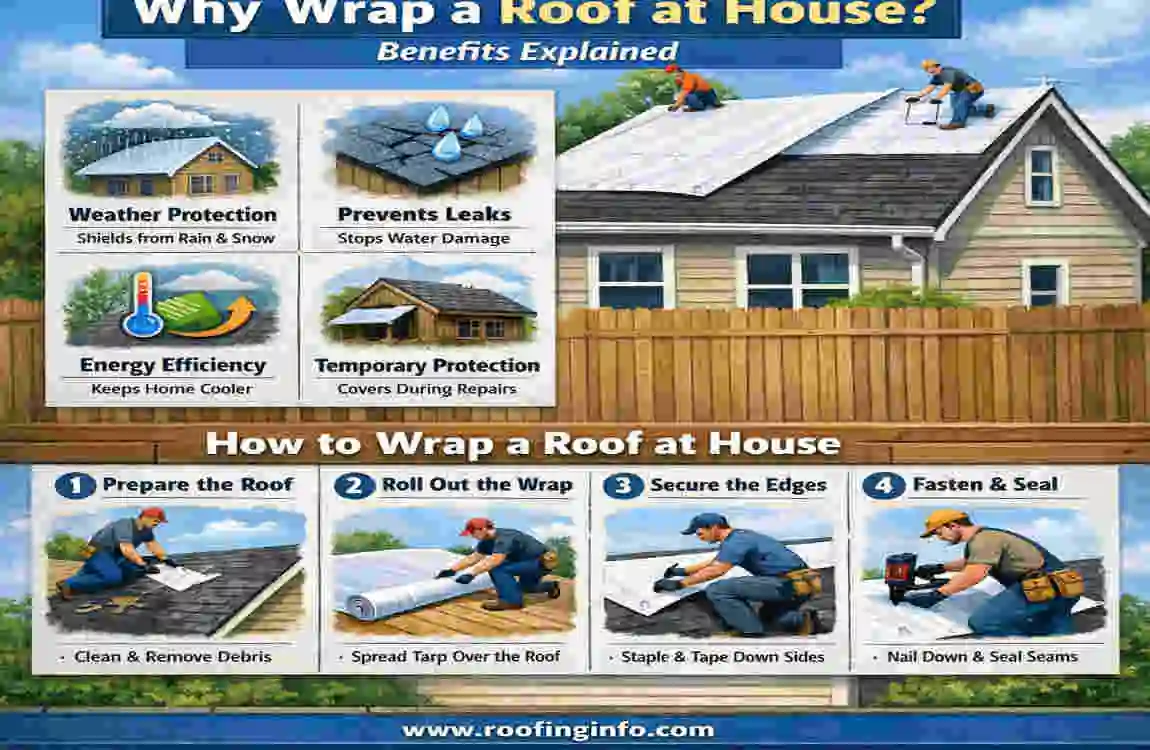
Why Wrap a Roof on a House? Benefits Explained
Before you climb up that ladder, you need to understand exactly why this project is so important. When we talk about wrapping a roof, we mean installing a protective layer directly over your wooden roof deck, right beneath your final shingles or metal panels. This layer is typically made of a waterproof underlayment, ice-and-water shield, or a specialized synthetic membrane wrap.
The benefits of wrapping house roof structures go far beyond simply keeping the rain out. First and foremost, a high-quality wrap will extend your roof’s lifespan by 20 to 30%. Because it acts as a secondary barrier, any water that sneaks past your shingles will hit this waterproof membrane and flow safely into your gutters, rather than rotting your wood.
Secondly, let’s talk about energy efficiency. Modern reflective roof wraps can actually cut your summer cooling costs by up to 15%. They reflect the harsh sun away from your attic, keeping your entire living space incredibly comfortable. Furthermore, a fully wrapped and sealed roof provides significant storm resistance. In fact, many insurance companies now offer Premium discounts for homes with upgraded, modern roof underlayments.
Let’s quickly bust three common roofing myths:
- “Wrapping is just for brand new roofs.” False! You can and should apply a new wrap whenever you replace your shingles.
- “Tar paper is good enough.” Not anymore. Modern synthetic wraps outlast old-school felt paper by decades.
- “It is too hard for a DIYer.” If you can follow instructions, measure carefully, and respect safety rules, you can absolutely do this.
Tools and Materials Checklist
Preparation is the absolute key to success. You do not want to be halfway through rolling out your membrane only to realize you forgot your utility knife on the ground. To successfully wrap a roof on a house DIY style, you need to gather your materials beforehand.
The star of the show is your synthetic underlayment. This material usually costs around $0.20 per square foot and is incredibly lightweight and tear-resistant. You will also need roofing cap nails (which have a wide plastic head to prevent tearing), a sharp utility knife with extra blades, and a sturdy, safe extension ladder.
To help you plan, here is a budget breakdown for a standard 1,500-square-foot roof.
Category: Essential Items Needed, Estimated Cost Range
Materials : Synthetic underlayment rolls, waterproof seam tape, ice and water shield $200 – $500
Tools: Roofing hammer, heavy-duty staple gun, sealant gun, utility knife, chalk line $50 – $150
Safety Gear: OSHA-compliant roof harness, non-slip roofing boots, thick work gloves $30 – $80
Preparation Steps Before Wrapping
You cannot simply toss a membrane onto a dirty roof and hope for the best. Proper preparation is what separates a failed DIY job from a professional-grade installation. In fact, roofing experts agree that properly prepared valleys and edges prevent 80% of premature roof failures.
First, let’s talk about safety. Working at heights is dangerous. You must carefully inspect your roof deck. Look for any soft spots, rotting wood, or protruding nails from the old roof. You must sweep the entire surface completely clean. Even a tiny pebble left under your new wrap can cause a puncture over time.
Next, check the pitch (the steepness) of your roof. If your roof is extremely steep, you must use roof jacks and walk boards, along with your safety harness. Never attempt to work on a steep roof without proper staging.
Always check the weather forecast for the upcoming week. You need a solid window of dry, mild weather. You do not want high winds catching your underlayment like a sail while you are trying to nail it down.
Finally, measure your total square footage carefully. Buy 10% more material than you think you need to account for overlaps and cutting mistakes. When you take the time to prepare the deck, sweep away debris, and map out your plan, learning how to wrap a house roof properly becomes an incredibly smooth process.
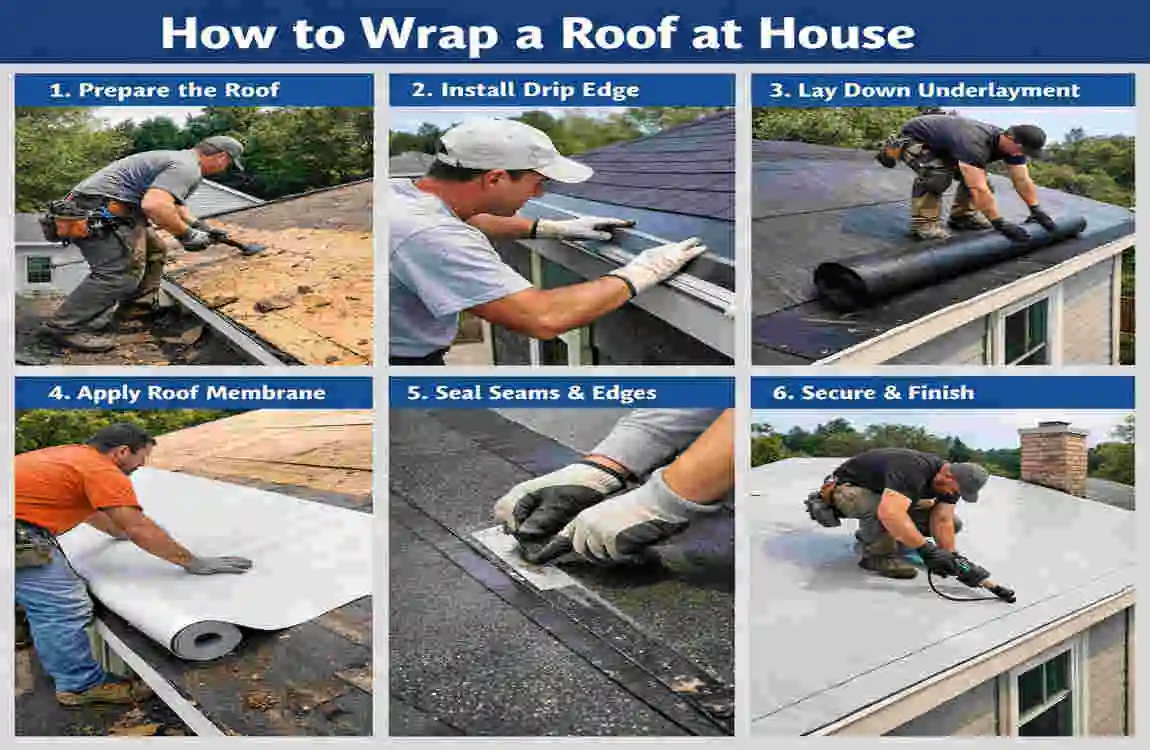
Step-by-Step: How to Wrap a Roof on a House
Now we reach the core of our guide. This is exactly where you will learn the hands-on process. Take your time, read through these seven detailed steps, and visualize yourself completing each one.
Choose the Right Roof Wrap Material
Before you climb the ladder, you have to select the perfect material for your specific climate. You generally have three main options: traditional asphalt-saturated felt, modern synthetic underlayment, and rubberized asphalt (often called ice-and-water shield).
If you live in a region that gets heavy snow and ice in the winter, you absolutely must use a rubberized asphalt ice and water shield on the bottom edges of your roof. This material literally melts and seals around the nails you drive through it, creating a waterproof barrier that prevents ice dams from leaking into your living room.
For the rest of the roof, modern synthetic underlayment is the clear winner for 2026. While old-school felt paper can tear easily and absorb water if left exposed, synthetic wraps are made from woven polymers that resist tearing and water absorption. They are incredibly strong, lightweight, and completely waterproof. When you calculate the cost-benefit analysis, spending a few extra dollars on synthetic wrap is the smartest investment you can make for your home’s longevity.
Set Up Safety and Staging
Do not skip this step. No home improvement project is worth risking a trip to the emergency room. When learning how to wrap a roof on a house, understanding OSHA-compliant safety tips is your priority.
Start by setting up your extension ladder on firm, level ground. The ladder should extend at least 3 feet above the roof edge to provide a safe handhold when stepping on and off. Next, install your safety harness system. You will need to secure a reusable roof anchor to the very peak (the ridge) of your roof, driving the heavy-duty screws directly into the solid wood trusses—never just into the thin plywood.
Attach your safety rope to the anchor, put on your full-body harness, and connect your lanyard. Always wear shoes with soft, high-traction rubber soles to grip the wood. Finally, this is not a solo job. You need a team of at least two people. Having a partner on the ground to hand up materials, hold the ladder, and call for help in an emergency is absolutely vital for safe house roof wrapping.
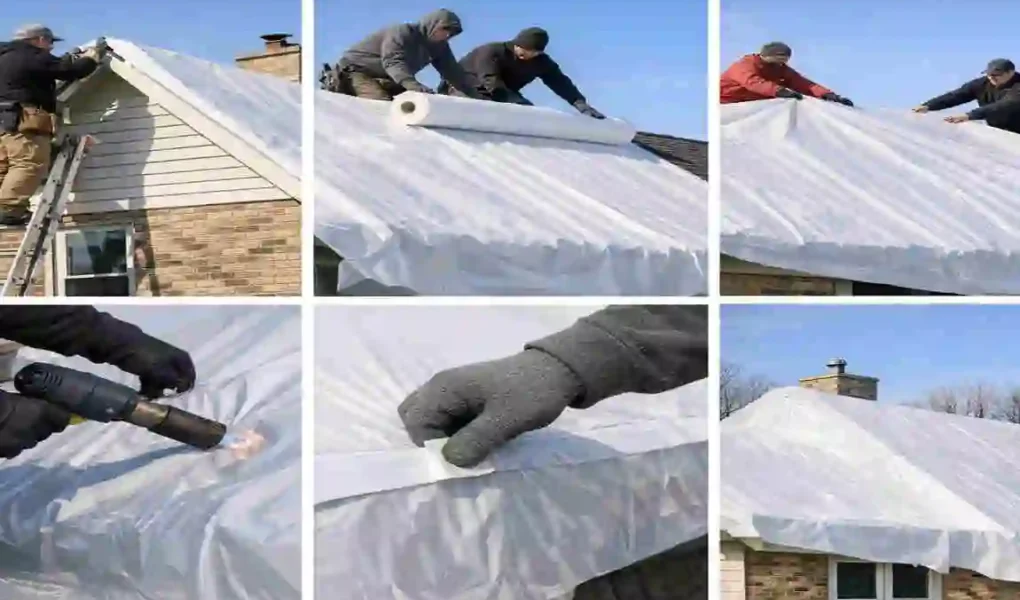
Start at Eaves and Work Up
Now the actual wrapping begins. You must always start at the very bottom edge of your roof (the eaves) and work your way up toward the peak. Think about how fish scales work. By starting at the bottom and overlapping the higher layers over the lower layers, gravity naturally pulls water down and off the roof without it ever catching a seam.
Roll out your first starter strip of underlayment completely horizontal, parallel to the roof edge. If you are using an ice and water shield, this is where it goes. Peel off the adhesive backing and press it firmly flat against the wood.
If you are using a standard synthetic wrap, roll it out and secure it using your roofing cap nails. Space your nails according to the printed circles on the membrane—usually every 6 to 8 inches along the edges, and every 12 to 24 inches in the middle. Make sure the wrap hangs over the bottom edge just a tiny bit to direct water straight into your gutters.
Handle Valleys, Vents, and Chimneys
The flat, wide-open sections of your roof are easy to work on. The places where your roof changes direction or where objects poke through are where leaks actually happen. You must pay special attention to valleys (where two sloping roofs meet in a V-shape), plumbing vents, and chimneys.
Here is a massive pro hack for a truly leak-proof seal: you must double-layer your valleys. Before you run your horizontal rows of underlayment across the whole roof, take a full roll of your self-adhering ice and water shield and run it straight down the center of every valley. Press it firmly into the crease.
When your horizontal rows eventually cross over this valley, you will have two layers of heavy-duty protection in the exact spot where thousands of gallons of rainwater will eventually flow. For plumbing pipes and vents, cut your underlayment precisely around the base. Do not leave giant gaps. Later, you will install metal flashing over these areas, but the tighter your wrap fits around the pipe, the safer your attic will be from moisture.
Overlap and Secure Seams
As you finish your first horizontal row at the bottom, it is time to start the second row above it. The most critical part of this entire process is your overlap. If you do not overlap correctly, the wind will blow rain straight up and under your wrap.
Every synthetic wrap brand has printed lines to guide you. Generally, you need a minimum 6-inch horizontal overlap. This means the bottom edge of your second row must cover the top 6 inches of your first row.
When you reach the end of a roll and need to start a new one on the same row, you need a vertical overlap of at least 12 inches. To make this connection completely wind-resistant, use heavy-duty seam tape (approved by the underlayment manufacturer) to seal the vertical joint. Keep pulling the material tight as you go. You want the wrap to lie perfectly flat against the roof deck. Wrinkles can cause your final shingles to look wavy and unprofessional.
Finish Edges, Ridges, and Drip
You are almost there! As you work your way up, you will eventually reach the very top peak of the roof, known as the ridge. Do not just stop your wrap at the edge of the peak. You need to run the underlayment completely over the top of the ridge and down the other side by at least 6 inches. When you wrap the other side of the roof, you will overlap the ridge again, creating a watertight cap at the very highest point of your home.
Next, install your metal drip edge. The drip edge is an L-shaped metal piece that runs along the perimeter of your roof. Along the bottom eaves, the drip edge should actually go under your wrap. Along the sloped sides (the rakes), the drip edge goes over the wrap. This specific layering ensures that driving rain cannot rot the exposed edges of your plywood decking.
Take a moment to do a final visual inspection. Walk the roof and look for any missing nails, accidental tears, or loose seams.
Weatherproof and Test
Your roof is now fully wrapped, but you need to do a few final touches before you call the job complete and start hauling heavy bundles of shingles up the ladder.
Take a high-quality, exterior-grade roofing sealant and a caulking gun. Walk around every single plumbing vent, exhaust pipe, and chimney base. Apply a thick, continuous bead of sealant where the underlayment meets these protrusions. This adds a final, flexible barrier against heavy rain.
If you want absolute peace of mind, you can perform a gentle hose test. Have your partner stand in the attic with a flashlight while you gently spray water over a complex area, like a sealed valley or a chimney base. Wait 15 minutes. If your partner sees no drips in the attic, you have successfully mastered how to wrap a house roof properly.
Finally, check the manufacturer’s guidelines for cure time. Many modern synthetic wraps are UV-resistant and can be left exposed to the sun and rain for up to 6 months before you have to install the final shingles. However, getting your shingles on as soon as possible is always the safest route.
Common Mistakes and How to Fix Them
Even the most enthusiastic DIYers can stumble. When you are learning how to wrap a roof on a house, avoiding pitfalls is just as important as knowing the right steps. Here are the most common mistakes people make, and exactly how you can fix them.
- Mistake: Having poor, sloppy overlaps.
- The Problem: If you only overlap your rows by an inch, strong winds will force water right under the seams, rotting your wood.
- The Fix: Always use the printed guidelines on the wrap. If you notice a spot where your overlap is too short, do not rip it up. Apply a wide strip of manufacturer-approved waterproof seam tape over the entire joint to seal it tight.
- Mistake: Ignoring the roof pitch during installation.
- The Problem: Wrapping a low-slope roof requires completely different overlapping rules than a steep roof. If your roof is almost flat, a standard 6-inch overlap is not enough.
- The Fix: For low-slope roofs (under a 4:12 pitch), you must overlap your horizontal rows by a massive 19 inches, effectively double-layering the entire roof. Always read the instructions on the box.
- Mistake: Skimping on materials to save money.
- The Problem: Buying cheap staples instead of plastic cap nails, or refusing to buy ice and water shield for your valleys.
- The Fix: Standard staples will easily tear through underlayment during a windstorm. Spend the extra $20 on proper plastic-capped roofing nails. They hold the material securely and seal the hole they create.
Cost vs. DIY Savings Table
One of the most rewarding parts of learning how to wrap a roof at home DIY style is the incredible amount of money you keep in your own pocket. Roofing labor is incredibly expensive, and contractors often mark up material costs.
By dedicating a weekend to doing this yourself, you can dramatically reduce your home renovation budget. Let’s compare your options to see the true return on investment for a standard 1,500-square-foot roof.
Installation Method, Total Estimated Cost, Estimated Time, Overall Savings vs. Pro
Complete DIY Wrap $400 – $800 2 Full Days $2,000+
Hiring a Pro Roofer $3,000+ 1 Day –
Buying Materials Only $250 – $450 – Maximum Budget Win
As you can clearly see, providing your own labor yields massive savings. You can take that $2,000 you saved and invest it right back into high-end architectural shingles, completely transforming your home’s look and value. Prioritize your safety, take your time, and enjoy the financial rewards of your hard work.
FAQs: How to Wrap a Roof on a House
We know that tackling a project this large can raise many specific questions. To help you feel completely prepared, we have gathered the most frequently asked questions about roof wrapping.
What is the best material to wrap a house roof?
For the vast majority of modern homes in 2026, synthetic underlayment is the absolute best choice. It is heavily tear-resistant, incredibly lightweight, and completely waterproof. Unlike old felt paper, it will not wrinkle or rot if it gets rained on before you install your shingles. However, remember to use a rubberized ice-and-water shield on your eaves and valleys for maximum protection.
Can renters wrap their roof?
Generally speaking, no. If you are a renter, any major structural repairs or exterior improvements are the legal responsibility of your landlord. Modifying the roof could violate your lease agreement and leave you liable for damages. Always check your lease. If you have an active leak, document it with photos, notify your landlord in writing immediately, and use temporary indoor tarps to protect your belongings while you wait for professional repairs.
How long does a modern roof wrap last?
If you purchase a high-quality synthetic underlayment and install it correctly without any punctures, the wrap itself can last anywhere from 20 to 50 years. It will effectively last as long as the shingles or metal panels you place over it.
What tools are absolutely needed for DIY roof wrapping at the house?
You do not need heavy machinery. As listed in our tools section above, your core tool kit must include: a sturdy extension ladder, an OSHA-compliant safety harness and anchor, a specialized roofing hammer, plastic cap nails, a utility knife with fresh blades, and a caulking gun for sealant.