Imagine waking up to the roar of a hurricane tearing through your neighborhood. Your home shakes, winds howl, and suddenly, your roof gives way. It’s a nightmare many homeowners face, but it doesn’t have to be yours. In 2024 alone, hurricanes caused a staggering $165 billion in damage across the U.S., with roofs among the most vulnerable areas. That’s where knowing how to put plywood on a roof comes in. This simple upgrade can turn your house into a fortress, resisting winds up to 150 mph and keeping your family safe.
Think of your roof as the shield over your head. Without proper reinforcement, high winds can lift it off, causing water damage, structural failure, and costly repairs. But with plywood sheathing installed correctly, you add layers of strength that hold everything together. This isn’t just about survival—it’s about thriving through the storm. I’ve seen families in hurricane zones sleep more easily knowing their homes are fortified.
Why Plywood on Your Roof Matters for Storm Protection
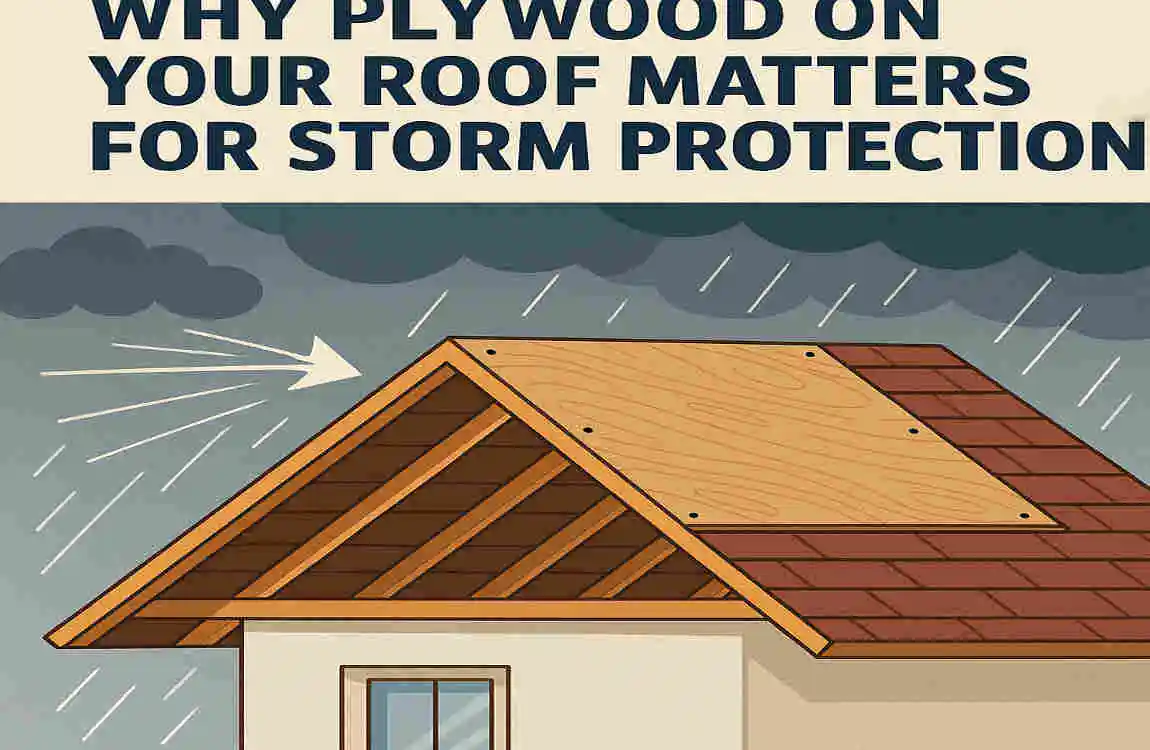
Storms don’t play fair. They come barreling in with fierce winds that can rip shingles off and turn your roof into a sieve. That’s why adding plywood sheathing is a game-changer. It acts like a sturdy backbone, strengthening the rafters and preventing the uplift that sends roofs flying. If you’ve ever wondered about a plywood roof for storms, this is it—it’s your first line of defense against nature’s fury.
Let’s talk benefits. Plywood distributes weight evenly, making your roof more resistant to high winds. In hurricane zones, building codes often require it because it can handle pressures that would crumple weaker materials. Picture this: during a storm, winds push and pull on your roof. Without plywood, those forces can create weak points. But with it, everything stays locked in place, reducing the risk of leaks or total collapse.
Now, compare plywood to alternatives. You might hear about OSB (oriented strand board) or metal sheathing. OSB is cheaper but swells in moisture, which isn’t ideal for wet storms. Metal is durable but pricey and more complex to install. That’s why CDX plywood shines—it’s an exterior-grade option, typically 5/8-inch thick, that’s affordable and tough. It resists warping and holds nails like a champ, making it perfect for hurricane plywood installation.
Real stories drive this home. Take Hurricane Ian in 2022, which devastated parts of Florida. Homes with fortified roofs, including proper plywood, often survived with minimal damage. One family shared how their plywood-sheathed roof held firm while neighbors’ homes lost entire sections. It’s not just luck; it’s preparation. Studies show that reinforced roofs can cut repair costs by up to 50% after a significant storm.
But why stop at survival? Plywood also boosts your home’s value. Insurance companies love it—some even offer discounts for storm-proof upgrades. And in areas prone to storm damage, storm-proof plywood roofs are often mandatory for new builds or renovations.
Let’s break down the science—wind speed matters. A 5/8-inch CDX plywood can withstand winds over 140 mph when installed correctly. Thicker options go even higher. Imagine your roof as a puzzle; plywood is the piece that locks it all together.
Tools and Materials You’ll Need
Before you climb that ladder, let’s get your shopping list sorted. Having the right tools and materials makes putting plywood on a roof smoother and safer. You don’t want to be halfway up and realize you’re missing nails—that’s a recipe for frustration.
Start with the basics. You’ll need plywood sheets, fasteners, and safety gear. Aim for quality to ensure everything stays in place during a storm. Pro tip: Buy about 10% extra plywood to account for cuts and mistakes. For an average roof, costs run $500 to $1,500, depending on size.
Materials: 5/8-inch CDX plywood sheets (4×8 ft), roofing nails (8d galvanized, 2.5-inch), hurricane straps/clips. These form the core structure and secure your roof against winds over 140 mph. Plywood provides the base, nails hold it down, and straps prevent uplift.
Tools: circular saw, drill, ladder (extension, 24-ft), safety harness, chalk line, measuring tape. For precise cutting and installation. The saw trims sheets, the drill fastens straps, and the ladder plus harness keep you safe while working at heights.
Safety Gear: Gloves, goggles, a hard hat, and ear protection. Protects against cuts, flying debris, falls, and noise. Essential to avoid injuries during the plywood roof installation steps.
Safety Precautions Before Starting
Safety isn’t optional—it’s your top priority when learning how to put plywood on a roof. One wrong move, and what should be an empowering project turns into a hospital visit. Let’s keep things bright and secure.
First, assess your roof. Check the pitch—if it’s steeper than 6:12 or your home is over two stories, consider hiring pros. Steep roofs amplify fall risks. Also, inspect for existing damage, such as rot or weak spots. Fixing those now prevents bigger issues later.
Weather plays a significant role. Only work in dry conditions. Rain makes surfaces slippery, and wind can turn plywood sheets into sails. Aim for calm, clear days.
Follow guidelines from experts. Use a safety harness tethered to a secure anchor point. Work in teams—have at least one buddy to hold ladders or pass materials. Wear all that gear we listed: gloves to grip, goggles for eye protection, and a hard hat for overhead hazards.
Step-by-Step Guide: How to Put Plywood on a Roof
This is the heart of it—your detailed roadmap for plywood roof installation. We’ll break it down into manageable parts, so even if you’re new to DIY, you can follow along. Grab your tools, and let’s fortify that roof against storms.
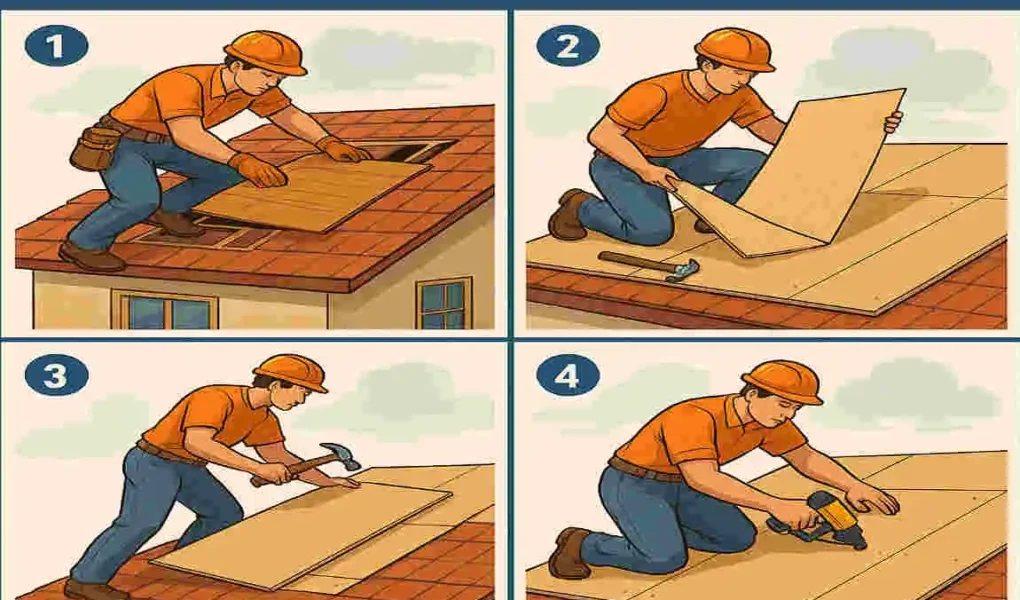
Prepare Your Roof and Workspace
Preparation sets the stage for success. Start by inspecting your existing roof decking. Look for rot, water damage, or loose areas. If you’re overlaying old shingles, remove any that are curling or damaged. This ensures a flat surface for the new plywood.
Clear away debris, such as leaves or old nails. Set up your workspace on the ground and organize tools and materials for easy access. Secure ladders or scaffolding firmly; they should extend at least three feet above the roof edge.
Measure your roof area accurately. Multiply length by width, then divide by 32 square feet (the size of a standard sheet) to know how many you need. Add extra for overlaps and cuts.
Why bother with all this? A clean, measured setup prevents errors and saves time. You’re building a storm-proof plywood roof, so precision matters.
Cut Plywood to Size
Now, let’s shape those sheets. Work on the ground to avoid accidents. Lay out the plywood and use a chalk line to mark cuts that align with your roof’s rafters. This ensures everything fits snugly.
Grab your circular saw and follow the lines for straight, clean cuts. Wear goggles—sawdust flies everywhere. Avoid overcutting; measure twice, cut once.
Stagger the seams like bricks in a wall. This distributes stress evenly, boosting strength against the wind.
Tip: If your roof has odd angles, like around chimneys, cut cardboard templates first. It saves wood and frustration.
Install Plywood Sheathing
Time to get those sheets up. Start at the eaves, the bottom edge of the roof. Align the first sheet with the drip edge for proper drainage.
Follow this numbered process:
- Position the sheet flush against the edge and rafters.
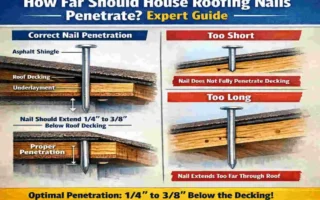
- Nail it down using a pattern: every 6 inches along edges and 12 inches in the field, per building codes.
- Overlap sheets at valleys and ridges for seamless coverage.
- Add H-clips between rafters to prevent buckling.
- Secure hurricane straps to every rafter and tie the plywood to the structure below.
Use galvanized nails to resist corrosion. Space them right—too far apart, and winds can pry sheets loose.
Work row by row, moving upward. If you’re installing plywood on the roof for a hurricane, these straps are key; they counter uplift forces.
Pause and check alignment often. A level helps here. This step is where your roof transforms into a wind-resistant powerhouse.
Secure Edges and Seams
Edges and seams are weak points in storms, so lock them down. Apply a bead of sealant along all seams to block water infiltration. Let it cure as per the product’s instructions.
Add metal edging or flashing around the perimeter. This protects against wind and rain.
Inspect for gaps—anything over 1/8 inch needs to be filled. Use wood filler or extra sealant.
Do a tug test: Gently pull on the sheets to ensure they’re firm. If something shifts, add more nails.
This step seals the deal, literally. In hurricane plywood installation, secure edges keep your roof from blowing away during howling winds.
You’re almost there—take pride in the details.
Final Checks and Underlayment
Walk the roof carefully (with safety gear on) to ensure even coverage: no bumps or loose spots.
Add a layer of felt or synthetic underlayment over the plywood. This waterproofs everything, protecting against leaks.
If needed, re-shingle or apply new roofing material on top. Match it to your home’s style for a seamless look.
These finals tie it all together, readying your roof for battle.
Post-Installation Inspection
Bring in a pro for a sign-off, especially if you’re insuring against storms. They spot what you might miss.
Maintain it annually: Check for wear and re-secure as needed.
Common Mistakes to Avoid When Installing Plywood on a Roof
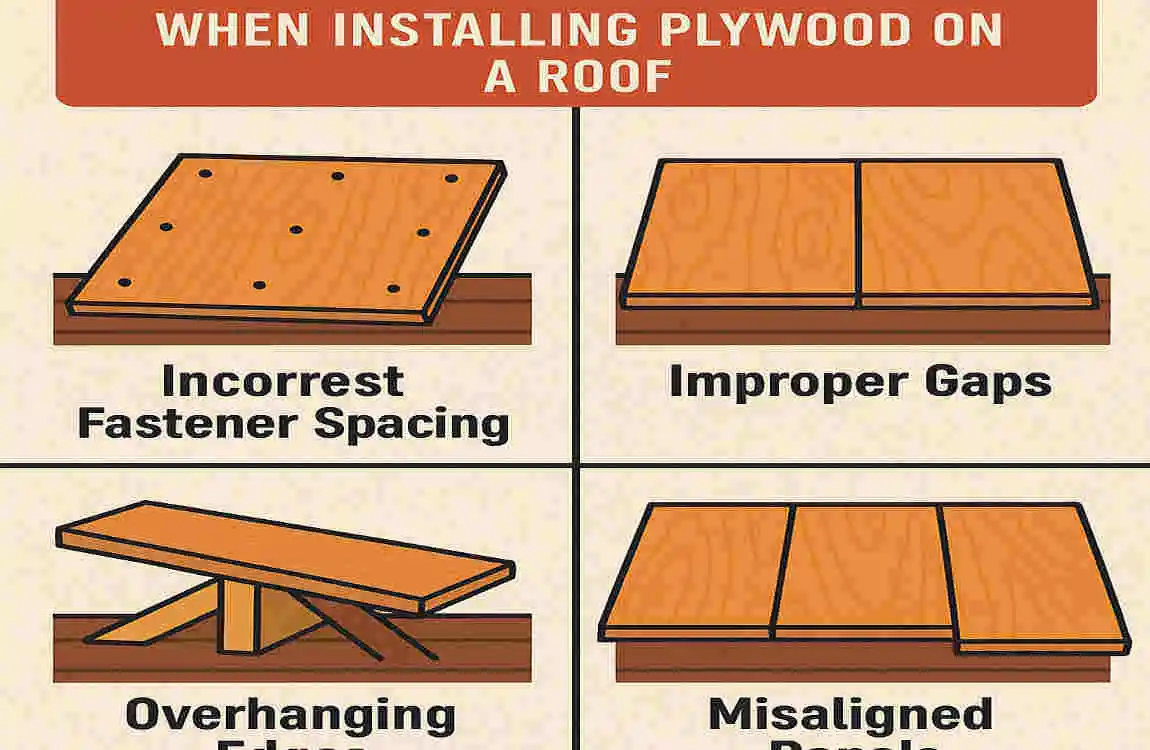
Even seasoned DIYers slip up, but you can learn from them. Avoiding these pitfalls ensures your storm-proof plywood roof lasts.
Here’s a bulleted list of common errors:
- Using the wrong thickness: Opt for less than 5/8-inch thickness, or it might fail in high winds. Always go thicker for storms.
- Improper nailing: Spacing nails too wide creates weak spots. Stick to the 6/12-inch pattern.
- Ignoring local codes: Skip hurricane zone rules, and you could face fines or insurance denials. Check regulations first.
- Working solo on steep roofs: This invites falls. Always team up.
To fix these, double-check plans before starting. For example, if nailing’s off, remove and redo the sheet. Before-and-after checks prevent repeats.
Cost Breakdown and Time Estimates
Budgeting keeps surprises at bay. For a 1,500 sq ft roof, expect these averages.
Item Cost (Avg. 1500 sq ft Roof)Time
Plywood $800 4-6 hours
Tools/Nails $200 N/A
Labor (DIY vs Pro) $0-2000 1-3 days
DIY saves cash but takes time. Pros speed it up, but add cost. The ROI? Thousands saved in repairs.