Are you tired of staring at outdated, scratched-up floors but feeling totally scared off by the skyrocketing costs of professional installation? You are not alone. In fact, one of the most common complaints I hear from homeowners is that they love the look of a renovation but hate the price tag of labor. With the flooring industry reporting a massive 20% market growth in vinyl products leading into 2025, it is clear that people are waking up to a secret: you don’t need a contractor to get a luxury look.
Here is the truth: installing vinyl flooring is one of the most accessible, high-impact DIY projects you can tackle. I have personally upgraded three different homes using various vinyl products, and the fear of messing it up is much worse than the actual work.
Why Choose Vinyl Flooring for Your Home Upgrade?

Before we get our hands dirty, let’s talk about why you are making this choice. Vinyl flooring has come a long way from the shiny, plastic-looking sheets you might remember from your grandmother’s kitchen. Today, Luxury Vinyl Plank (LVP) and Luxury Vinyl Tile (LVT) are the heavy hitters of home design, offering a blend of aesthetics and practicality that hardwood cannot match.
Unmatched Durability
If you have kids, pets, or just a busy household, durability is likely your top priority. Modern vinyl is engineered with a wear layer—a clear, protective coating that sits on top of the design. This makes the floor incredibly resistant to scratches, dents, and stains. Unlike solid hardwood, which panics at the sight of a water spill, most vinyl flooring is 100% waterproof. You can install it in bathrooms, basements, and kitchens without worrying about warping or buckling due to humidity.
Incredible Affordability
Let’s talk numbers because the budget is usually the deciding factor. Real hardwood can cost $8 to $15 per square foot for materials alone. In contrast, high-quality vinyl usually runs between $2 and $7 per square foot. When you factor in that you are learning how to install vinyl flooring yourself, you are cutting out the labor cost entirely. That frees up thousands of dollars in your renovation budget for other upgrades, like new furniture or fresh paint.
versatile Styles and Trends
The technology behind vinyl printing has advanced so much that it is often difficult to tell the difference between vinyl and real wood or stone. You can find planks with textured grains that mimic the feel of oak, hickory, or walnut. Whether you are going for a rustic farmhouse look or a sleek, modern aesthetic, there is a vinyl option for you. Plus, as eco-friendly options become more available, many brands are now offering recyclable materials, making your upgrade more sustainable.
Tools and Materials You’ll Need for Vinyl Flooring Installation
You wouldn’t try to bake a cake without a mixing bowl, and you shouldn’t start a flooring project without the right gear. Having the correct tools on hand will make the difference between a frustrating weekend and a smooth, successful install. The best part? Own half of these, and the rest are affordable.
The Essential Tool Kit
Here is what you need to gather before Day 1:
- Utility Knife: Your best friend. You will use this for scoring and snapping planks. Make sure you have plenty of fresh blades.
- Tape Measure: Accuracy is everything. Get a sturdy one that locks easily.
- Tapping Block and Pull Bar: These are crucial for clicking planks together tightly without damaging the edges.
- Rubber Mallet: Used with the tapping block to gently nudge planks into place.
- Spacers: These small wedges maintain the necessary expansion gap between the floor and the wall.
- Carpenter’s Square or Speed Square: To ensure your cuts are perfectly straight.
- Jigsaw or Oscillating Tool: While a knife works for straight cuts, power tools are a lifesaver for tricky shapes around toilets or vents.
- Knee Pads: Trust me on this one. Your knees will thank you later.
- 100-lb Floor Roller: (Required mostly for glue-down, but helpful for some click-lock products to ensure seams are tight).
Material Shopping List
- Vinyl Planks or Tiles: Calculate your square footage (Length x Width) and then add 10%. This extra amount accounts for waste from cutting and allows you to keep spare planks for future repairs.
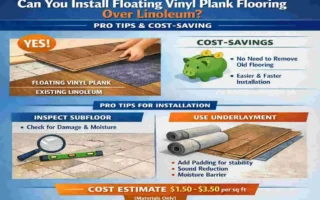
- Underlayment: Many modern LVP options come with underlayment attached. If yours doesn’t, you will need to buy rolls of foam underlayment to cushion the floor and dampen sound.
- Transition Strips: These bridge the gap between your new floor and existing floors (like tile or carpet) in other rooms.
- Adhesive: Only if you are using the glue-down method.
Budget Breakdown: For a standard 200-square-foot room, you can expect to pay $200 to $500 for materials, depending on the vinyl quality you choose.
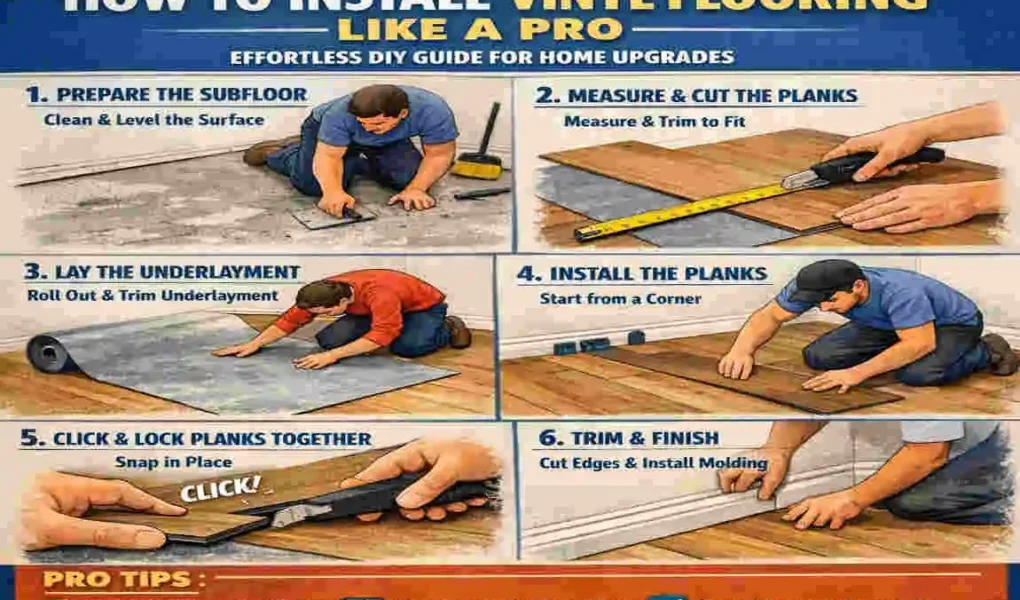
Preparing Your Space: Step-by-Step Surface Prep
I cannot stress this enough: Preparation is 50% of the job. If you rush this stage, your new floor might look good for a week, but eventually, joints will pop, or you will feel bumps under your feet. A flawless finish starts with the subfloor.
Assess the Subfloor
Your subfloor doesn’t need to be pretty, but it does need to be flat. Use a long straight edge (like a level) to check for dips and humps. The industry rule of thumb is that the floor should not have a variance of more than 3/16 of an inch over a 10-foot span. Suppose you have high spots (like nail heads or clumps of drywall mud), sand or grind them down. If you have low spots or dips, use a floor leveling compound to fill them in.
Remove Old Flooring
If you have carpet, rip it out along with the tack strips and staples. If you have tile, you can install over it if the grout lines are narrow and the tiles are secure. However, for the best results, removing the old layer is usually safer. Use a scraper to get up any stuck-on residue or old glue.
The Deep Clean
Once the old floor is gone and the subfloor is flat, you need to clean. And I mean really clean. Sweep up the big debris, then vacuum meticulously. Even small pebbles can cause pressure points under vinyl planks. If you are installing over concrete, it is often a good idea to degrease the floor with a cleaner like TSP (Trisodium Phosphate) to prevent oils from interfering with the installation.
Acclimation is Key
This is the step most beginners skip. When you bring your vinyl boxes home, do not install them immediately. Vinyl expands and contracts with temperature. Stack the boxes flat in the room where they will be installed and let them sit for 48 hours. This allows the material to adjust to the humidity and temperature in your home, preventing warping later.
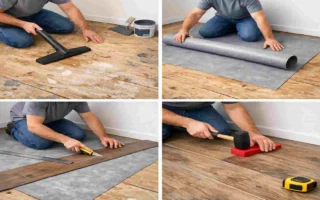
How to install Vinyl Flooring: Click-Lock Plank Method
This is the most popular method for DIYers because it is generally “floating,” meaning it doesn’t attach to the subfloor. It relies on a tongue-and-groove system that snaps together. Here is your detailed, step-by-step guide on how to install vinyl flooring using the click-lock method.
plan Your Layout
Don’t just start laying planks. Measure the room’s width and divide it by the width of a plank. If the remainder is very small (like less than 2 inches), you don’t want to end up with a tiny sliver of a plank at the far wall. To avoid this, you may need to trim the width of your first row of planks to balance the room. Also, decide which direction you want the planks to run. Usually, running them parallel to the longest wall or towards the main light source looks best.
Establish the First Row
Place spacers along the wall. These create a roughly 1/4-inch gap that allows the floor to expand during hot weather. Without this gap, your floor could buckle. Lay your first plank with the “tongue” side facing the wall. Connect the next plank to the short end of the first one. Usually, you angle it in and drop it down. Use your tapping block to ensure the seam is tight. Continue until you reach the end of the row.
Cutting the Planks
You will inevitably hit the wall and need to cut a plank.
- Measure: Flip the plank over so the underside is facing up. Place it next to the wall (don’t forget the spacer!) and mark your cut line.
- Score: Use your square and utility knife to score the plank’s surface firmly. You don’t need to cut all the way through.
- Snap: Hold the plank firmly and snap it over your knee or the edge of a table. It should break cleanly along the line.
- Install: Use the piece you just cut to start your second row. This automatically creates a “staggered” look that is stronger and more natural.
The Click-Lock Rhythm
Now you get into the flow. For the second row and beyond, you are connecting the long edge of the plank to the previous row.
- Angle the tongue of the new plank into the groove of the old row at about 45 degrees.
- Lower the plank until it locks.
- Use your tapping block and mallet to tap the long edge tight, then tap the short end to connect it to the neighbor plank.
- Check for gaps: If you see a dark line between planks, it’s not locked. Tap it again.
Dealing with Obstacles
When you reach a door frame, don’t try to cut the plank to fit around the intricate shape of the molding. Instead, undercut the door jamb. Take a scrap piece of flooring, lay it on the subfloor next to the door frame, and rest your saw on top of it. Cut the bottom of the wood frame. Now, your vinyl plank can slide neatly underneath the frame for a seamless look.
The Final Row
The last row is often tricky because you don’t have room to swing a hammer. You will likely need to rip (cut lengthwise) these planks to fit. Once placed, use the pull bar to hook the edge of the plank, then hammer it toward you to pull it tight into the joint.
Glue-Down Vinyl Tile Installation Guide
While click-lock is great, glue-down vinyl is often preferred for bathrooms or very large rooms where you don’t want the floor to shift. It is a bit messier, but the bond is permanent.
Preparation and Layout
Just like with planks, find the center of the room and snap a chalk line. You typically want to start installing from the center and work your way out so the pattern is symmetrical.
Applying the Adhesive
You will need a trowel with specific notch sizes (check the glue bucket instructions). Spread the adhesive in small sections—don’t try to do the whole room at once, or the glue will dry before you get there. Wait for the “flash” time: Most glues need to sit for 10-15 minutes to become tacky before you lay the tile. If it’s too wet, the tiles will slide around.
Laying the Tiles
Press the tiles firmly into the adhesive, butting them tightly together. Unlike click-lock, there is no mechanical joint holding them; it is just the glue. Make sure to stagger the seams if you are using plank-style tiles, or line them up perfectly if you are using square stones.
Roll It Out
Once a section is laid, use a 100-lb floor roller. This is vital. The heavy roller crushes the adhesive ridges flat and ensures 100% contact between the tile and the subfloor. It also squeezes out any trapped air bubbles.
Cure Time
Stay off the floor! Glue-down floors usually need 24 to 48 hours to cure fully. Walking on them too soon can shift the tiles and ruin your alignment.
Finishing Touches and Pro Tips for Flawless Results
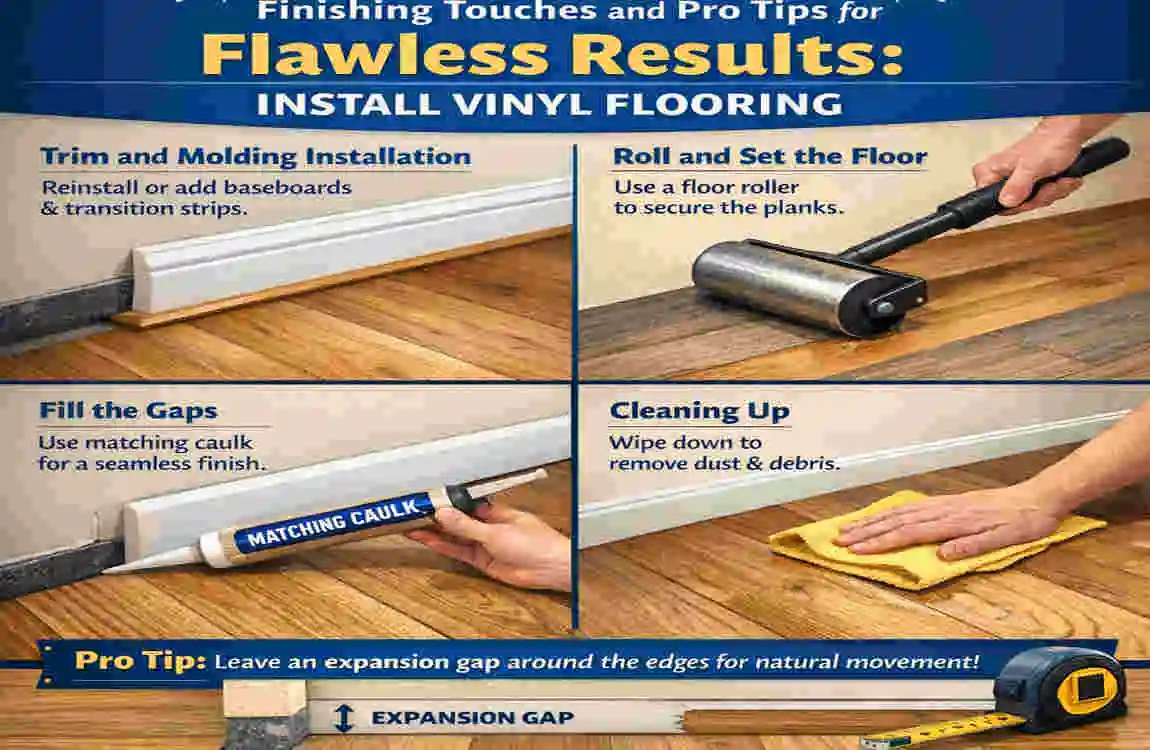
You have laid the floor, but you aren’t done yet. The difference between a DIY job and a pro job is in the finished work.
Install Molding and Transitions
Remember those expansion gaps you left along the walls? They are ugly. You need to cover them.
- Baseboards: If you removed them, reinstall them now. Nail them into the wall, not the floor. The floor needs to be able to move underneath.
- Quarter Round (Shoe Molding): If you left the baseboards on, install quarter-round molding to cover the gap between the baseboards. It adds a nice, finished detail.
- T-Moldings: Use these in doorways where the vinyl meets another floor of the same height.
Pro Tip: The “Mix and Match”
Before you install, open 3 or 4 boxes of vinyl at once. Pull planks from different boxes as you work. Why? Because sometimes there are slight color variations between boxes. Mixing them ensures you don’t end up with one dark patch and one light patch on your floor.
Sealing for Wet Areas
If you installed vinyl in a bathroom or laundry room, take a tube of 100% silicone caulk and run a thin bead along the perimeter where the floor meets the wall (or tub). This prevents water from seeping underneath the vinyl and causing mold.
Maintenance
To keep your floors looking new, skip the harsh chemicals and wax. A simple mixture of water and a mild pH-neutral cleaner is all you need. Sweep regularly to keep grit from scratching the wear layer.
Common Mistakes to Avoid When Learning How to install Vinyl Flooring
I have made mistakes, so you don’t have to. Here are the most common pitfalls to watch out for.
Ignoring the Patterns
Avoid “H-joints” or “step patterns.” An H-joint occurs when two seams align perfectly with a seam two rows back, forming an H. A step pattern is when your seams look like a perfect staircase. Both look artificial. Randomize your stagger (aim for at least 6-8 inches between seams) for a natural look.
Forgetting the Expansion Gap
I see this constantly. A DIYer fits the floor tight against the wall because it looks cleaner. Six months later, summer humidity hits, the floor expands, hits the wall, and buckles in the middle of the room. Always use spacers!
Not Checking Under Door Jambs
If you don’t undercut the door jambs, you will have to cut the vinyl to the shape of the trim, leaving a gap that you have to fill with caulk. It looks sloppy. Undercutting is easier and looks professional.
Rushing the Prep
Installing over an uneven floor will eventually cause the locking mechanisms to break. If you hear a “clicking” or “cracking” sound when you walk on your new floor, it means there is a hollow spot underneath. Take the time to level the subfloor first.
Cost Breakdown: DIY vs. Professional Installation
Let’s look at the real savings. This table assumes a standard 200-square-foot room.
Aspect DIY Cost Estimate Professional Cost EstimateNotes
Materials $400 – $800 $400 – $800 The material cost is the same, but pros may get a small trade discount.
Tools: $100-$150; $0. You keep the tools forever!
Labor $0 $800 – $1,500 This is where the magic happens.
Total Cost $500 – $950 $1,200 – $2,300
Total Savings Up to 70%
As you can see, the savings are massive. Even if you have to buy every single tool on the list, you are still coming out way ahead.
FAQs: How to install Vinyl Flooring
How long does it take to install vinyl flooring? For a standard 200 sq. ft. room, a beginner can finish the job in 4 to 8 hours. If you have many complex cuts or angles, it might take a full weekend.
Can I install vinyl flooring over tile? Yes, absolutely! As long as the tile is flat, secure, and level. If the grout lines are very deep/wide, you should fill them with a leveling compound first so they don’t telegraph (show through) the vinyl.
What is the best underlayment for vinyl flooring? If your planks have attached padding, you generally don’t need any additional padding. If not, look for a high-density foam underlayment. It provides moisture protection and sound absorption.
Is vinyl flooring pet-friendly? It is arguably the best flooring for pets. It offers traction for paws, resists claw scratches, and wipes up accidents easily without soaking in.
Do I need to remove my baseboards? It is highly recommended for a professional look. However, if you are careful, you can install the floor with baseboards in place and use quarter-round molding to hide the expansion gap.