Have you ever pulled into your driveway, looked admiringly at your home, and then had your eyes drawn immediately to that ugly, grey pipe running down the side of the wall? You aren’t alone. It is a frustration that countless homeowners face. You spend time and money on landscaping, painting, and decor, only to have the industrial look of exposed plumbing ruin the vibe.
If you are wondering how to hide pipes the outside the house, you have come to the right place. It is easier than you think to turn those eyesores into design features. You don’t need to be a professional contractor to get professional-looking results. With a free weekend and a little bit of creativity, these 7 DIY tricks deliver quick results without breaking the bank.
The Importance of Concealing Exposed Outdoor Pipes
Before we dive into the “how,” let’s talk about the “why.” You might be thinking, “It’s just a pipe, does it really matter?” The short answer is: yes, it does. Leaving pipes exposed isn’t just a cosmetic issue; it can actually impact the longevity of your luxury home‘s components and its overall market value.
Aesthetic Benefits: Boosting Curb Appeal
First and foremost, visible pipes create visual clutter. When you look at a home, your eye craves symmetry and clean lines. An exposed PVC pipe or a jagged copper line disrupts that flow. It sticks out like a sore thumb against your siding or brickwork.
By taking the time to hide outdoor pipes, you instantly elevate your property’s look. Think of it like tucking in your shirt; it just looks neater and more put-together. Real estate experts often note that curb appeal is critical. In fact, studies suggest that a significant majority of homebuyers notice exterior flaws immediately. If a potential buyer sees messy plumbing on the exterior, they might wonder what else has been neglected on the interior. Concealing these pipes signals that this home is well-loved and well-maintained.
Practical Protection: Weatherproofing Your Home
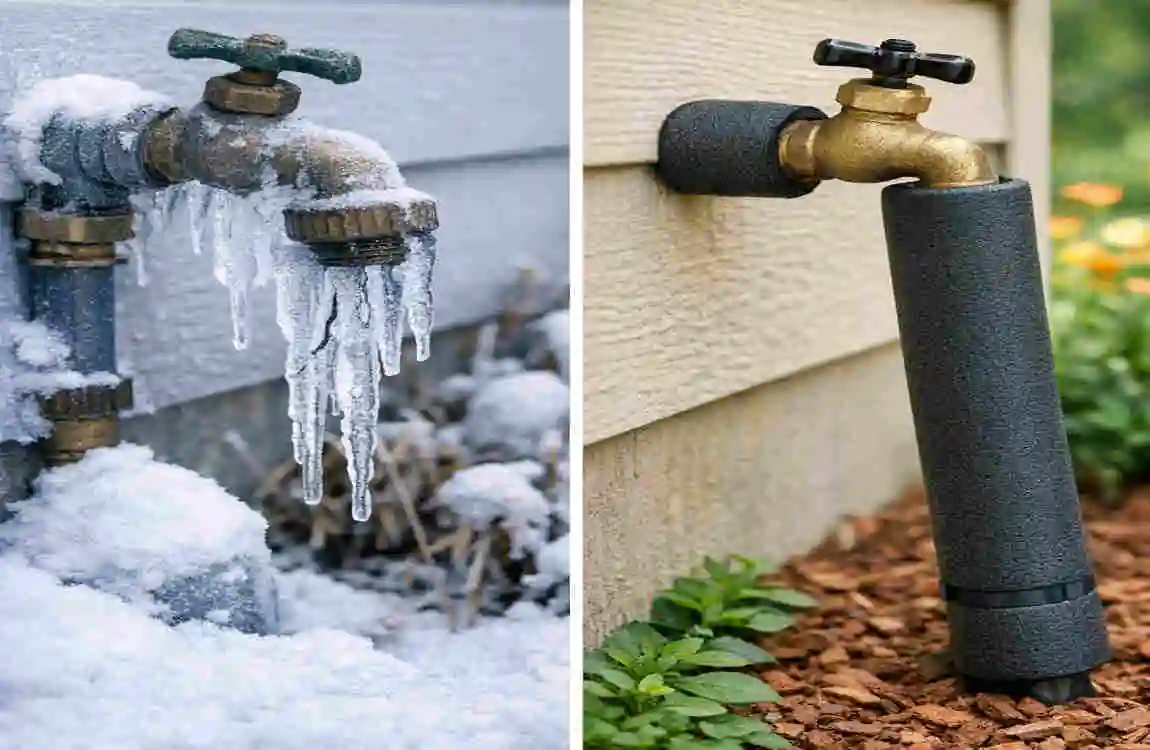
Beyond looks, there is a very practical reason to cover up. Pipes exposed to the elements are vulnerable. Depending on where you live, your exterior plumbing faces harsh UV rays from the sun, freezing temperatures in the winter, and physical damage from lawn equipment or pests.
Sunlight makes PVC pipes brittle over time, leading to cracks and leaks. Freezing temperatures are even more dangerous, causing burst pipes that result in expensive water damage. By building a DIY pipe cover or using an enclosure, you are adding a layer of insulation and protection. You are effectively shielding your plumbing from the weather, which extends the life of the pipes and saves you money on potential repairs down the road.
Comparison: Exposed vs. Hidden Pipes
FeatureExposed Outdoor PipesHidden / Covered Pipes
Visual Appeal Cluttered, industrial, unfinished Clean, polished, intentional
Maintenance: High risk of UV damage & freezing. Protected from the elements
Pest Risk Accessible to rodents/insects Sealed and less accessible
Property Value can lower perceived value , increase curb appeal & value
Safety Risk of accidental impact damage is buffered against impact
Types of Outdoor Pipes You Might Need to Hide
Not all pipes are created equal, and identifying what you are dealing with is the first step. Here are the most common offenders you might find on your exterior walls:
- Downspouts and Gutters: While necessary for drainage, they are often placed awkwardly.
- AC Condenser Lines: These copper and foam-covered lines running from your unit to the house can be particularly unsightly.
- Water and Gas Lines: These utility feeds often enter the home in visible spots.
- Sewer Vents: Large, wide pipes that often extend up the side of the house.
- Radon Mitigation Pipes: Essential for health, but usually very industrial-looking.
Essential Supplies for DIY Pipe Hiding Projects
The beauty of these projects is that they don’t require heavy machinery. You can find almost everything you need at your local hardware store. While the specific materials will depend on which trick you choose, here is a general list of essential supplies to get you started.
Core Materials & Tools:
- Measuring Tape: Accuracy is key.
- Wood Planks or Plywood: For building box covers.
- Outdoor Paint or Stain: Ensure it is weather-resistant.
- PVC Pipes: If you are using the sleeve method.
- Saw: A circular saw or handsaw for cutting wood/plastic.
- Drill and Screws: For assembly and mounting.
- Construction Adhesive or Caulk: For sealing gaps.
- Ladder: Safety first for those high-up spots!
Budget Breakdown: Most of the tricks we are about to discuss are incredibly budget-friendly. You can expect to spend under $50 for simple paint or lattice projects. Even the more robust wood box covers usually cost less than $100 in materials.
A Note on Durability: When selecting materials, always prioritize durability. If you live in a sunny climate, look for UV-resistant plastics and paints. If you are in a wet area, use treated lumber (such as pressure-treated pine or cedar) that resists rot. Spending a few extra dollars on quality materials now will save you from having to redo the project next year.
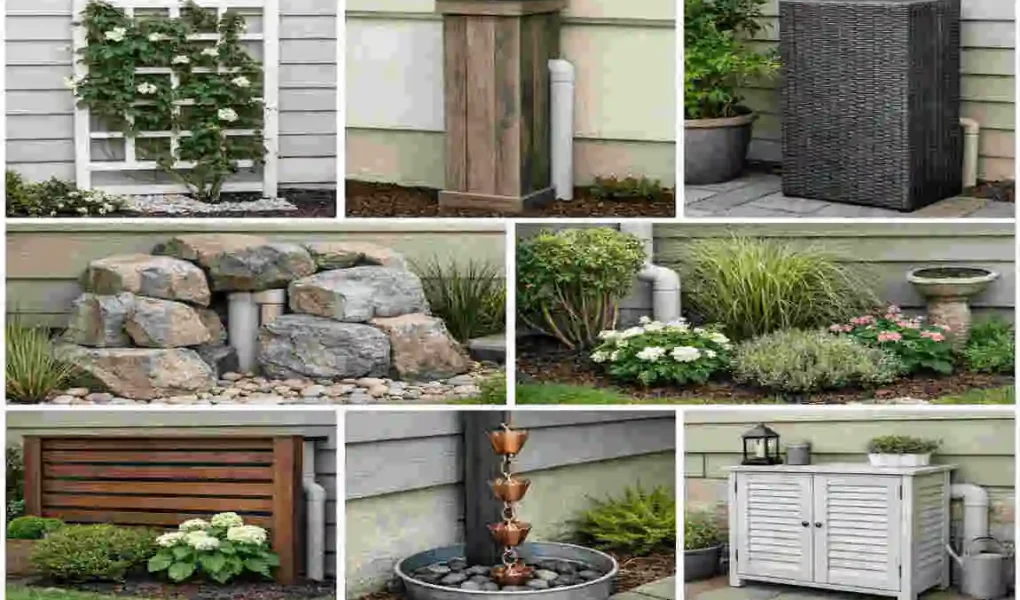
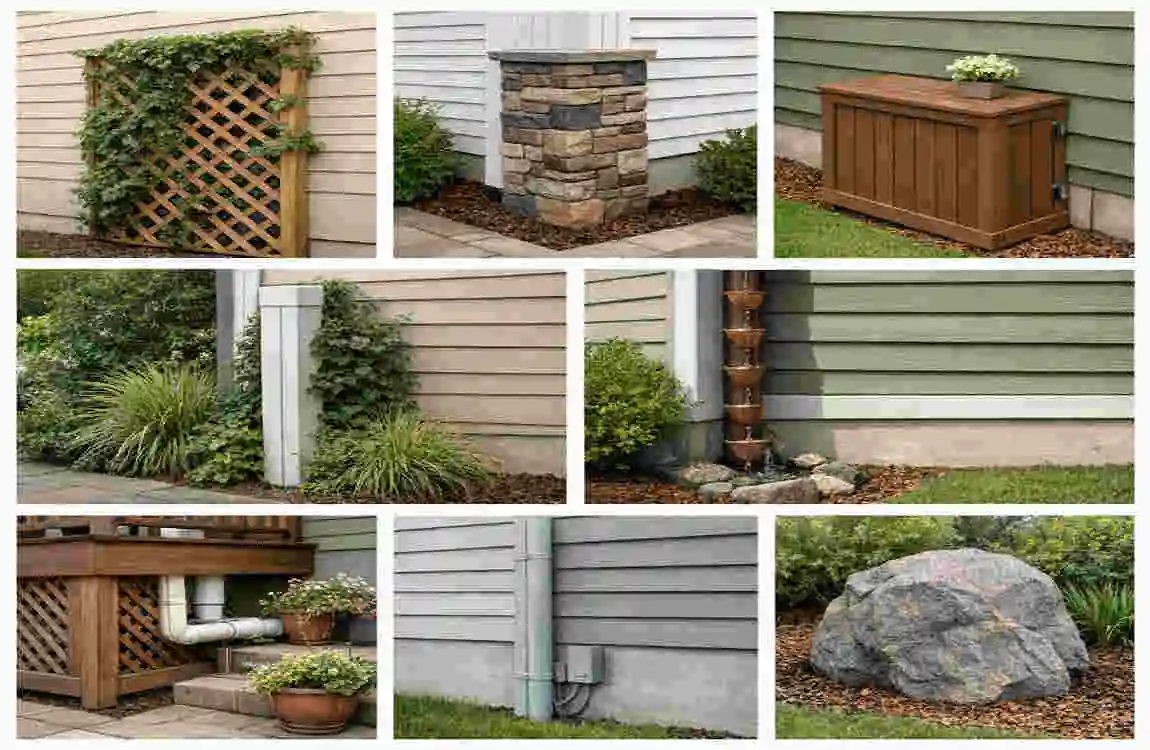
Clever DIY Tricks to Hide Pipes on the Outside of the House
Now, let’s get to the fun part. Here are seven distinct, actionable ways to hide pipes outside the house. We have arranged these from substantial construction projects to quick, renter-friendly fixes.
Build a Custom Wood Box Cover
This is perhaps the most classic and effective way to hide outdoor pipes. A wood box cover creates a permanent, clean structure that can be painted to match your house perfectly. It essentially looks like a column or a corner trim piece rather than a cover-up.
Why We Love It: It offers complete concealment and heavy-duty protection.
Step-by-Step Guide:
- Measure and Mark: First, measure the height, width, and depth of the pipes you want to cover. Be generous with your measurements—you want a few inches of clearance on all sides so the pipes aren’t touching the wood.
- Cut Your Timber: Using treated plywood or distinct wood planks (like cedar), cut three strips: a front face and two side pieces. The side pieces need to be deep enough to clear the pipes.
- Assemble the “U” Shape: Using wood glue and exterior-grade screws, attach the side pieces to the back of the front face to create a long “U” shaped channel.
- Add Mounting Cleats: You cannot screw the box directly into the pipe. Instead, screw wooden blocks (cleats) to the exterior wall of your house on either side of the pipe.
- Install the Box: Slide your “U” shaped box over the pipe and screw it into the wooden cleats you just installed.
- Finish: Sand down any rough edges, caulk the seams to prevent water entry, and paint the box the same color as your siding.
Time: ~2 Hours | Cost: Low to Medium ($30-$60)
Wrap with Faux Stone or Brick Panels
If you have a home with a stone facade or love the rustic look, faux stone panels are a brilliant solution. These are lightweight, foam-like panels that look exactly like real masonry but can be cut with a standard knife.
Why We Love It: It adds texture and architectural interest while blending seamlessly with brick homes.
Step-by-Step Guide:
- Prep the Surface: Ensure the area around the pipe is clean and dry. If you are covering a wide area, you might need to build a light wooden frame around the pipes first (similar to Trick 1) to give the panels something to stick to.
- Cut the Panels: Measure your area and cut the faux stone panels to size. Most of these panels have interlocking edges to hide the seams.
- Apply Adhesive: Use a heavy-duty construction adhesive designed for outdoor use. Apply it generously to the back of the panel.
- Stick and Secure: Press the panels firmly into place. If you built a wood frame, you can also use small finish nails for extra hold.
- Grout (Optional): Some panels come with a touch-up kit or matching caulk to fill in any gaps between the “stones,” making the finish look 100% authentic.
Time: ~1 Hour | Cost: Medium ($40-$80)
Plant a Climbing Vine Screen
For the nature lovers out there, why build a structure when you can grow one? Using plants is the most eco-friendly way to hide exposed pipes outside. It softens the hard lines of your home and adds a touch of greenery.
Why We Love It: It improves air quality, looks natural, and requires very few tools.
Step-by-Step Guide:
- Install a Trellis: You should never let vines grow directly on your siding or pipes, as they can cause damage. Install a simple wood or metal trellis in the ground in front of the pipes. Leave about 6 inches of space between the trellis and the wall.
- Choose Your Plants: Select a fast-growing, evergreen climber. English Ivy is popular but can be invasive; Star Jasmine or Clematis are beautiful, fragrant alternatives that are easier to control.
- Planting: Dig a hole at the base of the trellis, add some good compost, and plant your vine.
- Training: As the plant grows, gently weave the tendrils through the trellis. Over time, the leaves will create a dense “green wall” that completely obscures the plumbing behind it.
Time: 30 Mins Setup (+ Growing time) | Cost: Low ($25)
Use PVC Pipe Camouflage Sleeves
Sometimes the best way to hide something is to make it look like something else that belongs there. By placing a larger, cleaner pipe over the ugly ones, you create a uniform look. This is arguably the easiest DIY pipe cover method.
Why We Love It: It is incredibly fast and requires zero carpentry skills.
Step-by-Step Guide:
- Select the Right Size: Buy a PVC pipe that has a diameter slightly larger than the pipe you are trying to hide. For example, if you are hiding a 1-inch copper line, get a 2-inch or 3-inch PVC pipe.
- Cut Lengthwise: This is the tricky part. You need to slice the PVC pipe down its entire length so it can “clam shell” open. A table saw is best for this, but be very careful. Alternatively, buy “split conduit” tubing, which comes pre-split.
- Encapsulate: Pull the split PVC open and snap it around the ugly pipe.
- Seal and Paint: Use PVC glue to seal the slit shut for a seamless finish. Then, paint the plastic to match your house siding perfectly. When the color matches, the pipe virtually disappears visually.
Time: ~45 Mins | Cost: Very Low ($15)
Create Decorative Shutters or a Lattice Panel
If the pipes are located near a window, you can use optical illusions to your advantage. Extending the window’s visual width with shutters or lattice can cover pipes that run alongside the frames.
Why We Love It: It adds “cottage charm” and increases the architectural detail of the home.
Step-by-Step Guide:
- Assessment: This works best for pipes running vertically near a window.
- Build a Deep Shutter: Instead of a flat shutter, build one that is essentially a shallow box (similar to Trick 1) but with a shutter or lattice front.
- Hinge It: Attach the shutter to the wall using hinges on the side furthest from the window.
- Close it: Swing the shutter closed over the pipe and secure it with a latch.
- Benefits: This hides the pipe but allows you to swing the shutter open easily if a plumber needs to access the lines for maintenance.
Time: ~2 Hours | Cost: Medium ($35-$50)
Install a Faux Rock Enclosure
This trick is specifically for pipes that protrude from the ground or are low on the wall, such as sewer cleanouts, water main shut-offs, or irrigation controls.
Why We Love It: It integrates seamlessly with your garden landscaping.
Step-by-Step Guide:
- Measure the Height: Determine how high and wide the protruding pipes are.
- Buy a Faux Rock: Visit a garden center or look online for hollow “landscape rocks.” These are made of durable resin and look incredibly realistic.
- Place and Secure: Place the rock over the pipes.
- Anchor It: Most quality faux rocks come with stakes. Drive these into the ground through the flanges at the bottom of the rock. This prevents the wind (or curious raccoons) from knocking it over.
- Landscaping: Surround the faux rock with real gravel, mulch, or small bushes to blend it into the environment.
Time: 15 Mins | Cost: Medium ($50)
Deploy Outdoor Curtains or Fabric Screens
If you are a renter or you need a solution that can be removed in seconds, fabric is your best friend. This brings a soft, resort-like feel to your patio or side yard.
Why We Love It: No drilling required (usually), soft aesthetic, and 100% temporary.
Step-by-Step Guide:
- Install a Rod: If the pipes are in an alcove or under an overhang, use a tension rod. If on a flat wall, install two simple hooks.
- Select Fabric: Buy outdoor-rated canvas or curtain material. It must be mildew-resistant and UV-stable.
- Hang: Slide the curtain onto the rod and hang it in front of the pipes.
- Tie Backs: When you want to check the pipes, tie the curtain back. This looks particularly good near outdoor seating areas, as it mimics the look of a cabana while hiding the ugly utility lines behind it.
Time: 20 Mins | Cost: Low ($20)
Comparing the Tricks
To help you decide which method is right for your home, here is a quick comparison:
TrickCostTimeDifficultyBest For
Wood Box Low 2 Hrs Medium Permanent concealment
Faux Stone Medium 1 Hr Medium Brick/Stone homes
Vines Low 30 Min+ Easy Garden lovers
PVC Sleeve Very Low 45 Min Easy Thin pipes/wires
Lattice/Shutter Medium 2 Hrs High Near windows
Faux Rock High 15 Min Very Easy Low/Ground pipes
Curtains Low 20 Min Very Easy Renters/Patios
Expert Advice for Success + Pitfalls to Avoid
Now that you have selected your method, we want to make sure you succeed. As with any home improvement project, there are right ways and wrong ways to do things.
Key Tips for Success
- Check Local Codes: Before you permanently box anything in, check your local building codes. Some municipalities require specific access points for gas meters or electrical shut-offs.
- Don’t Block Airflow: If you are hiding an AC unit or lines that generate heat, ensure your cover allows for ventilation. Lattice is great for this.
- Use Rust Inhibitors: If you are painting the actual metal pipes, clean them first and use a rust-inhibiting primer.
- Maintenance Matters: Check your covers once a year. Look for wasp nests inside boxes or vines that are growing too aggressively into the siding.
Common Mistakes to Avoid
The biggest mistake homeowners make is permanently sealing access. Never glue a box so tightly that you can’t remove it. Pipes burst, lines leak, and technicians need access. Always use screws (not nails/glue) for structural covers so they can be backed out.
Another common pitfall is ignoring drainage. If you build a wooden box that touches the ground, it will rot. Keep wood at least 2 inches off the soil, or use a concrete paver as a base.
Finally, be careful when drilling. If you are attaching cleats to your luxury house, ensure you aren’t drilling into the pipe you are trying to hide!
Frequently Asked Questions About Hiding Outdoor Pipes
Q: How can I hide pipes on the outside of my house without drilling? A: Tricks 3, 6, and 7 are your best bets. Using freestanding trellises for vines, placing faux rocks, or using tension rods for curtains requires little to no drilling into the home’s exterior.
Q: Are these DIY methods permanent? A: Most are semi-permanent. Wood boxes and faux stone panels are durable and long-lasting. Still, if you use screws instead of construction adhesive, they can be removed if necessary.
Q: What is the best material for hot climates? A: If you live in an area with intense heat, avoid cheap, thin plastics as they can warp. Treated wood, metal, or high-quality UV-resistant resin (like faux rocks) are the best choices.
Q: Is it expensive to hire a professional to hide pipes? A: Yes, hiring a carpenter or mason can cost hundreds of dollars. Doing it yourself using the methods above generally costs under $50 to $100, saving you a significant amount of money.