Have you ever looked up at your roof after a heavy storm and wondered if you should grab a ladder to check for damage? You are certainly not alone. Every year, thousands of homeowners decide to take home maintenance into their own hands. However, it might surprise you to learn that over 100,000 ladder-related falls occur annually in the United States alone. Many of these preventable accidents happen right at home during simple do-it-yourself tasks.
As a homeowner, you have perfectly valid reasons for wanting to get up there. Do a quick seasonal inspection, perform minor repairs, or clear out those gutters without paying hefty professional fees. Saving money and taking pride in your home are great goals. But saving a few dollars is never worth risking a serious injury.
That is exactly why you need this Ultimate Guide: How to Climb Your House Roof Safely. Getting onto your roof is not just about leaning a piece of metal against your gutters and hoping for the best. It requires preparation, the right tools, and a deep understanding of gravity.
Why Safety Matters for House Roof Climbing
When you’re standing on the ground and looking up, your roof might not seem that intimidating. It looks like a solid, flat surface. But the moment you step off the ladder and onto the actual shingles, your perspective changes instantly. Suddenly, you realize you are suspended high above the ground on a slanted surface. Understanding the risks is the very first step in proper roof fall prevention.
The Hidden Risks of Roof Access
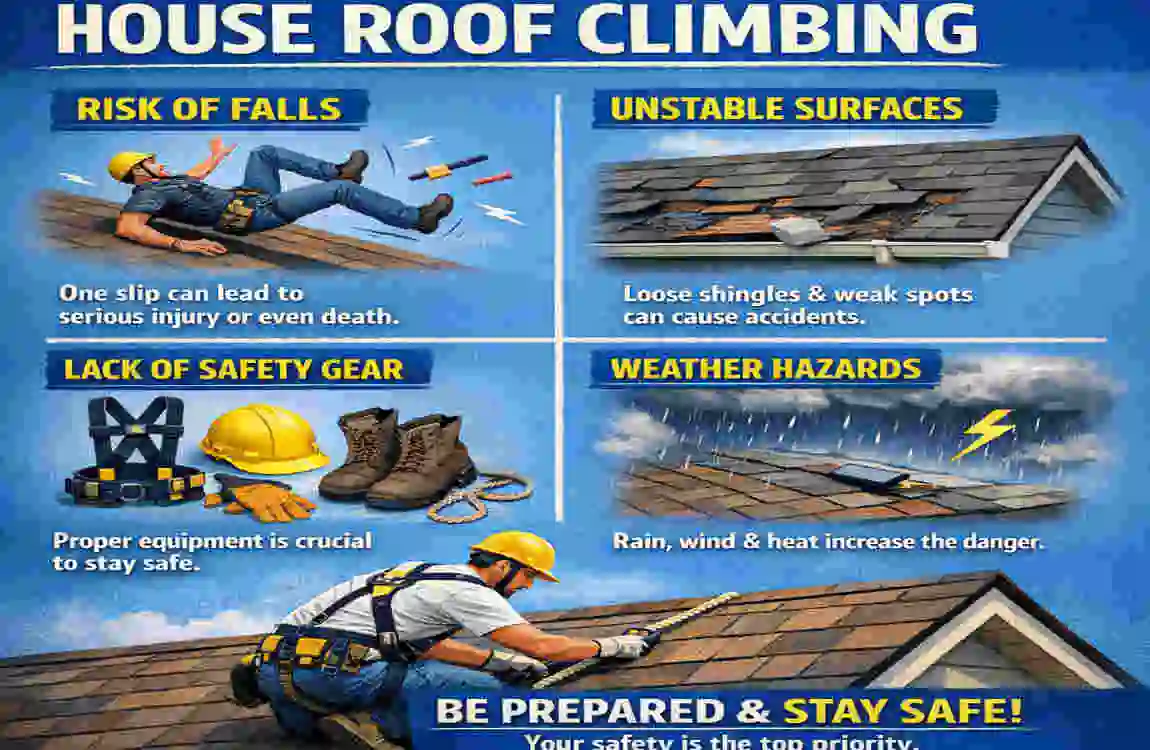
The most obvious danger of climbing your roof is falling. But what actually causes these falls? Often, it is a combination of small, easily overlooked factors. Slips on steep pitches are incredibly common. Morning dew, a light layer of dust, or a patch of hidden moss can turn a seemingly dry roof into an ice rink.
Ladder failures are another massive risk. A ladder that is not properly secured can slide sideways or kick out from the bottom. Weather also plays a tricky role. A sudden gust of wind that you barely feel on the ground can easily knock you off balance when you are twenty feet in the air. You must respect these elements every single time you climb.
The Homeowner Disadvantage
Let’s face the hard truth: homeowners face significantly greater risks than professional roofers. Why? Because professionals have daily experience, muscle memory, and strict safety protocols. As a homeowner, you might only climb your roof once or twice a year. You lack that everyday familiarity.
Because of this inexperience, DIYers often skip crucial safety steps. They might wear the wrong shoes, rush the job to beat the sunset, or carry heavy tools in their hands while climbing. Implementing safe roof climbing techniques bridges the gap between a dangerous amateur attempt and a secure, professional-style inspection.
The Real Benefits of Safe Practices
Taking the time to follow house roof safety tips does more than keep you alive. It protects your livelihood. A serious fall can result in broken bones, long hospital stays, and months of lost wages. Avoiding an emergency room visit is the ultimate goal, but safe practices also protect your property.
When you climb recklessly, you are more likely to damage your home. Dropping heavy tools can crack tiles, and improper walking techniques can tear off expensive asphalt shingles. By moving carefully and deliberately, you preserve your home’s value while keeping your body intact.
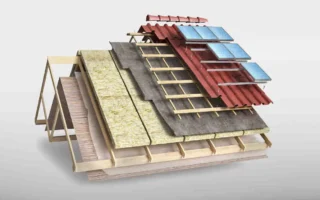
House-Specific Focus: From Asphalt to Metal
Not all roofs are created equal. The surface you are walking on dramatically changes how you need to behave. Asphalt shingles offer decent grip when dry, but they become slippery when old and loose. Metal roofs, on the other hand, are notoriously slick. A single drop of water on a metal roof makes it completely un-walkable without specialized equipment.
Location also matters. If you live in a modern urban area, your home might have complex rooflines, multiple valleys, and steep dormers. Consider the unique architecture of sloped homes in places like Lahore, where heavy rain demands steep pitches. Navigating these requires more precise planning than walking on a simple, low-sloped ranch house.
If reading about these risks makes you feel hesitant, listen to that instinct! You never have to take on this risk alone. Skip the danger entirely and contact our team for a free, professional roof inspection today. We have the training to do it safely.
Essential Safety Gear for Roof Access
You would never jump out of an airplane without a parachute. Similarly, you should never step onto a roof without the proper protective equipment. The right gear acts as your personal safety net. Let’s break down the exact items you need for a successful and safe climb.
Choosing the Ultimate Ladder
Your ladder is your bridge to the roof. You generally have two choices: an extension ladder or an articulating (multi-position) ladder. For most two-story homes, a heavy-duty fiberglass extension ladder is your safest bet. Fiberglass does not conduct electricity, which protects you if you accidentally brush against a hidden power line.
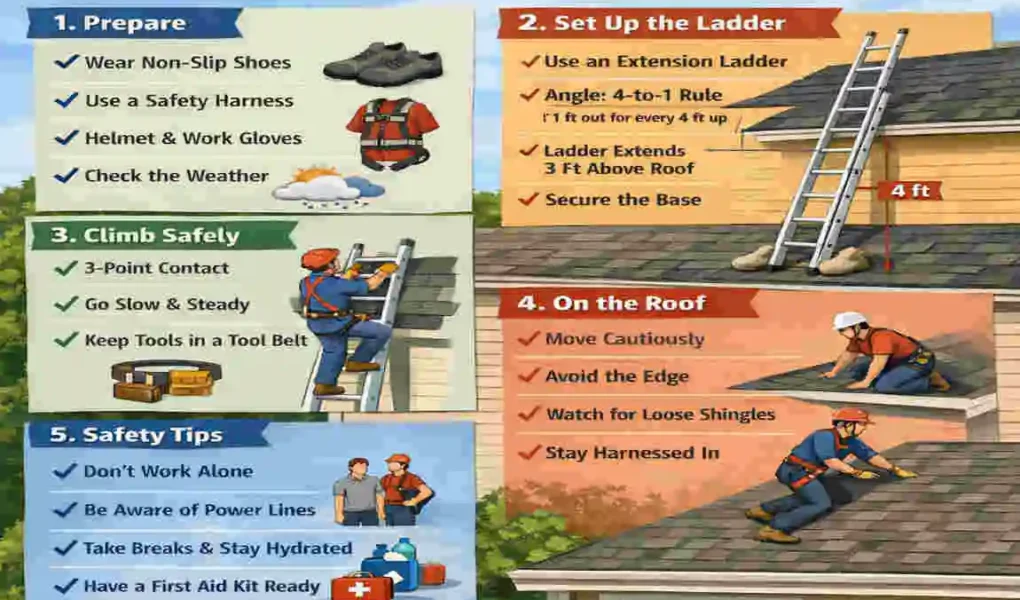
When setting up your DIY roof access ladder, you must follow the strict “4:1 angle rule.” For every four feet of height you need to climb, the base of the ladder must be one foot away from the wall. This specific angle provides the maximum stability, preventing the ladder from tipping backward or sliding down the wall.
The Importance of Proper Footwear
Do not underestimate the power of your shoes. The footwear you choose means the difference between staying upright and taking a dangerous slide. Never wear heavy, stiff-soled work boots on a roof. They might protect your toes, but they offer terrible traction on slanted surfaces.
Instead, you need slip-resistant soles made of soft rubber. Soft rubber boots or high-quality sneakers grip asphalt shingle granules much better. Before you climb, check the bottoms of your shoes. If the tread is worn out or caked in mud, change your shoes immediately. You want maximum surface contact to maintain your grip.
Harnesses and Roof Anchors
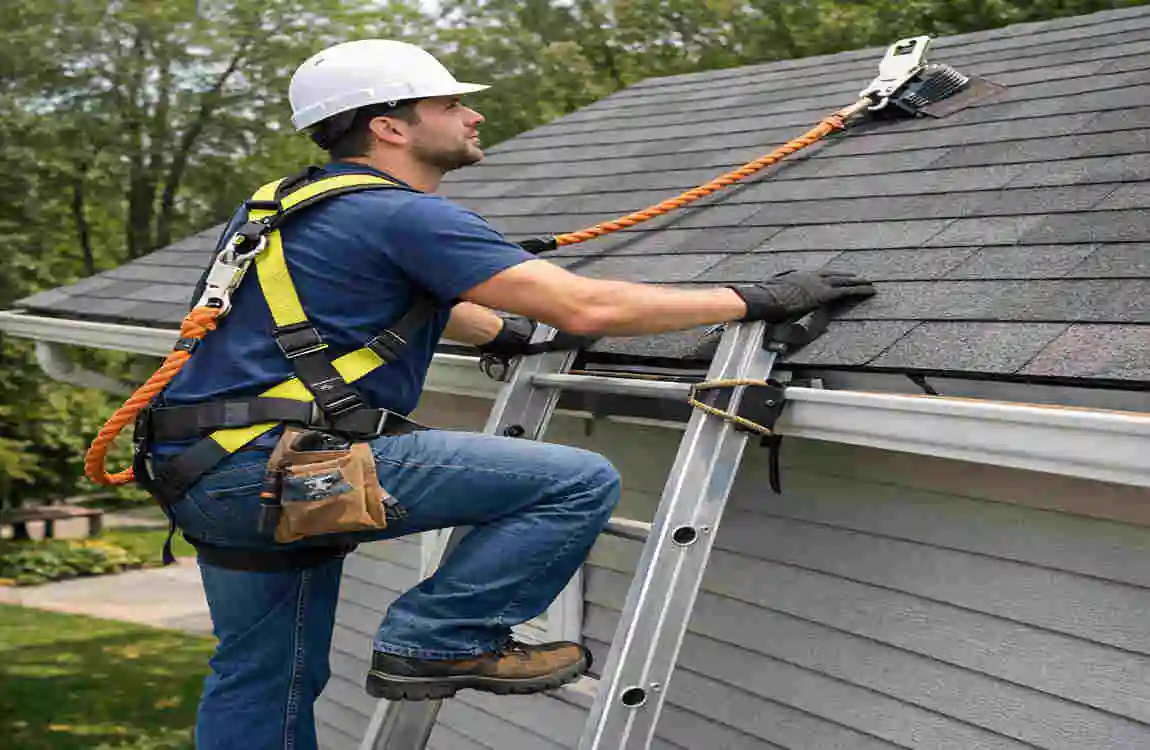
If your roof has a pitch steeper than a gentle slope (specifically anything over a 4:12 pitch), you must wear a fall protection harness. A personal fall arrest system includes a full-body harness, a shock-absorbing lanyard, and a secure roof anchor point.
You attach the anchor directly to the wooden trusses of your roof, usually at the very peak. If you happen to slip, the harness catches you before you hit the ground. While it takes a little extra time to install an anchor, this single piece of equipment is the ultimate lifesaver. Never gamble with gravity when you are high up.
Smart Tool Management
When you are climbing, you need both of your hands absolutely free. Trying to carry a hammer, a drill, and a tube of sealant while climbing a ladder is a recipe for disaster. This is where tool management becomes a critical part of your safety routine.
Invest in a sturdy tool belt or a hoisting rope bag. Keep your hands bare, or wear specialized non-slip gloves that provide tactile feedback. Additionally, keep a basic first-aid kit on the ground nearby. Being prepared for small scrapes prevents panic when you are up high.
Your Safety Gear Checklist
To make your preparation easy, we have put together this simple checklist. Review this table before every single climb.
Gear Item Purpose Recommended Type
Ladder provides stable, secure access to the roof edge. Fiberglass extension ladder, Type IA rating.
Harness Acts as a fall arrest system to stop you mid-air. Full-body harness with a shock-absorbing lanyard.
Shoes maximize traction and grip on slanted surfaces. Soft-rubber soled shoes or specialized roofing boots.
Tool Belt: Keeps your hands totally free during your climb. Canvas or leather multi-pouch belt with secure loops.
Choosing the Right Ladder and Placement
Having the best ladder in the world will not help you if you set it up incorrectly. Ladder placement is where most homeowners make their first critical mistake. Let’s walk through exactly how to select and place your ladder for maximum security.
Selecting the Perfect Ladder Height
A ladder that is too short forces you to reach and stretch, which immediately throws off your center of gravity. As a golden rule, your ladder must extend at least three feet above the edge of the roof.
Why three feet? Because when you reach the top, you need something solid to hold onto while you step off the rungs and onto the roof surface. If the ladder stops exactly at the gutter, you have nothing to grab, forcing you to crawl awkwardly onto the shingles. Additionally, always check the weight rating of your ladder. It must support your weight plus the weight of any tools or materials you carry.
Finding the Perfect Placement
Look closely at the ground around your home. You need firm, level ground to support the ladder’s feet. If you place a ladder on soft mud or wet grass, the feet will sink unevenly the moment you step on it. If you must set up on dirt, dig out a small, level trench, or place a wide, sturdy piece of plywood under the feet to distribute the weight evenly.
Look up before you set the ladder down. Are there any tree branches in the way? More importantly, are there any overhead power lines? Keep your ladder at least ten feet away from any electrical wires. Furthermore, never place a ladder directly in front of a door unless you have locked it and posted a warning sign on the other side.
Mastering the Tie-Off Method
Professionals never rely on gravity alone to keep a ladder in place. They tie it off. Once you have safely reached the roof edge, use a strong bungee cord, a heavy-duty rope, or specialized ladder straps to secure the top of the ladder to your home’s gutter system or fascia board.
This simple step prevents the ladder from sliding to the side as you shift your weight onto the roof. It also ensures that a strong gust of wind will not blow your ladder down while you are working up top, leaving you stranded.
Navigating House Specifics: Corner Access
If your home has a complex layout, finding a safe spot to lean your ladder can be tricky. Avoid leaning your ladder against flimsy plastic gutters if possible. Instead, look for strong structural points.
Corner access points, located near the hips or valleys of your roof, are often the safest areas. The structure is heavily reinforced in these spots, providing a solid resting place for the ladder rails. Take your time walking around your property to find the absolute safest launch pad.
Step-by-Step: How to Climb Your House Roof Safely
You have your gear, and your ladder is perfectly placed. Now comes the moment of truth: the climb itself. This is where you put your safe roof climbing techniques into practice. Follow these exact steps to ensure you get up and down without a scratch.
The Pre-Climb Inspection
Never rush this first step. Before your foot touches the first rung, assess the environment. Check the weather forecast. If there is even a slight chance of rain, lightning, or high winds, cancel your plans immediately.
Next, do a visual inspection of the roof from the ground. Look for obvious dangers, such as wet moss, thick algae, or a buildup of fallen leaves. Check for loose or missing shingles. If you spot these hazards in the area where you plan to work, you will need to adjust your approach or call a professional.
The Safe Ladder Ascent
When you are ready, step onto the ladder. You must absolutely follow the “three-point contact rule” at all times. This means you must have two hands and one foot, or two feet and one hand, securely gripping the ladder at any given moment.
Face the ladder directly. Do not look around at your yard, and do not twist your body to talk to someone on the ground. Keep your body centered between the side rails. Your belt buckle should never go past the left or right rail. Climb slowly, smoothly, and deliberately.
The Roof Transition
Getting off the ladder and onto the roof is the most dangerous part of the entire process. Do not rush this transition. When your feet are near the roof edge, grab the top of the ladder (the part extending three feet above the edge) with both hands.
Slowly step one foot over the edge and place it firmly on the roof surface. Test the grip before committing your full weight. If you are near a roof valley or hip, try to straddle it. Valleys offer a natural angle that makes it easier to balance as you pull your other foot off the ladder. Step up at an angle rather than walking straight up the slope.
Mastering On-Roof Movement
Now that you are on the roof, you need to change the way you walk. Forget how you walk on flat ground. On a slanted surface, you want to keep your center of gravity low. Bend your knees slightly.
When walking up a slope, point your toes slightly downward and lean forward into the hill. This maximizes the surface area of your rubber soles against the shingles. Whenever possible, walk along the ridge (the very peak) of the roof. It is the flattest and most structurally sound part of the house. Avoid walking straight down the slope. Instead, walk diagonally in a zig-zag pattern to maintain better control over your momentum.
The Careful Descent
Descending is often harder than climbing up because gravity is working against your line of sight. When you are finished, return to your ladder. Face the roof, not the ground, as you approach the edge.
Hold firmly onto the top rails of the ladder. Slowly lower one foot onto the appropriate rung. Make sure you feel the rung solidly under your shoe before transferring your weight. Use the same slow, three-point contact rule as you climb down. Do not skip rungs or jump off the bottom of the ladder, as this can easily cause a sprained ankle.
Roof Type Considerations
Every roof has its own personality, and treating them all the same is a massive safety hazard. The steepness of your roof and the materials it is made from will dictate exactly how you need to behave.
Navigating Low-Pitch Homes
If you have a flat or low-pitch residential roof, you might think you are completely safe. While these roofs are certainly easier to walk on, they come with a false sense of security. Because they are relatively flat, homeowners tend to walk faster and pay less attention.
Low-pitch roofs collect more dust, dirt, and morning dew than steep roofs. When this mixture becomes slightly wet, it forms a nearly invisible layer of slime. Always test your traction with a few sliding steps before walking confidently across a low-pitch roof.
Conquering Steep-Pitch Houses
Steep roofs are incredibly intimidating, and for good reason. Once a roof passes a certain angle, human ankles cannot bend enough to keep your feet flat on the surface. For these steep-pitch houses, standard walking is out of the question.
If you must access a steep roof, you must use specialized equipment, such as chicken ladders (ladders that hook securely over the roof ridge) or professionally installed roof brackets with wooden walk planks. These tools create a flat, artificial surface for you to stand on. Never attempt to free-walk a steep slope.
Material Impacts: Tiles vs. Shingles
The material of your roof changes the game entirely. Traditional asphalt shingles are flexible and covered in rough granules, making them relatively safe to walk on when dry. However, on hot summer days, these shingles soften. Walking on them can easily tear the asphalt, ruining your roof and causing leaks.
Clay tiles or slate roofs are a totally different story. These materials are incredibly fragile. If you step in the wrong spot, the tile will shatter under your weight. Not only does this cause expensive damage, but the broken pieces act like marbles under your shoes, sending you slipping down the roof. Unless you are highly trained in walking on tiles, leave these roofs to the experts.
Tailoring to Pakistani Homes: Lahore Monsoon Prep
If you are managing a home in a bustling city like Lahore, you have unique challenges. Many homes in this region feature varied roof levels and are subjected to intense monsoon seasons. Preparing your roof for heavy rains often requires clearing drains and inspecting waterproofing layers.
Because these urban roofs often have smooth concrete finishes or specialized waterproofing paints, they become incredibly slick. When inspecting these roofs before the monsoon hits, ensure the surface is bone dry. Wear ultra-grippy shoes and be highly aware of low parapet walls, which offer minimal protection from a fall over the edge.
Common Mistakes and How to Avoid Them
Even with the best intentions, homeowners repeatedly fall into the same dangerous traps. By identifying these common errors, you can actively prevent them during your own project. Here are the biggest mistakes and simple fixes for each.
- Mistake 1: The Dangerous Overreach
- The Problem: You are cleaning your gutters, and the leaves are just out of reach. Instead of climbing down and moving the ladder, you stretch your body to the side.
- The Solution: Use the “belt buckle rule.” Your belt buckle should never cross outside the vertical side rails of the ladder. If you cannot reach the spot while keeping your body centered, climb down and reposition the ladder. It takes an extra minute, but it prevents the ladder from tipping over.
- Mistake 2: Ignoring the Pitch
- The Problem: You look at the roof, assume it is not “that steep,” and climb up without a harness, only to freeze in panic halfway up when you realize how steep it truly is.
- The Solution: Use technology to your advantage. Download a free pitch gauge app on your smartphone. Rest it against the slant of your roof from a safe vantage point. If the app reads a pitch above 4:12, you must use proper fall arrest gear. Do not guess; measure it.
- Mistake 3: Working Completely Solo
- The Problem: You decide to do a quick inspection while everyone else is out of the house. If you fall or get stuck, no one is there to help or call emergency services.
- The Solution: Never, ever climb a roof alone. Always have a spotter. Your spotter should hold the ladder base, hand you tools, and keep an eye on your movements. If something goes wrong, they are your immediate lifeline.
When to Call the Professionals
This guide empowers you with knowledge, but the smartest decision a homeowner can make is knowing when to say, “This is too dangerous for me.” There is absolutely no shame in stepping back and letting the pros handle it. In fact, it is the mark of a wise property owner.
Spotting the Red Flags
Certain situations should instantly tell you to keep your ladder in the garage. If your roof has an extremely steep pitch (anything greater than 9:12), it is strictly professional territory.
If your home is three stories high, or the edge of the roof is more than twenty feet off the ground, the risk factor multiplies exponentially. Furthermore, if you spot obvious signs of severe structural damage—like a sagging roof deck, massive rot, or large missing sections of shingles—do not step foot on it. You could easily fall right through the rotten wood.
Skip the Risks, Book the Experts
Why spend your weekend sweating, stressed out, and risking a hospital trip? You deserve peace of mind. Let our certified, highly trained team handle the danger for you.
We utilize state-of-the-art safety gear, professional rigging, and years of daily experience to navigate your roof safely. Skip the risks entirely and book our certified team for a comprehensive, stress-free roof inspection today. We will provide a detailed report on your roof’s condition without you ever having to leave the ground.
Frequently Asked Questions (FAQs)
To ensure this Ultimate Guide: How to Climb Your House Roof Safely leaves no stone unturned, we have compiled the most common questions homeowners ask before a climb.
How steep is too steep for house roof climbing?
Generally, any roof with a pitch greater than 4:12 (rising 4 inches vertically for every 12 inches horizontally) is considered steep enough to require specialized safety gear, such as a harness. Anything over an 8:12 or 9:12 pitch is considered extremely dangerous for non-professionals. If you feel uncomfortable just looking at it, it is too steep for a DIY climb. Call a professional.
When is the best time for safe roof access?
The absolute best time to climb your roof is late morning on a clear, dry day. By late morning, the sun has had enough time to burn off any slippery morning dew or frost. Avoid the extreme heat of the mid-afternoon, which can make you dizzy and damage hot asphalt shingles. Never climb during high winds, rain, or immediately after a storm.
What gear is required under local safety laws?
While residential DIYers might not be legally bound by commercial Occupational Safety and Health standards, following their guidelines is the smartest move you can make. Safety authorities universally recommend a Type IA fiberglass ladder, a full-body personal fall arrest system (harness, lanyard, and anchor) for elevated heights, and soft-soled, slip-resistant footwear. Your life is worth the investment in commercial-grade safety gear.