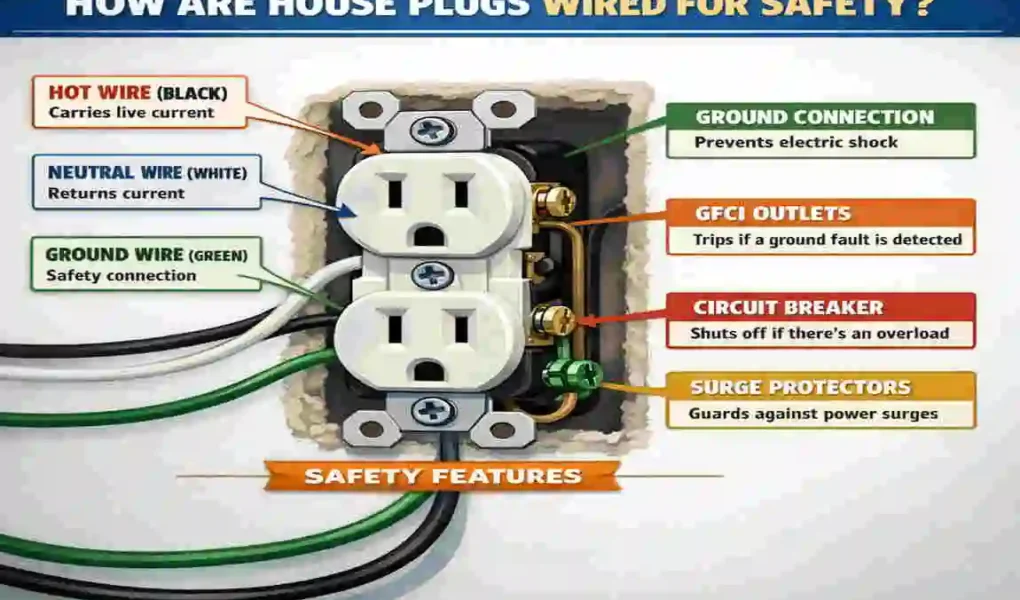
If you have ever looked at a wall outlet and wondered how our house plugs are wired, you are not alone. Many homeowners use outlets every single day without ever thinking about what is happening behind the wall. But the truth is simple: house plugs are wired to carry power from your electrical panel to your devices safely. When the wiring is done correctly, your lights, chargers, appliances, and tools all work the way they should. When done poorly, the risks can be serious.
Faulty plug wiring is one of the major causes of home electrical fires. That is why electrical outlet safety matters so much. A loose connection, the wrong wire in the wrong terminal, or a missing ground can lead to heat buildup, sparks, shocks, and even fire. For homeowners, understanding the basics is not just helpful; it’s essential. It can help protect your home, your family, and your property.
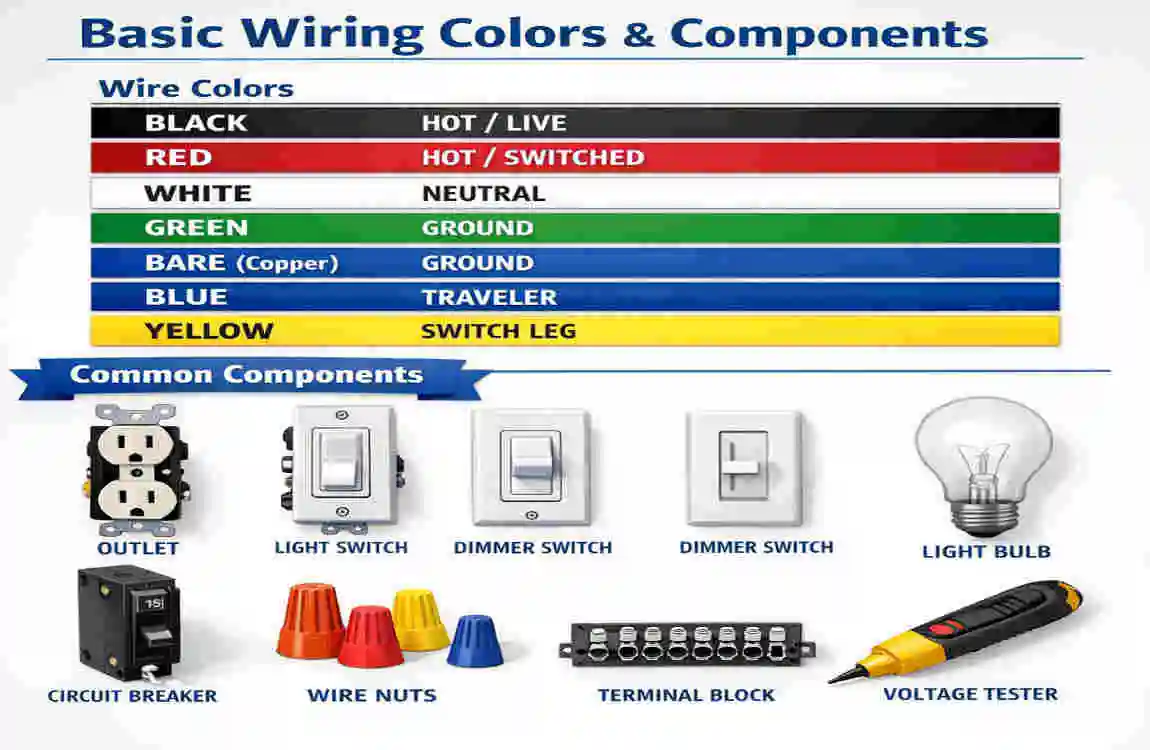
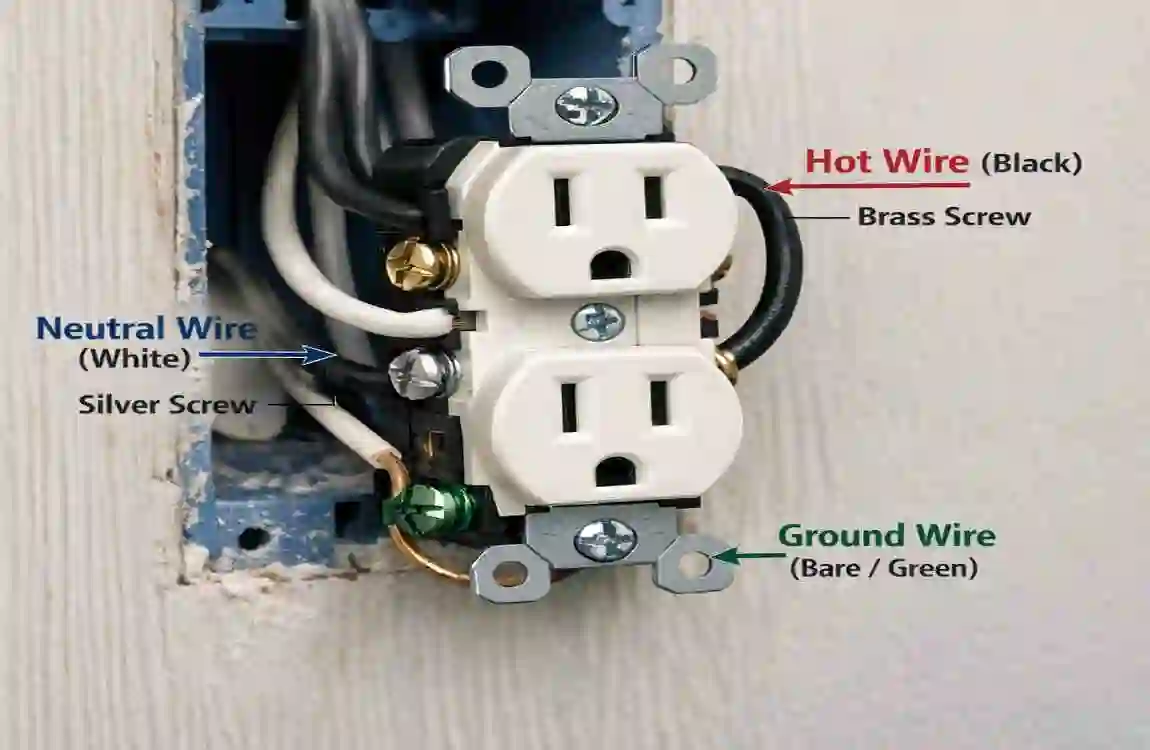
Basic Wiring Colors and Components
Understanding the basic parts of an outlet is the first step to understanding electrical outlet wiring. House plugs are not random clusters of wires. Each wire has a job, and each terminal has a purpose. When these parts are matched correctly, the outlet runs safely and efficiently.
Wire Color Codes Explained
Wire colors help electricians identify each conductor.
In many UK and international systems, the wire colors are:
- Brown = live
- Blue = neutral
- Green/yellow = earth
In the United States, the most common color code is:
- Black or red = hot
- White = neutral
- Green or bare copper = ground
These colors are more than just labels. They guide safe installation and help prevent dangerous mistakes. The hot or live wire brings power to the outlet. The neutral wire carries the electricity back to complete the circuit. The ground wire is a safety path that helps send fault current away if something goes wrong.
Here is the easiest way to think about it:
- Hot/live wire = brings power in
- Neutral wire = sends power back
- Ground/earth wire = protects you if a fault happens
If a wire is connected to the wrong terminal, an outlet may still appear to work, but it can become unsafe. That is why matching the color and the terminal is so important for home plug safety.
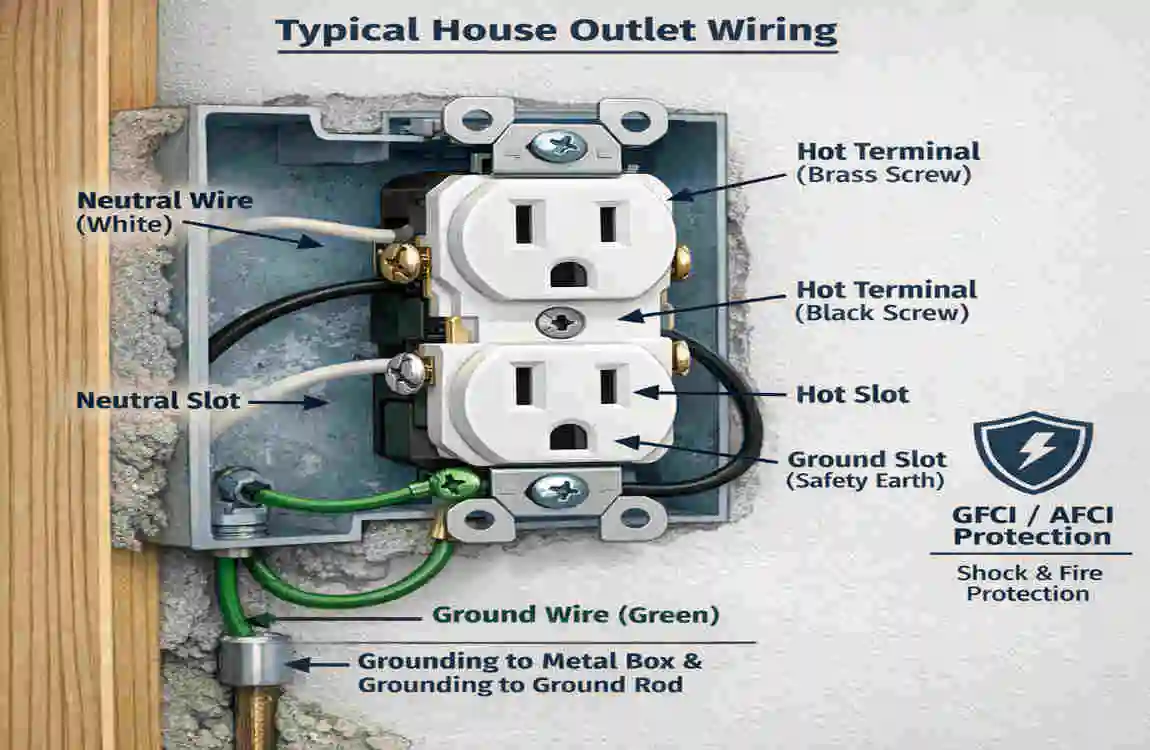
Anatomy of a House Plug
A standard outlet or house plug usually has three main connection points:
- Hot terminal: often brass or gold
- Neutral terminal: often silver
- Ground terminal: green screw or green-colored terminal
Inside the outlet, these terminals are connected to the wall wiring. The plug face then gives you the slots where you insert the appliance cord.
A very simple text version looks like this:
HOUSE WIRING TO OUTLET
Black/Hot -> Brass/Gold terminal
White/Neutral -> Silver terminal
Green or Bare Ground -> Green screw
A 3-prong outlet uses all three connections for better safety. The round or U-shaped opening is the ground. This ground connection is important because it provides a safe path for electricity during a fault.
Why the Ground Wire Matters
The ground wire is one of the most important safety parts of modern outlets. If a hot wire touches metal in a device or outlet box, the ground path helps trip the breaker rather than letting the metal remain energized. That can reduce the chance of shocks.
This is also why older 2-prong outlets can be a concern. They may not offer the same level of protection as a properly grounded 3-prong outlet. In older homes, the wiring may still work, but it may not offer today’s safety expectations.
Safety Note
Always remember this: wire colors are there to help, but they are not a substitute for testing. Some older homes have changed colors over time, and previous repairs may not follow modern standards. Never assume a wire is safe just because it “looks right.” If you are dealing with outlet wiring, turn off the power first and verify the circuit is dead before touching anything.
Step-by-Step Wiring Guide
This section explains the basic process of wiring a standard outlet in a simple, educational way. It is useful for understanding how electricians do the work, and it can help you spot whether an outlet has been installed correctly.
Tools and Prep for Safe Wiring
Before any work starts, safety must come first. Electrical work is not the place to rush.
Common tools include:
- Voltage tester
- Wire strippers
- Needle-nose pliers
- Screwdriver set
- Electrical tape
- Flashlight
Before touching the outlet, the power should be switched off at the breaker panel. Then the circuit should be tested with a voltage tester to make sure no electricity is present. Never trust the wall switch alone. Never assume a breaker is labeled correctly. Test it.
That one step can help prevent a shock.
Also, make sure the area is dry. Water and electricity do not mix well, and even a small amount of moisture can increase the danger.
Wiring a Standard 3-Prong Outlet
A standard outlet is usually connected in a simple sequence. The goal is to match each wire to the correct terminal so power can flow correctly and safely.
Here is the basic process:
- Strip the wire ends carefully.
- Remove only enough insulation to expose the conductor. Too much exposed copper can increase the risk of contact with other wires or metal parts.
- Connect the hot wire to the brass terminal.
- In the US, this is usually the black wire. In other systems, this may be the brown or live wire.
- Connect the neutral wire to the silver terminal.
- This is commonly the white wire in the US or the blue wire in many other systems.
- Connect the ground wire to the green screw.
- This is the safety connection. It may be green or bare copper.
- Tighten each connection securely.
- Loose connections can cause heat, arcing, or intermittent power problems.
- Install the outlet back into the box.
- Make sure no wires are pinched behind the device.
- Restore power and test the outlet.
- A plug tester or multimeter can confirm correct operation.
In many luxury homes, electricians also use a pigtail for grounding. That means multiple ground wires are joined together with a short extra wire that connects to the outlet. This keeps the grounding path solid even when there are multiple cables in the box.
A Simple Outlet Wiring Example
Think of it like this:
- The hot wire delivers power to the outlet
- The neutral wire returns the power
- The ground wire stands by for safety if something fails
If one of these is missing or reversed, the outlet may become unsafe. For example, reversed hot and neutral can still let a lamp turn on, but it can create dangerous conditions inside the appliance.
Common Mistakes to Avoid
Many outlet problems stem from small mistakes during installation. Some of the most common ones are:
- Over-tightening screws can damage the wire or terminals
- Leaving exposed copper, which can touch the box or another wire
- Reversing hot and neutral
- Failing to connect the ground wire
- Using the wrong outlet type for the circuit
- Crowding wires into the box, which stresses the connections
These mistakes may not show up right away. The outlet may seem fine for weeks or months. But over time, loose wiring can heat up and cause arcing, increasing the risk of fire.
Why Polarity Matters
Polarity is simply the direction of power flow. In a properly wired outlet, electricity enters through the hot side and returns through the neutral side. If the polarity is reversed, some devices may still function, but safety is reduced.
That is why electricians use testers after installation. A correct-looking outlet face does not always mean the wiring is correct behind the wall.
Safety Standards and Protections
Modern home wiring is not just about getting power to the outlet. It is about protecting people from shock and fire. That is where safety devices come in.
GFCI and AFCI Requirements
A GFCI is a ground-fault circuit interrupter. It monitors tiny differences between the hot and neutral currents. If electricity starts flowing where it shouldn’t, such as through water or a person, the GFCI trips quickly and cuts power.
A GFCI outlet is especially important in places where water is present, such as:
- Bathrooms
- Kitchens
- Laundry rooms
- Garages
- Basements
- Outdoor outlets
An AFCI is an arc-fault circuit interrupter. It is designed to detect dangerous electrical arcing that can occur when wires are damaged, loose, or overloaded. Arcing can create heat and start fires inside walls.
AFCI protection is commonly used in:
- Bedrooms
- Living rooms
- Hallways
- Many other living spaces in modern homes
Why These Protections Matter
GFCIs and AFCIs do different jobs, but both are designed to prevent danger. One helps stop shocks. The other helps stop fires. Together, they play an important role in electrical outlet safety in a modern home.
Code Updates and Common Expectations
While electrical codes can vary by region, several modern safety practices are now widely used in new construction and renovations.
These include:
- Tamper-resistant outlets to help protect children
- Grounded 3-prong outlets in more areas
- GFCI protection in wet locations
- AFCI protection in many living spaces
- Proper wire gauge matched to the circuit amperage
For example, 14-gauge wire is typically used on 15-amp circuits, while heavier circuits need appropriately sized wire. Using the wrong wire gauge can overheat the circuit and cause problems.
Safety Feature Comparison Table
Feature Purpose Where It Is Commonly Required
GFCI Shock prevention Bathrooms, kitchens, garages, basements, outdoor areas
AFCI Fire arc detection in bedrooms, living rooms, hallways, and many indoor living areas
Tamper-Resistant Outlets , Child safety , New installations in many homes
Grounded 3-Prong Outlets , Better protection , General residential use
Proper Wire Gauge Prevents overheating , all branch circuits
What Tamper-Resistant Outlets Do
Tamper-resistant outlets have internal shutters that block foreign objects from entering the socket. That makes them a smart choice in homes with children. They do not stop normal plug use, but they help prevent accidental shock from keys, toys, or fingers.
Why Older Wiring Needs Extra Attention
Older homes may still have two-prong outlets or outdated wiring methods. Some were installed before modern safety rules were common. If your home has these older systems, do not ignore them. They may still power your devices, but they may not offer the same level of protection as newer outlets.
This is one reason many homeowners choose to upgrade older receptacles during a remodel or inspection.
Advanced Safety Features
Once you understand the basics, it helps to know about newer tools and upgrades that make outlet wiring even safer.
Smart Plugs and Overload Protection
Smart plugs are popular because they let you control devices from your phone or automate them with schedules. Some also show power usage or warn you when a device is drawing too much energy.
That can be useful, but smart plugs should never be used to hide a bigger wiring problem if an outlet is loose, warm, or sparking, a smart plug is not the solution.
Also, avoid daisy-chaining power strips, extension cords, and adapters. When too many devices are plugged into a single outlet, the circuit can become overloaded. That creates heat and can trip breakers or start a fire.
A good rule is this: if you are running out of outlets, fix the outlet shortage properly instead of stacking adapters.
Upgrading Old 2-Prong Outlets
If your home still has old 2-prong outlets, it may be a sign that the system needs attention. These outlets were common in older buildings, but many do not provide a dedicated ground path.
Warning signs include:
- Outlets that feel warm
- Sparks when plugging in devices
- Plugs that fit loosely
- Buzzing sounds
- Lights that flicker when appliances run
In some cases, a 2-prong outlet can be upgraded to a safer setup, often by installing a grounded outlet or using a GFCI-protected replacement where code allows. But this should be done carefully and in accordance with local electrical regulations.
Why Upgrades Help
Modern outlets are designed to reduce risk. They help protect against:
- Shock from a fault
- Fire from arcing or loose wiring
- Damage to expensive electronics
- Unsafe conditions for children and pets
A proper upgrade is not just about convenience. It is about lowering risk in the entire home.
Before-and-After Example
A common upgrade path looks like this:
- Before: old 2-prong outlet, no ground, loose faceplate, possible wear
- After: grounded 3-prong outlet, tested wiring, GFCI protection where needed, secure fit
Even though the outlet may look like a small part of the house, it plays a major role in safety.
Inspection and Maintenance Tips
Once outlets are wired correctly, they still need basic attention over time. Regular checks can prevent bigger problems later.
Daily and Weekly Checks
You do not need to be an electrician to notice warning signs. A simple visual and touch check can tell you a lot.
Look for:
- Warm outlets or plugs
- Discoloration around the faceplate
- Cracked covers
- Loose plugs that fall out easily
- Frayed cords
- Burning smells
- Buzzing or crackling sounds
If you notice any of these, stop using the outlet until it is inspected.
You can also test GFCI outlets monthly by pressing the test button and then the reset button. This helps confirm that the protection still works.
Simple Home Maintenance List
Here are a few good habits that support safe wiring:
- Check outlets in kitchens, bathrooms, and garages more often
- Keep cords out of doorways and away from heat sources
- Replace damaged outlet covers
- Do not overload one outlet with too many devices
- Make sure plugs fit snugly
- Use only proper extension cords for temporary use
These habits may seem small, but they add up.
Signs You May Have a Wiring Problem
Sometimes the problem is not the appliance. It is the outlet itself. Watch for these signs:
- Breakers that trip often
- Lights that dim when appliances start
- A tingling feeling when touching metal appliances
- Outlets that do not hold plugs well
- Sizzling sounds behind the wall
These are not normal. They may point to loose wiring, a damaged outlet, or an overloaded circuit.
When to Call a Professional
Some electrical work should never be guessed at. Call a licensed electrician if you notice:
- Loose connections
- Buzzing outlets
- Burn marks
- Repeated breaker trips
- Old aluminum wiring
- Mixed wiring types in the same circuit
- Any outlet that shocks you
A professional can test the circuit, check the box, verify grounding, and confirm that the wiring meets code. That is especially important in older homes where previous repairs may have been done poorly.
If you are searching for peace of mind, this is one area where expert help is worth it.
How House Plugs Are Wired in Real Homes
Now let’s bring it all together in a more practical way. In real homes, outlet wiring usually follows a general pattern, but the details can vary depending on the age of the luxury house, local code, and the type of outlet being installed.
Standard Outlet Wiring in Simple Terms
A typical modern outlet is wired so that:
- One conductor brings power in
- One conductor sends power back
- One conductor provides safety grounding
That sounds simple, but it is exactly why correct connections matter. The outlet must be installed so the electrical current has the right path. If that path is broken, reversed, or loose, the system becomes unsafe.
What Happens Inside the Wall
Behind the outlet face, wires are usually joined in a junction box. The box helps contain sparks and protect the connections. The outlet itself is mounted to the box, and the wires are secured under terminal screws or backwire clamps, depending on the outlet style.
A good installation keeps the following in mind:
- Wires are stripped to the correct length
- Connections are tight but not damaged
- Grounding is continuous
- No bare copper is exposed beyond the terminals
- The outlet is flush with the wall
- The box is not overcrowded
This is the hidden part of outlet safety. What you see on the outside may look simple, but what happens behind the wall is what keeps the outlet safe.
Why Reversed Wiring Can Be Dangerous
A reversed outlet may still power a lamp, but it can leave certain parts of a device energized when they should not be. That can create a shock hazard during repair or normal use.
This is one reason professionals test every outlet after installing it. A quick test can reveal reversed polarity, missing ground, or a faulty GFCI setup before the problem becomes serious.
FAQ
How are house plugs wired in the US vs. the UK?
In the US, outlets usually use black or red for hot, white for neutral, and green or bare copper for ground. In the UK, the typical color scheme is brown for life, blue for neutral, and green/yellow for earth. The function is similar, but the color standards are different.
Can I wire house plugs myself?
Some homeowners can handle simple replacements if they understand the basics, follow local code, and turn off power correctly. But because outlet wiring can be dangerous, many people choose a licensed electrician for safety and peace of mind. If anything seems unclear, it is better to call a pro.
What if my plug gets hot?
A hot outlet or plug often means trouble. It may indicate an overload, a loose connection, damaged wiring, or a failing receptacle. Unplug the device right away and stop using that outlet until it is checked.
How do I know if my outlet is grounded?
The most direct way is to test it with a proper outlet tester or have an electrician inspect it. A 3-prong outlet does not always mean true grounding is present, so testing matters.
What is the difference between GFCI and AFCI?
A GFCI protects people from shock by detecting ground faults. An AFCI protects against fire by detecting dangerous electrical arcs. They solve different problems, and many homes need both in the right places.
Why do some outlets trip more often than others?
Frequent tripping can happen if the circuit is overloaded, the appliance has a fault, moisture is present, or the outlet itself is failing. A tripped outlet should not be ignored, as it often warns that something is wrong.
What is the safest way to check an outlet?
Use a plug-in outlet tester or a voltage tester after power has been turned off and confirmed dead when doing physical work. If you are unsure, let a licensed electrician test it for you.
| Component | Color Code (US/UK) | Connection Point | Safety Role |
|---|---|---|---|
| Live/Hot | Black / Brown | Brass/gold terminal (right) | Carries power; fuse protects overloads |
| Neutral | White / Blue | Silver terminal (left) | Returns current; completes circuit safely |
| Ground/Earth | Green or bare / Green-Yellow | Green screw (top) | Diverts faults to prevent shocks |
| GFCI Outlet | N/A | Wet areas required | Trips on ground faults |
| Tamper-Resistant (TR) | N/A | All new installs | Blocks child access to slots |