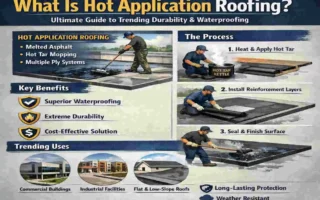
A leaking roof is more than just a minor inconvenience; it is a ticking time bomb for your property. When rainwater sneaks past your roof’s defenses, it can destroy your expensive wooden furniture, ruin your fresh paint job, and soak into your electrical wiring. Even worse, lingering moisture can quickly turn into toxic mould, posing serious health risks to your family and causing long-term structural issues that cost a fortune to repair.
When it’s pouring rain and you are caught off guard, you can’t just wait around while water damages your living space. You need immediate action. While you definitely need to call in the professionals for a permanent solution, mastering a quick DIY emergency roof repair can literally save your home from disaster. Learning how to temporarily fix leaking roof issues is an essential survival skill for any homeowner.
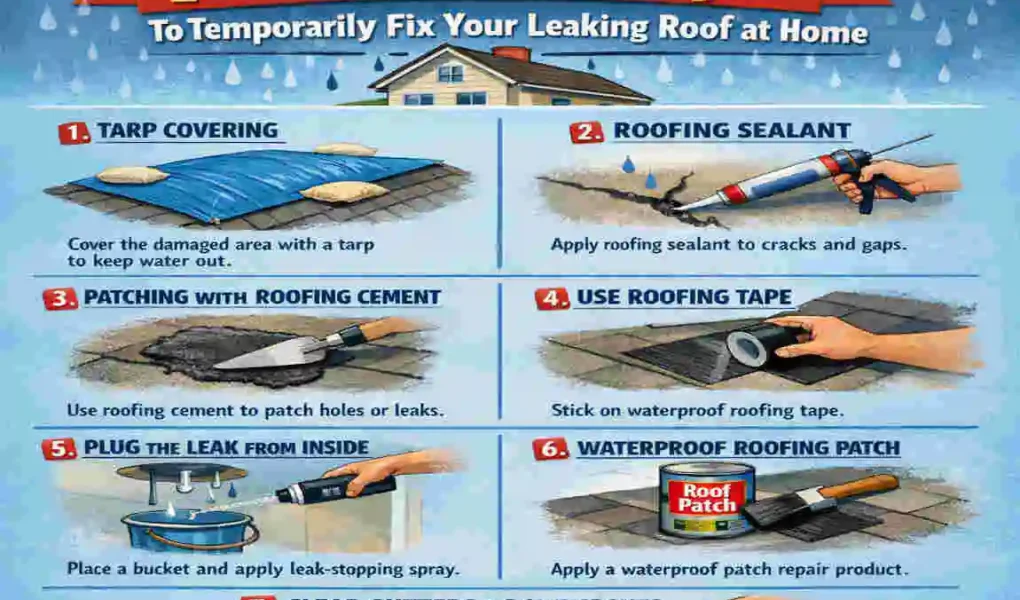
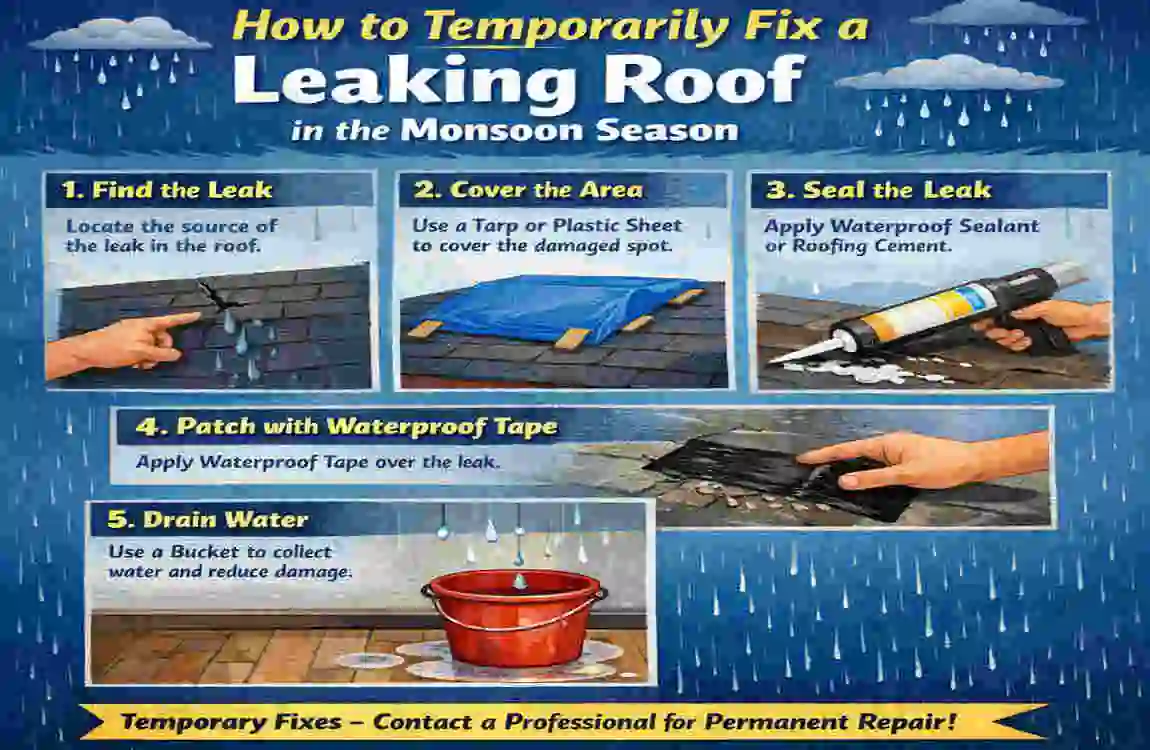
These quick, temporary fixes are designed to buy you valuable time. They act as a heavy-duty bandage, stopping the immediate water flow until the skies clear up and a professional waterproofing expert can arrive.
| Method | Materials Needed | Key Steps | Duration | Cost Estimate |
|---|---|---|---|---|
| Tarp Cover | Heavy-duty tarp, 2×4 boards, nails | Position over leak (extend 4ft beyond), secure with boards over ridge | 30-90 days | $30-100 |
| Roofing Cement | Cement tube, putty knife | Clean area, apply thick bead to cracks/shingles, smooth edges | 24hrs cure | $10-20 |
| Waterproof Tape | Roof repair tape | Dry surface, press tape over crack, overlap seams | Immediate | $15-25 |
| Sealant Spray | Aerosol can | From attic: Shake, spray underside liberally | Immediate | $10-15 |
| Replace Shingles | Cement, nails, hammer | Lift loose shingle, add cement/nails underneath, press down | 24hrs | $5-15 |
Common Causes of Roof Leaks
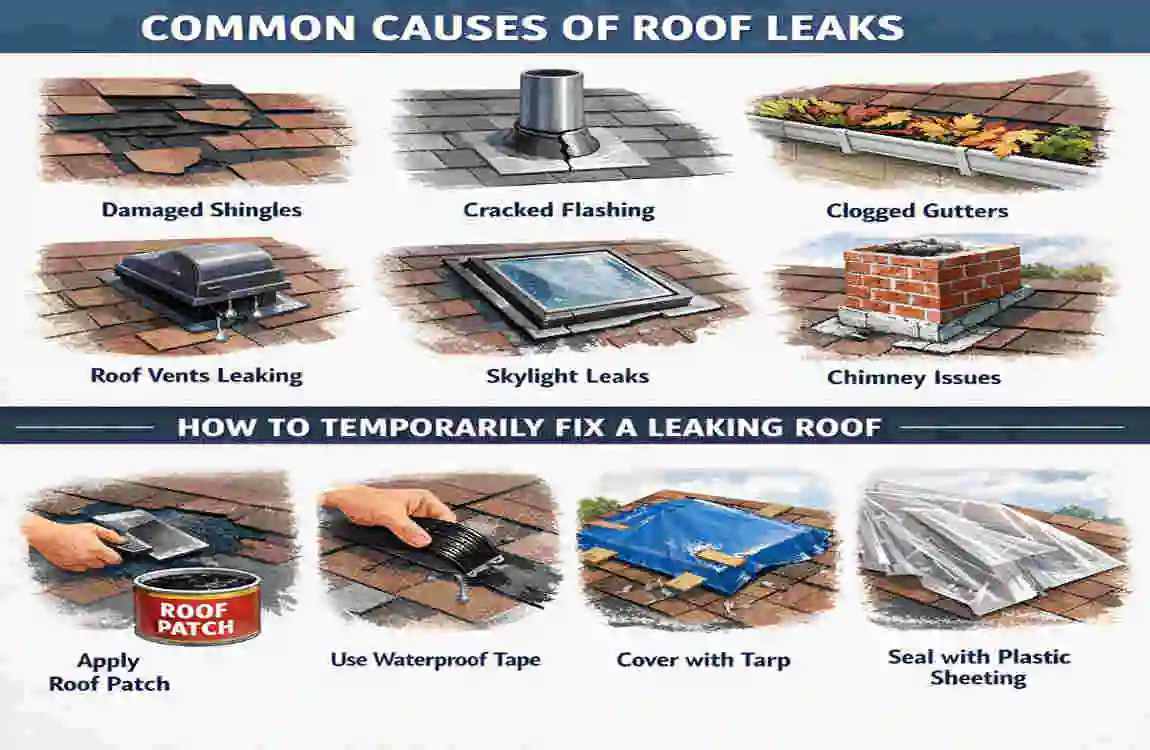
Before you grab your toolbox and rush up the ladder, it is important to understand why the water is getting inside in the first place. Roofs take a severe beating. They endure blistering summer heat, followed immediately by torrential monsoon downpours. This extreme weather fluctuation causes roofing materials to expand, contract, and eventually break down.
Here are the most common triggers for emergency roof leaks:
- Cracked or Missing Shingles: Heavy hail, violent windstorms, and relentless UV rays can cause your roofing materials to crack, curl, or blow away entirely, leaving the delicate under-layers exposed to the rain.
- Faulty Flashing Around Chimneys and Vents: Flashing is the thin metal material installed around roof joints, chimneys, and exhaust pipes to divert water. Over time, the sealant holding this metal in place dries out, cracks, and allows water to seep through.
- Clogged Valleys and Gutters: When leaves, dirt, and debris clog your gutters, the rainwater has nowhere to go. It pools up, backs up under your roof tiles, and easily seeps into your ceiling.
- Ageing Underlayment: The waterproof membrane beneath your main roofing material degrades over time. If your house is older, this protective barrier might simply be rotting away.
To help you diagnose the issue quickly, check out this handy comparison table. It highlights the specific warning signs for each cause and indicates the temporary risk level you are dealing with.
CauseWarning SignsTemporary Risk Level
Cracked Shingles Missing roof granules, visible dark water stains on your ceiling High (Needs immediate covering)
Poor Flashing Rust around exhaust pipes, dampness near the chimney Medium (Slow, continuous seepage)
Clogged Gutters Water overflowing the edges during heavy rain Low (Fixable from a sturdy ladder)
By identifying the root cause, you can choose the most effective emergency DIY roof leak fix to keep your home dry.
Safety First: Prep Before Any Fix
We cannot stress this enough: your safety is the number one priority. No piece of furniture is worth risking a severe injury or a fatal fall. Climbing onto a wet, slippery roof during an active storm is incredibly dangerous. As a professional standard, we strongly advise against attempting major repairs during lightning strikes or in heavy winds.
Before you even think about learning how to temporarily fix a leaking roof, you must prepare your workspace and safety gear. Always try to inspect the damage from the safety of the ground using binoculars, or investigate the leak from inside your attic first. Avoid solo climbs at all costs; always have a family member or neighbor foot the ladder and keep an eye on you.
Your Essential Safety Checklist
- Wait for a Break in the Weather: Never climb onto a wet roof during a downpour. Wait for the rain to slow down or stop completely. Wet tiles and concrete are as slippery as ice.
- Wear the Right Gear (PPE): Put on thick, non-slip rubber-soled shoes. Wear heavy-duty work gloves to protect your hands from sharp metal, and wear safety goggles to keep dirt and debris out of your eyes.
- Inspect Your Ladder: Ensure your ladder is placed on firm, level ground. Use the 4-to-1 rule: for every 4 feet of ladder height, the base should be 1 foot away from the wall.
- Use the Buddy System: Have someone stand at the base of the ladder holding it steady. Keep your mobile phone in your pocket in case you need to call for help.
- Map Your Route: Plan exactly where you will step. Walk slowly, keep your center of gravity low, and never step on weak or spongy-feeling spots on the roof.
Once you have safely identified the source of the leak and put on your safety gear, you are ready to apply a temporary fix.
Tarp the Damage
When a severe monsoon storm rips off a large section of your roofing, or a fallen tree branch creates a massive gap, a simple patch will not cut it. You need a large-scale barrier. Tarping the damage is the most reliable, widely used emergency cover in the world.
A heavy-duty waterproof tarp acts like a massive raincoat for your house. It is the absolute best way to prevent up to 90% of further water intrusion until the professionals arrive. Here is how you execute the tarp roof patch method flawlessly.
Step-by-Step Tarping Process
- Measure and Size the Tarp: Do not just guess the size. You need a heavy-duty woven plastic tarp that extends at least 4 feet beyond the leak on all sides. If the damaged area is 3 feet wide, your tarp needs to be at least 11 feet wide to provide safe coverage.
- Roll it Over the Ridge: This is the most critical step. Never stop the tarp in the middle of a downward slope, or water will just run right underneath its top edge. You must pull the top edge of the tarp completely over the highest peak (the ridge) of your roof so that rainwater naturally sheds down and away from the leak.
- Secure with Wooden Planks (2x4s): You cannot just place bricks on the corners and hope for the best. High winds will catch the tarp like a parachute and rip it away. Use thick wooden planks (2x4s) and wrap the edges of the tarp around them.
- Nail It Down: Use long, rust-proof roofing nails to screw or nail the wrapped wooden planks directly into the roof’s solid structure. Secure the top over the ridge, and weigh down the side and bottom edges firmly to create a tight, wind-resistant seal.
Pros and Cons of Tarping
Pros of the Tarp MethodCons of the Tarp Method
Covers large, disastrous areas easily Requires climbing onto the roof
Highly visible to roofing contractors Aesthetically unpleasing
Excellent protection against heavy rain Requires tools like hammers and wood
A Quick Storm Example: Last July, a massive windstorm hit the DHA phase areas tearing shingles off dozens of older homes. Families who successfully wrapped and nailed tarps over their roof ridges saved their living rooms from flooding. In contrast, those who just threw plastic sheets on the roof watched them blow away in minutes. Tarping works, but only if you secure it tightly!
Roofing Cement Sealant
If your leak is caused by small cracks, tiny holes, or a slightly lifted shingle, a massive tarp might be overkill. Instead, you can use roofing cement sealant—also known as roofing mastic or tar.
Think of roofing cement as a thick, heavy-duty, weatherproof glue. It is designed specifically to fill gaps and bond roofing materials, creating a watertight seal that withstands heavy rain and scorching sun alike. It is incredibly effective for patching up minor localized damage.
Tools You Will Need
- A standard caulking gun (if buying tubes) or a small trowel.
- A metal putty knife to smooth the cement.
- A wire brush or rag to clean the surface.
- A tub or tube of high-quality roofing cement.
Step-by-Step Application Process
Clean the Area Thoroughly Roofing cement will not stick to a wet, dirty, or algae-covered surface. Use your wire brush to scrub away any loose granules, dirt, and debris from the cracked area. Wipe it completely dry with an old rag.
Apply a Thick Bead of Cement If you are using a caulking gun, place the nozzle directly into the crack or hole. Squeeze the trigger slowly and apply a thick, continuous bead of sealant inside the gap. If you are using a tub, scoop a generous amount onto your putty knife and press it deep into the hole.
Smooth and Feather the Edges You do not want a giant, lumpy mound of tar on your roof, as this can trap water behind it. Use your putty knife to spread the cement out flat. “Feather” the edges by pressing down firmly so the patch blends smoothly into the surrounding roof surface. Water should glide right over it.
Allow Proper Drying Time Most standard roofing cements require at least 24 hours to cure and dry completely. Keep this in mind! If a massive rainstorm is hitting in 30 minutes, the wet cement might wash away. However, “wet-patch” roofing cements are available at local hardware stores and are specifically designed to be applied during active rain—ask for this if it is an emergency!
Waterproof Tape Patch
Sometimes, you need a fix that requires zero messy glues, zero heavy woods, and zero drying time. Enter waterproof tape patches.
Also known as butyl tape or peel-and-stick flashing tape, this miraculous invention is a homeowner’s best friend. It features an incredibly strong adhesive backing and a flexible, rubberised exterior. It is perfect for covering thin cracks on flat surfaces, sealing up tears in your underlayment, or patching small leaks around metal flashing.
Why Waterproof Tape is Highly Recommended
This method is incredibly fast. If you leak easily accessible from an attic window or a flat roof section, you can apply this tape in less than five minutes. It is also highly versatile and sticks to almost any material: wood, metal, plastic, and concrete.
How to Apply the Peel-and-Stick Patch
- Dry the Surface Completely: This is the golden rule of waterproof tape. Unlike some specialized cements, tape will never stick to a wet surface. You must take a towel and dry the area around the crack perfectly.
- Cut the Tape to Size: Measure the crack and cut a piece of tape that extends at least two inches past the damage on all sides.
- Peel and Press Firmly: Remove the plastic backing. Place the sticky side down directly over the crack. Now, using the palm of your hand or a small wooden roller, press down extremely firmly. You need to push out any trapped air bubbles to ensure the adhesive bonds with the roof texture.
- Overlap Your Seams: If the crack is very long and requires two pieces of tape, always overlap the seams like roof shingles. Place the lower piece of tape first, then place the higher piece overlapping it. This ensures water runs over the seam, rather than under it.
Sealant Spray from Inside
What do you do when a violent thunderstorm is actively raging outside? The roof is a slippery deathtrap, lightning is flashing, and going outside is absolutely out of the question. But water is still dripping onto your bed.
This is where the inside-out sealant spray method shines. It is the ultimate attic-friendly emergency roof repair because it requires absolutely zero roof climbing. You can stop the leak from the safety and dry comfort of your own attic.
Finding the Leak in the Dark
The hardest part of this method is finding the actual hole. Water is sneaky. It might enter your roof at one spot, run down a wooden rafter for 10 feet, and then drip onto your ceiling.
Grab a bright flashlight and head up to your attic. Do not look directly above the wet spot in your bedroom. Instead, look slightly higher up the roof slope. Follow the dark, damp water trail along the wood until you find the exact entry point where the water is pushing through the plywood or concrete slab.
Using the Rubberized Spray
Once you locate the entry hole or crack:
- Wipe the Area: Use a rag to wipe away the dripping water. Get the surface as dry as possible (though it will be tough during active rain).
- Shake the Can Vigorously: Rubberised sealant sprays (like Flex Seal) need to be well mixed. Shake the can for a full 60 seconds.
- Spray Liberally on the Underside: Hold the can about 8 to 12 inches away from the hole. Spray a thick, even coat directly onto the leaking crack.
- Wait and Recoat: Wait a few minutes for the first layer to dry, then apply a second, thick coat.
Important Limitations: We must be completely honest with you—this is a very temporary band-aid. Spraying from the inside means the water is still entering the outer layers of your roof and pooling up against your patch. It is not designed to hold back heavy, pooling water for long periods. Still, it will absolutely stop a slow, steady drip overnight so you can sleep in peace.
Replace Loose Shingles
If you have a traditional shingled roof and you notice that one specific piece has curled up, come loose, or been slightly dislodged by the wind, the fix is straightforward. You don’t need a massive tarp for one rogue shingle. You simply need to put it back in its place and secure it tightly.
A loose shingle is an open door for rainwater. The wind lifts the flap, the rain blows underneath, and suddenly your ceiling is ruined. Here is how to permanently lock that door with basic hand tools.
Tools for the Job
- A flat pry bar (or the back of a hammer).
- A small tub of roofing cement.
- A putty knife.
- Galvanized roofing nails and a hammer.
The Repair Process
Lift the Edges Gently: In the harsh heat, older shingles become very brittle and can snap in half if you bend them too far. Wait for a relatively warm (but not blazing hot) part of the day so the material is slightly flexible. Gently use your pry bar to lift the loose shingle and the shingle directly above it.
Add the Cement Barrier: Take your putty knife and scoop up a dollop of roofing cement. Smear a generous layer of cement directly underneath the loose shingle, covering the spot where it should normally stick to the roof.
Nail it Down Securely: Press the shingle down firmly into the wet cement. Next, lift the shingle above it slightly and drive two galvanised roofing nails through the top edge of your loose shingle to lock it down.
Seal the Nail Heads: Never leave shiny metal nail heads exposed to the rain, as they will quickly rust and create new micro-leaks. Take a tiny dab of roofing cement and smear it directly over the heads of the nails you just hammered in.
Before the fix, the shingle looks like a curled leaf, creating a dark, open gap. After the fix, it should lay completely flat against the roof, blending in seamlessly, with tiny black dots of cement covering the newly installed nails.
Caulk Around Penetrations
Did you know that the vast majority of roof leaks do not actually happen in the middle of a flat roof? They happen at the edges and penetrations. Any time a pipe, air vent, AC duct, or chimney cuts through your roof, it creates a massive vulnerability.
These “penetrations” are sealed with a combination of metal flashing and thick caulk. Over years of baking in the sun, that caulk dries up, turns brittle, and cracks. Water easily slips through these tiny hairline fractures and runs straight down your pipes into your house.
Targeting the Vents and Pipes
If you notice a water stain on your ceiling directly beneath a bathroom exhaust fan or a chimney, old caulk is likely the culprit. This is one of the easiest emergency roof repairs you can do.
- Remove the Old, Dead Caulk: You cannot put new caulk over old, crumbling caulk. It simply will not bond. Use a sharp utility knife or a scraper tool to aggressively remove the old, hardened sealant from around the base of the pipe or vent. Brush away the dust.
- Choose the Right Formula: Do not use cheap, indoor bathroom caulk for your roof. You must purchase a 100% waterproof, exterior-grade silicone caulk or a specialized polyurethane roof sealant. These formulas are designed to remain flexible in extreme temperatures without cracking.
- Apply the Silicone: Load your caulking gun. Cut the tube tip at a 45-degree angle. Slowly drag the gun around the entire base of the pipe, squeezing a thick, continuous line of silicone directly into the joint where the metal pipe meets the roof.
- Smooth the Bead: Wet your finger slightly and run it along the fresh caulk line to push the sealant deep into the crack and create a smooth, angled surface that repels water.
Plywood Patch for Holes
We have saved the most intensive temporary fix for last. Sometimes, a severe disaster strikes. A heavy tree branch snaps in the wind and punctures a physical hole straight through your roof decking. This isn’t a crack; it is a gaping wound in your house.
A tarp alone might sag into a massive hole and collect a heavy puddle of water, eventually collapsing. You need structural support. You need a plywood patch.
Creating the Wooden Barrier
- Clear the Debris: Safely remove the tree branch or debris from the hole. Use a saw to trim away the jagged, splintered edges of the broken roof decking to create a relatively clean, square opening.
- Cut the Plywood: Measure the new, cleaned-up hole. Cut a piece of thick, sturdy plywood the same size as the hole, so it fits like a puzzle piece. Alternatively, if working from the attic, cut a piece slightly larger than the hole.
- Secure the Patch: Screw the plywood piece directly into the sturdy wooden rafters surrounding the hole. Ensure it is incredibly tight and does not wobble.
- Seal the Edges: The wood alone is not waterproof. Take your roofing cement and heavily coat the seams where your new plywood patch meets the old roof.
- Tarp Over the Top: Finally, treat this repaired area exactly like Method 1. Place a heavy-duty tarp over the entire patched section and secure it with nails.
This multi-layered defence system provides significant protection against falling rain and wind until a contractor can permanently rebuild the roof structure.
Tools and Materials Checklist
If you live in a rainy area, you should never wait for a leak to occur before buying your supplies. Create an emergency “Roof Repair Kit” and keep it in your garage or storage room. When the monsoon hits, you will be calm, prepared, and ready to act.
Here is your numbered shopping list. You can find all of these materials easily at local hardware stores in areas like Shahdara, Township, or along Ferozepur Road.
- Heavy-Duty Woven Plastic Tarp (At least 12×12 feet)
- Roofing Cement / Mastic (1-gallon tub or multiple caulk tubes)
- Waterproof Butyl Tape (Peel-and-stick roofing roll)
- Exterior-Grade Silicone Caulk (With caulking gun)
- Galvanized Roofing Nails (Rust-proof, 2-inch)
- Thick Wooden Planks (2x4s for tarping)
- Basic Tools: Claw hammer, flat pry bar, putty knife, utility knife.
Budget Table Markets (Estimated PKR)
Essential ItemEstimated Price (PKR)Where to Find
Large Heavy-Duty Tarp 2,000 – 4,500 General Hardware/Tent Shops
Roofing Cement (Tub) 1,500 – 3,000 Specialized Paint/Hardware Stores
Waterproof Butyl Tape 1,000 – 2,500 Sanitary/Plumbing Shops
Silicone Caulk & Gun 800 – 1,500 General Hardware Stores
Safety Goggles & Gloves 500 – 1,000 Local Markets
By spending just a few thousand rupees upfront, you can save hundreds of thousands of rupees in interior water damage.
When to Call Professionals
While mastering how to temporarily fix leaking roofs is incredibly empowering, you must recognise your limits. A temporary patch is exactly that—temporary. It is a band-aid designed to last a few days or weeks, not years.
You must abandon the DIY route and call in professional roofing and waterproofing contractors immediately if you notice any of these severe red flags:
- Structural Sagging: If your ceiling is visibly bowing downwards or the roof decking feels spongy under your feet, the wood is completely rotten. A collapse could happen at any moment.
- Electrical Risks: If water is leaking anywhere near your ceiling fans, light fixtures, or electrical breaker boxes, step away immediately. Water and electricity are a deadly combination. Turn off your main power switch and call for help.
- Massive Damage: If more than a quarter of your roof has been damaged by a storm, no amount of tarping will save it.
If you are facing these issues, do not wait. Promote your home’s health with our expert waterproofing services. Our team of highly trained technicians knows exactly how to handle complex roof repairs, severe water damage, and structural assessments to ensure your family remains safe and dry.
Prevention Tips for Monsoon Season
As the old saying goes, an ounce of prevention is worth a pound of cure. You will never have to worry about emergency roof repairs in the middle of a thunderstorm if you maintain your roof properly during the sunny, dry months.
Here is how you can proactively protect your home before the heavy rains arrive:
- Clean Your Gutters Twice Yearly: Grab a ladder and scoop out the leaves, dirt, and bird nests from your roof gutters. Ensure your downspouts are completely clear so water can flow away from your house rapidly.
- Schedule Annual Inspections: Have a professional roofer walk your property once a year. They can spot a tiny hairline crack or a rusting vent pipe long before it turns into a ceiling leak.