It is a quiet, rainy Friday evening. You are sitting on your living room couch with a good book, enjoying the soothing sound of the rain outside. Suddenly, you hear a rhythmic drip, drip, drip coming from the corner of the room. You look up and see a dreaded, spreading brown water stain on your beautiful white ceiling. Panic sets in.
If this scenario sounds familiar, you are certainly not alone. Water finding its way into your house is a homeowner’s worst nightmare. However, before you start worrying about draining your savings account to pay for a massive construction project, take a deep breath. Learning how to tackle a roof leakage repair at home can save the day.
Taking immediate action when you spot a leak is incredibly important. A quick step‑by‑step response prevents massive structural damage, stops hazardous mold in its tracks, and helps you avoid incredibly expensive professional repair bills.
Why Roof Leakage Repair at Home Is Important
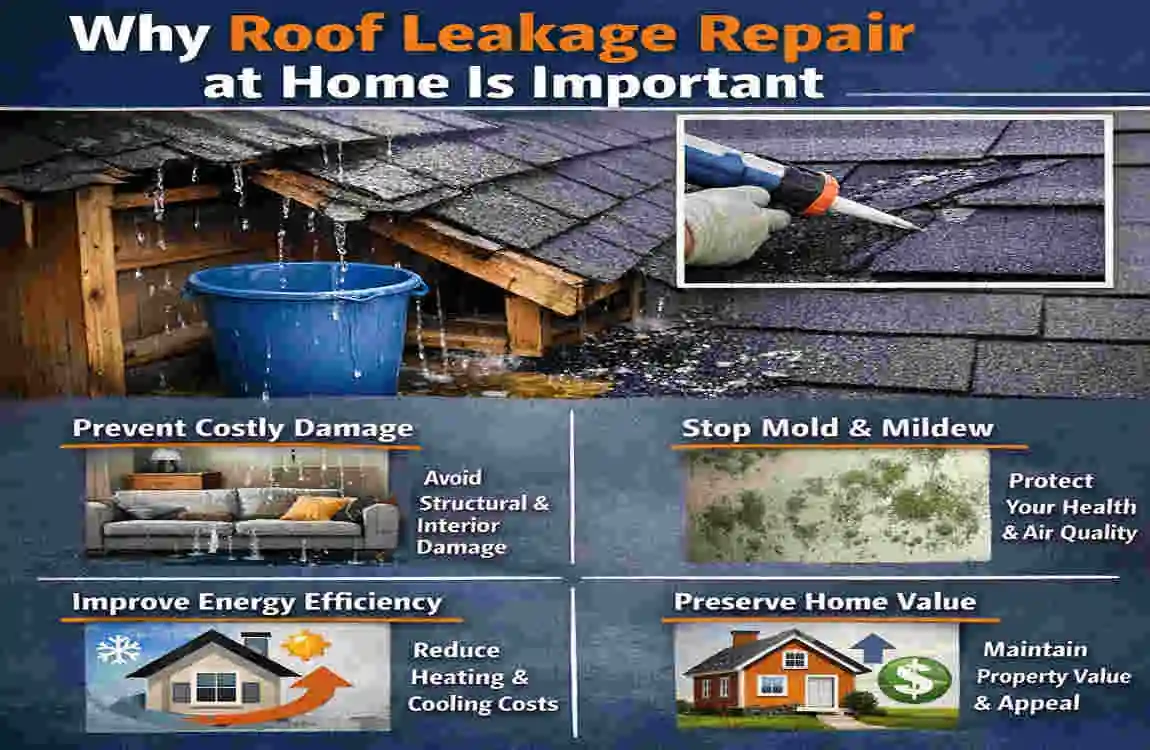
You might be tempted to put a bucket under that ceiling drip and ignore it until the rainy season passes. Please, do not do this! Ignoring a compromised roof is one of the most costly mistakes a homeowner can make.
When water enters your home, it rarely stays in one place. It travels along the rafters, soaking into your wooden beams, saturating your attic insulation, and seeping into your drywall. Even worse, water can easily enter your electrical systems, creating a massive fire hazard.
Furthermore, damp, dark spaces are ideal breeding grounds for mold and mildew. Within just 48 hours of a leak, mold spores can start multiplying in your walls and attic. This is not just a structural problem; it is a serious health hazard for you and your family, especially for anyone suffering from asthma or allergies.
The Cost Factor
Let’s talk about your wallet. A simple DIY roof leakage repair might only cost you the price of a tube of roofing sealant and a few replacement shingles—usually under fifty dollars.
On the other hand, if you let that small leak fester for months, the trapped moisture will rot your roof deck. What could have been a cheap weekend project suddenly morphs into a massive professional repair job, or even a full roof replacement, costing thousands of dollars.
The Long-Term Benefits
Taking the time to perform a home roof leak repair the moment you notice a problem is the ultimate form of home maintenance. Early intervention stops water damage dead in its tracks. It extends the overall lifespan of your roofing materials and protects your home’s resale value.
The good news? You do not need a contractor’s license to fix a simple problem. As long as you act quickly and prioritize safety, many minor leaks can be fully repaired at home by anyone willing to climb a ladder and follow instructions.
Common Causes of Roof Leaks
Before you grab your tools for a roof leakage repair at home, you need to understand exactly what you are fighting against. Knowing the root cause of a problem helps you decide if you can patch it yourself or if it is time to call in the cavalry. Here are the most common culprits.
Damaged or Missing Shingles
Your shingles take a beating from the sun, wind, and rain all year long. Over time, extreme weather can cause asphalt shingles to crack, curl at the edges, or blow off entirely during a heavy storm. When a shingle is missing, the protective underlayment is exposed to the elements, inevitably leading to a leak.
Flashing Issues Around Chimneys, Vents, and Skylights
Flashing refers to the thin pieces of metal installed around roof transitions—like where your chimney meets the shingles, or around a skylight. Because these are joints, they are highly vulnerable to water intrusion. Loose, cracked, or severely rusted metal flashing is actually one of the leading causes of residential water damage.
Clogged or Damaged Gutters
Your gutters have one job: to move rainwater away from your house. But if your gutters are overflowing with wet autumn leaves, pine needles, and dirt, the water has nowhere to go. It will eventually back up under the bottom edge of your roofline, soaking into the wood fascia and creeping under your shingles.
Roof Valleys and Seams
A roof valley is the V-shaped channel where two different downward-sloping sections of your roof meet. Because valleys channel a high volume of rainwater during a storm, the sealing in this area must be flawless. Poor initial sealing or wear-and-tear in a valley almost always guarantees water will seep through the seams.
Pipe Boots and Roof Penetrations
Take a look at your roof, and you will likely see a few plastic or metal pipes sticking out. These are plumbing vents and gas vents. The base of these pipes is protected by a rubber or metal seal known as a pipe boot. Over years of baking in the hot sun, rubber pipe boots can crack, dry rot, and eventually fail, allowing water to slide right down the side of the pipe and into your attic.
Age and Wear of the Roofing Material
Sometimes, there is no specific storm damage to blame. Roofing materials have an expiration date. Old asphalt shingles eventually lose their protective granules. They become brittle, lose their flexibility, and fail to expand and contract with temperature changes. Once materials reach this advanced stage of aging, minor leaks will start popping up everywhere.
Understanding these causes is the first major step in your home roof leakage repair journey. Now, let’s determine if it is safe for you to fix it.
When You Can Safely Do Roof Leakage Repair at Home
We love a good DIY project, but roofing is not something you should take lightly. It is vital to draw a very clear line in the sand between a roof leakage repair at home that you can handle yourself and a situation that requires a professional team.
DIY-Safe Situations
You can tackle a repair yourself if the problem is localized and minor. Here are some green lights for DIYers:
- You need to replace one or two cracked or missing asphalt shingles.
- You need to apply some fresh roofing cement to a small area of lifted metal flashing.
- You need to slide a new rubber pipe boot over an existing plumbing vent.
- You are simply cleaning out clogged gutters or sealing a tiny puncture hole.
If your problem fits into these categories, and your roof has a gentle, walkable slope, you are likely good to go!
When to Call a Professional
However, you must call a professional immediately if you encounter any of the following red flags:
- The water damage covers a massive area (more than a few feet wide).
- You notice the actual roof deck is visibly sagging or dipping inward.
- Multiple distinct leaks are happening in different rooms simultaneously.
- Your home has a very steep pitch, is multiple stories high, or requires specialized safety rigging to access.
A Crucial Safety Warning
Please remember that no amount of money saved is worth a trip to the emergency room. Always use extreme caution when dealing with ladders. Never climb onto a roof if the surface is wet, icy, or covered in slippery moss. Always be hyper-aware of where your overhead electrical power lines are located. If you feel dizzy, nervous, or unsteady, climb down immediately. Knowing when to call a professional is the smartest tool in your toolbox.
Tools and Materials You Need for DIY Roof Leakage Repair
Before you climb up that ladder, you need to make sure you have everything required to finish the job. There is nothing worse than being stuck on a hot roof and realizing you forgot your hammer in the garage!
Here is a handy checklist of materials for home roof leakage repair. We have organized it into a simple table so you can easily reference it before heading to the hardware store.
ItemCategoryPurpose
Extension Ladder Basic Tool: Safely accessing the edge of your roof.
Pry Bar / Flat Bar Basic Tool: Carefully lifting old shingles and removing stubborn nails.
Claw Hammer Basic Tool Driving in new roofing nails.
Utility Knife (with hook blades) Basic Tool Cutting thick asphalt shingles down to size safely.
Caulk Gun Basic Tool: Applying precise beads of sealant or liquid rubber.
Safety Gear Protection: Work gloves, safety goggles, and rubber-soled, non-slip shoes.
Asphalt Shingles Material: Matching your current roof to replace damaged sections.
Roofing Nails Material: Securing new shingles (usually 1.25-inch galvanized steel).
Roofing Cement / Tar Material Sealing cracks, edges, and flashing overlaps.
Flashing Strips Material Replacing rusted metal joints around chimneys.
Rubber Pipe Boots Material: Replacing dry-rotted seals around plumbing vents.
Optional But Highly Helpful Items
Depending on the scope of your roof leakage repair at home, you might also want to bring up a chalk line to ensure your new shingles are perfectly straight. If your wooden roof decking underneath the shingles has begun to rot, you will need a circular saw and some spare exterior-grade plywood to patch the structural hole. Finally, keep some metal screws handy if you are working specifically with metal flashing panels.
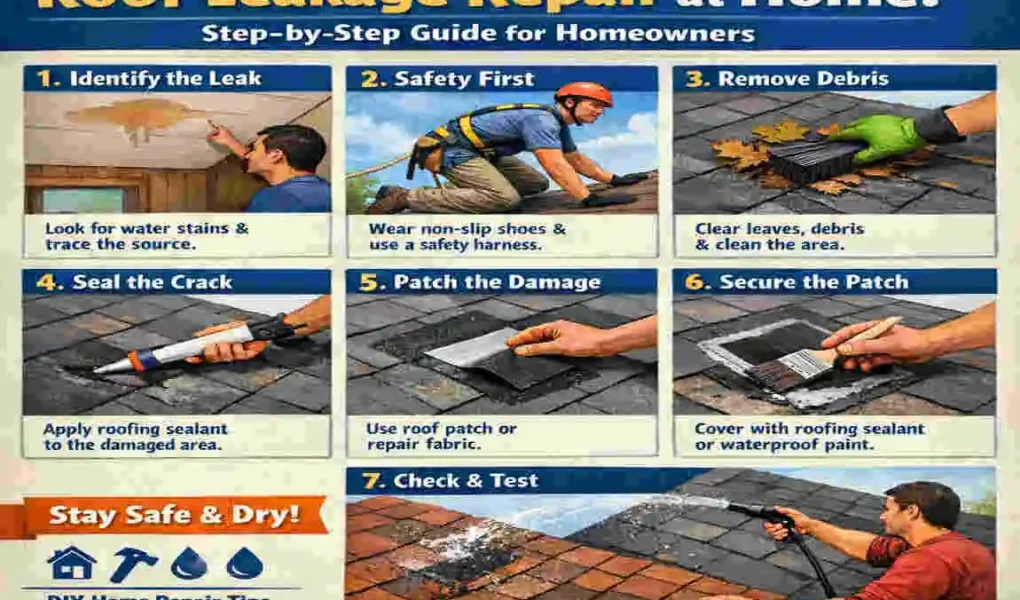
Inspect and Locate the Leak
Now that you are geared up, it is time to play detective. The phrase “roof leakage repair at home step 1: inspect and locate the leak ” is crucial because water is incredibly sneaky. The brown stain on your living room ceiling is rarely directly under the hole in the roof. Water enters, hits a rafter or a piece of plastic underlayment, travels downhill for several feet, and then drops onto your ceiling.
Look Inside First
Start your investigation inside the living space. Grab a flashlight and examine the water stains on the ceiling or the drywall. Use a tape measure to estimate how far the stain is from two different exterior walls. This will give you a general coordinate to work with when you move higher up.
Check Inside the Attic
Next, head up into your dark attic during the daytime. Turn off your flashlight for a moment and look up at the roof decking. Do you see any natural sunlight peeking through a crack? If so, you found a hole.
If it is dark, turn your flashlight back on and search the wooden rafters directly above your living room stain. Look for black mold, dark water trails, or soggy pink fiberglass insulation. Follow these wet trails upward along the wood until you find the highest point of moisture. That highest point is exactly where the water is penetrating the roof.
Inspect the Exterior Roof
Once you know the general location from the inside, carefully climb your ladder to the outside. Look specifically at the area you identified. Are there any obviously missing shingles? Is there a plumbing vent nearby with a cracked rubber boot? Are there thick piles of wet debris trapped in a roof valley?
Simulate Rain (If Safe)
If you have inspected the exterior and still cannot find the exact hole, you should run a wet test. Have a helper stand inside the attic with a flashlight. Take a garden hose up to the roof and gently run water over the suspected area, starting low and slowly moving higher. Tell your helper to shout the moment they see water dripping inside. Once they shout, you have officially found your target!
Clear and Prepare the Damaged Area
You have located the enemy. Now is the time to prepare for roof leakage repair at home. You cannot just slap new materials over wet, rotting debris. You have to create a clean, dry canvas for your repair actually to stick and hold long-term.
Safety First, Always
Before you start tearing things apart, double-check your safety setup. Ensure your ladder is on firm, level ground and extends at least three feet above the roof edge. If your roof is moderately steep, put on a safety harness and fall-protection gear. Ensure the weather is totally dry—never attempt to pull up shingles on a windy or rainy afternoon.
Remove debris and Old Materials
Put on your heavy-duty work gloves. Start by brushing away any loose pine needles, wet leaves, or branches from the repair zone.
If you are dealing with a damaged shingle, you cannot just rip it out violently. Shingles overlap each other. Take your flat pry bar and gently slide it under the shingle sitting directly above the damaged one. Carefully lift it just enough to expose the nails holding the damaged shingle in place. Use the notch in your pry bar to pop those nails out.
Expose the Leak Point
Slide the damaged shingle or rusted piece of flashing completely out. You should now be looking at the black roofing felt (underlayment) or the bare wooden roof deck. Wipe away any old, crusty roofing cement or dirt with a stiff wire brush. You want the bare surface underneath to be as clean, flat, and dry as possible so your new materials will adhere perfectly.
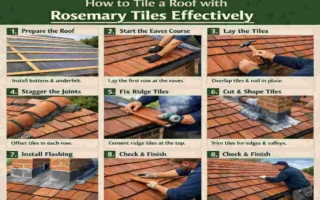
Choose the Right Repair Method for Your Roof Type
Not all roofs are created equal. A technique that works perfectly for modern asphalt will completely ruin a flat rubber roof. You must tailor your roof leakage repair at home to shingle roofs, tile roofs, or flat roofs.
Asphalt Shingle Roofs
This is the most common residential roof type.
- For tiny, hairline cracks: You might not even need to replace the shingle. You can lift the cracked edges, apply a thick bead of roofing cement underneath, press the crack together, and seal the top.
- For large cracks or missing pieces: You will need to physically cut out the broken tabs and install a brand new shingle patch.
Tile or Metal Roofs
Clay tiles and corrugated metal panels require a gentle touch.
- For minor tile issues: If a clay or concrete tile is just loose or slightly cracked, you can carefully lift it, apply a specialized exterior-grade masonry sealant, and reset the tile.
- For metal roofs, leaks usually occur at the screws. Back out the old rusted screw, apply a dab of urethane roofing sealant, and drive in a slightly larger metal roofing screw featuring a fresh rubber washer.
Flat or Low-Slope Roofs
Water pools heavily on flat roofs, so your seal must be absolutely watertight.
- For punctures and tears: You cannot use standard shingles. You must patch the area using a specialized self-adhesive roofing membrane or a thick coat of liquid rubber sealant, ensuring all seams and edges are completely covered.
Flashing and Roof Penetrations
If the leak is around a chimney or vent, the roofing material itself might be fine. You will need to focus on cleaning the metal joint, applying generous amounts of roofing cement, and either reinstalling the current flashing tightly or cutting a brand new metal piece to fit.
Performing the Roof Leakage Repair at Home
This is the main event. Here are step-by-step mini-guides for performing your roof leakage repair at home, depending on the exact problem you are facing. Remember to take your time and follow each step carefully.
Option A: Patching a Small Shingle Crack or Hole
If a falling branch poked a small hole in a single shingle, you can do a quick patch job.
- Lift and Clean: Use your pry bar to lift the damaged shingle gently. Clean any dirt from underneath it.
- Apply Cement: Load a tube of asphalt roofing cement into your caulk gun. Squeeze a thick, generous blob of cement directly into the hole or under the crack.
- Press and Seal: Press the shingle down firmly so the cement spreads out underneath and grips the underlayment.
- Top Coat: Apply another thin layer of roofing cement over the top of the crack to completely seal it from the rain.
- Pro Tip: Take a handful of loose gravel granules from your gutter and sprinkle them over the wet, black cement. This will hide the ugly black scar and protect the wet cement from harsh UV rays!
Option B: Replacing a Damaged or Missing Shingle
If the shingle is severely curled or half of it is missing, replacement is your only option.
- Break the Seal: Gently slide your flat bar under the row of shingles immediately above the broken one to break the factory adhesive seal.
- Remove Nails: Lift that top row slightly to expose the hidden nails holding your broken shingle in place. Pry those nails out and slide the broken shingle away.
- Insert the New Shingle: Take your fresh, matching shingle and slide it up beneath the top row until it aligns perfectly with the shingles beside it.
- Nail It Down: Drive 1.25-inch galvanized roofing nails into the appropriate nail line on the new shingle. Make sure the nail heads sit flush—do not overdrive them and tear the mat!
- Seal the Edges: Place a dab of roofing cement under the bottom corners of the new shingle so it bonds to the roof and won’t lift in the wind.
Option C: Resealing Damaged Flashing or Pipe Boots
If water is trickling down your plumbing vent, the rubber boot is likely compromised.
- Remove the Old Boot: Carefully pry up the shingles covering the base of the old plastic or rubber pipe boot. Remove the nails and pull the old boot up and over the vent pipe.
- Clean the Pipe: Wipe down the PVC pipe to remove dirt.
- Slide the New Boot: Slide the brand new rubber pipe boot down the pipe.
- Secure and Cement: Nail the base of the new boot into the roof deck. Apply a heavy layer of roofing cement around all the edges of the base.
- Replace Shingles: Reinstall the shingles over the top and sides of the boot’s base to ensure water flows over it, not under it.
Option D: Patching Small Holes in Flat Roofs
Flat roofs require a bit of extra stickiness.
- Clean the Surface: Sweep the area completely clean. Any dust will ruin the patch.
- Apply Primer: If you are using a peel-and-stick membrane, brush on an asphalt primer and let it get tacky.
- Place the Patch: Cut a piece of membrane at least two inches larger than the hole on all sides. Peel the backing and press it down flat, smoothing out any air bubbles.
- Seal the Edges: Brush a thick layer of liquid rubber or roofing cement along the edges of the patch to permanently seal it.
Completing this roof leakage repair at home manually is incredibly rewarding, but you still have to protect your hard work!
Seal and Protect the Repaired Area
Fixing the hole is only half the battle. If you do not properly seal your work, the very next rainstorm will find its way right back into your living room. The focus here is on how to seal roof leaks at home to ensure long-term durability.
Seal All Edges and Joints
Your best friend in this phase is your caulk gun loaded with Premium roofing cement or exterior-grade silicone sealant. Go back over your repair site. Did you install new flashing? Run a continuous, unbroken bead of sealant along the metal edges where it meets the wood or brick. Did you replace a pipe boot? Smear an extra collar of sealant right where the rubber neck meets the plastic pipe. You want to create a waterproof barrier that leaves absolutely no gaps for moisture to seep through.
Reinstall Surrounding Shingles Correctly
If you had to pull up surrounding healthy shingles to access a leak, you need to lay them back down perfectly. Maintain the proper overlapping pattern (much like fish scales) so water naturally cascades downward. If you nail a top shingle to a bottom shingle by accident, you will create a pocket that instantly traps water. Ensure every overlapping tab is secured with a small dab of roofing adhesive beneath it so the wind cannot lift it.
Add an Extra Layer (If Needed)
If you are protecting your roof from leakage repair at home on a flat or low-slope structure, consider going the extra mile. Once your patch has fully dried, roll a top coat of reflective, waterproof elastomeric roof coating over the entire repaired section. This extra rubberized layer acts as a shield against both standing water and the degrading effects of direct sunlight.
Test and Confirm the Leak Is Fixed
You packed up your tools, washed the tar off your hands, and breathed a sigh of relief. But wait—how do you actually know your roof-leakage repair at home was successful? You cannot just hope for the best; you need to verify it.
Dry Test (Visual Inspection)
Before you put the ladder away, do a final, close-up visual check. Look closely at the replacement shingles. Are they lying perfectly flat? Check your nailing patterns. Are any nail heads exposed to the open air without a dab of sealant covering them? Check the metal flashing. Is it pressed tightly against the chimney without bowing outward? If everything looks tight, secure, and well-caulked, you are ready for the wet test.
Wet Test (Safe Simulation)
This is how to confirm roof leakage repair at home before a real storm hits. Grab your garden hose and have your helper head back up into the dark attic with their flashlight. Stand on the ground or safely on your ladder and spray a continuous, gentle shower of water directly over the newly repaired area. Keep spraying for about five to ten minutes. If your helper in the attic does not see a single drop of water coming through the decking, congratulations! You have successfully sealed the leak.
Monitor After Natural Rain
Even if you pass the hose test, nature is unpredictable. Heavy, wind-driven rain acts differently than a garden hose. Make it a point to pop your head into the attic and check your ceiling closely after the next major natural rainstorm. If everything remains bone dry, you can officially pat yourself on the back.
Preventing Future Roof Leakage at Home
They say an ounce of prevention is worth a pound of cure, and that is especially true in roofing. Now that you have mastered the art of repairing a leak, you should focus your energy on preventing roof leakage repair at home issues from ever happening again. Implementing a simple, proactive maintenance routine will save you immense time and money.
Here is your essential checklist on how to avoid roof leakage at home:
- Schedule Regular Roof Inspections: You do not need to wait for a leak to look at your roof. Make it a habit to visually inspect your roof twice a year—ideally in the early spring and late fall. Grab a pair of binoculars and scan the roof from your yard. Look for curled shingles, cracked boots, or loose metal. Additionally, always do a quick check immediately following a severe windstorm or hail event.
- Prioritize Gutter Cleaning and Maintenance: We cannot stress this enough. Clean your gutters out at least twice a year. If you have large trees overhanging your property, clean them 4 times a year. Free-flowing gutters prevent water from backing up under your shingles and, in cold climates, from forming destructive ice dams.
- Trim Back Overhanging Trees: Branches scraping against your shingles will act like sandpaper, stripping away the protective granules and tearing the asphalt. Furthermore, overhanging branches provide a highway for squirrels and raccoons who might try to chew holes in your roof vents. Keep all branches trimmed at least six feet away from the roofline.
- Check Flashing and Seals Routinely: The roofing cement you just applied will not last forever. Sun and freezing temperatures will eventually cause sealants to crack and shrink. Every few years, you should proactively climb up and touch up the caulk around your chimneys, skylights, and plumbing vents.
- Invest in Professional Check-Ups: Even if you are a dedicated DIYer, there are things an untrained eye will miss. Suggesting an annual or bi-annual professional roof inspection for long-term home protection is always a wise investment. A pro can catch tiny problems months before they turn into major indoor leaks.
When to Call a Professional for Roof Leakage Repair
We have spent this entire guide empowering you to handle minor repairs. However, as responsible roofing experts, we must reiterate the importance of knowing when to step back. There are times when a professional roof leakage repair at home is not just an option, it is an absolute necessity.
Signs You Need Pros, Not DIY
If you climb into your attic and find that the wooden roof trusses are black with rot or actively bowing downward, do not attempt to fix them yourself. This is a severe structural failure. Furthermore, if you patch a leak, test it, and water continues to pour in from a mystery location, it’s likely traveling through a complex, hidden entry point higher up on the roof. If you are ever uncomfortable working at height, or if your roof pitch is steep enough to feel like a slide, stay on the ground.
Benefits of Hiring a Roofing Contractor
Knowing when to call a pro for roof leakage repair comes with massive benefits. Professional contractors use specialized diagnostic tools, such as thermal imaging cameras, to detect hidden moisture in your walls. We provide precise, permanent fixes rather than temporary band-aids. Most importantly, professional work comes backed by strong warranties, giving you total peace of mind that if the leak returns, we will fix it at no extra cost to you.
If you are looking at your ceiling right now and feeling overwhelmed, do not hesitate to reach out. You can easily click over to our contact page or request a free, no-obligation roof inspection. We are always here to help you protect your home.
Safety Tips for Doing Roof Leakage Repair at Home
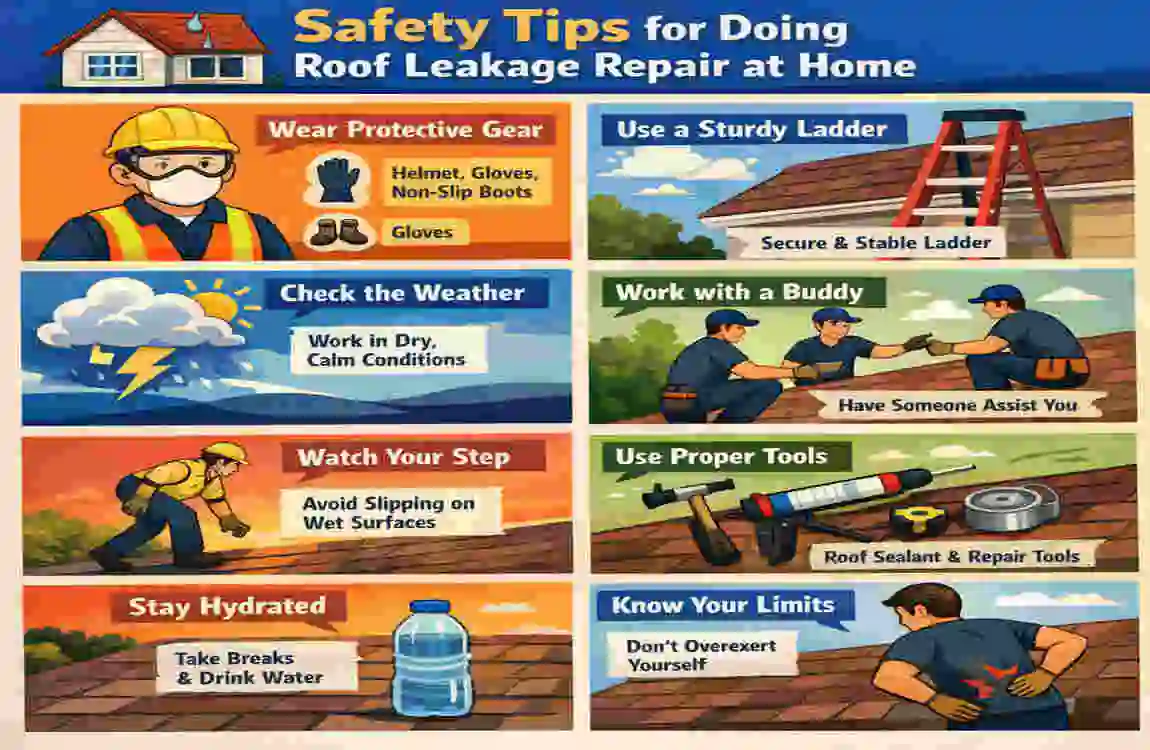
Please finish this project with a dry house and zero injuries. Roofing is inherently dangerous work. Please review these essential safe roof leakage repair at home tips before you set foot on the first rung of your ladder.
- Master Ladder Safety: Always use a sturdy, heavy-duty extension ladder. The base of the ladder should sit on perfectly flat, stable ground. Apply the “four-to-one” rule: for every four feet the ladder rises, the base should be one foot from the wall. Always tie off the top of the ladder to a secure anchor point so it cannot slide sideways.
- Dress the Part: Never wear old, worn-out sneakers or sandals on a roof. You must wear soft, rubber-soled shoes with aggressive traction. Wear thick work gloves to protect your hands from sharp nails and jagged metal edges, and always wear safety goggles when scraping old debris or cutting shingles.
- Watch the Weather: Never attempt a repair if the roof is wet, frosty, or covered in morning dew. Asphalt gets incredibly slick with even a tiny bit of moisture. Avoid windy days entirely, as a sudden gust can easily throw you off balance.
- Use the Buddy System: Never work on a roof alone. Always have a helper on the ground who can hand you tools, hold the ladder base, and call for help in an emergency.
- Beware of Electrical Lines: Look up before you carry a ladder vertically. Keep yourself, your ladder, and your tools at least ten feet away from any overhead power lines entering your home.
Frequently Asked Questions About Roof Leakage Repair at Home
Even after reading a comprehensive guide, you might still have a few lingering questions before you climb up that ladder. To help you feel completely confident, we have put together this short FAQ section covering the most common concerns homeowners have about tackling a roof leakage repair at home.
Can I Fix a Leaking Roof From the Inside?
The short answer is no, you cannot permanently fix a leaking roof from the inside of your attic. While it is tempting to just smear some sealant on the underside of your wooden roof deck, this is only a temporary band-aid.
When you seal the leak from the inside, the rainwater is still penetrating your exterior shingles. That trapped water will simply pool on top of your inner patch and continue to rot your wooden rafters. For a true roof leakage repair at home, you must always address the actual source of the hole on the outside of your roof.
How Much Does a DIY Roof Repair Cost?
One of the best parts about doing a roof leakage repair at home is the massive cost savings. If you are dealing with a minor issue, you can expect to spend very little.
A standard tube of high-quality roofing cement usually costs under ten dollars. A small bundle of replacement asphalt shingles will typically run you between thirty and forty dollars. Assuming you already own basic tools like a hammer and a ladder, you can easily complete a minor patch job for under fifty dollars. Compared to a professional service call, taking the DIY route keeps your hard-earned money right in your pocket!
What is the Best Sealant for a Roof Leak?
The exact sealant you need depends heavily on the weather and your specific roofing material. However, your most reliable option is usually a standard bituminous roofing cement (often just called roofing tar).
This thick, black cement is incredibly durable, highly water-resistant, and flexes well with temperature changes. If you are fixing a crack during a rainstorm, you will want to look for a specialized wet-patch roofing cement that is designed to stick to damp surfaces. For metal flashing or rubber pipe boots, a premium exterior polyurethane liquid sealant is highly recommended because it will not shrink or crack under the hot sun.
Does Homeowner’s Insurance Cover Roof Leaks?
This is a very common question, and the answer depends entirely on why your roof is leaking. Take a close look at your insurance policy.
If your roof starts leaking because a sudden windstorm ripped off your shingles, or a heavy tree branch fell and punctured your roof deck, your insurance will likely cover the damage. However, if your leak is caused by general old age, lack of maintenance, or simply ignoring clogged gutters, your insurance company will likely deny the claim. This is why staying proactive and learning how to do a minor roof leakage repair at home is so vital!
How Long Will a DIY Roof Patch Last?
A well-executed DIY repair can last for several years, but you should generally view it as a temporary solution.
If you properly replaced a missing shingle and nailed it down correctly, that fix will last for the remaining lifespan of the roof. However, if you simply squeezed roofing cement into a crack or patched a hole with a rubber membrane, the sun and extreme weather will eventually wear that patch down. Always keep a close eye on your repaired area, and plan to call a professional for a permanent fix or a full roof replacement down the road.