Installing laminate flooring on stairs is a straightforward DIY project that updates your home affordably and safely. It requires precise measurements and adhesive for secure installation on uneven surfaces.
Why Choose Laminate Flooring for Stairs?
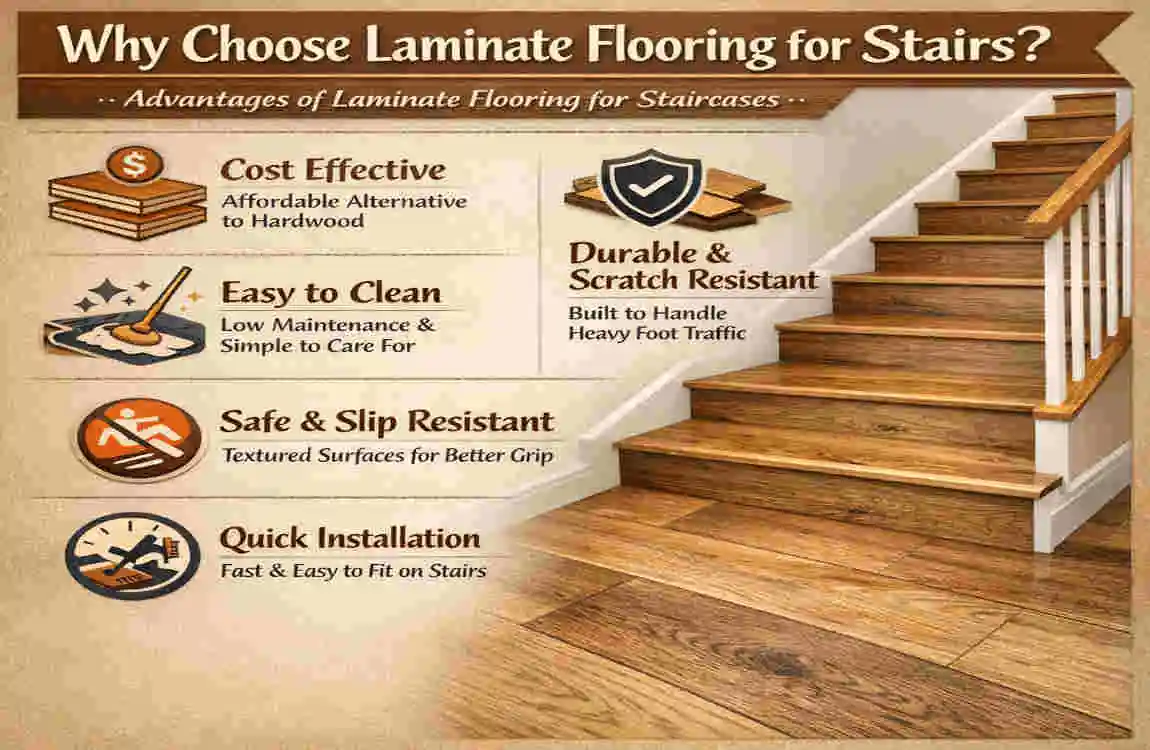
You might be wondering, “Is laminate really the best choice for a high-traffic area like stairs?” The short answer is: Absolutely.
In the past, laminate had a reputation for looking fake or feeling hollow. But technology has come a long way. Modern laminate flooring is incredibly tough. It is designed to resist water, scratches, and the heavy foot traffic that stairs endure daily. Plus, high-quality laminate mimics the look and texture of real hardwood so well that your guests probably won’t know the difference.
The Benefits of Carpet and Hardwood
When you compare laminate to carpet, the hygiene difference is night and day. Carpet on stairs acts like a filter, trapping dirt that vacuum cleaners struggle to reach. Laminate creates a sealed, smooth surface that you can sweep clean in seconds.
Compared to solid hardwood, laminate is a fraction of the price. Hardwood is beautiful, but it is also softer and more prone to dents from pet claws or dropped toys. Laminate often comes with a protective wear layer (look for an AC3 or AC4 rating) that acts like a shield against daily abuse.
Here is a quick breakdown of how laminate stacks up against the competition:
FeatureLaminate on StairsCarpetHardwood
Cost per sq. ft. $3 – $7 $2 – $5 $8 – $15
Durability High (Scratch Resistant) Medium (Stains/Wears) High (Prone to Dents)
Maintenance Easy (Sweep/Mop) Difficult (Vacuum/Shampoo) Medium (Special cleaners)
Install Time 1-2 Days 1 Day 2-3 Days
Pro Tip: If you are asking, “Is laminate good for stairs regarding safety?” The answer is yes, provided you choose a textured laminate rather than a high-gloss, slippery one. Always prioritize safety over shine.
Tools and Materials Needed
You cannot build a house without a hammer, and you cannot install stunning stairs without the right gear. Having the proper tools will make the difference between a frustrating struggle and a smooth workflow.
Here is your comprehensive checklist. You likely already have many of these in your garage.
Essential Tools for the Job
- Tape Measure: You need precision here. A digital laser measure is nice, but a classic metal tape is reliable.
- Circular Saw or Miter Saw: You will be making many cuts. A miter saw (chop saw) is best for speed and accuracy.
- Jigsaw: Stairs aren’t always perfectly square. A jigsaw helps you cut around awkward corners or banister posts.
- Table Saw: Highly recommended for ripping the long “riser” pieces, though a circular saw with a guide can work.
- Combination Square: Essential for marking straight cut lines.
- Caulk Gun: For applying the heavy-duty adhesive.
- Utility Knife: For cutting underlayment or trimming excess glue.
- Pry Bar and Hammer: To remove the old nastiness (carpet/tack strips).
- Safety Gear: Knee pads (your knees will thank you), safety glasses, and a dust mask.
The Materials List
- Laminate Planks: Calculate the square footage of your treads and risers. Always add 10-15% extra for waste. You will make mistakes; having extra planks saves you a trip to the store.
- Stair Nosing: The special trim piece that covers the sharp edge of the step. It is non-negotiable for a finished look and safety.
- Construction Adhesive: Do not skimp on this. You need heavy-duty liquid nails or a polyurethane adhesive (like PL Premium).
- Wood Glue: For the tongue-and-groove joints.
- Caulk/Filler: Colored to match your laminate for filling gaps.
Estimated Cost: For an average flight of 12-14 stairs, expect to spend between $200 and $500, depending on the quality of laminate you choose.
Preparation: Measuring and Planning Your Stairs
This is the phase that separates the amateurs from the pros. Do not rush the prep work. If your foundation is bad, your new floor will squeak, shift, or fail.
Assess Your Staircase
Take a good look at what you are working with. Are your stairs a straight shot up, or do they curve (winders)? Do you have a “bullnose” (an overhang) on your existing wooden steps?
Most standard stairs have an overhang. You have a choice here:
- Cut the overhang off: Use a jigsaw or circular saw to make the riser flush with the tread.
- Fill the gap: Glue plywood to the riser to flush it with the tread edge. Note: Having a square, 90-degree angle between the riser and the tread makes installation much easier.
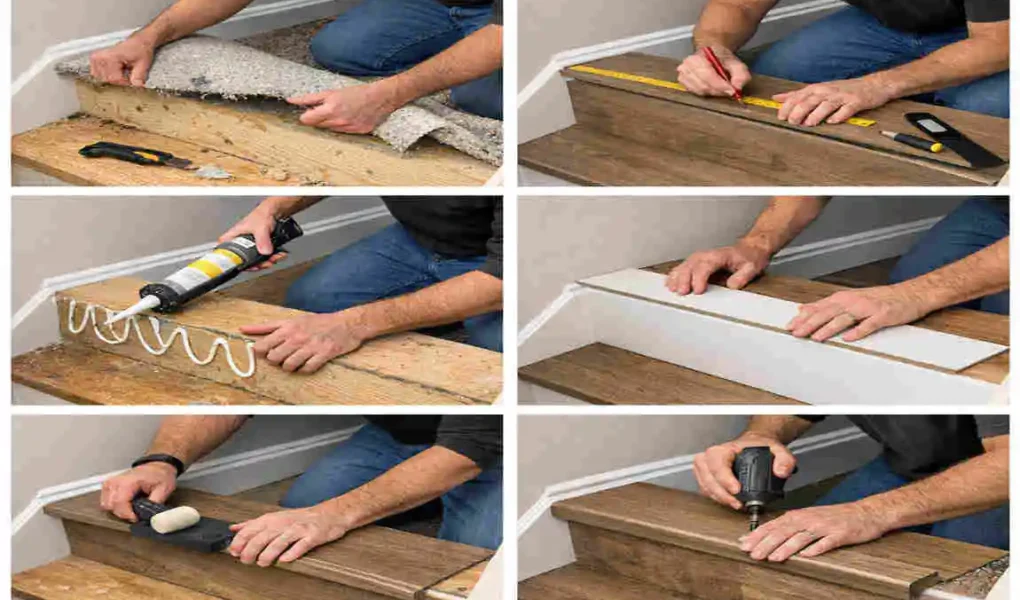
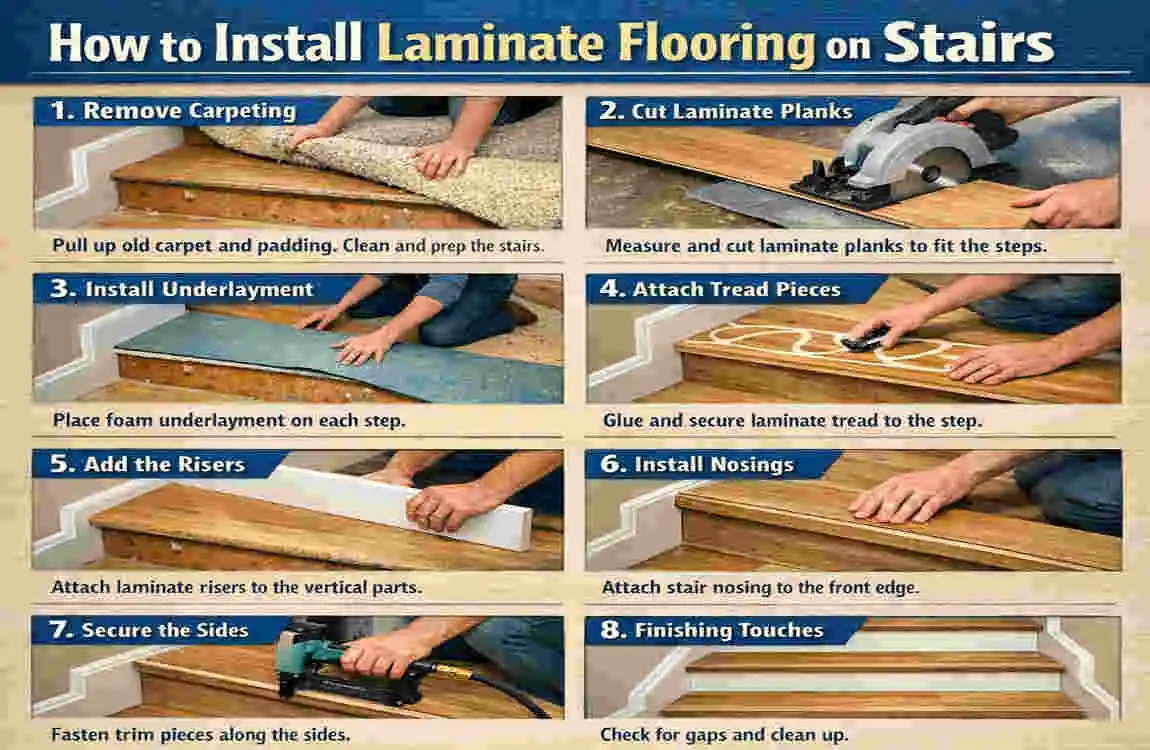
The Demolition
It is time to get messy.
- Rip it up: Use your pliers and pry bar to pull up the carpet.
- Remove Tack Strips: These are the spiky wood strips holding the carpet. They are sharp, so wear gloves. Slide your pry bar under them and pop them off.
- Pull Staples: This is tedious but necessary. Every single carpet staple needs to be removed or hammered completely flat. If you leave a staple sticking up, it will prevent your laminate from sitting flat.
Measuring the “Rise” and “Run”
- The Rise: The vertical height of each step.
- The Run: The horizontal depth where you step.
Important: Do not assume every step is the same size. Houses settle. Carpenters make mistakes. Measure every single step individually and number them on the subfloor with a marker (e.g., “Step 1”, “Step 2”).
Subfloor Prep
Clean the stairs thoroughly. Vacuum every speck of dust. If the wood subfloor is uneven, use a little wood filler or sanding to level it out. The adhesive needs a clean, dry surface to bond correctly.
Step-by-Step Guide: How to Install Laminate Flooring on Stairs
Now that your stairs are naked, clean, and measured, we can start the transformation. We will break this down into digestible phases.
Installing the Risers
We always start with the risers—the vertical pieces that face you as you walk up. Installing these first provides a solid base for the treads to sit against.
- Measure and Cut: Measure the height and width of the first riser. Transfer these measurements to your laminate plank. If your plank isn’t wide enough to cover the whole height, you may need to click two planks together and rip them down to size on a table saw.
- The Dry Fit: Before you touch any glue, hold the cut piece up to the riser. Does it fit snug? Is there a massive gap? If it’s too tight, shave a little off.
- Apply Adhesive: Once the fit is perfect, load up your caulk gun with construction adhesive. Apply a generous “zigzag” pattern on the back of the laminate plank. You want good coverage, but not so much that it oozes out everywhere.
- Press and Hold: Press the riser firmly against the existing stair riser. Give it a good thump with your fist or a rubber mallet to ensure it makes contact.
- Secure It: While the glue sets, you can use a few finish nails (if you have a nail gun) to hold it in place. If you don’t have a nail gun, use painter’s tape to hold the riser tight against the wood until the glue grabs.
Repeat this process for all the risers on the staircase.
Laying the Treads and Stringers
Now for the horizontal part—the treads. This is the surface you walk on, so it needs to be rock solid. Unlike laminate on a floor, which “floats” (isn’t glued down), laminate on stairs must be glued down for safety.
- Measure the Tread: Measure the depth of the step from the new riser you just installed to the edge of the step.
- Cut the Plank: Cut your laminate plank to the correct depth. Most stairs are wider than a single plank, so you will likely need to click two planks together laterally. Apply a thin bead of wood glue inside the groove before clicking them together to ensure they never separate.
- The Overhang Consideration: Remember that your stair nosing (the trim piece) will take up some space on the edge. You need to cut your laminate tread short enough to allow the nosing to fit. Check the instructions on your specific nosing product to see exactly how much space it requires.
- Adhesive Application: Just like the risers, apply a thick zigzag of construction adhesive to the wooden subfloor of the step.
- Placement: Press your cut laminate tread into the glue. Slide the back edge tight against the riser you installed in Phase 1. Wiggle it slightly to spread the glue underneath.
The Critical Stair Nosing
This is the most important step for the visual finish and the safety of the stairs. The nosing covers the gap between the tread and the riser below it.
- Measure Twice: Measure the width of the step exactly.
- Cut the Nosing: Use your miter saw to cut the nosing to length.
- Install the Track (If applicable): Some stair nosing systems come with a metal track that you screw into the subfloor. If yours has this, install the track first.
- Glue and Snap: If yours is a “flush” nose that glues down, apply adhesive to the subfloor and the back of the nosing. Press it firmly into place. It should lock into the edge of the laminate tread you just laid.
- Tape it Down: Use blue painter’s tape to tape the nosing tightly to the tread. This acts like a clamp while the glue cures. Leave this tape on for at least 12 to 24 hours.
Warning: If the nosing feels loose or rocky, do not proceed. It must be completely solid. Add more glue or screws (if the design allows) until it is immobile.
Secure, Trim, and Finish
You are in the home stretch!
- Caulking: You will likely have small gaps between the planks and the wall (stringers). Use a color-matched acrylic caulk to fill these lines. This hides imperfections and gives a seamless look.
- Quarter Round (Optional): If the gaps are too large for caulk, you can install a small quarter-round molding along the edges to cover them.
- Clean Up: Wipe away any excess glue immediately with a damp cloth before it dries. Once that construction adhesive hardens, it is incredibly difficult to remove without damaging the floor.
Final Checks and Curing
Do not walk on your masterpiece yet!
- The Waiting Game: Let the stairs sit for 24 hours. This allows the adhesive to cure completely. Walking on them too soon can shift the planks and create gaps.
- The Walk Test: After the curing period, walk up and down. Listen for squeaks. If you hear a squeak, it usually means the glue didn’t bond in that spot. You may need to drill a tiny hole and inject more glue, or use a finish nail to secure it.
Common Mistakes to Avoid When Installing Laminate on Stairs
Even experienced DIYers can slip up. Here are the pitfalls that can ruin your project and how to dodge them.
- Not Removing the Old Nosing/Overhang
- The Issue: If you leave a rounded “bullnose” on the wood subfloor and try to install square laminate over it, the laminate will crack when you step on the edge because there is no support underneath.
- The Fix: You must either cut the overhang off or fill the gap underneath it to create a square surface.
- Skipping the Acclimatization
- The Issue: Laminate is made of wood byproducts. It expands and contracts with humidity.
- The Fix: Leave your boxes of laminate open in the room where the stairs are for at least 48 hours before installation. This lets the material adjust to your home’s temperature.
- Measuring Once, Cutting Once
- The Issue: Walls are rarely perfectly straight. If you cut a perfect rectangle, you might find unsightly gaps on the sides.
- The Fix: Use a sliding T-bevel or a stair tread gauge. These tools copy the exact angle of the corner, allowing you to trace that angle onto your laminate for a perfect fit.
- Using the Wrong Glue
- The Issue: Standard white craft glue or cheap adhesive won’t withstand the vibration from footsteps.
- The Fix: Only use premium polyurethane construction adhesive. It needs to be flexible enough to handle vibration but strong enough to hold permanently.
Here is a quick troubleshooting guide:
Mistake/Symptom: Quick Fix
Squeaky Stairs. The adhesive didn’t bond. Inject more glue or use a finish nail.
Gaps between planks. You didn’t tap them tight enough. Use a pull bar to close the gap (if the glue is wet) or fill with colored wood putty.
Loose Nosing DANGER. Remove, clean, and re-glue immediately with more adhesive.
Cost Breakdown and Time Estimate
Let’s be real about the budget and schedule.
The Financial Breakdown:
- Materials (Laminate + Nosing): Approximately $200 – $400, depending on the size of your staircase.
- Adhesives & Caulk: $40-$60.
- Tools (if you need to buy them): $50-$150.
- Total DIY Cost: $300-$600.
- Professional Cost: $1,200-$2,500.
Time Estimate:
- Prep (Demo & Cleaning): 2-4 hours.
- Installation: 4-8 hours (depending on your cutting speed).
- Finishing (Caulk/Clean): 1-2 hours.
- Total Time: Expect to spend a full weekend on this. Saturday for demo and install, Sunday for finishing touches after the glue dries.
FAQs: How to Install Laminate Flooring on Stairs
Here are the most common questions I get asked about this project.
Can you put laminate on stairs over carpet? No. Absolutely not. The laminate needs a hard, flat, stable surface. The carpet is too soft; the laminate would crack and disconnect immediately. You must rip the carpet out.
Do I need underlayment on stairs? Generally, no. On flat floors, underlayment is used for sound dampening and cushioning. On stairs, you want the laminate glued directly to the wood subfloor for maximum stability. However, some laminates come with attached padding—that is fine, but you still need to use construction adhesive.
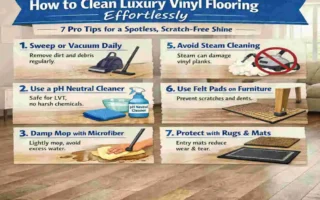
How do I clean laminate stairs? Keep it simple. A soft broom or a vacuum with a hard-floor attachment is best. For mopping, use a damp (not wet) microfiber mop. Avoid soaking the stairs with water, as it can seep into the seams.
Can I install laminate on curved stairs? Yes, but it is much harder. You will need to make complex angled cuts for the pie-shaped steps. A cardboard template is your best friend here. Make a template of the step using cardboard, ensure it fits, and then trace that onto your laminate.
Which adhesive is best for laminate stairs? Look for “PL Premium” or “Liquid Nails Heavy Duty.” You want a construction adhesive that claims to bond wood to wood and has a fast grab time.