We all know that sinking feeling. You drop a heavy cast-iron pan, a potted plant leaks water for days, or you drag a heavy piece of furniture across the room without protection. Suddenly, your beautiful floor has a glaring flaw. Hardwood floors are famous for their durability and timeless beauty, but they are not entirely invincible.
Over time, daily life takes its toll. You might notice deep scratches, warped sections, ugly water damage, or even cracked boards. When you stare at that ruined plank, your first thought might be absolute panic. You might wonder if you have to tear up the entire room and start from scratch.
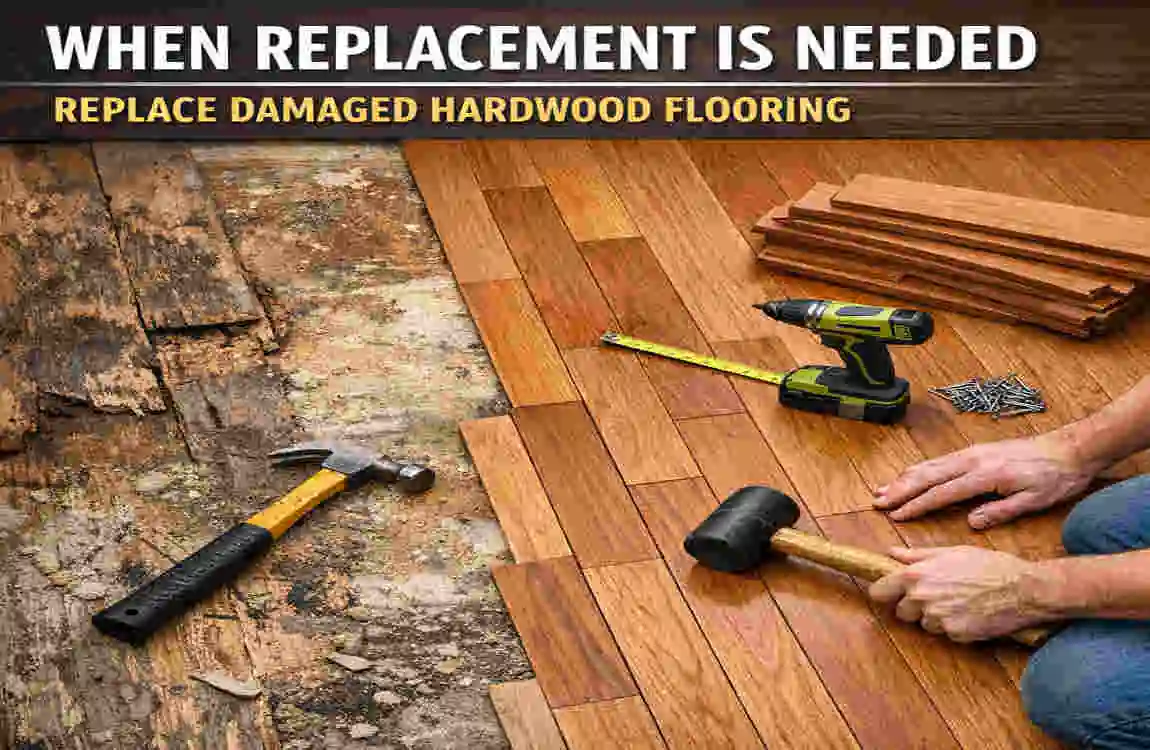
Fortunately, you can breathe a sigh of relief. Fixing the problem is often much cheaper and way more efficient than ripping out your whole floor. In most cases, you only need to learn how to replace damaged hardwood flooring in isolated, small sections. By removing just the affected planks and putting new ones in their place, you can restore your room to its former glory.
When Replacement Is Needed
Before you grab a saw and start cutting into your floor, step back and evaluate the situation. Not every scratch or dent requires a full board replacement. Sometimes, you can save yourself a lot of time by simply doing a minor surface repair.
This section will help you decide whether you should repair, refinish, or completely replace the damaged area. It is important to know the difference so you can avoid doing unnecessary work.
Minor Surface Scratches and Small Dents
If your floor only has shallow scratches from dog claws or minor dents from dropped keys, you probably do not need to replace the plank. Light surface damage usually only affects the protective top coat of the floor. You can often fix these minor issues with a simple wood filler, a stain touch-up marker, or a quick buff and recoat. DIY hardwood floor repair for minor scratches is quick, inexpensive, and does not require power tools.
Deep Gouges and Split Boards
On the other hand, if a sharp object has gouged deeply into the raw wood, or if a board has literally split down the middle, a touch-up pen will not save you. When the wood’s physical structure is compromised, dirt and moisture will eventually become trapped in the cracks. In this scenario, you will absolutely need to remove and replace the damaged board to maintain the integrity of your floor.
Warped, Swollen, or Buckled Wood
Wood is a natural, porous material. It responds to changes in humidity and moisture. If you notice boards lifting at the edges (cupping) or bubbling in the middle (crowning), you have a moisture problem. While minor cupping can sometimes be sanded flat after the room dries out, severely warped or buckled wood will never return to its original shape. You will need to pull those ruined boards out and replace them.
Severe Water-Damaged Boards
Water is the ultimate enemy of hardwood flooring. If a hidden pipe leak, a pet accident, or a spilled drink sits on the floor too long, the wood will absorb the liquid. The boards will turn black or dark gray, and they may even start to rot or grow mold. Once a board is heavily water-damaged and deeply discolored throughout the grain, sanding it will not remove the stain. The only real solution is to completely replace the affected planks.
Loose, Creaking, or Unstable Planks
Sometimes the damage is not something you can see, but rather something you can hear and feel. If a board shifts under your feet or makes a loud, annoying squeak every time you step on it, the tongue-and-groove locking system might be broken. The subfloor underneath could also be damaged. Removing the loose plank allows you to inspect the subfloor, fix the squeak, and secure a fresh, stable board in its place.
Tools and Materials You Will Need
Preparation is the secret to any successful home improvement project. Before you dive into the step-by-step instructions, gather all your tools and materials. Having everything within arm’s reach will make the job much smoother and prevent frustrating mid-project trips to the hardware store.
Replacing a hardwood board requires a mix of basic hand tools and a few power tools. You will be cutting, prying, cleaning, gluing, and nailing. Because you will be dealing with sawdust, sharp metal, and flying wood splinters, gathering your safety gear is just as important as grabbing your hammer.
Here is a complete checklist of what you will need to get the job done right:
Essential Materials
- Replacement hardwood board or plank: Make sure it matches your floor’s species and size.
- Wood glue: A high-quality carpenter’s glue for securing the new board.
- Finishing nails or flooring nails: Nails used to secure the board to the subfloor.
- Wood filler: To hide the tiny nail holes after installation.
- Stain and finish touch-up products: To blend the new wood with the old wood.
Required Power Tools and Hand Tools
- Circular saw or oscillating multi-tool: For making precise cuts into the damaged board without hitting the subfloor.
- Chisel and hammer: For carefully splitting and lifting the old wood pieces out.
- Pry bar: A small flat pry bar is essential for gently pulling up stubborn wood pieces.
- Nail set: A small metal tool used to tap finishing nails below the surface of the wood.
- Tape measure and pencil: For accurate measuring and marking.
- Sandpaper or a sanding block: To smooth out rough edges and prep for the finish.
- Vacuum or shop vacuum: To keep the work area free of sawdust and debris.
Crucial Safety Gear
- Safety glasses: To protect your eyes from flying wood chips and splinters.
- Heavy-duty work gloves: To protect your hands from sharp nails and rough wood edges.
- Dust mask: To keep you from breathing in fine sawdust while cutting and sanding.
Safety and Prep Work

Now that your tools are lined up, you need to prepare the room. Jumping straight into cutting without prepping your space is a recipe for disaster. You want to protect the surrounding floor, manage the dust, and ensure your replacement materials are truly ready to go.
Clear the Room and Protect the Area
First, move all furniture, rugs, and decorative items away from the work area. Give yourself plenty of space to move around, kneel, and use your tools safely. If the damaged board is right up against a wall, you might need to gently pry off the baseboard trim to create space to work.
Next, put down protective painter’s tape around the damaged board. This creates a visual boundary so your tools do not accidentally scratch the good boards right next to the bad one.
Manage the Dust
Cutting wood indoors creates a massive amount of fine dust. This dust loves to float through the air and settle on everything you own. To prevent this, turn off any nearby heating or air conditioning vents. You do not want your HVAC system sucking up the sawdust and blowing it into your bedrooms. You can also tape a plastic drop cloth over the doorways to keep the dust contained in one room.
Match the Replacement Board
Before you cut the old board out, take a good hard look at your replacement plank. Does it match? You need to confirm that the new board matches the existing wood species (like red oak, white oak, or maple).
You also need to check the thickness and the width. Even a fraction of an inch difference will create an ugly, uneven bump in your floor. If you have leftover boards in the attic or basement from when the floor was originally installed, you are in luck! If you bought a new board, you might need to stain and seal it later to match the aged color of your floor.
Inspect for Hidden Problems
As you prepare to work, look closely at the damaged area. Ask yourself: Why did this board get damaged? If it was a dropped heavy object, it is an isolated incident. But if the board is buckled or black from water, you need to inspect the area for ongoing moisture problems.
Is there a leaky radiator nearby? Does a potted plant leak when you water it? You must fix the moisture source before you put a new board down. Otherwise, your brand-new plank will just end up ruined in a few months.
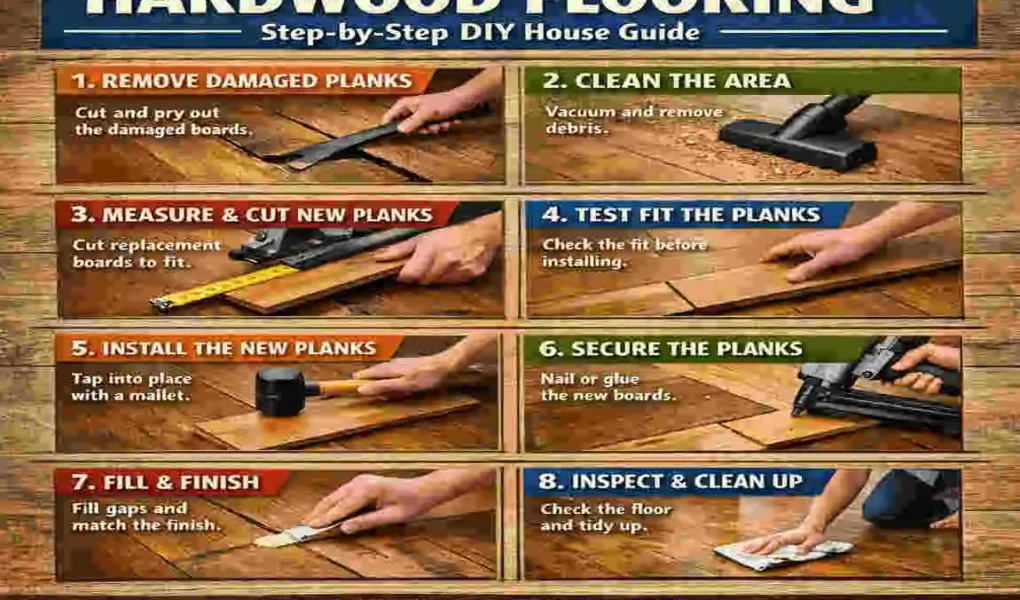
Identify the Damage
The first official step in learning how to replace damaged hardwood flooring is to map out your attack plan. You need to examine the floor carefully and mark the exact board—or section of boards—that needs to be removed.
Locate and Isolate the Damaged Plank
Get down on your hands and knees and inspect the bad board. Trace the edges of the plank with your eyes. Hardwood floors are locked together with a tongue-and-groove system. This means the edge of one board slides into the slot of the next board. You need to see exactly where the damaged board begins and ends.
Check the Surrounding Boards
Sometimes, what appears to be damage to one board can spread to its neighbors. Press firmly on the wood around the damaged area. Do the surrounding boards feel spongy? Do they squeak loudly? Do you see dark water stains creeping across the seams into the next plank?
If the problem is isolated to just one plank, you can move forward with a single board replacement. But if the surrounding boards are also soft, rotting, or severely warped, you will need to cut those out too. Replacing one damaged board will not magically solve an underlying subfloor rot issue.
Mark Your Boundaries
Once you know exactly which board has to go, mark it clearly. The easiest way to do this is to outline the damaged board with brightly colored painter’s tape. You can also use a pencil to draw a large “X” right on the face of the bad wood. This simple step keeps you focused and guarantees you will not accidentally cut into a perfectly good piece of flooring when the sawdust starts flying.
Measure and Match
Now is the time to measure the damaged plank and prepare your replacement piece. This step requires patience. Your new board needs to sit perfectly flush with the old boards, so accurate measuring is absolutely critical.
Measure the Old Board
Use your tape measure to measure the exact length and width of the damaged board you plan to remove. Write these numbers down. If you are only cutting out a small, broken section of a very long board, decide exactly where you want to make your straight crosscuts and measure that length.
Cut the New Board to Length
Measure your replacement board to match the length of the damaged section you are removing. Use a pencil and a straight edge to mark your cut line. Use your circular saw or a miter saw to cut the new board to the exact length you need.
Pro Tip: It is always a smart idea to prepare a little extra material. If you make a mistake while cutting or if the wood splinters unexpectedly, having a backup board ready will save you a lot of frustration.
Dry-Fit the New Board Above the Hole
Obviously, you cannot put the new board into the floor yet, but you can lay it directly on top of the damaged board. Check the grain direction. Does the pattern look natural next to the surrounding boards? Check the color. If the new board is raw, unfinished wood, keep in mind that you will be adding stain later.
By lining everything up now, you confirm that your replacement piece is the right size and style before you commit to destroying the old board.
Cut Out the Damaged Board
This is the most intimidating step for many DIYers. Cutting the board correctly is the most technical part of the project. The goal here is to remove the damaged plank without harming the good flooring next to it or slicing into the subfloor beneath it.
Do not rush this part. Work slowly, breathe, and let your power tools do the heavy lifting.
Set Your Saw Depth Carefully
Whether you are using a circular saw or an oscillating multi-tool, you must adjust the blade depth. You only want the blade to cut through the thickness of the hardwood floor (which is usually 3/4 of an inch). You absolutely do not want the blade to plunge deeply into the wooden subfloor below it.
Take a spare piece of hardwood (or your new replacement board) and hold it up to your saw blade. Adjust the saw’s bottom shoe so the blade just barely extends past the bottom of the wood. Lock the depth firmly in place.
Make the Relief Cuts
You cannot simply pull a board straight up because its edges are locked tightly into the surrounding boards by the tongue-and-groove system. You have to cut the board into smaller pieces to free it.
Turn on your saw and carefully plunge the blade into the center of the damaged board. Cut a long line straight down the middle of the board, stopping a few inches before you reach the ends. Then, make two angled cuts from the center line out toward the corners of the board, creating a shape that looks somewhat like a diamond or a stretched-out “X” in the middle of the plank.
Remember to stop your cuts short of the surrounding flooring edges! You do not want the spinning blade to nick the good boards.
Chisel and Pry It Out
Once you have made your relief cuts, put the saw down. Take your sharp chisel and your hammer. Place the chisel tip into the cut lines and tap it gently with the hammer. Your goal is to split the wood along the cuts so you can remove the board in small chunks.
Once a piece is loose, slide your flat pry bar under it and lift it out gently. Work from the center of the board outwards toward the edges. When you get to the edges, wiggle the wood carefully so the tongue slides out of the neighboring board’s groove without snapping off. Pry out all the pieces of the damaged board, slowly and carefully, until the hole is empty.
Clean the Opening
Congratulations! The damaged board is gone. However, before you can put the new board in, you have to deal with the messy hole left behind.
If you just drop a new board into a dirty hole, it will sit unevenly. It might stick up higher than the rest of the floor, or it might rock back and forth when you step on it. A clean cavity ensures your new plank sits perfectly flat and secure.
Remove Old Fasteners and debris
Look down into the opening. You will probably see old flooring staples, rusty nails, or jagged splinters of wood protruding from the subfloor. Use a pair of pliers or the claw of your hammer to pull out every single nail and staple.
If the original floor was glued down, you will see rough patches of dried, crusty adhesive. Take a metal paint scraper or your chisel and aggressively scrape away all the old glue. The subfloor needs to be completely smooth.
Vacuum and Inspect the Subfloor
Grab your shop vacuum and suck up all the sawdust, dirt, and wood chips inside the hole. Pay special attention to the grooves of the surrounding boards—make sure no little pebbles or splinters are trapped in there.
Now, touch the exposed subfloor. Is it totally dry? Is it level? If you find a patch of mold or if the subfloor feels squishy and rotten, you must stop and fix the subfloor before moving on. Assuming the subfloor is solid, dry, and flat, you are ready to proceed to the next step.
Prepare the Replacement Board
Here is a flooring secret that trips up many beginners: you cannot just slide a brand-new tongue-and-groove board straight down into a tight hole.
Because the surrounding floor is already locked in place, there is no physical way to angle the new board and slide both the tongue and the groove in at the same time. To get the new board to lay flat, you’ll need to make a slight modification.
Remove the Lower Groove Edge
Take your replacement board and flip it over. Look at the side of the board that has the groove (the slot). You will notice that the groove has a top lip and a bottom lip.
You need to completely remove the bottom lip of the groove.
You can do this with a table saw, a circular saw, or simply take your hammer and chisel and carefully knock the bottom lip off. By removing this bottom edge, you change the board from a locking piece into a drop-in piece. The top lip will still sit neatly over the neighboring board’s tongue to hide the seam, but the bottom will no longer block you from pushing the board straight down into the floor.
Test the Fit Without Glue
Before you bring out the sticky wood glue, you must do a dry run. Try to fit the modified replacement board into the opening. Slide the tongue of your new board into the groove of the existing floor first. Then gently push the other side (the side you removed the bottom lip from) down into the hole.
Does it fit snugly? Does it sit perfectly flush with the surrounding flooring? If it feels too tight and binds against the neighboring planks, take the board back out. Use your sandpaper or a sanding block to shave down the edges just a tiny bit. Adjust the board until you get a snug, comfortable, workable fit.
install the New Board
This is the exciting part. You are finally putting the floor back together. Take your time here, as this step requires precision to ensure the board stays secure for decades.
Apply the Wood Glue
Take your new board out of the hole. Grab your high-quality wood glue. Apply a generous, wavy bead of glue directly onto the exposed subfloor. You want enough glue to hold the board firmly, but not so much that it squeezes up into a huge mess.
Next, apply a thin line of wood glue into the groove of the new board, and along the bottom edge where you removed the lower lip. This ensures the new board bonds securely to its neighbors.
Tap the Board Into Place
Slide the tongue of your new replacement board into the groove of the existing floor. Then, press the modified side down into the glue.
It might be a tight squeeze. Do not hit your new board directly with a metal hammer, as this will dent and ruin the wood you just worked so hard to prepare. Instead, lay a scrap piece of wood over the new board and gently tap it with your hammer. This will force the new board perfectly into place, flush with the surrounding floor.
Wipe away any wet glue that squeezes out of the seams immediately using a damp rag. If you let the glue dry on top of the floor, it will ruin your finish.
Secure with Nails
Glue alone is strong, but adding a few nails guarantees the board will never shift or squeak. Use your finishing nails (or an air-powered brad nailer) to drive them directly into the face of the new board, near the edges.
You do not need many nails—two or three at each end are usually enough. Once the nails are in, take your metal nail set tool. Place the tip of the nail set onto the head of the nail, and tap it with your hammer to drive the nail head just below the surface of the wood. This hides the shiny metal and creates a small dimple that you will fill later.
Sand and Blend
Your new board is securely installed in the floor! However, right now, it probably looks a little obvious. The final frontier in replacing damaged hardwood flooring is making the new board disappear seamlessly into the rest of the room. This process involves filling, sanding, staining, and sealing.
Fill the Holes and Sand
First, grab your wood filler. Press a tiny dab of filler into the holes left by your finishing nails. Smooth it out with your finger or a small putty knife. Let the filler dry completely according to the package instructions.
Once the filler is dry, use fine-grit sandpaper (120 to 220 grit) to lightly sand the entire repaired area. Sanding removes slight height differences between the new board and the old boards. It smooths out the nail filler and removes any tiny splinters. Always sand in the direction of the wood grain to avoid leaving ugly cross-scratches.
Apply Stain and Finish
If your new board is already pre-finished to perfectly match your floor, you can skip this part! But if you used raw wood, you need to add color.
Matching an old floor color is often the most difficult part of the repair. Wood changes color as it ages and is exposed to sunlight. Before you wipe the stain onto your beautifully installed board, test the stain color on a scrap piece of the new wood.
Once you are happy with the color match, wipe the stain onto the new board with a clean rag. Let it soak in, wipe off the excess, and allow it to dry thoroughly. Finally, seal the wood with a compatible finish coat (like polyurethane). Apply two or three thin coats, letting each coat dry completely. This finish will protect the wood and match the sheen of your existing floor, whether shiny or matte.
Crucial Advice: Keep traffic away! Let the area dry completely before you allow kids, pets, or heavy shoes to walk on it.
Final Inspection
The glue is dry, the stain is cured, and the tools are put away. Before you move all your heavy furniture back into the room, conduct a thorough final inspection. This ensures your repair was completely successful and safe.
The Walk Test
Take your shoes off and put on a pair of soft socks. Walk carefully back and forth over the repaired area. You should glide right over the new board without feeling a bump. If your sock catches or snags on an edge, the board is not flush, or there is a rough splinter that needs extra sanding.
Check for Movement and Appearance
Stand directly on the new board and shift your weight around. The board should feel rock-solid. If it wiggles or squeaks, the glue might not have bonded, or the subfloor may be uneven.
Kneel and inspect the finish. Does the sheen match? Are there any visible gaps between the new board and the old ones? If you see a tiny gap, you can carefully push a small amount of color-matched wood putty into the seam to hide it. Finally, if you removed any baseboards or shoe molding during your prep work, carefully nail them back into place.
Common Mistakes to Avoid
Even smart, capable homeowners can make mistakes when replacing damaged hardwood boards. Knowing what can go wrong before you start helps you avoid ruining your floor. Here are some of the most common mistakes to watch out for.
Cutting Too Deep into the Subfloor
This is the biggest rookie mistake. If you do not adjust your saw depth properly, your blade will slice right through the hardwood and severely slice the subfloor underneath. A damaged subfloor will compromise your home’s structural integrity and cause your new floorboards to sag. Always double-check your blade depth!
Choosing a Mismatched Board
Wood is not just “wood.” A piece of red oak looks drastically different from a piece of white oak. If you try to replace a damaged hickory plank with a piece of cheap pine, no amount of stain will ever make it look right. The grain patterns will clash, and the repair will look like an ugly patch. Take a piece of the damaged board to the lumber yard to ensure you get a perfect match.
Leaving debris Under the New Plank
We mentioned cleaning the hole, but it bears repeating. If you leave even a tiny, flat wood chip or a blob of old dried glue on the subfloor, your new board will not sit flat. It will teeter like a bad restaurant table. Vacuum the subfloor aggressively.
Skipping Moisture Control
If you replace a water-damaged board without fixing the leaky window or the dripping pipe that caused the problem, you are wasting your time. The new board will simply rot again in a few months. Always address the root cause of the damage before you implement the cosmetic fix.
Repair vs. Replace: Knowing Your Limits

This DIY guide focuses on replacing single, isolated damaged boards. But how do you know when a simple patch job is no longer enough?
Sometimes, damage is so extensive that attempting to replace it board by board will drive you crazy. You have to understand the limits of DIY repair. If a massive appliance leaks and floods half your kitchen, leaving dozens of boards cupped, stained, and buckling, a spot-repair is pointless. In cases of widespread damage, you will need to consider larger-scale refinishing or ripping up a large section of the room.
To help you decide the best course of action, use this simple comparison table to evaluate your floor’s condition:
Floor Condition Recommended ActionWhy This Is the Best Choice
Light surface scratches and minor dullness Refinish or Polish The wood structure is fine. A light sanding and a fresh coat of polyurethane will easily restore the shine.
One or two deeply gouged or cracked boards Patch Repair (DIY Replace) The damage is isolated. Cutting out a few bad boards saves money and preserves the rest of the healthy floor.
Small area of dark water stains (pet urine, plant leak) Patch Repair (DIY Replace) Deep stains cannot be sanded out. Replacing the specific stained boards removes the ugly marks completely.
Widespread cupping or buckling across the room Full Replacement (Pro Help) The subfloor is likely compromised by severe moisture. The entire floor system needs to be evaluated and rebuilt.
Floor feels spongy and sinks when you walk . Full Replacement (Pro Help) . This indicates serious structural rot in the subfloor or joists. A cosmetic board patch will not fix a failing structure.
If you ever feel overwhelmed by the scope of the damage, do not hesitate to call a professional flooring contractor for an assessment.
Maintenance Tips to Protect Your Repair
You just spent a lot of time and effort fixing your beautiful hardwood floor. Naturally, you want to keep it looking perfect for as long as possible. The best way to avoid replacing more damaged hardwood flooring in the future is to practice preventive maintenance.
Here are some easy, everyday tips to extend the life of your newly repaired floor:
Use Felt Pads and Rugs
Never drag heavy furniture across bare wood. Attach thick felt protector pads to the bottom of all your chairs, tables, and couches. Place high-quality area rugs or mats at all your exterior doors to catch gravel, dirt, and moisture before they get tracked onto the hardwood.
Control Indoor Humidity
Wood expands and contracts with changes in air moisture. Keep your home’s humidity levels stable—ideally between 35% and 55% year-round. Use a humidifier in the dry winter months and an air conditioner or dehumidifier during the muggy summer months to prevent your boards from warping or separating.
Clean Spills Immediately
Do not let liquids sit on the wood. Whether it is a dropped glass of water, a dog’s drool puddle, or wet winter boots, wipe up moisture immediately with a soft, dry cloth. When it’s time to clean the entire floor, avoid using soaking-wet mops or harsh, abrasive chemical cleaners. Use only specialized, hardwood-safe cleaning products and a damp microfiber mop.
FAQ Section
Can you replace just one damaged hardwood board?
Yes, absolutely! As we outlined in this guide, you can replace a single damaged hardwood board without tearing up the entire floor. By carefully cutting the center of the damaged board and chiseling it out, you can remove the bad piece while leaving the surrounding tongue-and-groove boards perfectly intact. It requires patience and a steady hand, but it is a very common and effective DIY repair.
How do you match a new board to old hardwood flooring?
Matching a new board to an old floor is a two-part process. First, you must match the wood species (e.g., Red Oak, Hickory, Maple) and the exact physical dimensions (width and thickness). Second, you must match the color. Old floors naturally darken and change color due to exposure to UV light. To match the color, you will likely need to buy unfinished replacement wood and experiment with mixing different wood stains on a scrap piece until you achieve the exact aged shade of your existing floor.
Can I replace damaged hardwood flooring without sanding the whole room?
Yes. If you are only replacing one or two boards, you do not need to rent a massive drum sander and sand down the entire room. You only need to lightly hand-sand the new replacement board to ensure it sits perfectly flush with its neighbors. Once the new board is stained and sealed to match, it will blend in. You only need to sand the whole room if you want to completely change the color of the entire floor.
What causes hardwood boards to warp or buckle?
Moisture is almost always the culprit behind warped or buckled hardwood floors. When dry wood absorbs excess moisture from the environment, it expands. Because the boards are packed tightly together, they have nowhere to go but up, leading to bubbling, crowning, or cupping at the edges. This moisture can come from direct water spills, hidden plumbing leaks, high indoor humidity, or moisture rising from a damp basement or concrete slab subfloor.
Is it better to repair or replace damaged hardwood flooring?
It depends entirely on the extent of the damage. If the damage is superficial (light scratches) or isolated to just a few heavily gouged boards, it is much cheaper and faster to repair those specific spots. However, if your floor has widespread, severe water damage, structural rot, or has been sanded down so many times over the decades that the wood is paper-thin, it is better to invest in a complete floor replacement.