Ever wondered why furring strips are put under metal roofing? If you are planning a renovation or building a new home, this question might have crossed your mind while reviewing quotes or talking to contractors. It might seem like an extra step or an unnecessary expense at first glance. However, the truth is that this simple addition is not optional—it is absolutely key to durability, especially in harsh weather conditions.
Think of your roof as a long-term investment. You wouldn’t build a house on a shaky foundation, right? Similarly, installing a metal roof without the proper groundwork is asking for trouble down the line. Metal roofs are famous for their incredible lifespan, often lasting 40 to 70 years with proper installation. But here is the catch: longevity relies heavily on what lies beneath the metal panels.
What Are Furring Strips and Their Role in Roofing?
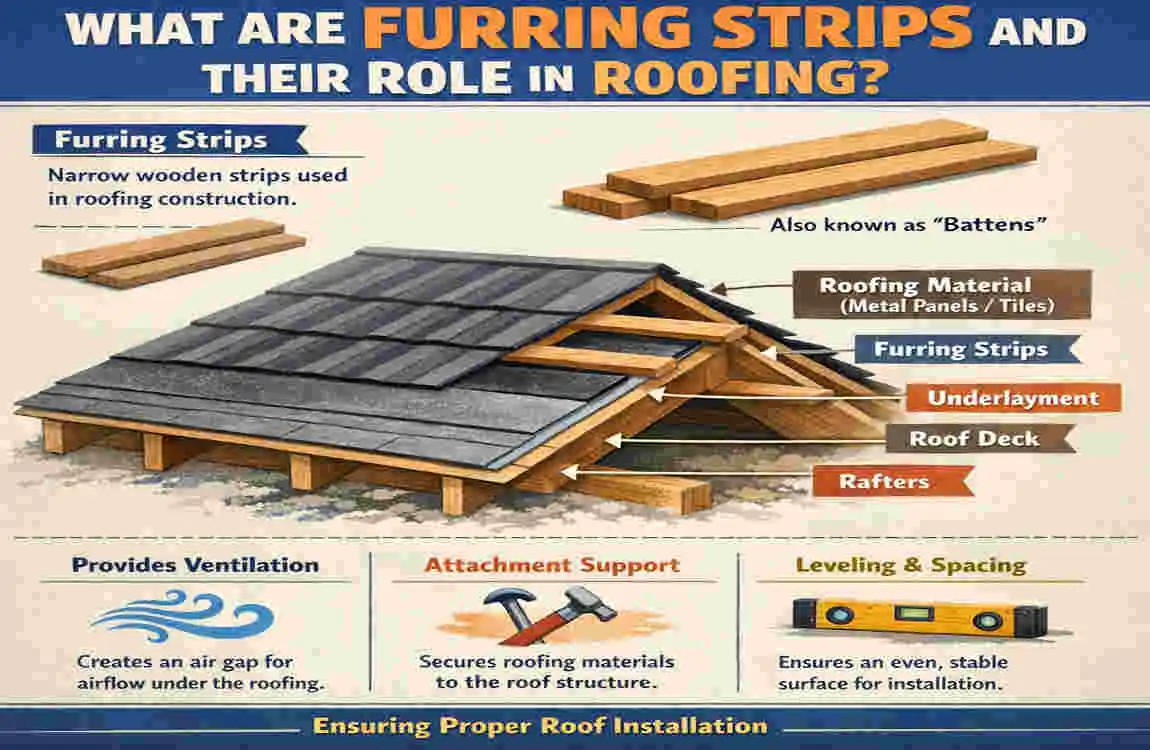
Before we dive into the deep benefits, let’s get on the same page about what these things actually are. Furring strips are essentially long, thin strips of material—usually wood or sometimes metal—that are nailed perpendicular to the rafters or trusses of your roof.
If you go to a lumberyard, you will typically see them sold as 1×2 or 1×3-inch strips. They aren’t massive beams; they are spacers. Their primary job isn’t to hold the weight of the snow or the roof itself, but rather to create a dedicated space between the roof deck (the flat plywood surface) and the metal panels you install on top.
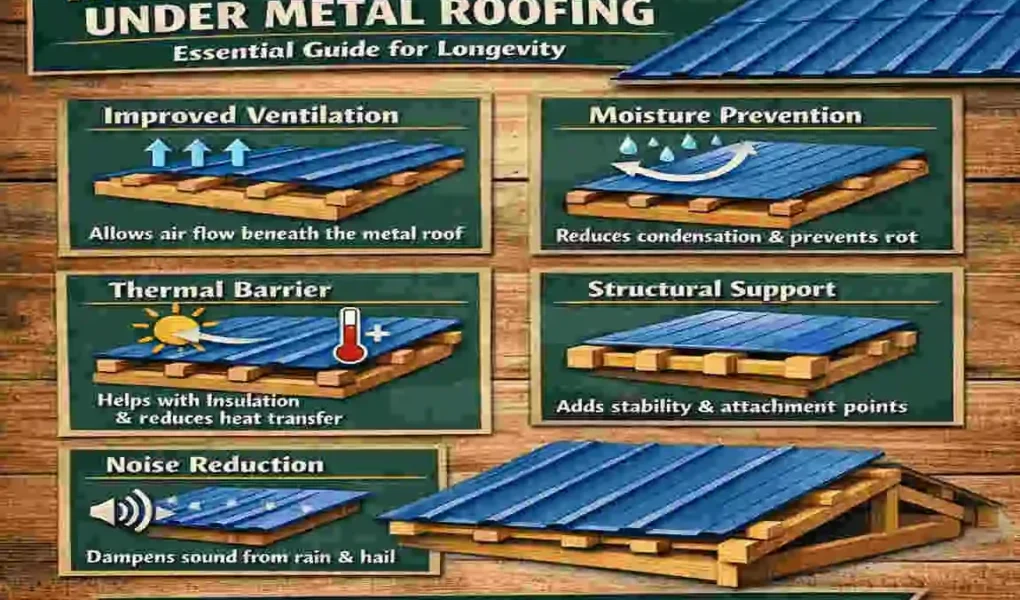
The Primary Purpose: The Air Gap
The magic of furring strips lies in the air gap they create. When you nail these strips down, you lift the metal roofing off the deck. This creates a channel for air to flow freely. Think of it like the difference between wearing a tight, rubber raincoat against your bare skin versus wearing a breathable jacket with a mesh lining. The mesh allows air to move, keeping you dry and comfortable. Furring strips do the same thing for your house.
Furring Strips vs. Purlins
It is easy to get these two terms confused, so let’s clear that up.
- Purlins: These are usually thicker, larger pieces of lumber (like 2x4s) used for structural support. They span across rafters to support the roof load.
- Furring Strips: These are thinner and are used primarily for leveling surfaces and creating ventilation gaps.
While they look similar, their jobs are different. However, in the context of metal roofing evolution, the use of furring strips has become standard practice since the 1950s. Builders realized quickly that laying metal directly on wood trapped moisture, leading to rot. Understanding why put furring strips under metal roofing starts with recognizing this history of trial and error.
Core Reasons: Why Put Furring Strips Under Metal Roofing
Now that we know what they are, let’s get into the “why.” Why should you spend the extra money and time to install these strips? The answer boils down to four critical factors that directly impact how long your roof will last and how comfortable your home will be.
Superior Ventilation and Moisture Control
This is, without a doubt, the most important reason. Moisture is the silent killer of homes. When you live in a house, you generate heat and humidity—from cooking, showering, and even breathing. This warm, moist air rises. Eventually, it hits your roof deck.
If you have metal panels sitting directly on that wood deck, there is nowhere for that heat and moisture to go. It gets trapped. In the summer, the sun heats the metal, and that heat transfers straight into your attic, turning your home into an oven. In winter, warm air from your house meets the cold metal roof, creating condensation.
Condensation is the enemy. It turns into water droplets that soak into your roof deck. Over time, this leads to:
- Rotting wood: Weakening the structure of your roof.
- Mold growth: Which can lead to health issues for your family.
- Reduced insulation effectiveness: Wet insulation doesn’t perform as well.
By installing furring strips, you create a ventilation channel. Air can enter through the eaves (the bottom edge of the roof) and travel up under the metal panels, then exit through the ridge vent at the top. This constant airflow dries out moisture. Studies in the roofing industry have shown that proper ventilation can reduce moisture buildup by up to 80%.
For those living in climates like Lahore, where humidity can be stifling, this airflow is crucial to avoid mold and rot eating away at your investment.
Handling Thermal Expansion and Contraction
Metal is a unique material because it reacts dramatically to temperature changes. It is not static. When the sun beats down on a metal roof, the metal expands. When the sun goes down or a cold rain hits, the metal contracts.
Here is a surprising fact: Metal expands and contracts 2 to 3 times more than wood.
If you screw a long metal panel directly into a solid wood deck, you are restricting this movement. As the metal tries to expand, it has nowhere to go. This builds up stress. Over time, this stress causes two major problems:
- Oil Canning: This occurs when the metal buckles, forming wavy or rippled surfaces. It ruins the aesthetic of your roof.
- Wallowed Holes: As the metal pushes and pulls against the screws, it eventually widens the screw holes. Once the hole is bigger than the screw, water can get in.
Furring strips provide a “flex space.” Because the metal is attached to the strips rather than the solid deck, the entire system has a little more “give.” This prevents buckling and warping, which is essential in areas with hot summers, like the sweltering heat we see in Pakistan.
Protection from Condensation and Corrosion
We talked about moisture rotting the wood, but what about the metal itself? Metal rusts. Even galvanized or painted metal can corrode if it sits in a puddle of water for too long.
When condensation forms on the underside of a metal panel (which happens frequently due to temperature differences), gravity pulls it down. If the metal is flat against the roof deck, that water is trapped against the metal’s surface. This constant contact with moisture accelerates rust and corrosion.
The Air Gap Solution: With furring strips, water creates droplets on the underside of the metal. Because there is an air gap, the droplets can drip off onto the underlayment and run down the roof, or evaporate thanks to the airflow. This keeps the underside of your metal panels dry.
By adding these strips, you can potentially extend your roof’s life by 20 to 30 years. You are rust-proofing your roof from the inside out.
Noise Reduction and Energy Efficiency
Let’s talk about comfort. One common complaint about metal roofs is the noise they make. “Will it sound like I’m inside a drum when it rains?”
If you install metal directly on the deck, the answer is often “yes.” The impact of rain or hail on the metal transfers the sound vibration directly into the wood deck and into your home.
Furring strips act as a sound buffer. By lifting the metal off the deck, you decouple the materials. The air gap deadens the sound. It won’t be silent, but it can be up to 50% quieter than a direct-to-deck installation.
Furthermore, that air gap acts as an insulator. It creates a thermal break. In the summer, it prevents the metal from scorching and conducting heat directly into your attic. This keeps your home cooler and can lower your air conditioning bills by 10-15%.
Furring Strips vs. Direct-to-Deck Installation: A Comparison
To truly understand the value, it helps to compare the two methods side by side. Many homeowners are tempted to go “Direct-to-Deck” because it seems faster and cheaper upfront. But as we will see, the long-term costs tell a different story.
Here is a breakdown of how the two methods stack up:
Feature Installation With Furring Strips Direct-to-Deck Installation
Ventilation Excellent: Continuous airflow removes heat and moisture. Poor: No airflow; heat and moisture get trapped.
Longevity: 50+ Years. Protects both the metal and the wood structure. 20-30 Years: Risk of premature rot and rust is high.
Initial Cost Slightly Higher: Requires additional wood strips and extra labor. Lower: Less material and faster install time.
Quieter Noise Level: An air gap dampens the sound of rain and hail. Louder: Vibrations transfer directly into the home.
Best for Sloped Roofs, Humid Areas: Ideal for longevity in all climates. Flat, Dry Climates: Only viable in very specific, arid conditions.
The Verdict: While direct-to-deck saves you a few dollars today, it costs you thousands later. The lack of ventilation means your underlayment will break down faster, your screws will loosen, and your wood will rot. This comparison clearly highlights why putting furring strips under metal roofing beats direct methods every time.
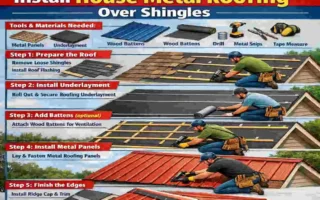
Step-by-Step: Installing Furring Strips Under Metal Roofing
If you are a DIY enthusiast or want to make sure your contractor is doing it right, here is a simplified walkthrough of the installation process.
Note: Always prioritize safety. Use a harness and work with a partner.
Prep the Roof Deck
Before you lay a single strip, the roof deck must be ready. If this is a re-roofing project, remove the old shingles (unless you are doing a lay-over, which furring strips are great for!). Inspect the plywood for rot and replace bad sheets. Clean off all debris.
- Vital Step: install a high-quality synthetic underlayment over the entire deck. This is your final waterproof barrier.
Select Your Materials
Don’t use scrap wood. You need pressure-treated lumber, typically 1×3 or 1×4 inches. Pressure-treated wood resists rot and bugs.
- Spacing Strategy: You will generally space these strips 24 inches on center. This matches the standard width of many insulation products and provides solid anchoring.
install the Strips
Lay the strips horizontally across the roof, perpendicular to your rafters (at a 90-degree angle).
- Start at the bottom (the eave) and work your way up to the ridge.
- Secure them with ring-shank nails or screws that are long enough to penetrate the roof deck and bite into the rafter below.
- Space them carefully, usually 2 to 3 feet apart vertically, as specified in your metal panel instructions.
Add the Metal Panels
Once the grid of strips is secure, you are ready for the metal.
- Lay the metal panels vertically over the horizontal strips.
- Screw the metal into the furring strips.
- Make sure you are hitting the wood solidly. If you miss, that screw is a leak waiting to happen.
- Overlap the seams of the metal panels as per the manufacturer’s guide.
Seal and Flash
This is where the pros separate themselves from the amateurs.
- Install ridge caps at the peak.
- Install flashing at the eaves and rakes (edges).
- Use foam closure strips (which look like puzzle pieces shaped like your metal) to seal the gaps between the metal ribs and the ridge cap. This keeps birds and bugs out while letting air out.
Pro Tip for Lahore & Humid Areas: If you are building in a region with heavy monsoon rains, consider using galvanized metal hat channels instead of wood furring strips. They will never rot, regardless of humidity levels.
Benefits for Longevity: Real-World Examples and Data
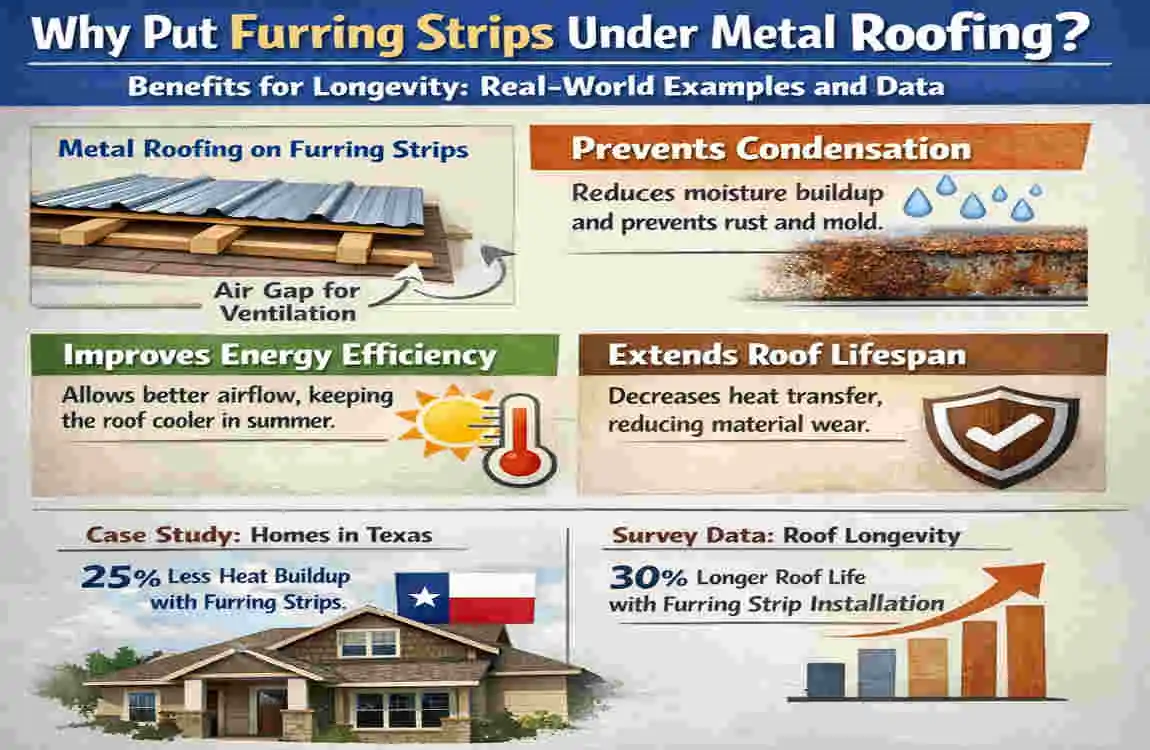
You might be thinking, “This sounds good in theory, but does it work in the real world?” The answer is a resounding yes.
The Farmhouse Case Study
Consider a study of agricultural buildings in the United States. Two barns were built in the same year with the same metal roofing. Barn A used furring strips; Barn B was direct-to-deck.
- Barn A (Furring Strips): After 60 years, the roof remained structurally sound, with minimal rust.
- Barn B (Direct): required a full replacement after 25 years due to severe rusting from the underside and rotted purlins caused by condensation.
The Pakistan Context
In places like Punjab, where temperatures can soar to 45°C+ in the summer and drop significantly in winter, thermal shock is real. Metal roofs installed without strips in these regions frequently suffer from “wallowed out” screw holes within 10 years. Homes that utilize the furring strip method, providing that crucial air gap, consistently report cooler indoor temperatures and roofs that withstand the expanding and contracting cycles for decades.
The ROI Calculation
Let’s talk numbers. Installing furring strips might add $500 to $1,000 to the initial cost of an average home roof (material and labor). However, a full roof replacement because of rot can cost upwards of $10,000 to $15,000.
- Investment: $1,000
- Savings: Avoids a $15,000 replacement.
- ROI: Massive.
Data from the National Roofing Contractors Association (NRCA) supports this, consistently citing ventilation as the primary factor in roofing system longevity.
Choosing the Right Furring Strips for Your Metal Roof
Not all strips are created equal. Your choice depends on your budget, climate, and roof type.
Wood Furring Strips
- Pros: Affordable, easy to cut, easy to find, breathable.
- Cons: Can rot if not pressure-treated, can warp if stored improperly.
- Best For: Residential homes, DIY projects, and asphalt shingle overs.
- Cost: Generally PKR 50-150 per strip (depending on size and treatment).
Steel Hat Channels
- Pros: Perfectly straight, will never rot, fire-resistant, very strong.
- Cons: More expensive, harder to cut (need metal shears), conducts heat.
- Best For: Industrial buildings, areas with high termite risk, or extreme humidity.
Sizing Guide
Roof Type Strip Material Recommended Spacing
Standard Corrugated 1×4 Wood 24 inches
Standing Seam 1×4 Wood or Steel 12-24 inches (check manual)
Stone Coated Steel 2×2 Wood 14 inches
Factors like your roof pitch also matter. Steeper roofs drain water faster, so you have slightly more leeway. Flatter roofs require proper installation to prevent water from pooling against the strips.
Common Myths About Furring Strips Under Metal Roofing
Despite the clear benefits, there is a lot of bad advice floating around. Let’s bust a few myths.
“You don’t need them for modern metal roofs.”
Fact: False. While metal coatings have improved, the physics of condensation and thermal expansion haven’t changed. Modern metal still sweats, and it still moves. The science of ventilation remains the same regardless of how fancy the paint on the metal is.
“It makes the roof too high and looks weird.”
Fact: Furring strips only add about 0.75 to 1.5 inches of height. From the ground, this is completely invisible. The trim and flashing cover the edges, giving your roof a sleek, professional look.
“It’s too expensive.”
Fact: We covered this in the ROI section. The cost of the wood is negligible compared to the cost of the metal panels. Skipping them is “penny-wise and pound-foolish.” You are saving pennies now to spend thousands later.
“Only professionals can do it.”
Fact: If you can swing a hammer and read a tape measure, you can install furring strips. It is actually one of the easiest parts of the roofing process. It creates a forgiving grid that makes laying the metal panels easier, not harder.
Maintenance Tips for Metal Roofs with Furring Strips
Once you have installed your roof with furring strips, the maintenance is incredibly low, but it’s not zero. Here is how to keep it in top shape:
- Annual Inspections: Once a year, grab a pair of binoculars or safely climb a ladder. Look for any screws that might have backed out. Even with furring strips, vibration can loosen things over the course of a decade.
- Keep Gutters Clean: Clogged gutters can cause water to back up under the eaves. This can soak the bottom furring strip. Keep the water flowing.
- Clear debris: Leaves and branches sitting on the roof trap moisture. Brush them off.
- Check the Ridge Vent: Ensure the ventilation path at the top hasn’t been blocked by bird nests or debris. The air gap only works if air can flow through it.
- Repainting: Every 10-15 years, check the paint finish. A fresh coat helps prevent surface rust.
FAQs: Why Put Furring Strips Under Metal Roofing
Here are quick answers to the most common homeowner questions.
Q: Why put furring strips under metal roofing? A: To create an air gap that provides ventilation, prevents condensation and rot, allows for thermal expansion, and creates a quieter, longer-lasting roof.
Q: Are furring strips necessary for all metal roofs? A: While you can install directly to the deck, it is highly recommended to use strips for almost all residential applications to guarantee longevity and validate warranties.
Q: How much space should be between furring strips? A: Typically, 24 inches on center is the standard. However, always check the installation guide for your specific metal panel brand.
Q: Can I install metal roofing without furring strips? A: Yes, but you risk condensation buildup, mold, and “oil canning” (warping) of the metal. It significantly reduces the roof’s lifespan.
Q: What is the cost of furring strips in Pakistan? A: Prices vary by timber market, but expect to pay between PKR 50 and PKR 150 per running foot, depending on the wood quality and treatment.