There are no hollow echoes, no annoying squeaks, and absolutely no shifting when you step. That is the magic of a properly executed glue-down floor. If you have a concrete slab and want to bring the warmth and beauty of real wood into your space, learning how to install glue-down wood flooring on concrete is the ultimate game-changer for your home renovation.
While floating floors have their place, gluing your wood floor directly to a concrete subfloor offers a level of stability that simply cannot be matched. It feels permanent because it is permanent. This specific installation method is absolutely ideal for basements, slab-on-grade homes, or any major renovation where you want a premium, high-end feel. Unlike floating floors that can feel spongy, or nail-down floors that require a wooden subfloor, the glue-down method secures your flooring directly to the foundation of your home.
Industry guides continually show a rising popularity for this method, noting that modern adhesives create bonds that are up to 20% more durable than those used in the past. When you use the right materials and follow the proper steps, you create a floor that will easily withstand the high traffic of daily life, rowdy pets, and active kids.
| Tool | Purpose |
|---|---|
| Notched trowel (e.g., B11 or 3010) | Spreads adhesive evenly in ridges for optimal bonding. |
| Measuring tape | Measures room dimensions and plank cuts accurately. |
| Utility knife or circular saw | Cuts planks to fit edges and obstacles cleanly. |
| Level and chalk line | Ensures subfloor flatness and straight starting lines. |
| 75-100 lb roller | Presses planks firmly into adhesive for full contact. |
| Rubber mallet and tapping block | Taps planks together without damaging edges. |
| Carpenter’s square | Checks for square layout at walls. |
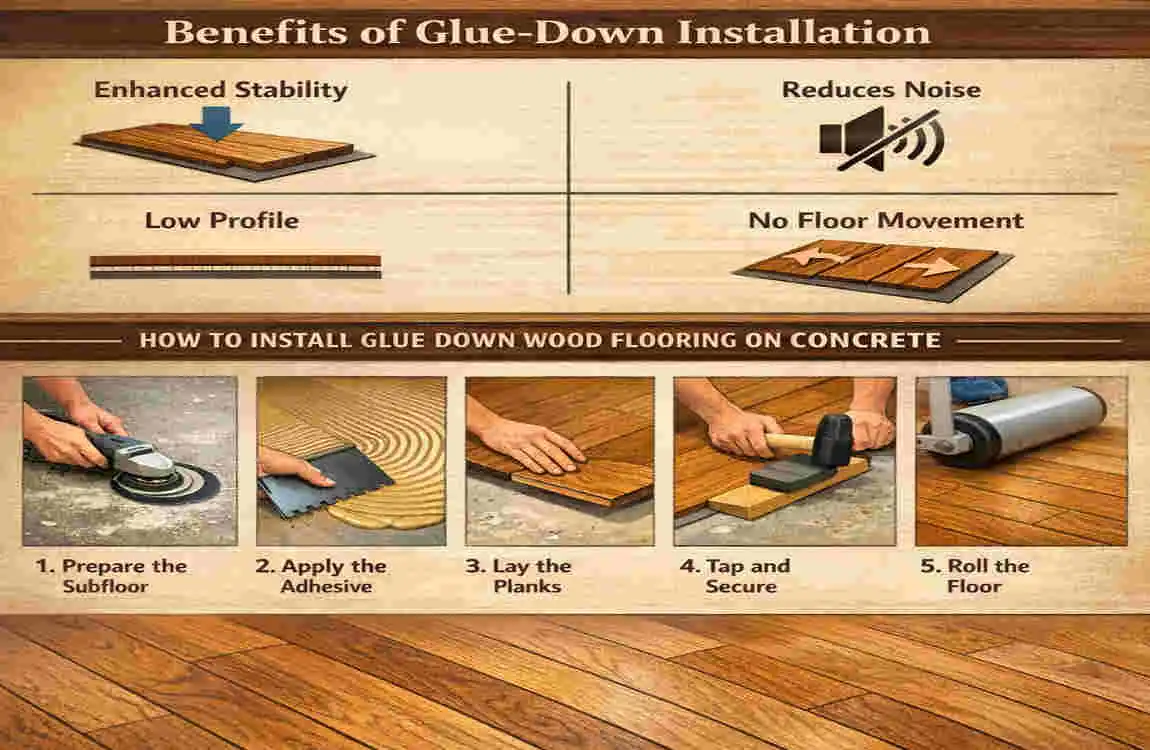
The Incredible Benefits of Glue-Down Installation
Before you dive headfirst into purchasing materials, let us talk about why you are making the right choice. Why should you spend the extra time and effort to glue down your flooring? The benefits go far beyond just aesthetics.
First and foremost, you get rock-solid adhesion. When you glue engineered hardwood directly to your concrete slab, you prevent future shifting or movement. The floor becomes one with the house. This direct bond eliminates the “spongy” feeling you sometimes get with floating floors.
Secondly, you will notice a massive noise reduction. Because there is no layer of air trapped between the wood and the subfloor, foot traffic sounds muffled and solid, rather than hollow and loud. This is especially important in high-traffic homes or open-concept living spaces where noise can easily travel.
Finally, let us talk about longevity. When properly installed and maintained, a glue-down wood floor can easily last 20 to 30 years. It is an investment in your home’s value and your daily comfort.
To help you see the bigger picture, let us compare the glue-down method to other popular installation techniques:
Installation MethodBest Used ForOverall DurabilityCost Level
Glue-Down Concrete slabs, basements, high-traffic rooms Very High Medium to High
Floating Quick DIY projects, over existing floors Medium Low
Nail-Down Plywood or wooden subfloors Very High High
A Quick Pro Tip: This method is practically tailor-made for moisture-prone areas like basements or ground-level slabs, provided you prep the concrete correctly. With the right moisture barriers and adhesives, your floor will remain beautiful and warp-free for decades.
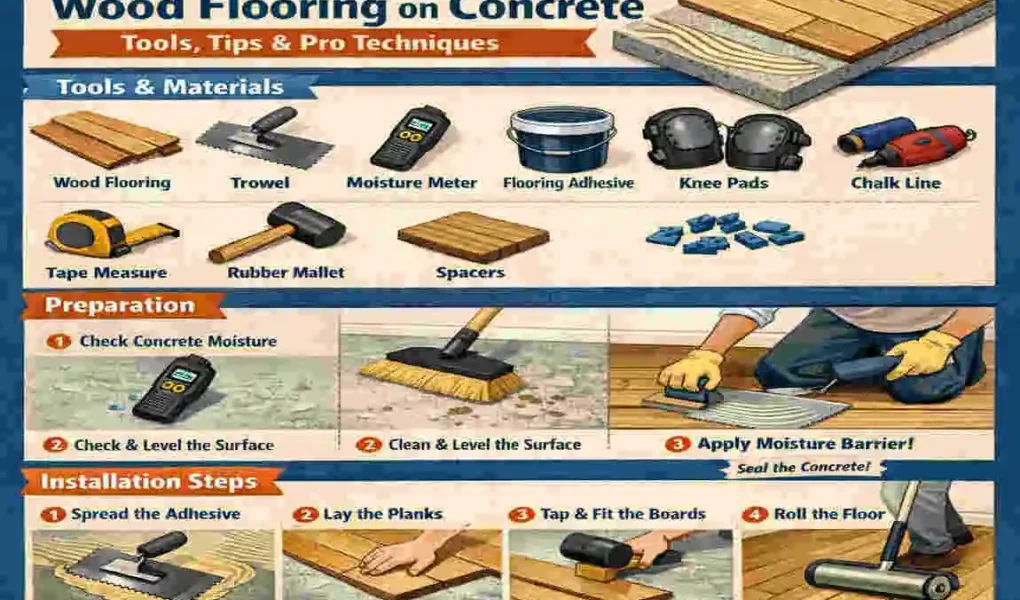
Essential Tools and Materials You Will Need
To pull off a professional-looking installation, you absolutely need the right tools. Trying to cut corners with cheap tools will only make your job harder and compromise the final result. Gather these items before you even open a box of flooring.
Here are your must-have tools and materials, broken down for easy scanning:
- The Right Notched Trowel: This is crucial. You generally need a 1/4″ x 3/16″ V-notch trowel to spread about 1 to 1.2 kilograms of adhesive per square meter. Always check your specific adhesive bucket for the exact trowel recommendation.
- Premium Wood Flooring Adhesive: Look for a urethane-based, moisture-cured adhesive. These are incredibly strong, flexible, and often contain low VOCs (Volatile Organic Compounds), making your indoor air safer to breathe during installation.
- Concrete Preparation Gear: You will need a concrete moisture meter (or a calcium chloride test kit), a concrete grinder for high spots, and a high-quality self-leveling compound for low spots.
- Installation Hand Tools: A sturdy pry bar, a heavy-duty tapping block, a metal pull bar, a 6-foot carpenter’s level, a chalk line for your starting point, and plenty of safety gear (safety glasses and ear protection).
- Expansion Spacers: Wood expands and contracts. You will need 3/8″ expansion spacers to keep the wood away from your walls.
- Knee Pads: Do not skip these! You will be on your knees for hours, and good knee pads are worth their weight in gold.
- Cutting Tools: An oscillating multi-tool for undercutting door jambs, and a reliable miter saw and table saw for cutting your planks.
A Huge Pro Tip: Rent a floor roller! Specifically, look for a heavy-duty floor roller weighing 100 to 150 pounds. Rolling the floor after you lay the planks ensures the wood makes 100% contact with the adhesive, pushing out trapped air and flattening the ridges.
If you are mapping out your budget, expect to spend $500 to $800 on adhesive, self-leveler, and tool rentals for a standard 400-square-foot room. This does not include the cost of the wood itself, but it ensures you have what you need for a flawless application.
Preparing the Concrete Subfloor
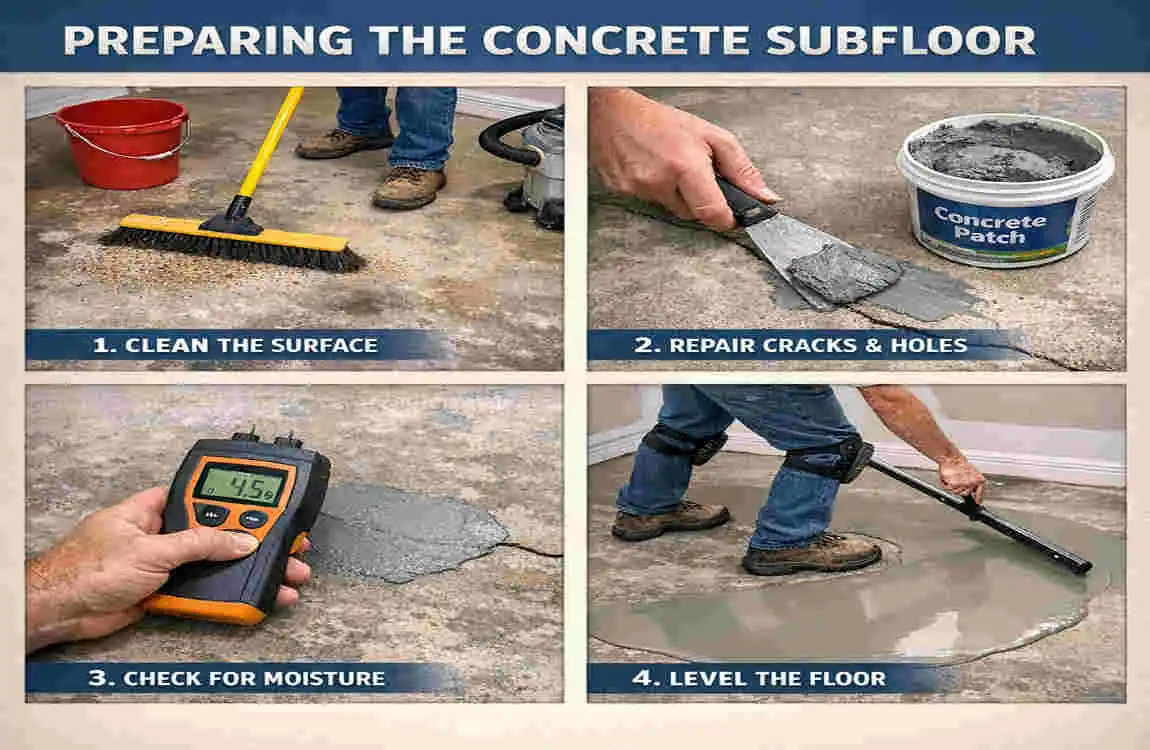
If there is one section of this guide you need to read twice, it is this one. This is the critical first phase. In the flooring industry, it is well known that nearly 80% of all glue-down floor failures stem from poor subfloor preparation. If your concrete is not ready, your beautiful new wood floor is doomed from the start.
Do not rush this. Take your time, put in the elbow grease, and make sure your concrete slab is perfect before you ever open a bucket of glue.
Test for Hidden Moisture
Concrete might look and feel bone dry, but it acts like a giant, hard sponge. It constantly absorbs and releases water vapor from the earth below. You must test the moisture levels. Use a calcium chloride test kit or an in-situ RH (Relative Humidity) probe.
For most standard urethane adhesives, your moisture emission rate should not exceed 3 pounds per 1,000 square feet over 24 hours. If your moisture is higher than this, you must apply a specialized moisture barrier primer before you glue anything down.
Clean the Surface Thoroughly
Adhesive cannot stick to dust, dirt, or old paint. You need a virgin concrete surface. Start by vacuuming up all loose debris. Next, degrease the floor with a heavy-duty cleaner such as TSP (Trisodium Phosphate). If the slab is particularly dirty or has been exposed to the elements, you might need to pressure-wash it and let it dry completely. If there is old glue, paint, or sealer on the floor, you will need to mechanically scrape or grind it off.
Level the Playing Field
Wood flooring does not bend well. If your concrete is wavy, your floor will have hollow spots that pop and crackle when you walk on them. You need to check for flatness.
Take your 6-foot level or a straightedge and drag it across the floor. You are looking for any deviations greater than 3/16 of an inch over a 10-foot span. If you find a high spot, use your concrete grinder to shave it down. If you find a low spot (a “birdbath”), fill it in using a high-quality, Portland cement-based self-leveling compound. Spread it smooth and let it cure.
Apply a Moisture Barrier (If Needed)
If your slab sits directly on the ground (slab-on-grade) or is below ground (basement), applying a moisture barrier is often non-negotiable. Look for a non-permeable primer or an adhesive with a built-in vapor retarder. This creates a chemical shield that stops subterranean moisture from warping your gorgeous new wood planks.
Your Subfloor Prep Checklist:
- Sweep the floor vigorously, then vacuum it twice.
- Patch all visible cracks and divots with a concrete filler.
- Verify the flatness with a long straightedge, marking high and low spots with a pencil.
- Apply leveling compound where needed and allow 24 to 48 hours for complete cure.
After these steps, your subfloor should be smooth, flat, clean, and completely bare. You are now ready for the fun part.
Choosing the Right Flooring and Adhesive
You cannot just glue any piece of wood to concrete. For this specific project, your absolute best choice is engineered hardwood flooring.
Why? Engineered hardwood is constructed from multiple layers of wood pressed together in a cross-grain pattern. This unique construction makes it highly resistant to the expansion and contraction caused by changes in temperature and humidity. A solid piece of hardwood is much more likely to cup, crown, or buckle when glued directly to a concrete slab. Look for an engineered plank with a thick wear layer (around 3-5mm) so you can sand and refinish it in the future if needed.
Next, you need to match your adhesive to your flooring. The industry gold standard for gluing wood to concrete is a moisture-cured urethane adhesive. Products like Bostik’s BEST or Taylor 201 are phenomenal choices. They remain incredibly strong but offer just enough flexibility to move with the wood as your house naturally shifts slightly through the seasons.
Before you install, you must consider the environment. Keep your home’s indoor humidity between 40% and 60%. Narrower planks (3 to 5 inches wide) are generally safer to glue down than ultra-wide planks, as they distribute expansion forces better.
Most importantly: You must acclimate your wood! Bring the closed boxes of flooring into the room where they will be installed. Leave them there for 7 to 14 days at normal room temperature. This allows the wood to adapt to your home’s specific climate, preventing significant shrinking or swelling after the glue dries.
Step-by-Step Installation Guide
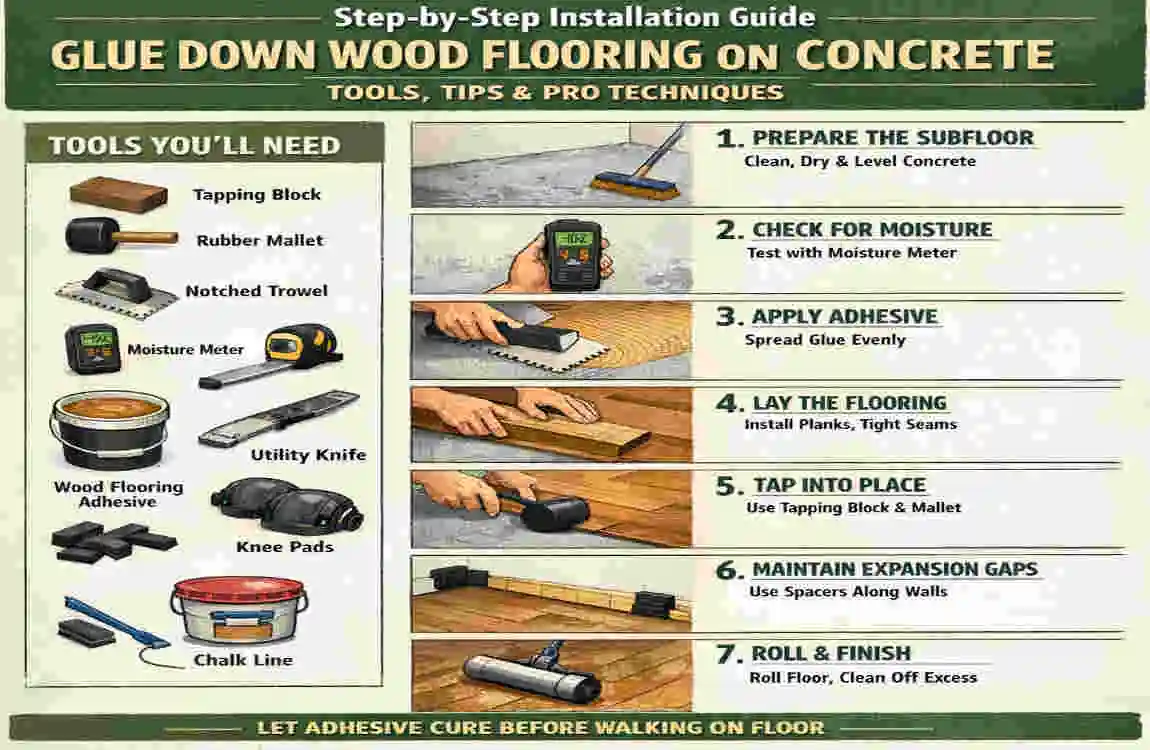
Now we arrive at the main event. You have prepped the concrete, acclimated your wood, and gathered your tools. Let us break down exactly how to install glue down wood flooring on concrete, step by detailed step.
Spreading the Adhesive Properly
Working with urethane wood adhesive is a bit like working with sticky molasses. It requires a specific technique. You never want to spread out more glue than you can cover with flooring in about 30 to 45 minutes. If you spread too much, the glue will dry out and form a “skin,” losing its ability to grab the wood.
Pour a small amount of adhesive onto the concrete. Take your notched trowel and hold it firmly at a 45-degree angle. Scrape the trowel across the floor, pressing firmly so the flat edge scrapes the concrete clean while the notches leave perfect, uniform ridges of glue.
Once spread, many urethane adhesives require “flash time” or “tack up” time. This means you let the glue sit exposed to the air for 45 to 90 minutes until it becomes sticky to the touch, but does not transfer onto your finger. Always read your specific bucket’s instructions regarding flash time, as every brand is slightly different.
Laying the Critical First Row
Your first row dictates how the rest of the room will look. If your first row is crooked, the entire floor will be crooked. Take your time here.
Before you spread glue against your starting wall, dry-lay the first row. Pick the longest, straightest boards from your boxes. Place your 3/8″ expansion spacers against the wall, and lay the boards down to see how they fit. Snap a chalk line on the concrete to give yourself a perfectly straight visual guide.
Once you are happy, spread your adhesive up to the chalk line. Carefully place the first board into the glue. Do not slide it around, or you will push the glue into a pile. Drop it straight down.
Fit the tongue of the second board into the groove of the first. Use your tapping block and a hammer to gently tap the joint until it is completely closed. Never hit the wood directly with a hammer; you will crush the delicate edges. Once the first row is down, roll it immediately with your heavy floor roller to set it firmly into the adhesive ridges.
Installing the Middle and Final Rows
As you move out into the center of the room, you need to establish a strong, visually appealing pattern. The golden rule of wood flooring is to stagger your seams.
The end joint of a board in one row should be at least 6 to 8 inches away from the end joint in the row right next to it. Never let your seams line up to create an “H” pattern on the floor; it weakens the floor’s structure and makes it look highly amateurish.
To achieve a natural look, use a technique called “racking.” Open three or four boxes of flooring at once. Pull boards from different boxes randomly. Wood is a natural product, and color variations happen. By mixing the boxes, you evenly distribute light and dark boards across the room, creating a beautiful, cohesive look.
When you reach the ends of a row, cut the final piece to fit. Measure the gap, subtract 3/8″ for your expansion gap, and cut the board using your miter saw or a jigsaw.
To pull these end pieces tight against the rest of the row, use your metal pull bar. Hook one end over the edge of the board and gently tap the other end with your hammer to pull the joint tight.
Handling Tricky Edges and Transitions
Flooring installation is rarely just a big square room. You will encounter door frames, closets, and transitions to other types of flooring.
When you reach a doorway, do not try to cut the wood to fit perfectly around the complex shape of the door jamb. Instead, undercut the door jamb. Take a scrap piece of your new flooring, lay it flat on the concrete next to the door frame, and rest your oscillating multi-tool blade on it. Plunge the blade into the door frame, cutting away the bottom slice of wood. Now, your new flooring can simply slide cleanly underneath the door frame for a flawless, professional finish.
When transitioning to tile or carpet, you will need to install T-moldings or transition strips. Glue the molding track directly to the concrete using your urethane adhesive, leaving proper expansion gaps on either side.
For the very last row against the far wall, you will almost certainly have to rip the boards lengthwise. Measure the gap in several places (walls are rarely perfectly straight), subtract your 3/8″ expansion gap, and use a table saw to rip the boards to the exact custom width required.
Rolling and Curing the Floor
Laying the wood is only half the battle. Securing it is the final, vital step.
Once a section of the floor is laid (or once the whole room is done, depending on the speed of your work), you must use a heavy-duty floor roller weighing 100 to 150 pounds. Roll the entire floor twice. The first pass is the “wet pass” done shortly after laying the wood to crush the adhesive ridges flat against the back of the plank. The second pass is a “dry pass” done an hour or two later to ensure the bond remains tight as the glue begins to cure.
Pro Technique: If you are worried about getting total coverage, you can “back-butter” the planks. This means applying a thin skim coat of adhesive directly to the back of the board before pressing it into the glued concrete. This guarantees 95% to 100% coverage, which is phenomenal for long-term stability. Also, always try to work uphill or away from the door, so you are not stepping on freshly laid, sliding planks.
After rolling, stay off the floor! Let the room sit completely untouched for 24 to 72 hours. Allowing foot traffic too early will shift the planks and break the adhesive bond before it fully hardens.
Pro Tips and Common Mistakes to Avoid
Even seasoned DIYers can stumble when learning to install glue-down wood flooring on concrete. Keep these professional tips in mind to ensure your project runs smoothly.
Pro Tip: Always monitor the temperature of your concrete slab. The room might feel warm, but concrete holds the cold. Your slab temperature should be consistently between 65°F and 80°F for the adhesive to cure properly.
Avoid Rushing the Adhesive: One of the most common mistakes is spreading too much glue and letting it “skin over” before laying the wood. If you lay wood onto skinned-over adhesive, it will not grab. You will end up with hollow spots that pop when you walk on them. Work in small, manageable sections.
Never Ignore Moisture: Skipping the moisture test is a recipe for disaster. If trapped moisture rises from the concrete, it will push into the bottom of the wood planks, causing the edges to curl upward. This is called “cupping,” and it can ruin an entire floor.
What happens if you make a mistake? Here is a quick troubleshooting checklist:
The Common Mistake The Professional Fix
Uneven subfloor leaving hollow-sounding spots Prevent this entirely by using a self-leveler during prep. If already glued, specialized epoxy injection kits can fix small hollow spots.
High concrete moisture causing wood to cup Always apply a barrier primer or use a moisture-retarding adhesive before installation.
Poor seam staggering creating an ugly pattern Use the random rack method. Pull boards from 3-4 different boxes simultaneously to mix lengths and colors.
Glue squeezing up between the floorboards Clean it immediately! Use adhesive remover wipes before it dries. Once dried, urethane is nearly impossible to remove cleanly.
Proper Finishing and Long-Term Maintenance
Congratulations, the hard work is done! The floor is laid, the glue is cured, and your room looks completely transformed. Now it is time to put on the finishing touches.
Carefully remove all your 3/8″ expansion spacers from around the perimeter of the room. Install your baseboards and shoe molding (or quarter round). Remember, nail the baseboards into the wall, not into the floor! The floor still needs to be able to expand and contract freely underneath the trim.
If you installed pre-finished engineered hardwood, simply dry-buff the floor with a microfiber mop to remove any lingering dust. If you installed unfinished wood, you will now need to rent a sander, sand the floor smooth, and apply your stain and polyurethane topcoats.
To keep your new glued-down floor looking stunning for the next 20 years, follow strict maintenance rules. Clean it only with a damp mop and a pH-neutral wood floor cleaner. Never use a steam mop. The extreme heat and moisture will blast through the finish, penetrate the wood, and eventually destroy the adhesive bond below.
To maintain its luster, plan for an annual “screen and recoat.” This is a light buffing of the top clear coat, followed by a fresh layer of polyurethane, which restores the shine and fixes micro-scratches without sanding down to bare wood.
Frequently Asked Questions (FAQs)
You likely still have a few specific questions swirling in your mind. Let us address the most common inquiries homeowners have when tackling this project.
Can I install glue-down wood flooring on brand new concrete? Yes, but you must be incredibly patient. New concrete holds massive amounts of water. You must wait a minimum of 60 to 90 days for a new slab to cure and release its initial moisture before you can even begin testing it. Once the 90 days have passed, perform a calcium chloride test to ensure the moisture emission rate is safe.
What are the best glue down wood flooring on concrete tools? The non-negotiable tools include a high-quality 1/4″ x 3/16″ V-notch trowel (for perfectly sized glue ridges), a heavy floor roller (100-150 lbs for crushing those ridges and securing the bond), an oscillating multi-tool (for flush-cutting door frames), and a concrete moisture meter. Skimping on these specific tools will severely complicate your installation.
Is it difficult to remove a glue-down floor later? Truthfully, yes. Urethane adhesives are designed to be permanent. Removing a glue-down floor usually requires motorized floor scrapers and significant physical labor. This is why getting it right the first time is so crucial.
Do I need an underlayment for a glue-down floor? No. In a glue-down installation, the adhesive acts as the bonding agent directly between the concrete and the wood. Adding a traditional soft underlayment (like you would with a floating floor) would defeat the purpose, as you cannot glue wood to a soft, floating pad. However, if sound dampening is a huge concern, there are specialized cork or rubber underlayments designed specifically to be double-glued (glued to the concrete, then the wood glued to the underlayment).
Why do I need to leave an expansion gap if the wood is glued down? Even though the wood is securely bonded to the concrete, it is still an organic, porous material. It will swell slightly in the humid summer and shrink slightly in the dry winter. The adhesive is formulated to stretch with this microscopic movement. If you do not leave a 3/8″ gap at the walls, the expanding wood will press against the drywall, creating immense pressure that will cause the floor to buckle upward, ripping the glue right off the concrete.
How long does the adhesive smell last? Modern urethane adhesives are largely low-VOC, meaning they do not off-gas toxic, harsh-smelling fumes like older glues did. However, there is still a mild, distinct odor. With open windows and good ventilation, the smell usually dissipates completely within 48 to 72 hours after the installation is complete.