You step out of a relaxing, steamy shower, and instead of your feet hitting cold ceramic tiles, they meet the warm, inviting texture of natural wood. Wood floors add undeniable spa-like elegance and incredible warmth to any bathroom. However, they also come with a notorious reputation. You might have heard horror stories about wood floors warping, cupping, and rotting from constant exposure to humidity, steam, and rogue splashes.
The truth is, wood and water are natural enemies. Unprotected wood acts just like a sponge, eagerly soaking up every drop of moisture in the air. When wood absorbs water, it swells. When it dries, it shrinks. This constant expansion and contraction will eventually destroy your beautiful flooring.
But do not let that discourage you! You do not have to abandon your design dreams. The secret to making this beautiful design choice work lies entirely in the protection layer. Learning how to seal wood floors in bathroom environments effectively is the ultimate game-changer. Proper sealing creates an impenetrable moisture barrier, transforming vulnerable timber into a highly durable, waterproof surface.
| Item | Purpose |
|---|---|
| Medium- and fine-grit sandpaper | Smooth surface and remove imperfections |
| Wood filler | Repair cracks or gaps |
| Waterproof sealer (polyurethane varnish, resin-acetone mix, or stain-sealer combo) | Create moisture barrier; choose bathroom-grade for high humidity |
| Applicator (brush, lambswool roller) | Even application along wood grain |
| Tack cloth or vacuum | Dust removal |
| Elastic edge sealant or caulk | Seal seams and transitions to walls |
The Viability of Wood Floors in Bathrooms
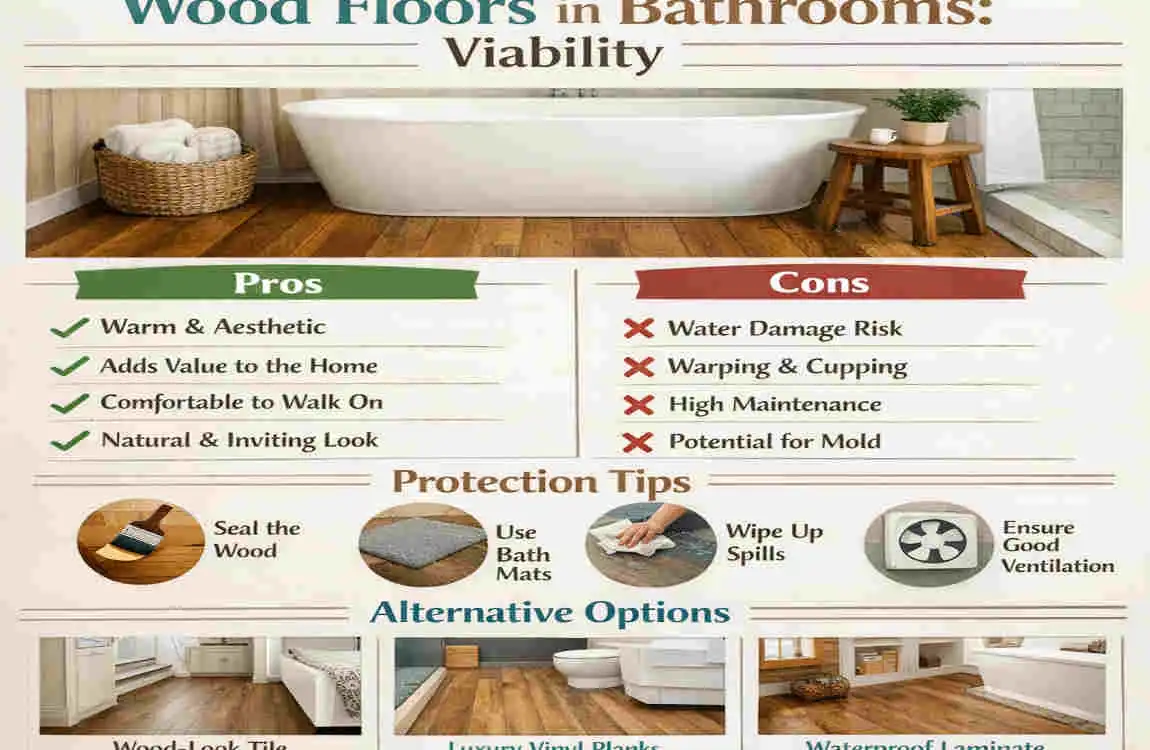
Before we jump into the mechanics of sealing wood floors in bathroom settings, we need to address the elephant in the room: Is putting wood in a wet environment a good idea?
Understanding the Moisture Challenge
Bathrooms are uniquely hostile environments for organic materials. Every time you take a hot shower, the room fills with thick steam. When you wash your hands or step out of the tub, water inevitably drips onto the floor. If you leave natural wood exposed to this high humidity, the wood fibers will swell. Over time, this leads to structural damage, mold growth, and a ruined floor. Therefore, you cannot simply lay down raw planks and hope for the best. Sealing bathroom wood floors is an absolute necessity, not an optional upgrade.
Choosing the Best Wood Types
Not all wood species are created equal, especially when it comes to handling moisture. If you are starting a new flooring project, choose a wood type that naturally resists water.
Engineered oak is a fantastic choice. Unlike solid hardwood, engineered wood features multiple layers of wood pressed together, making it incredibly dimensionally stable. It will not warp or shift nearly as much as solid timber. Teak is another Premium option. Teak naturally contains high levels of oils and rubber, which provide built-in water resistance. It has been used on boat decks for centuries for this very reason!
Assessing the Subfloor
Even if you master the art of the waterproof wood bathroom floor, your top layer is only as strong as what lies beneath it. You must assess your subfloor before installing or sealing any wood. Never lay wood flooring directly over an uneven or moisture-prone surface. We highly recommend using a moisture-resistant plywood or a solid cement board base. This prevents dampness from seeping up from beneath the house and attacking your wood.
The aesthetic appeal of rich, warm wood over sterile tile is unmatched. By preparing correctly and understanding the environment, you set yourself up for total success.
Essential Materials: What You Need to Seal Wood Floors Bathroom Style
You cannot build a house without bricks, and you cannot waterproof a floor without the right supplies. Gathering your materials in advance ensures a smooth, uninterrupted workflow.
Here is a quick breakdown of everything you will need to get the job done right.
Waterproofing Materials Breakdown
Category Essential Items Purpose in the Project
Prep Tools Sandpaper (80, 120, 220, 320 grit), shop vacuum, tack cloths Smoothing the surface, opening wood pores, and removing every speck of dust.
Sealants Oil-based polyurethane, Waterlox, or marine-grade epoxy Creating the actual waterproof barrier that blocks moisture.
Application High-quality natural bristle brushes, foam rollers, lambswool applicator Spreading the sealant in smooth, even coats without leaving brush marks.
Safety Gear Nitrile gloves, respirator masks, portable ventilation fans Protecting your lungs and skin from strong Volatile Organic Compounds (VOCs).
Optional Adds Anti-tannin primer, clear wax topcoat, silicone bathroom caulk Extra moisture blocking and securing the edges around plumbing fixtures.
Budgeting for Your Project
How much will this endeavor cost? The great news is that doing this yourself is highly cost-effective. For an average-sized bathroom (around 100 square feet), you can expect to spend between $100 to $300 on materials. The bulk of this cost will go toward purchasing a Premium, high-quality sealant. Never skimp on your sealant; finding the best sealant for wood floors is worth every extra penny.
Preparation: The Secret to a Waterproof Wood Bathroom Floor
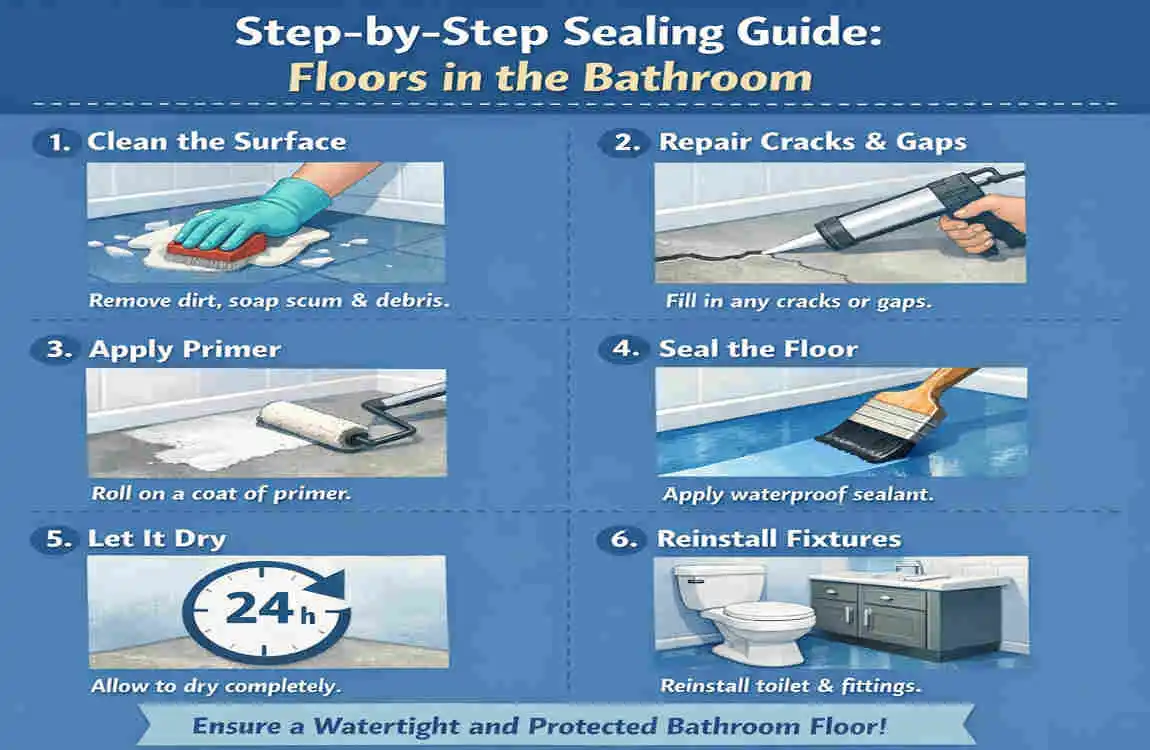
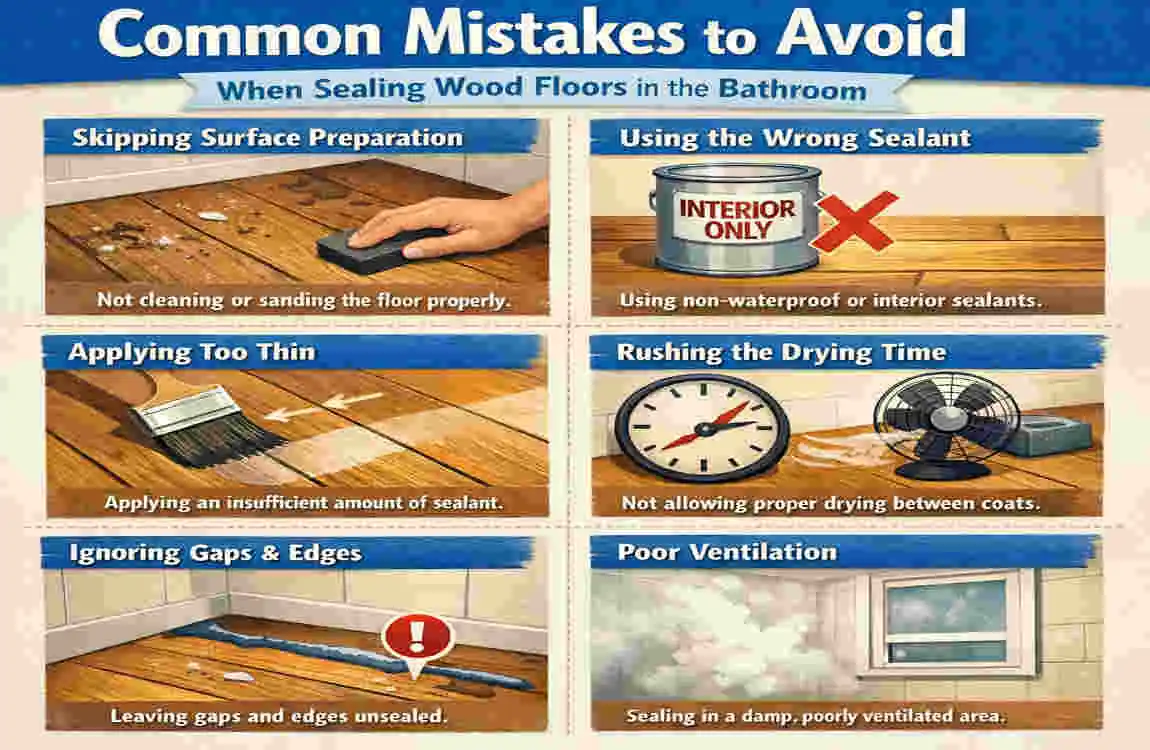
Ask any professional woodworker, and they will tell you the same thing: the finish is only as good as the prep work. If you skip steps here, your sealant will peel, bubble, and ultimately fail. Do not rush this phase!
Clean the Surface Thoroughly
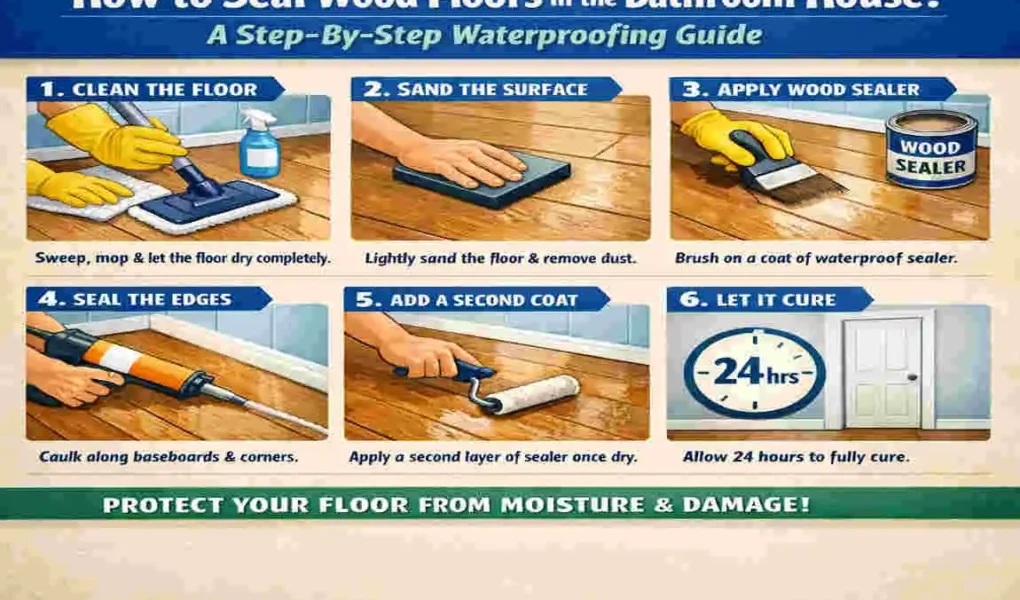
Start by removing absolutely everything from the bathroom floor. Sweep up loose debris, and then go over the entire area with a heavy-duty shop vacuum. Next, you need to wash the floor to remove unseen oils, soap scum, or chemical residues. We recommend using a TSP (Trisodium Phosphate) cleaner. Wash the floor meticulously, but do not flood the wood with water. Once clean, you must allow the floor to dry completely. Wait at least 48 hours before moving to the next step.
Sand the Wood to Perfection
Once the floor is bone dry, it is time to sand. Sanding removes old, degraded finishes and opens the wood’s pores so it eagerly drinks in the new sealant.
- Start with a coarse 80-grit sandpaper to strip away old finish and smooth out deep scratches.
- Move up to a 120-grit sandpaper to refine the surface.
- Finish with a fine 220-grit sandpaper to make the wood feel as smooth as glass.
Always sand moving with the grain of the wood, never across it. Going against the grain will leave ugly scratch marks that your sealant will highlight.
Repair Gaps and Cracks
Wood naturally shrinks and expands, which can leave gaps between your floorboards. In a bathroom, water will seek out these cracks and pool inside them, causing rot. Use a high-quality, stainable wood filler to pack into any visible cracks or gouges. Pay special attention to the areas around your toilet flange and shower edges, as these are high-risk splash zones. Smooth the filler with a putty knife, then let it dry according to the package directions.
Prime if Necessary
If you are working with oak or certain exotic woods, consider applying an anti-tannin primer. Woods like oak contain natural tannins (acids) that can sometimes bleed through water-based sealants, causing ugly yellow or brownish stains. A primer locks those tannins in place.
A Stern Warning: Poor preparation is the number one reason floor sealants peel off. Take your time, let things dry fully, and wipe the entire floor down with a sticky tack cloth to grab microscopic dust before you open your sealant.
Step-by-Step Guide on How to Seal Wood Floors in Bathroom
Now we reach the main event. If you want to master how to seal wood floors in bathroom environments, you must treat this as a layered process. You are not just painting the floor; you are building a microscopic, waterproof shield.
Here is your detailed, step-by-step playbook.
Apply the Penetrating Base Sealer Coat
Your first coat is the most important because it needs to soak deep into the raw wood fibers, locking them together and sealing them from the inside out.
If you are using an oil-based polyurethane, professionals often recommend thinning the first coat with a splash of mineral spirits (about a 10% reduction). This makes the liquid thinner, allowing it to penetrate deeper into the wood grain rather than just sitting on top.
Dip your natural bristle brush or lambswool applicator into the sealant. Apply the liquid smoothly and deliberately, always pulling your strokes along the direction of the wood grain. Do not brush back and forth aggressively, as this will whip air bubbles into the finish. Make sure you generously coat the joints where the floorboards meet, as these seams are highly vulnerable to water damage.
Once you have covered the entire room—working your way out the door so you do not paint yourself into a corner—leave the room and turn on your exhaust fan.
Lightly Sand and Prepare for the Second Coat
Wait for the first coat to dry completely. Depending on your room’s humidity and the product you chose, this usually takes between 4 to 6 hours (though oil-based products may require overnight drying).
Once dry, the floor might feel slightly rough to the touch. This is called “grain raise.” The moisture in the sealant causes microscopic wood fibers to stand up. You need to knock these down. Take a piece of ultra-fine 320-grit sandpaper and very lightly scuff the entire floor. You are not trying to remove the sealant; you are just smoothing the surface.
After scuffing, vacuum the floor again and wipe it down with a fresh tack cloth. This scuffing process also creates microscopic scratches that give the next coat of sealant something to grip, ensuring the layers bond tightly. If you are using a Premium product like Waterlox, this second coat will really start to build that beautiful, water-resistant film.
Build Up Your Waterproof Layers
A single coat of sealant will not protect a bathroom floor. To achieve a truly waterproof wood bathroom floor, you must build up multiple thin layers. Thick coats take forever to dry, often remain soft, and are prone to wrinkling or bubbling. Thin coats dry hard and clear.
You should apply 3 to 4 complete coats of your chosen sealant.
- Oil-based sealants offer incredibly deep protection and dry to a hard, durable finish, though they take longer to cure.
- Water-based sealants have a much lower odor and dry rapidly, allowing you to apply multiple coats in a single day.
Apply each coat exactly as you did the last: brush with the grain, let it dry, lightly scuff with 320-grit paper, clean the dust, and apply the next layer. Some modern homeowners even choose to apply advanced nano-coatings as a final top layer to provide extreme scratch resistance, though this is entirely optional.
Focus on Edges and Plumbing Fixtures
The center of your floor is rarely where water damage begins. The true danger zones in any bathroom are the edges. Water loves to hide where the floorboards meet the baseboards, around the base of the toilet, and directly beneath the sink vanity.
When applying your final coats, pay meticulous attention to these perimeter zones. You want to push the sealant right up to the edges.
Once the final coat of sealant is completely dry, you have one more crucial task. You must apply a bead of 100% silicone bathroom caulk around the base of the toilet, around the tub or shower transition, and along the bottom edge of the baseboards. The sealant protects the wood’s surface, but the silicone caulk prevents water from slipping down between the cracks and rotting the subfloor.
Respect the Crucial Cure Time
Applying the sealant is only half the battle; waiting for it to cure is the other half. There is a massive difference between a floor being “dry to the touch” and fully “cured.”
When a floor is dry, the solvents have evaporated. When a floor is cured, the chemical compounds have fully cross-linked, reaching their maximum hardness and waterproof capabilities.
You can usually walk on the floor with clean socks after 24 to 72 hours for light use. However, you should avoid placing heavy furniture (like your bathroom vanity or heavy rugs) back into the room for a full 7 days. Keep your bathroom exhaust fans running continuously this week to vent VOCs and support the chemical curing process. If you rush this step and drop a heavy, wet bathmat on uncured sealant, you will ruin the finish.
Choosing the Best Sealant Wood Floor Moisture Protection
You cannot talk about how to seal wood floors in bathroom spaces without discussing the actual chemicals you will use. The market is flooded with options, but only a few truly stand up to a wet bathroom environment. Let us look at how the top contenders compare.
Sealant Comparison Table
Type of Sealant Major Pros Major Cons Best Bathroom Use Case Durability Rating
Oil-Based Polyurethane Penetrates deeply into the wood, gives an amber glow, and is highly durable. Strong chemical odor, takes a long time to dry, yellows over time. High traffic family bathrooms. High
Waterlox (Tung Oil Base) Moves with the wood and creates a brilliant, moisture-resistant film. Requires many thin coats to build protection, strong initial smell. Areas prone to frequent wet splashing. Very High
Marine Epoxy The absolute ultimate waterproof barrier, forms a plastic-like shell. Very glossy, slippery when wet, incredibly difficult to repair if scratched. Direct shower transitions. Extreme
Hard Wax Oil Beautiful natural look, easy to spot-repair scratches. Less durable against standing water, needs frequent reapplication. Low moisture guest bathrooms (half-baths). Moderate
Our Top Recommendation
If you want the perfect balance of beauty, durability, and moisture resistance, Waterlox is widely considered the gold standard for sealing bathroom wood floors. Because it is formulated with natural Tung oil, it penetrates deeply into the wood fibers rather than just sitting on the surface like a plastic sheet. It naturally flexes with the wood as humidity changes, preventing the micro-cracks that plague standard polyurethane. While it takes time to apply properly, the waterproof results are phenomenal.
Maintenance and Longevity for Sealing Bathroom Wood Floors
Congratulations! You have successfully learned how to seal wood floors in bathroom spaces, and your floor looks incredible. But the work does not entirely stop here. To ensure your floor survives for the next decade, you must adopt proper maintenance habits.
Your Weekly Cleaning Routine
Keep it simple. Sweep or vacuum the floor weekly to remove abrasive dirt and sand that can scratch the sealant. When it is time to mop, use a heavily wrung-out damp mop. Use a mild, pH-neutral wood floor soap. Never slop buckets of water onto a wood floor, even a sealed one!
Your Yearly Maintenance Routine
Inspect your floor thoroughly once a year, focusing on the areas around the tub and sink. If you notice the finish looking dull or water no longer beads up on the surface, it is time for a maintenance coat. You usually do not need to re-sand the whole floor to bare wood. Clean it, lightly scuff it with a 320-grit pad, and roll on one fresh topcoat of your sealant to restore the protective barrier.
What You Must Avoid at All Costs
- Steam Cleaners: Never, under any circumstances, use a steam mop on a wooden bathroom floor. The intense heat and pressure will blast moisture straight through the microscopic pores of your sealant, causing the wood to blister and peel instantly.
- Standing Water: While your floor is now highly water-resistant, it is not a swimming pool. If you spill water or step out of the shower dripping wet, wipe up the puddles with a towel promptly.
- Harsh Chemicals: Avoid bleach or ammonia-based bathroom cleaners on the floor, as they will eat away at your chemical seal.
With diligent care, a properly sealed wooden bathroom floor can last 5 to 10 years before requiring a complete sanding and refinishing.
Common Mistakes When Figuring Out How to Seal Wood Floors in Bathroom
Even confident DIYers can stumble when tackling a wet-room flooring project. Avoid these common pitfalls to keep your floor pristine.
Skipping the Sanding Process Many people try to cut corners by applying new sealant directly over an old, worn-out finish. This is a recipe for disaster. The new sealant will not grip the wood fibers, and within weeks you will see it peeling off in large, ugly flakes. Always sand down to the bare wood.
Applying Coats Too Thickly In a rush to finish the job, it is tempting to slather the polyurethane on like thick syrup. Resist this urge! Thick coats of sealant dry on the surface but remain liquid underneath. This causes the finish to wrinkle, bubble, and feel sticky for months. Three thin coats are always better than one thick coat.
Ignoring Room Humidity During Application Wood is incredibly sensitive to the environment. If you try to seal your floor on a rainy day when the humidity is 90%, the sealant will trap that moisture in the wood, leading to cloudy, milky-looking finishes. Aim to seal your floor when the room’s relative humidity (RH) is sitting comfortably between 40% and 60%.
Frequently Asked Questions About How to Seal Wood Floors in Bathroom
As you plan your project, you likely have a few specific scenarios in mind. Let us answer some of the most common questions homeowners have.
Can I seal existing wood floors in my bathroom? Absolutely! If you bought an older home with original hardwood in the bathroom, you can save it. However, you must thoroughly inspect the floor first. If the wood is soft, rotting, or severely warped, it must be replaced. If the wood is structurally stable, sand away the old finish completely and follow our step-by-step guide to bring it back to life.
Is standard polyurethane enough protection near showers? Standard polyurethane is great, but near a heavy splash zone like a shower, you need extra insurance. We highly recommend pairing your polyurethane finish with a waterproof membrane system installed beneath the wood, and utilizing heavy silicone caulk at the exact transition point where the wood meets the shower pan.
Are there any eco-friendly sealant options? Yes. If you are sensitive to smells or want a greener home, look for Premium water-based, low-VOC (Volatile Organic Compounds) sealants. They dry much faster than oil-based products, clean up easily with soap and water, and do not off-gas harmful chemicals into your home for weeks.
What is the final cost per square foot? If you handle the labor yourself, learning how to seal wood floors in bathroom spaces is highly economical. Expect to pay roughly $1 to $3 per square foot for the raw materials, sandpaper, and high-end sealants. This is a fraction of the cost of hiring a professional flooring contractor.