If you’re researching how to build a lean-to roof on the side of the house, understanding the right materials is the first and most important step. A lean-to roof is one of the simplest roof styles to build, but it still needs the right parts to stay strong, dry, and safe.
Homeowners often choose a DIY lean-to roof for practical reasons. It works well for patio covers, storage sheds, carports, side extensions, and outdoor workshops. It is also a smart choice when you want to add usable space without building a full second roof structure.
The success of the project depends on choosing the correct lean-to roof materials. Good materials help with durability, weather resistance, cost control, and easy installation. The wrong choice can lead to leaks, weak framing, and costly repairs later.
What Is a Lean-To Roof?
A lean-to roof is a single-sloped roof that leans against an existing wall or structure. It is often used as an attached lean-to roof, with one side connecting to the house and the other resting on posts or an outer wall.
This lean-to roof design is popular because it is simple, cost-friendly, and easier to build than more complex roof types like gable roofs. It also works well as a sloped roof extension when you want extra covered space.
Most lean-to roofs use a gentle slope to help rainwater and snow slide off. The exact pitch depends on the roof material and your local weather. Still, the goal is always the same: keep water moving away from the house and prevent pooling.
Why Material Selection Matters for a Lean-To Roof
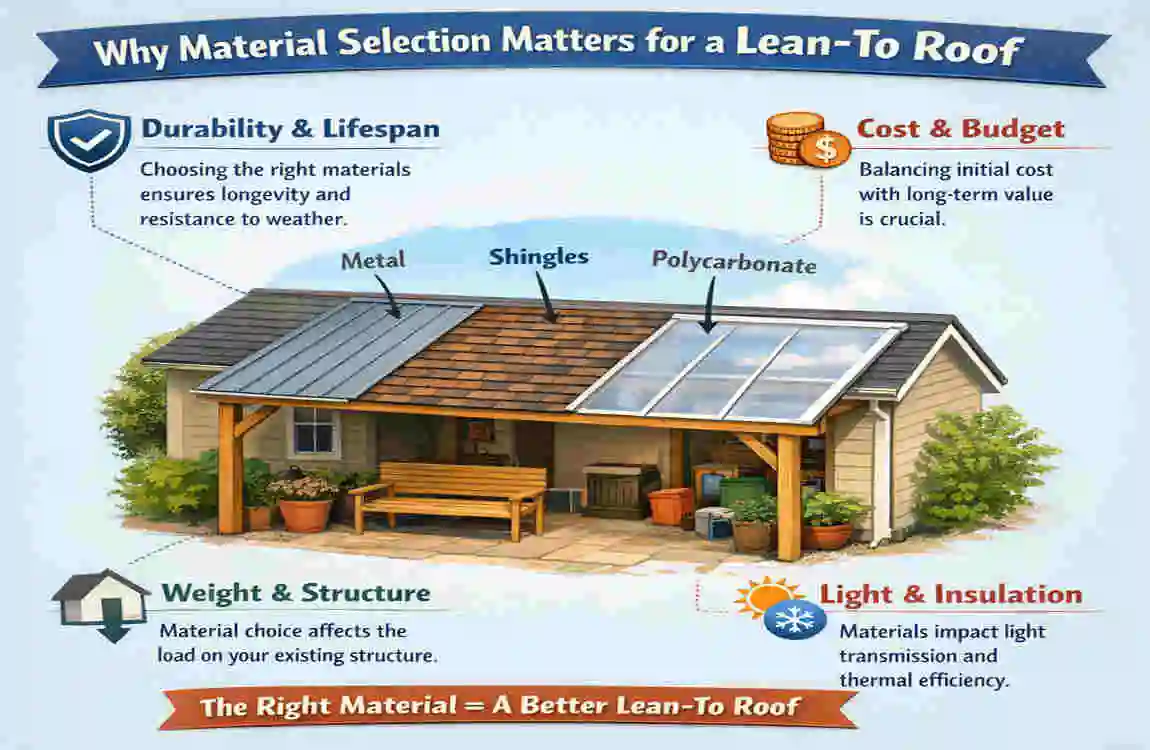
Choosing the right material is not just about looks. It affects the whole structure.
A lean-to roof must handle weight, wind, rain, heat, and sometimes snow. If the materials are weak or of poor quality, the roof may bend, leak, or wear out quickly. Good material choices improve structural integrity and help the roof last longer with less maintenance.
Material selection also affects drainage. A roof that sheds water well will protect your home’s walls and reduce the risk of rot, mold, and rust. In many places, local codes also require specific framing sizes, fastening methods, and roof slopes.
Climate Considerations
Your local weather should guide your choices.
- In rainy climates, waterproof roofing and strong flashing matter most.
- In snow-heavy regions, you need stronger framing and a pitch that sheds snow well.
- In hot, sunny areas, UV-resistant roofing can last much longer.
Budget vs. Durability
Cheaper materials may save money at the start, but they may wear out faster. More durable options cost more upfront, but they can save repair costs later. For most homeowners, the best choice is not the cheapest one—it is the one that offers the best long-term value.
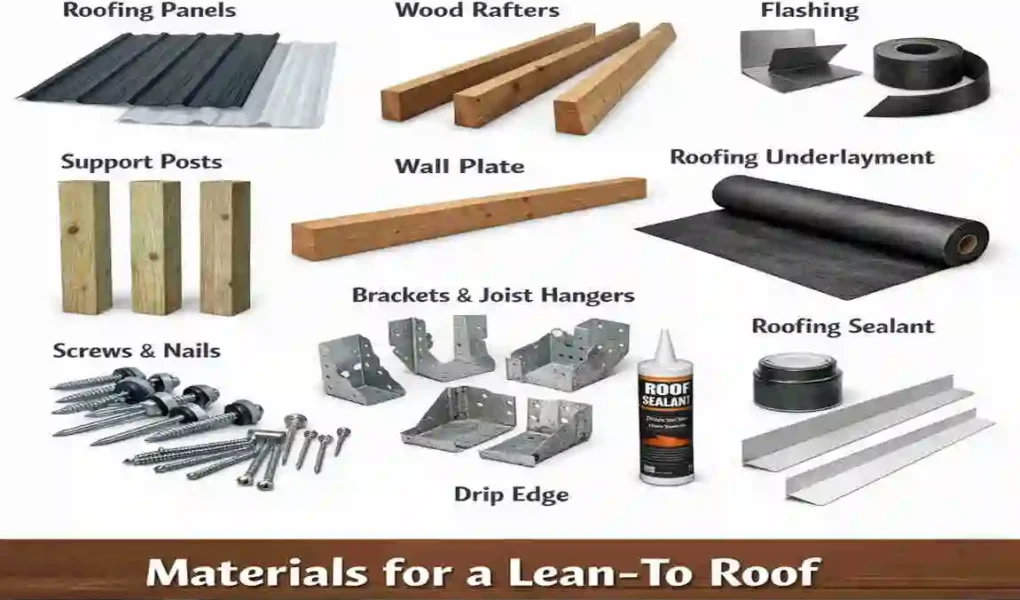
Essential Materials Needed to Build a Lean-To Roof
Pressure-Treated Lumber for the Frame
The frame is the backbone of the roof, so the wood must be strong and moisture-resistant. Pressure-treated lumber is usually the best choice because it handles outdoor exposure better than regular wood.
Common sizes include 2x4s, 2x6s, 4×4 posts, and 6×6 support posts. Smaller pieces are often used for rafters and wall plates, while larger posts help carry the roof load.
You will usually use this lumber for:
- Rafters
- Wall plates
- Beams
- Support posts
For a strong lean-to roof framing, always choose lumber that fits the size and load of your project.
Roofing Sheets or Roofing Panels
The top layer protects the structure from the weather. Your choice of panels affects appearance, cost, light, and durability.
Metal Roofing Panels
Metal is one of the most durable options for a weatherproof lean-to roof. It lasts a long time, sheds water well, and handles wind better than many other materials. It is a top choice for carports, sheds, and outdoor work areas.
Polycarbonate Roofing Sheets
These sheets are lightweight and let natural light pass through. They work very well for patio covers and areas where you want brightness without full sun. A polycarbonate lean-to roof is often chosen for comfort and style.
Asphalt Shingles
Shingles can match the house roof, which makes the project look more unified. They are affordable, but they take more work to install on a lean-to roof and may need a stronger base underneath.
Corrugated Plastic Panels
These are budget-friendly and easy to install. They are good for simple projects, but they usually do not last as long as metal or quality polycarbonate.
MaterialCostLifespanMaintenanceBest Use
Metal Roofing Panels Medium to High Long Low Carports, sheds, durable covers
Polycarbonate Sheets Medium Medium Low Patio covers, bright spaces
Asphalt Shingles Low to Medium Medium Medium Matching house extensions
Corrugated Plastic Low Short to Medium Medium Budget builds, light-duty covers
Rafters and Support Beams
Rafters carry the weight of the roof covering and transfer it to the beams and posts. Without strong rafters, the roof can sag or fail.
The spacing matters too. Most lean-to roofs use 16 inches or 24 inches on center, depending on the load and roofing type. Heavier materials usually need closer spacing.
Roof pitch also plays a big role. A steeper pitch drains water faster, while a lower pitch may require extra waterproofing.
Fasteners and Hardware
Good fasteners keep everything locked in place. Since this roof sits outdoors, you need hardware that resists rust and corrosion.
Common items include:
- Galvanized screws
- Lag bolts
- Joist hangers
- Hurricane ties
- Roofing nails
These parts improve structural stability and help the frame stay secure in wind and changing weather. For most projects, galvanized roofing screws are a smart choice because they hold well and resist rust.
Roofing Underlayment and Waterproofing Materials
The roofing panels are only part of the protection. Underlayment adds a second layer against moisture.
Useful materials include:
- Roofing felt
- Synthetic underlayment
- Waterproof membranes
- Flashing
This layer helps prevent leaks from reaching the wood deck or framing. It is one of the best ways to improve roof waterproofing and reduce future damage.
Flashing and Drainage Components
Flashing and drainage parts help direct water away from the house.
You may need:
- Drip edge
- Gutters
- Downspouts
- Wall flashing
These parts are especially important for lean-to roof drainage because water must flow away from the wall connection. Poor flashing can lead to wall damage and hidden leaks over time.
Concrete and Anchoring Supplies
If your lean-to roof uses posts, those posts must be anchored properly. This usually means using concrete mix, post anchors, and ground footings.
These supplies help the roof stand firm during wind and heavy weather. They also reduce shifting and movement. Strong roof post footings are a key part of safe construction.
Tools Required to Build a Lean-To Roof
You do not need a huge workshop to build this roof, but you do need the right tools.
Essential Tools
- Circular saw
- Drill
- Hammer
- Measuring tape
- Level
- Ladder
- Chalk line
- Safety gear
Optional Power Tools
- Nail gun
- Impact driver
- Miter saw
Safety Equipment You Should Never Skip
Safety matters on every roofing job. At minimum, wear:
- Gloves
- Eye protection
- A harness is used when working at height
- A hard hat when needed
These DIY roofing tools and safety items make the job easier and safer.
Step-by-Step Overview of How to Build a Lean-To Roof on the Side of a House

Plan and Measure the Roof Area
Start by measuring the space and deciding the roof size. You also need to calculate the slope so water can drain properly. Before you build, check local permit requirements to ensure your project stays compliant.
Install the Ledger Board
The ledger board attaches to the house wall and supports one end of the rafters. This part must be properly secured because it carries a significant portion of the load.
Set Support Posts and Beams
Next, install the outer posts and beams. These usually sit on concrete footings and must be aligned carefully. If the posts are uneven, the roof will not sit correctly.
Install Rafters
Attach the rafters with the correct spacing and secure them tightly. This is one of the most important parts of DIY lean-to roof installation because the rafters shape the whole roof.
Add Roofing Material
Once the frame is complete, install the roofing panels or sheets. Overlap the panels properly and seal exposed areas to stop leaks.
Install Flashing and Gutters
Finish by adding flashing at the roofline where it meets the house. Then install gutters and downspouts to direct water away from the structure. This final step greatly improves protection.
Best Roofing Material Options for Different Lean-To Roof Projects
Project Type: Best Roofing Material
Patio Cover Polycarbonate
Shed Roof Corrugated Metal
Carport Metal Panels
Modern Extension Standing Seam Metal
Budget Build Corrugated Plastic
The best lean-to roof materials depend on how you plan to use the space. For example, patio covers often benefit from light-filtering sheets, while carports need stronger weather resistance.
Common Mistakes to Avoid When Building a Lean-To Roof
Some mistakes keep showing up in lean-to roof problems.
- Using the wrong roof pitch
- Forgetting proper drainage
- Choosing weak fasteners
- Ignoring permit rules
- Using untreated wood
- Installing flashing poorly
Avoiding these roofing installation mistakes can save you time, money, and frustration.
Lean-To Roof Maintenance Tips
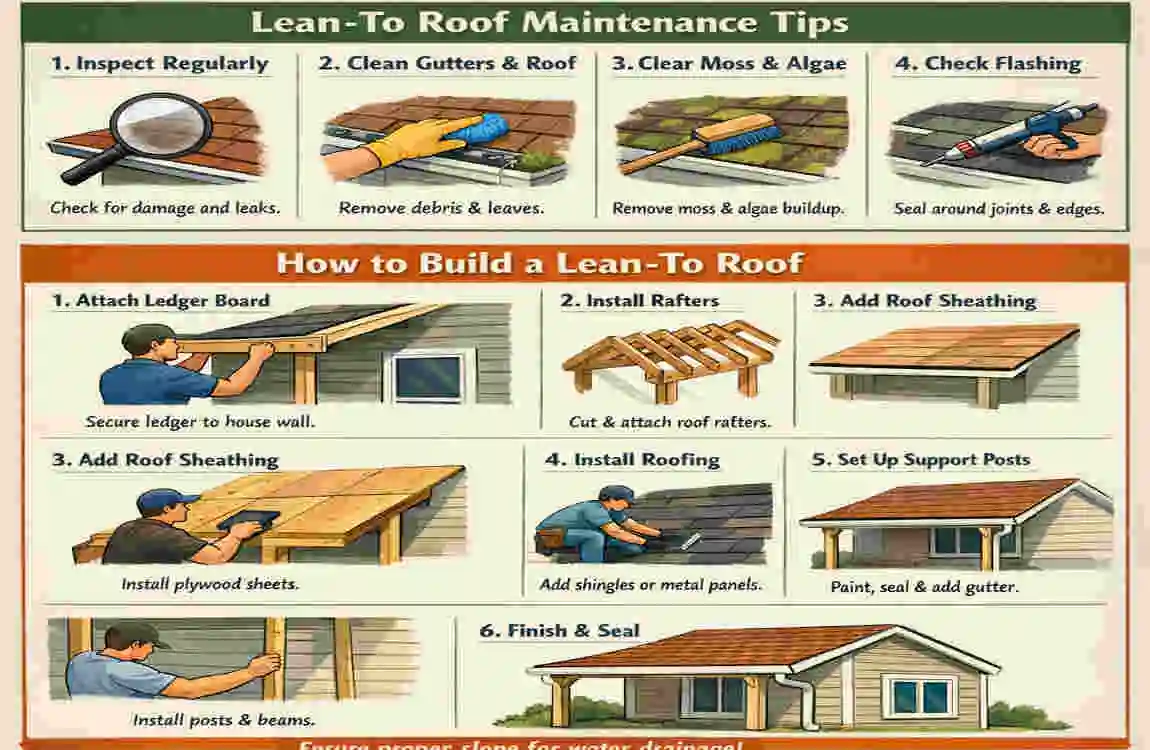
A lean-to roof does not need constant attention, but it does need regular care.
Check it each season for loose screws, damaged panels, rust, and leaks. Clean gutters so water can flow freely. If you spot wear early, repair it before it turns into a bigger problem.
A simple routine helps you maintain lean-to roof performance for many years.
Frequently Asked Questions About Lean-To Roof Materials
What Is the Cheapest Material for a Lean-To Roof?
Usually, corrugated plastic is the cheapest option. It works for light-duty builds, but it is not the longest-lasting choice.
Is Metal Roofing Better Than Shingles for a Lean-To Roof?
In many cases, yes. Metal is often more durable, sheds water better, and needs less maintenance. Shingles may look better on some homes, but they usually take more labor to install on a lean-to structure.
What Pitch Should a Lean-To Roof Have?
The right pitch depends on the roofing material and your weather conditions. In general, a steeper pitch is better for drainage, especially in rainy or snowy areas.
Do I Need a Permit to Build a Lean-To Roof?
Often, yes. Many local building codes require a permit, especially if the roof attaches to your house. Always check before starting.
How Long Does a Lean-To Roof Last?
It depends on the materials. A well-built roof with quality framing, flashing, and roofing panels can last many years, especially with regular maintenance.
| Category | Materials Needed for a Lean-To Roof |
|---|---|
| Framing | 2×4 lumber for rafters & support beams |
| Sheathing | 7/16″ OSB or plywood panels |
| Fasteners | Galvanized nails (3.5″ & 2″), roofing screws with rubber sealant |
| Underlayment | Felt underlayment or ice/water shield |
| Edge Protection | Drip edge flashing, fascia & soffit material |
| Roof Covering | Asphalt shingles or metal roofing panels or polycarbonate sheets |
| Flashing | Aluminum flashing (for wall-to-roof junction) |
| Hardware | Hurricane ties, metal L-brackets, wall plates |