You just spent your entire weekend building a beautiful custom garden shed or an outdoor storage box. You used standard plywood, painted it a lovely shade of green, and stepped back to admire your handiwork. But fast forward just a few months, and the first heavy rainstorms hit. Suddenly, that beautiful wood begins to warp, the edges start splitting apart, and your hard work is literally peeling away. It is incredibly frustrating, isn’t it?
This exact heartbreak is exactly why sealing matters so much when it comes to outdoor woodworking. Exterior plywood is highly vulnerable because it absorbs moisture rapidly through its exposed core layers. When water seeps into these layers, the glue holding the wood veneers together fails, leading to a disastrous process known as delamination. Without proper protection, your project is doomed before it even faces its first winter.
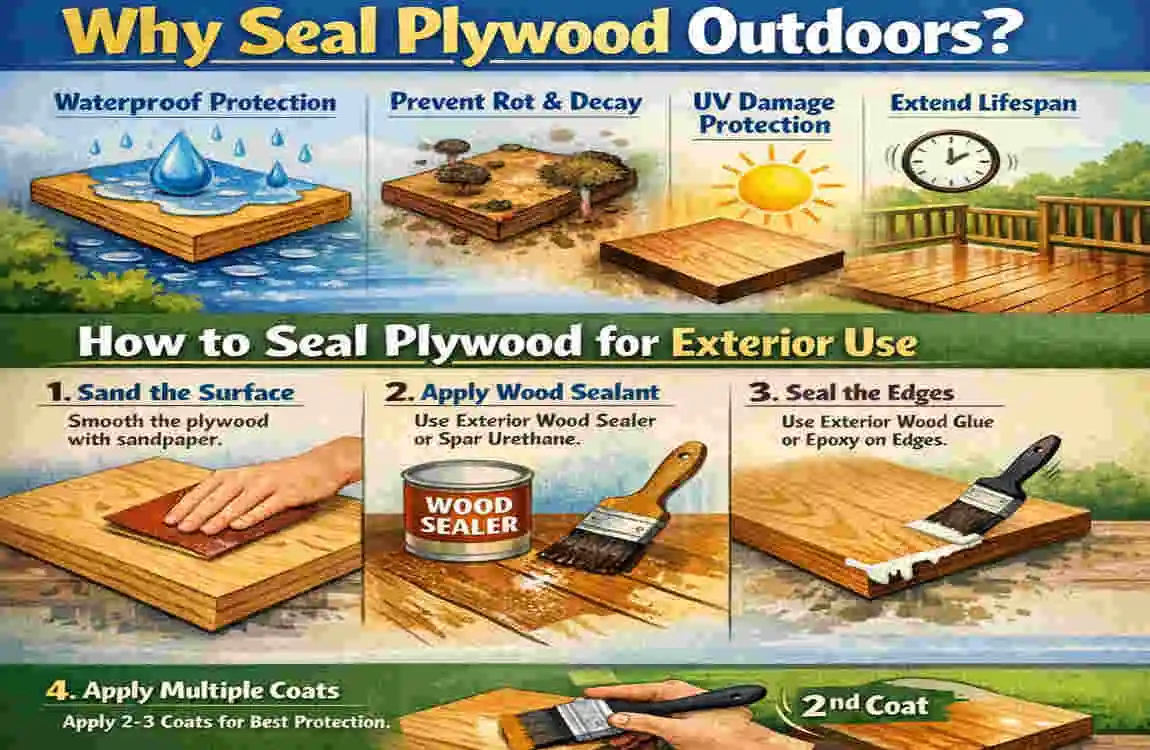
Why Seal Plywood Outdoors?
Before you grab a brush and start painting, it helps to understand exactly what you are up against. Understanding the enemy is the first step in winning the battle against the elements.
Plywood’s Unique Vulnerabilities
Plywood is a fantastic building material, engineered by gluing multiple thin layers (veneers) of wood together. However, this layered design is also its biggest weakness outdoors. The exposed core layers on the edges of the board act like tiny, thirsty sponges. They suck in ambient water, causing the wood to swell, buckle, and eventually rot. Once moisture penetrates the core, fungi and mold take hold, destroying the structural integrity of the wood from the inside out.
Extreme Environmental Threats
Your outdoor projects do not just face a little rain; they battle severe environmental threats year-round. UV degradation from the sun breaks down wood fibers, making them brittle. Freeze-thaw cycles in colder climates force absorbed water to expand as ice, violently pushing the wood layers apart. On the other end of the spectrum, extreme humidity—like the heavy monsoons in Lahore or tropical coastal regions—creates a constant, suffocating moisture blanket that tests even the toughest woods.
The Undeniable Benefits of Sealing
Taking the time to seal your plywood yields incredible returns. A proper seal extends the life of your wood by 5 to 10 times. It maintains the structural strength required for weight-bearing projects, prevents unsightly warping, and dramatically enhances the aesthetic appeal of the wood grain.
Knowing Your Wood: CDX vs. Marine-Grade
Not all plywood is created equal. CDX plywood is an affordable, common exterior-grade wood, but it still requires heavy sealing because it contains small voids and knots. Marine-grade plywood, on the other hand, is Premium. It is made with waterproof glues and has zero core voids, meaning water cannot pool inside it. However, even marine plywood needs surface sealing to prevent rot! Knowing when to upgrade depends on your budget and how much water exposure the project will face.
Here is a quick look at how unsealed wood stacks up against sealed wood:
Factor Unsealed Plywood Sealed Plywood
Moisture Resistance Poor Excellent
Lifespan Outdoors 1-2 years 10+ years
Cost per Sheet Base Price +20-30% upfront savings on replacement
Materials Needed
To get this job done right, you need to assemble the proper toolkit. Having everything on hand before you start prevents panic trips to the hardware store while your sealant is drying. Here is your essential shopping list:
- Sandpaper: You will need a variety of grits. Grab 80-grit for rough spots, 120-grit for general smoothing, and 220-grit for finishing between coats.
- Heavy-Duty Cleaners: A TSP (Trisodium Phosphate) solution or a diluted bleach mixture is necessary to strip away dirt, grease, and hidden mold spores.
- Your Chosen Sealer: Depending on your method, pick up high-quality epoxy, polyurethane, oil-based stains, or water repellents.
- Application Tools: Invest in good-quality synthetic bristle brushes, foam rollers for flat surfaces, HVLP sprayers for large jobs, and a few tack cloths to remove dust.
- Wood Filler: Ensure it is an exterior-grade, stainable wood filler for patching up gaps.
- Safety Gear: Don’t forget nitrile gloves, a respirator mask, and safety goggles.
Pro Tip: Always choose exterior-grade products when shopping for finishes. For example, if you opt for polyurethane, make sure it is a spar urethane. Spar urethane contains special oils that allow the finish to flex and bend as the wood naturally expands and contracts with temperature changes, preventing the dreaded cracking that regular indoor polyurethane suffers from.
Surface Preparation
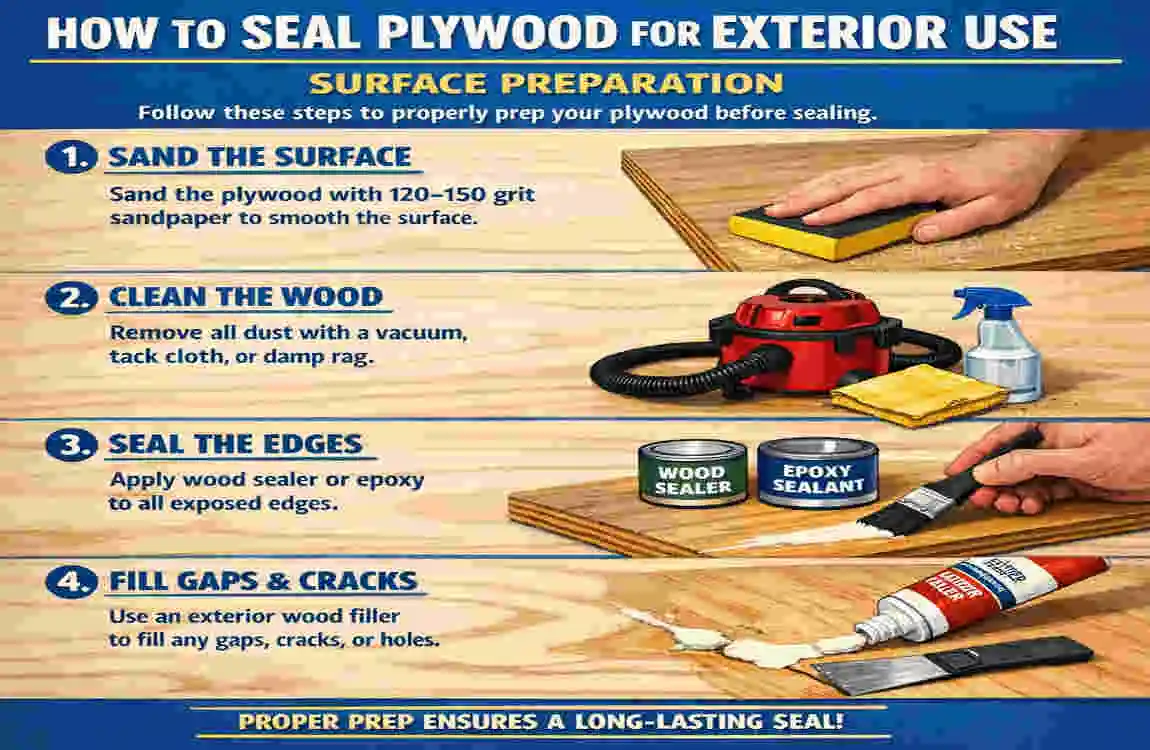
You might be tempted to skip straight to the fun part of painting on the shiny sealer, but do not do it! Surface preparation is the single most important phase of learning how to seal plywood for exterior use. A sealer is only as good as the surface it clings to. If you apply a Premium waterproof coating over dust and grease, it will peel right off.
Clean Thoroughly
Your first mission is to get the wood surgically clean. Use your TSP solution and a stiff-bristled brush to scrub away dirt, natural wood oils, and any factory residues. Once you have scrubbed it down, rinse it lightly and let it dry completely. And when we say completely, we mean it—give it a full 48 hours in a dry, well-ventilated space. Sealing damp wood traps moisture inside, which guarantees rotting.
Sand the Edges First
The edges of a plywood board are its Achilles’ heel. Because they expose the cross-grain of the wood, they are the most vulnerable to water. Grab your 120-grit sandpaper and aggressively sand the edges to smooth out rough splinters and create a uniform surface. A smooth edge absorbs sealer much more evenly than a jagged one.
Fill Imperfections
Inspect your plywood sheets closely. Do you see any knots, divots, or small gaps between the veneer layers? Fill these in with your exterior-grade wood filler. Use a putty knife to press the filler deep into the gaps, slightly overfilling them. Once the filler is completely dry, sand it perfectly flush with the surrounding wood using your 220-grit sandpaper.
Prime if Needed
If you are planning to paint your plywood or use a solid stain, a high-quality, penetrating primer is your best friend. An exterior primer blocks initial moisture from creeping in and provides an aggressive bonding layer for your topcoats. It also stops the natural tannins in the wood from bleeding through and discoloring your final finish.
Edge Sealing Techniques
Because the edges are so problematic, they require special attention. A highly recommended technique is to use thinned epoxy specifically on the edges before treating the rest of the board. By thinning a small batch of two-part epoxy resin with a compatible solvent, you allow the mixture to soak deeply into the porous end-grain rather than just sitting on top. This creates an impenetrable plastic plug right where the wood needs it most.
Best Waterproofing Methods
There is no single “perfect” way to seal plywood; the best method depends entirely on your project’s budget, exposure level, and desired appearance. Let’s look at the top five methods available to you.
Method Pros Cons Best For Durability Cost
Epoxy Resin Ultimate waterproofing , Brittle if applied too thick , High-exposure areas , 15+ years , $$$
Polyurethane Flexible, great UV-resistant , Multiple coats needed , Decks, outdoor furniture , 5-10 years , $$
Oil-Based Sealant Deep penetration, natural look Reapply yearly Fences, garden sheds 3-5 years $
Water Repellent Easy spray application Less durable over time Quick weekend projects 2-4 years $
Varnish/Paint Beautiful aesthetic finish Cracks over time Siding, decorative items 4-7 years $$
The Epoxy Method
If you are building something that will face constant, punishing moisture—like a boat, a planter box, or a piece of outdoor furniture in a rainy climate—epoxy resin is the undisputed king of waterproofing.
Epoxy is a two-part chemical system consisting of a resin and a hardener. When mixed, they create a plastic-like shell that is entirely impervious to water. To use epoxy effectively on plywood, you want to apply 2-3 thin coats. The first coat should often be slightly thinned so it penetrates deep into the wood fibers, locking them together. Subsequent coats build up a rock-hard barrier.
The main downside? Epoxy is highly susceptible to UV damage and will yellow or chalk in the sun. Therefore, it always requires a topcoat of UV-resistant varnish or polyurethane to protect the epoxy itself.
The Polyurethane Method
Polyurethane, specifically exterior spar urethane, is the most popular choice for general DIY projects. It offers a fantastic balance of durability, flexibility, and cost.
You can choose between water-based and oil-based polyurethane. Water-based dries quickly, cleans up with soap, and stays crystal clear. Oil-based takes longer to dry and requires mineral spirits for cleanup, but it offers a richer, amber glow and slightly higher durability.
When applying polyurethane, you will brush it on in thin, even strokes. The secret to a glass-like finish is to sand the surface with 220-grit sandpaper between each coat lightly. This removes tiny dust bumps and gives the next layer of polyurethane something to grip onto.
Oil Sealants
Sometimes, you want to preserve the totally natural, rustic look of the wood. In these cases, penetrating oil sealants like boiled linseed oil or pure tung oil are fantastic choices.
Unlike epoxy or polyurethane, which form a hard film on top of the wood, oils soak deep into the cellular structure of the plywood. They cure inside the wood, hardening the fibers and actively repelling water. Oil finishes are incredibly breathable, meaning if moisture does somehow get inside, it can evaporate out rather than getting trapped under a plastic film. The trade-off is maintenance; oils dry out over time and usually require a fresh coat every single year to maintain their waterproofing abilities.
Spray-On Treatments
If you are staring down a massive project—like 100 feet of plywood fencing—brushing on polyurethane might sound like a nightmare. This is where water repellents and spray-on treatments shine.
Products like Thompson’s WaterSeal are incredibly convenient. You can load them into an affordable garden sprayer and coat large areas in minutes. These liquid treatments contain waxes, oils, and resins that cause water to bead up and roll off the surface aggressively. While they are incredibly easy to apply and very budget-friendly, they offer the lowest tier of durability. You will need to reapply spray-on treatments every two to four years, depending on sun exposure.
Hybrid Approaches
Why settle for one method when you can combine them for maximum protection? Hybrid approaches are what the professionals use for high-end outdoor builds.
One common hybrid technique is to saturate the plywood deeply with a penetrating oil sealant first. Once the oil has fully cured over several weeks, you top it off with two coats of exterior spar urethane. The oil protects the deep fibers from the inside, while the urethane provides a flexible, UV-resistant armor on the outside. Another popular hybrid is the epoxy/varnish combo mentioned earlier—using epoxy for absolute waterproofing and a marine varnish over top for UV protection.
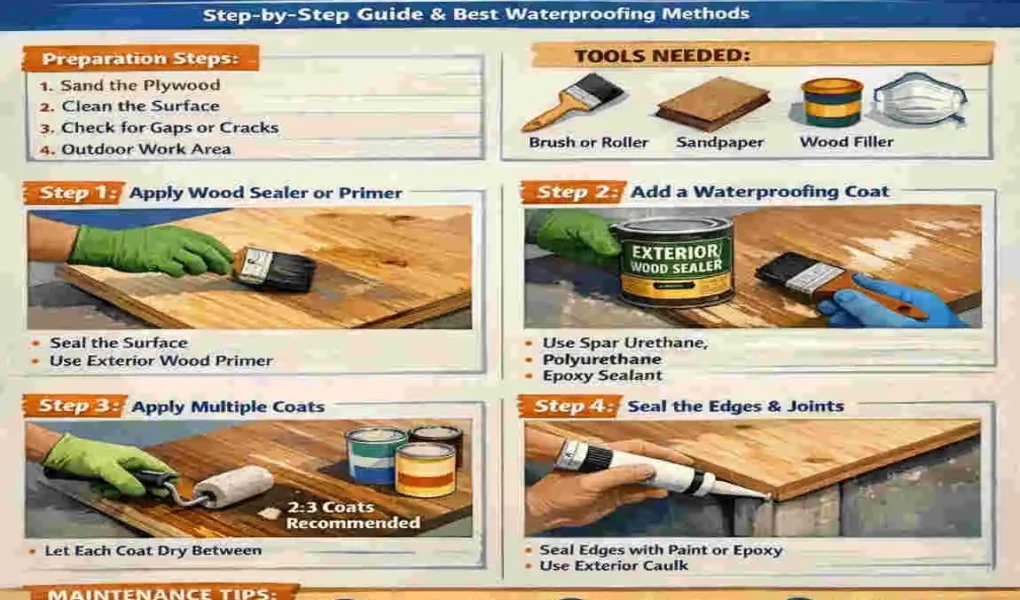
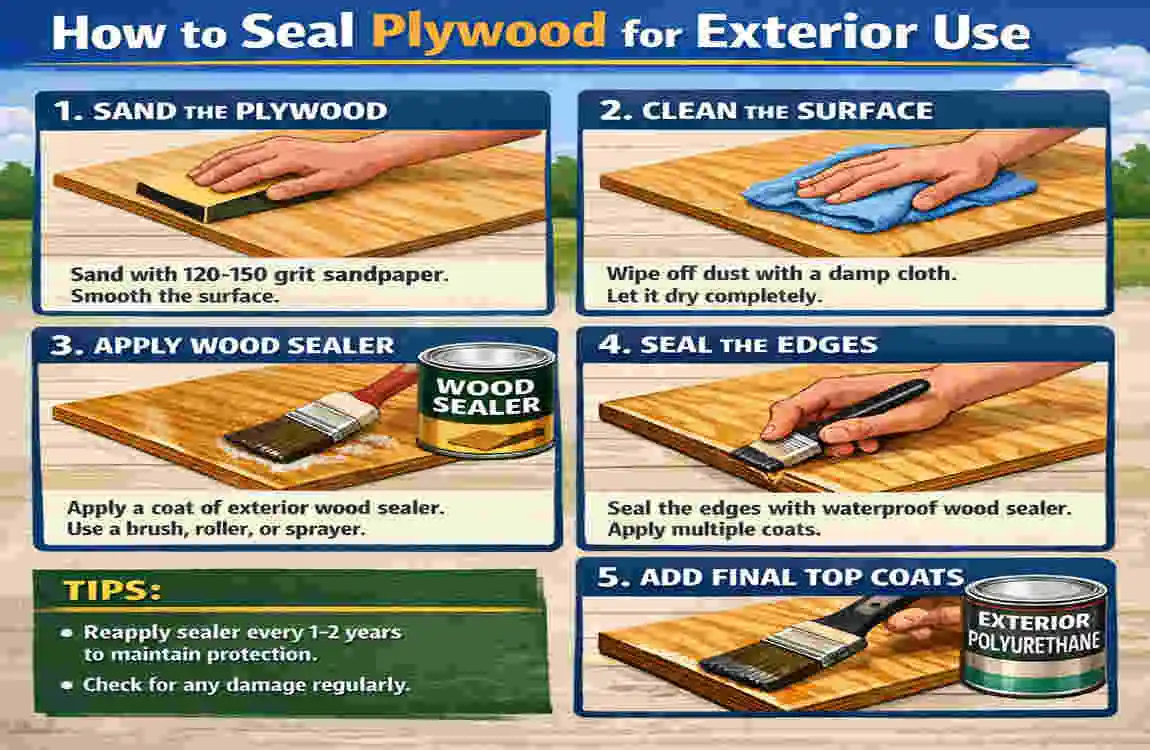
Step-by-Step Sealing Guide
Ready to get to work? Follow this detailed, day-by-day roadmap to ensure your plywood is armored against whatever nature throws its way.
Prep Day 1: Clean and Sand
Start your project on a clear, dry weekend. Put on your respirator and safety goggles. Wash your plywood thoroughly with your TSP solution and let it dry. Once dry, take your 120-grit sandpaper and sand all the flat surfaces, moving in the direction of the wood grain. Spend extra time focusing on the edges until they are completely smooth and free of splinters. Wipe the entire board down with a tack cloth to remove every single speck of dust.
Prime/First Coat
Once the wood is flawless, it is time for the first layer of defense. If you are painting, apply a generous coat of high-quality exterior penetrating primer. If you are staining or using clear coats, apply your thinned epoxy or your first layer of sealer. Work the product deeply into the wood fibers using a high-quality brush. Once applied, walk away and let it dry for a full 24 hours.
Sand Lightly
The first coat of liquid usually causes the microscopic wood fibers to stand up, creating a rough texture known as “raised grain.” Take your fine 220-grit sandpaper and very lightly scuff the surface by hand. You are not trying to remove the sealer; you want to knock down those raised fibers to make the surface feel buttery smooth. Wipe away the dust with a fresh tack cloth.
Main Coats
Now it is time to build up your armor. Apply the 2-3 main layers of your chosen waterproofing method (polyurethane, epoxy, etc.). Use long, even brush strokes to avoid leaving heavy brush marks. Pay strict attention to the manufacturer’s instructions regarding dry times, but generally, you want to wait about 4 to 6 hours between coats. Do not rush this step!
Edges & Ends
While applying your main coats, give double the attention to the edges and ends of the plywood. If you didn’t pre-seal them with epoxy, make sure you are dabbing extra sealer heavily into the end grain until it refuses to absorb any more. Alternatively, for hidden edges that touch the ground, you can use waterproof sealing tape for an extra physical barrier.
Cure Time
Just because the surface feels dry to the touch doesn’t mean the chemical curing process is finished. Leave your sealed plywood in a dry, warm environment for a minimum of 72 hours. After three days, do a quick water bead test: sprinkle a few drops of water on the surface. If it beads up perfectly like a freshly waxed car, you are ready to go.
install
Bring your sealed plywood outside for installation. When fastening the wood to your structure, try to use stainless steel or galvanized exterior screws to prevent rust stains. Crucial rule: Never install your plywood so it makes direct contact with the soil. Always leave a gap or use metal post bases to keep the wood elevated away from ground moisture.
Pro Tips & Maintenance
Sealing your plywood isn’t a “set it and forget it” task. To keep your project looking pristine for decades, you need a proactive mindset.
Annual Inspections
Make it a habit to inspect your outdoor woodwork every spring. Look for micro-cracks, peeling patches, or areas where water no longer beads up. A quick maintenance scuff-sand and a single reapplication of your topcoat every 1 to 2 years takes just a few hours, but prevents catastrophic rot.
Climate Tweaks
You must adapt your strategy to your local environment. If you live in an area with brutal, relentless sunshine—like the scorching summers in Punjab or Arizona—UV degradation is a bigger threat than rain. In these climates, heavily prioritize sealers loaded with UV blockers and consider using solid pigments (paint), as the pigment physically blocks UV rays from touching the wood.
Tools for Efficiency
If you are sealing large sheets of plywood for a shed or fence, throw away the paintbrush and rent an HVLP (High Volume Low Pressure) sprayer. Sprayers apply incredibly thin, perfectly even coats in a fraction of the time it takes to brush, eliminating ugly drip marks and brush strokes.
Eco-Friendly Options
If you are building a raised garden bed for growing vegetables, you do not want harsh chemicals leaching into your soil. Look for Low-VOC (Volatile Organic Compounds) sealers or stick to natural finishes like pure raw linseed oil or beeswax pastes. They require more upkeep but are 100% food safe.
Common Upgrades
If your project is going near a pool, a pond, or will serve as the actual floor of a boat, standard plywood won’t cut it. Upgrade to true Marine plywood. Combining marine-grade wood with a proper epoxy and varnish sealing system guarantees a waterproof lifespan that can easily exceed 20 years.
Common Mistakes to Avoid
Even seasoned DIYers can ruin a piece of wood if they aren’t paying attention. Avoid these project-killing blunders:
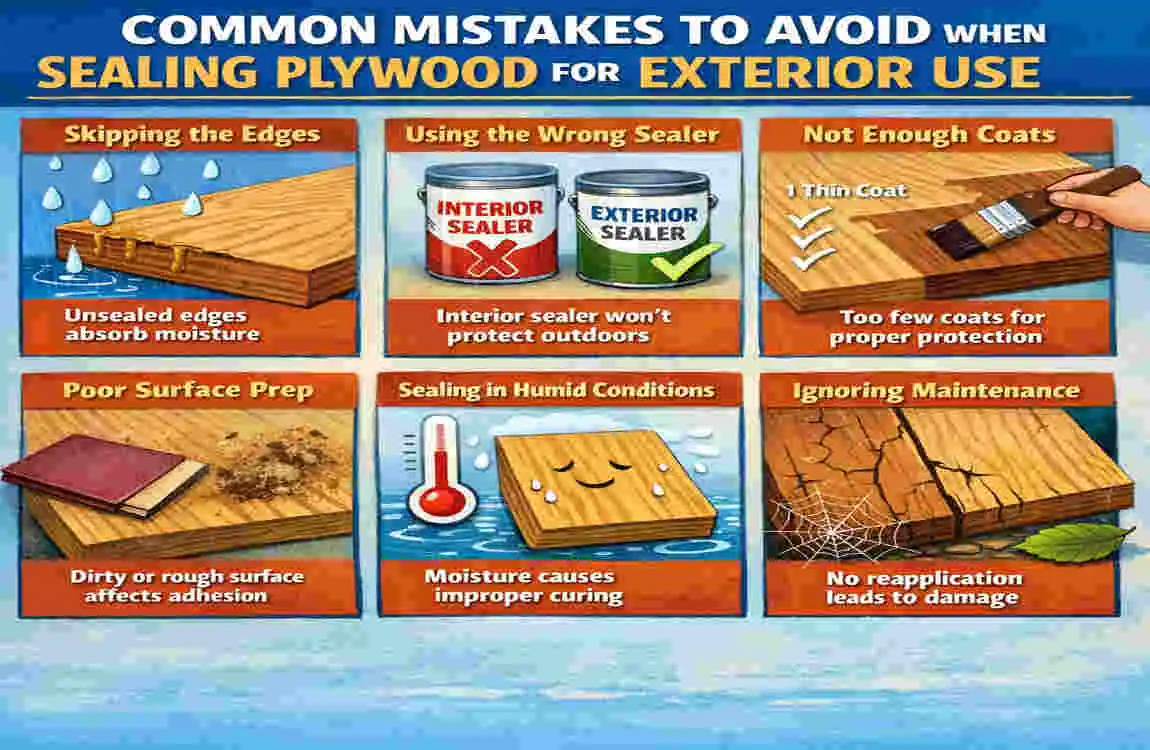
- Skipping the Edges: This is the most common mistake. Leaving the edges unsealed is like leaving the lid off a water bottle. The end-grain acts like tiny straws, sucking water straight into the core, leading to rapid and unstoppable delamination.
- Rushing Dry Times: Patience is mandatory. Applying a second coat of sealer before the first coat has fully off-gassed traps moisture and solvents between the layers. This results in a cloudy, milky finish or nasty chemical blisters that eventually peel off.
- Using the Wrong Products: Never try to save a few bucks by using interior polyurethane or standard interior paint outside. Interior products lack UV blockers and the chemical flexibility required to survive temperature swings. They will flake off within a single season.
- Applying Thick Coats: It is tempting to slather on one giant, thick coat of sealer to save time. Do not do it. Thick coats dry on the surface but stay gooey underneath. When the sun hits them, they wrinkle, crack, and fail. Always apply multiple thin, even coats.
FAQs
Can I use standard plywood outdoors without sealing it? Absolutely not. Unsealed standard plywood will absorb water immediately. Within a few months, it will warp, the veneers will peel apart, and it will begin to rot. It must be sealed to survive.
What is the best sealer if I am on a strict budget? If you need protection on a budget, oil-based sealants or basic water repellents (like Thompson’s) are your best bet. They are highly affordable and easy to apply, though you will need to reapply them more frequently than Premium products.
How long does sealed plywood actually last outdoors? With a high-quality sealing method (like epoxy or spar urethane) and proper annual maintenance, exterior plywood can easily last 5 to 15 years, depending on the severity of your local climate.