Struggling with low water pressure from your well? Installing and wiring a well pump can be a game-changer, ensuring a reliable water supply to your home and saving you the high costs of professional installation. Whether you’re dealing with a submersible pump for deep wells or a jet pump for shallow ones, this comprehensive guide will walk you through each step of the process.
Tools and Materials Needed
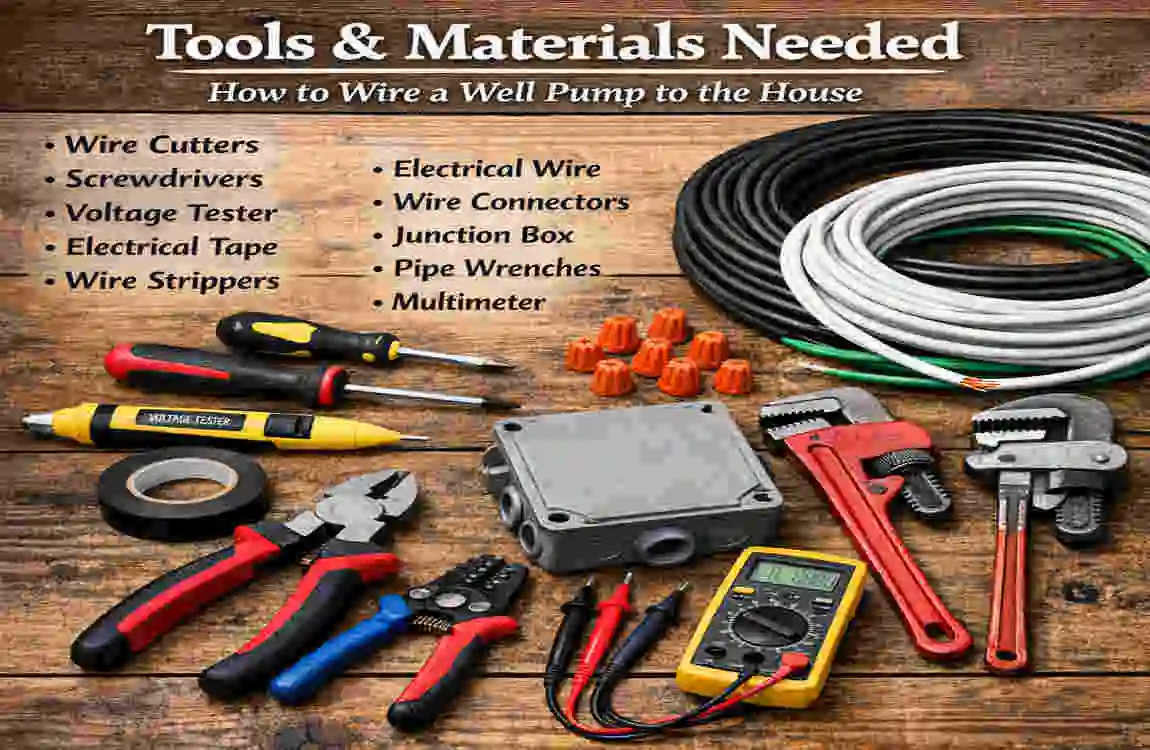
Before you begin, gather the right tools and materials. Proper preparation not only saves time but also ensures safety and efficiency throughout the installation process.
Essential Tools and Materials
- Wire: Use 10-3+G for depths less than 550 feet or 8-3+G for deeper installations.
- Control Box/Starter: Equipped with terminals (L1, L2, R, Y, B) for the pump wiring.
- Poly Pipe (160 PSI): Ideal for the water line.
- Check Valve: Prevents water backflow into the pump.
- Torque Arrestors: Protect the pump from spinning inside the well.
- Wire Strippers and Crimp Tools: For clean and secure wire connections.
- Heat Shrink Tubes: Ensure waterproof and durable wire splices.
- Voltage Tester/Multimeter: Test power and continuity during wiring.
- Safety Gear: Insulated gloves, goggles, and a safety rope for lowering the pump.
Pro Tip
Budget approximately $200-$500 for materials, depending on the depth of your well and the tools you already own.
Tool/Material Purpose Estimated Cost
10-3+G Wire Pump power extension $1/ft
Control Box Houses terminals for wiring $150
Poly Pipe (160 PSI) Supplies water to the house $0.50/ft
Wire Strippers & Crimps Clean wire connections $30-$50
Safety Precautions First
Before jumping into the wiring process, let’s talk about safety. Working with electrical systems and water can be hazardous, so it’s critical to take the necessary precautions.
Key Safety Steps
- Turn Off Power: Always shut off the breaker connected to the pump system before starting any work.
- Test for Voltage: Use a multimeter to confirm that no live current is flowing to the wires.
- Ground Wires Properly: Ensure the green ground wire is securely connected to the ground nut for protection against electrical shock.
- Follow NEC Codes: National Electrical Code (NEC) regulations dictate proper wiring for well pumps. Check if your area requires a permit.
Common Risks
- Electrical Shock: Always double-check that the power is off before handling wiring.
- Dry-Run Damage: Never run the pump without water, as it can cause overheating and permanent damage.
Types of Well Pumps
Choosing the right type of well pump depends on the depth of your well and your household’s water needs. Here’s a quick comparison of the two main types:
Pump Type Depth Suitability Wiring Complexity
Submersible Ideal for wells >25 ft High (requires splicing and control box)
Jet Best for wells <25 ft Low (direct wiring setup)
Submersible Well Pumps
- Best For: Deep wells with a water depth greater than 25 feet.
- Installation: Installed inside the well casing and requires underground wiring.
- Advantages: High efficiency and reliability for large water demands.
Jet Well Pumps
- Best For: Shallow wells with a depth of less than 25 feet.
- Installation: Mounted above ground, making maintenance easier.
- Advantages: Simpler to wire and maintain compared to submersible pumps.
Preparing the Well and Pump
Before wiring, you need to prepare the well and install the pump properly.
Steps to Prepare the Well
- Measure Well Depth: Use a weighted rope to determine the depth of your well.
- Lower the Pump: Attach the pump to a safety rope and carefully lower it into the well, securing the rope every 20 feet.
- Install Check Valve: Attach a check valve and nipple to the pump outlet to prevent backflow.
- Prep the Wiring: Splice the pump’s pigtail wires to the main cable using crimp connectors and heat-shrink tubing.
Install the Control Box
The control box serves as the brain of your pump system, housing all the necessary wiring terminals.
Installation Process
- Choose the Location: Mount the control box near the pressure tank, above ground in a dry, accessible area.
- Connect Terminals:
- L1 and L2: Connect to the hot wires.
- R, Y, B: Connect to the pump’s run and start wires.
- Ground Nut: Secure the green ground wire here.
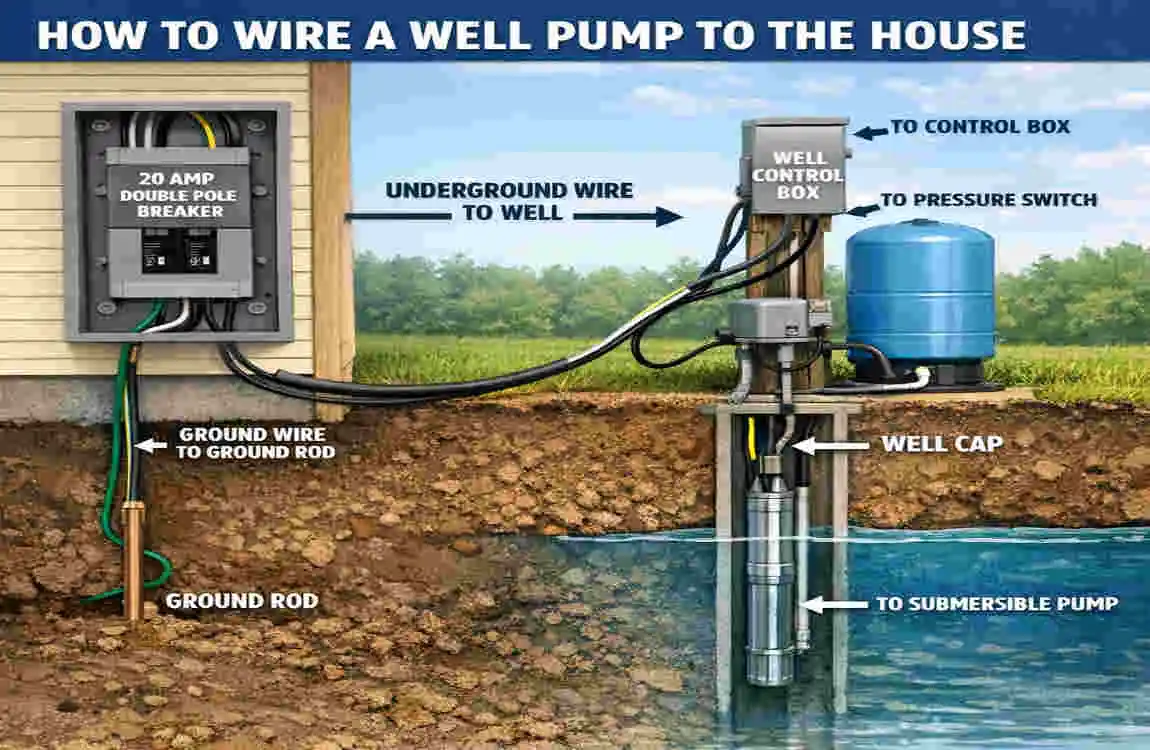
Diagram Note: Ensure the black and red wires from the pump connect to L1 and L2, while the yellow wire connects to the start terminal.
Splice Pump Wires
Splicing the pump wires is a critical step to ensure a secure and waterproof connection.
Splicing Steps
- Crimp the Wires: Use crimp connectors to join the pump’s pigtail wires to the main cable.
- Seal with Heat Shrink: Slide the heat-shrink tubing over the spliced wires and apply heat to create a watertight seal.
- Match Colors:
- Black → L1 (Hot)
- Red → L2 (Hot)
- Yellow → Start
- Test Continuity: Use a multimeter to ensure proper current flow through the connections.
Run Wires to the House
Running wires from the well to your house requires careful trenching and cable protection.
Steps to Run Wires
- Dig a Trench: Create a trench from the well to your house. The depth should comply with local codes (typically 18-24 inches).
- Use Conduit: Sleeve the wires in PVC or corrugated pipe for added protection against moisture and physical damage.
- Connect to Breaker: Terminate the wires at a disconnect switch or breaker panel using a 20-30A double-pole breaker.
Connect to Breaker and Test
Finally, connect the wiring to your house’s breaker box and test the system.
Connection Steps
- Gauge Selection: Match the wire gauge to the distance between the pump and house to avoid voltage drops.
- Prime the System: Fill the pump with water before turning on the breaker.
- Check Pressure Switch: Ensure the system operates at the desired pressure, typically 30/50 PSI or 40/60 PSI.
Common Mistakes to Avoid
Avoid these pitfalls to ensure a smooth and safe installation:
- Skipping Grounding: This can lead to electrical shock or fire hazards.
- Using Undersized Wire: May cause voltage drops and pump failure.
- Forgetting Torque Arrestors: Leads to pump spinning and potential damage.
FAQs
Q: How deep can submersible pumps be wired?
A: Up to 550 feet with the correct gauge wire.
Q: Do I need a permit?
A: Check your local building codes to determine if a permit is required.