Imagine pulling into your driveway after a long day. You look up at your home, expecting to feel that sense of pride, but instead, you notice something else. A greenish tint is creeping up the vinyl. There are dark, unsightly streaks near the gutters, and the once-bright white siding looks a bit dull and dingy. It happens to the best of us. Over time, nature takes its toll, depositing layers of dirt, pollen, mold, and mildew that can make even the most beautiful house look neglected.
But here is the good news: you don’t need to repaint, and you definitely don’t need to replace your siding. You need a good wash.
Pressure washing house siding is one of the most satisfying and effective DIY projects you can tackle. It is like an eraser for your home’s exterior. In just one afternoon, you can strip away years of grime and reveal the pristine surface underneath. Not only does this dramatically boost your curb appeal, but it also protects your investment. Real estate experts often note that a clean exterior can increase a home’s value by up to 5-7%. Furthermore, removing mold and mildew prevents them from eating away at your building materials, saving you thousands in repairs down the line.
However, there is a catch. If you grab a high-powered machine and start blasting away without a plan, you can strip paint, crack vinyl, or force water into places it shouldn’t go. That is why technique matters.
Safety First: Essential Precautions Before You Start
Before you even touch the trigger of a pressure washer, we need to talk about safety. It is easy to underestimate the power of these machines because they spray water. But make no mistake—a pressure washer is a power tool, not a garden hose.
Respect the Pressure
Residential pressure washers typically operate between 1,500 and 3,000 PSI (Pounds per Square Inch). To put that in perspective, a standard garden hose puts out about 40-60 PSI. The water coming out of the nozzle is moving at such high velocity that it can slice through skin, cause severe eye injuries, and even damage concrete if you aren’t careful.
When you are learning how to pressure wash house siding, the first rule is to respect the machine. Never point the wand at people, pets, or your own feet.
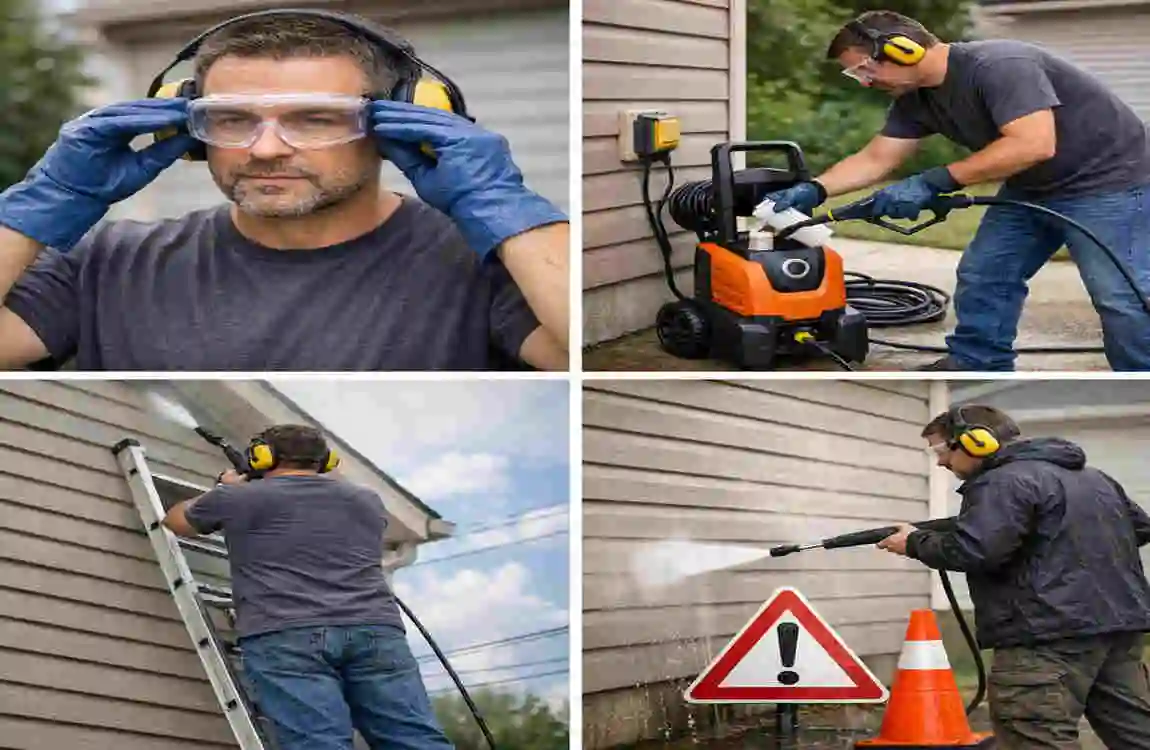
Gear Up Properly
You wouldn’t use a chainsaw in flip-flops, and you shouldn’t pressure wash in them either. Here is your safety checklist:
- Safety Goggles: This is non-negotiable. When the water hits the siding, dirt, paint chips, and small stones can fly back at your face at high speeds.
- Gloves: distinct heavy-duty gloves will improve your grip on the wet wand and protect your hands from chemicals.
- Non-Slip Boots: You will be working on wet, soapy surfaces. Sturdy, closed-toe boots with good traction are essential to prevent slips and falls.
- Hearing Protection: Gas-powered pressure washers are loud. Protect your ears with plugs or earmuffs.
- Long Pants and Sleeves: This protects your skin from debris and accidental sprays.
Environmental and Electrical Hazards
Beyond personal safety, you have to consider the environment you are working in. Always check the weather forecast. You want to avoid windy days, which can blow chemical mist back at you or onto your neighbor’s car. Freezing temperatures are also a no-go, as freezing water can expand in cracks and damage your siding.
Electricity and water are a dangerous combination. Before you start, locate all exterior power outlets. Ensure their covers are closed tightly. You should tape them shut with plastic. If you have outdoor light fixtures, avoid spraying them directly. For maximum safety, locate your breaker box and turn off the power to the exterior outlets and fixtures you will be working near.
Tools and Materials Needed
You can’t do a professional job with amateur tools. However, that doesn’t mean you need to buy the most expensive equipment on the market. You need the right equipment. Here is a breakdown of what you need to master pressure washing house siding successfully.
ItemRecommendationWhy It Matters
Pressure Washer 2,000-3,000 PSI (Electric or Gas) This range balances cleaning power with safety—too much damage to the siding; too low to clean.
Nozzles: 25-40° Fan Tip (Green or White). These tips spread the water out. A wide spray cleans effectively without cutting into the surface.
Detergent Specialized House Siding Cleaner. You need a formula specifically designed to kill mildew and cut through grime without harsh acids.
Extension Wand 12-24 ft Telescoping Wand. This allows you to reach the second story without having to stand on a dangerous ladder.
Safety Gear: Goggles, Gloves, Ear Protection. Protects your body from flying debris, chemical burns, and hearing loss.
Garden Hose Heavy-duty, non-kinking Ensures a steady supply of water to the machine so the pump doesn’t overheat.
Choosing the Right Machine
For most homeowners, a gas-powered washer with around 2,500 PSI is the sweet spot. It offers mobility (no cord to trip over) and consistent power. Electric washers are quieter and easier to maintain, but they sometimes lack the “oomph” needed for a two-story home.
The Importance of Detergent
Many beginners try to wash with just water. This is a mistake. Water alone pushes dirt around; detergent lifts it. Look for a cleaner that contains a mildewcide if you see green or black spots. This kills the spores so they don’t grow back immediately.
Budget Note: You don’t have to buy everything. You can rent a high-quality pressure washer for a day for around $50-$100. If you decide to buy, expect to spend between $250 and $400 for a reliable setup.
Preparing Your House Siding
Preparation is the secret to success. If you skip this stage, you risk damaging your home or your landscaping. Before you connect the hose, take a walk around your house and handle the following tasks.
Inspect the Surface
Look closely at your siding. Are there any loose panels? Is the stucco cracking? Is there rotting wood? Pressure washing house siding that is already damaged is a recipe for disaster. High-pressure water can rip siding right off the wall or blast water into the wall cavity, leading to mold in your insulation.
If you find damage, stop. Repair any loose boards, caulk any gaps, and replace cracked vinyl before you wash.
Protect Your Landscaping
Pressure washing detergents can be tough on plants. The best way to protect your bushes, flowers, and grass is to wet them down thoroughly with a regular garden hose before you start pressure washing.
Plant cells that are already saturated with water can’t absorb the chemical runoff as easily. If you have delicate prize-winning roses or a vegetable garden right next to the house, cover them with a lightweight tarp. Just remember to remove the tarp as soon as you are done so the plants don’t overheat.
Seal the House
You want water on the outside, not the inside. Close all windows and doors tightly. Verify that they are locked, as the pressure can sometimes blow an unlocked window open.
Take a roll of duct tape and plastic sheeting to cover:
- Outdoor electrical outlets.
- Doorbell cameras.
- External light fixtures.
- Dryer vents or exhaust fans (you don’t want water blowing into your ductwork).
Finally, clear the area. Move patio furniture, potted plants, and the grill away from the house so you have a clear path to walk and work.
Step-by-Step: How to Pressure Wash House Siding
Now that you are prepped and safe, it is time to get to work. Follow these numbered steps to ensure a thorough, streak-free clean.
Fill and Mix Your Solution
Start by preparing your pressure washer. Connect your garden hose and turn on the water spigot. Crucial: Squeeze the trigger on the gun to let water flow through the machine before you start the engine. This removes air pockets that can damage the pump.
Once the water is flowing, mix your detergent. Most pressure washers have a chemical tank or a siphon tube. If you are using a concentrated cleaner, dilute it according to the manufacturer’s instructions. A common ratio is about 1 part detergent to 10 parts water, but this varies.
Start Low with Soap
Attach your soap nozzle. This is usually the black tip, which has a wide opening to lower the pressure and activate the soap injector.
Here is a pro tip that surprises many people: Apply the soap from the bottom up.
If you apply soap from the top down, it will run down the dry, dirty siding in rivulets. These rivulets can “burn” clean streaks into the dirt that are surprisingly hard to blend in later. By starting at the bottom and working your way up, you ensure the soap sits evenly on the surface.
Coat a section of the house (about 10 feet wide) and let the solution dwell. You want it to sit for 10 to 15 minutes to break down the grime, but do not let it dry. If it starts to dry, mist it with a little more fresh soap.
Switch to Rinse Mode
Once the soap has done its work, remove the soap nozzle and attach your rinsing nozzle. For siding, the green (25-degree) or white (40-degree) tip is best. These create a water fan that cleans without cutting.
Rinse From Top to Bottom
Now, reverse your direction. When rinsing, always work from the top down. This uses gravity to your advantage, washing the dirt and soap down the wall and onto the ground.
Stand about 12 to 18 inches away from the siding. If you get too close, you risk damage. If you are too far, you won’t clean anything. Find that sweet spot.
Use a sweeping motion. Spray horizontally across the siding, overlapping your strokes slightly. Keep the wand moving; never let it linger in one spot, or you might leave a permanent mark.
Important Angle Tip: Try to spray at a downward angle or straight on. Never spray upward into the overlaps of vinyl or wood siding. Spraying upward can push water behind the panels, creating hidden mold.
Tackle Stubborn Stains
Sometimes a standard wash isn’t enough to remove heavy mold or rust stains. If you see black or green spots remaining after the first pass, you may need to spot-treat.
Mix a solution of bleach and water (a 1:10 ratio is usually safe for vinyl) in a pump sprayer. Apply it specifically to the moldy areas. Let it sit for a few minutes, then rinse thoroughly with your pressure washer. For rust stains, you may need a specialized oxalic acid cleaner.
Managing High Areas
Cleaning the second story is the trickiest part of pressure washing house siding.
Do not try to balance on a ladder while holding a pressure washer that kicks back when you pull the trigger. This is how most accidents happen.
Instead, use a telescoping extension wand. These attach to your gun and can reach 18 to 24 feet high while you stand safely on the ground. It takes a little arm strength to control, but it is much safer than falling off a ladder. If you can’t reach a spot safely, it is better to leave it or hire a pro than to risk injury.
The Final Rinse
Once you have scrubbed the whole section, give it one last quick rinse from top to bottom with fresh water. This ensures no soap residue is left behind, which can actually attract more dirt later. Move on to the next section of the house and repeat the process until the whole exterior shines.
Siding Types: Tailored Techniques
Not all siding is created equal. The method for pressure washing house siding depends on what your house is made of.
Vinyl Siding
Vinyl is the most common siding, but it is not invincible.
- Pressure: Keep it between 1,500 and 2,500 PSI.
- Danger: High pressure can shatter old, brittle vinyl. It can also drive water behind the seams.
- Technique: Focus on the downward angle. Vinyl is hung loosely to allow for expansion, so it moves. Don’t blast it so hard that it unhooks.
Wood Siding Clapboard or Shingle
Wood requires a gentle touch.
- Pressure: Use lower pressure, around 1,200 to 1,500 PSI. This is often called “soft washing.”
- Danger: High pressure will “fur” the wood, stripping the soft fibers and leaving a fuzzy surface that is hard to paint. It can also gouge the wood.
- Technique: Always spray in the direction of the grain. If you spray against the grain, you will splinter the wood.
Brick and Stone
Masonry is tough, but the mortar holding it together is not.
- Pressure: You can go up to 3,000 PSI if necessary, but start low.
- Danger: “Creaming” the brick (taking off the top hard layer) or blasting out the mortar joints.
- Technique: Saturate the brick with water before applying detergent. Brick is like a sponge; if it is dry, it will suck the soap deep inside where you can’t rinse it out.
Aluminum Siding
- Pressure: Low to Medium.
- Danger: Denting. Aluminum is soft. Also, watch out for “oxidation”—a chalky white powder. If you wash unevenly, you will leave streaks in the oxidation that are permanently visible.
- Technique: You usually need a special oxidation-removing detergent for older aluminum.
Stucco
- Pressure: Very Low.
- Danger: Blasting chunks of stucco off the wall.
- Technique: Rely almost entirely on the chemical cleaner to do the work, using the water only for a gentle rinse.
Common Mistakes and How to Fix Them
Even with the best intentions, mistakes happen. Here are the most common pitfalls people encounter when learning how to pressure wash house siding, along with how to avoid them.
- Getting Too Close: This is the number one cause of damage. If you hold the nozzle two inches from the siding, you are essentially cutting it with a water knife.
- Fix: Maintain a strict 12-inch distance rule. If the dirt isn’t coming off, use a better detergent, not more pressure.
- Using the Wrong Nozzle: The red tip (0-degree) creates a pinpoint laser of water. It has almost no cleaning width and is incredibly dangerous.
- Fix: Throw the red tip away or tape it up so you don’t use it by accident. Stick to green (25 degrees) or white (40 degrees).
- Skipping the Prep: If you don’t repair loose caulk or siding first, you will force water into your walls.
- Fix: Inspect your home twice before starting.
- Over-wetting without drying: If you wash your house on a humid, overcast week where it never dries, you might encourage more mold growth.
- Fix: Pick a week with sunny, dry weather for your project.
- The “Zebra Stripe” Effect: This happens when you blast dirt off with water pressure instead of using soap. You end up with clean lines and dirty lines.
- Fix: Use detergent to loosen all the dirt evenly before rinsing.
Maintenance After Pressure Washing
Congratulations! Your house looks brand new. Now, how do you keep it that way?
After washing, give your home 24 to 48 hours to dry completely. This is especially important for wood siding. If you plan to paint or stain the wood, you must wait until it is bone dry, or the paint will peel.
Once the house is dry, do a final walk-around. Check your windows to make sure no seals were broken. If you have wood siding, this is the perfect time to apply a clear sealant or stain, as the wood’s pores are clean and open.
To prevent buildup in the future, consider a light wash every year. It is much easier to wash off a year’s worth of dirt than to scrub off five years of hardened grime. Also, keep trees and bushes trimmed back from the siding. This increases airflow and reduces the shade that mold loves.
Cost Breakdown: Pro vs. DIY
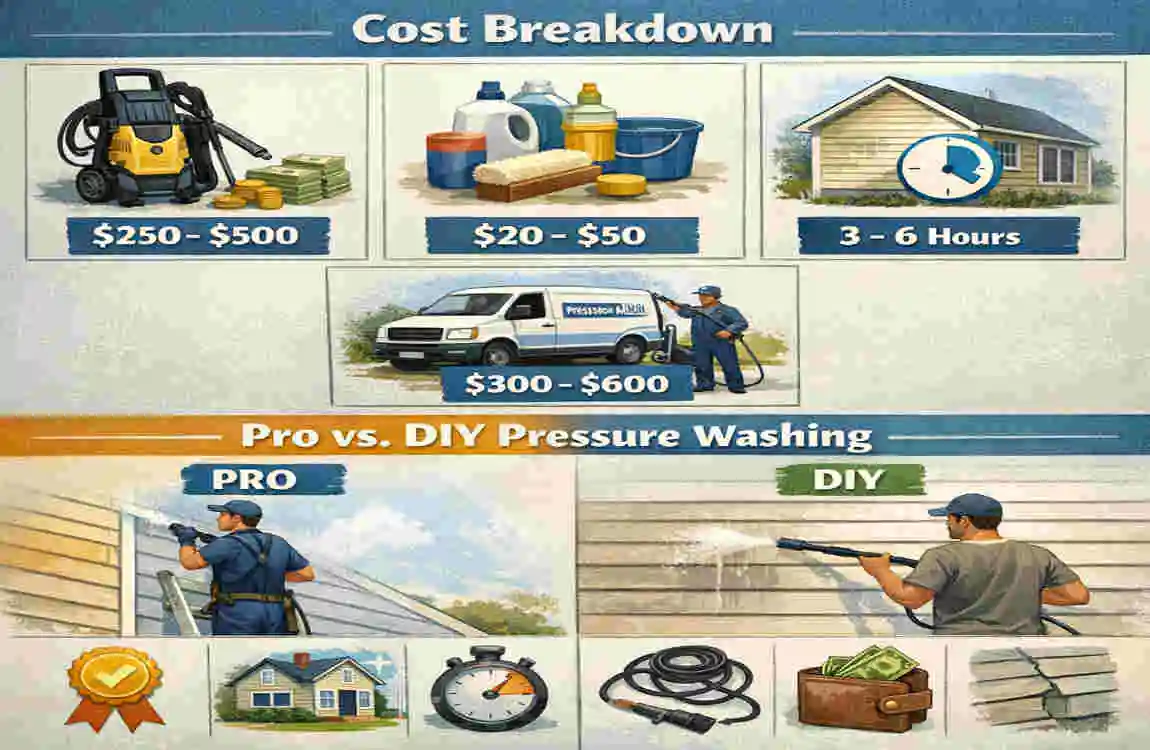
Is it worth doing it yourself? Let’s look at the numbers.
ApproachEstimated CostTime Commitment
DIY (Rental) $50 – $100 (Day Rental) + $30 Detergent 1 Full Day (Pickup, Prep, Wash, Return)
DIY (Buying) $250 – $400 (Machine) + $30 Detergent 1/2 Day (Prep and Wash)
Professional Service $250 – $600+ (Depends on house size) 0 Hours (You watch from the window)
Analysis: DIY saves you about 60-70% of the cost. If you have a one-story home and are physically fit, it is a no-brainer. However, if you have a steep three-story home or delicate historic siding, the risk of injury or damage might make the professional fee worth every penny.
FAQs: Pressure Washing House Siding
Q: How do I pressure wash house siding without damaging it? A: The secret is low pressure and high volume. Use a wide-angle nozzle (40-degree white tip), stand at least 12 inches away, and let the detergent do the heavy lifting rather than trying to blast the dirt off with force.
Q: Is 3,000 PSI safe for vinyl siding? A: Generally, no. 3,000 PSI is too strong for vinyl and risks cracking the panels. If you have a 3,000 PSI machine, use a wide nozzle and stand farther back to reduce the impact pressure, or adjust the machine’s regulator to lower the PSI to around 1,500-2,000.
Q: How often should I pressure wash my house? A: For most homes, once a year is ideal. If you live in a humid climate with lots of trees (which causes mold) or near a dirt road, you might need to do it twice a year.
Q: Will pressure washing make my deck or driveway slippery? A: During the process, the soap can make surfaces very slick. Wear non-slip boots. Afterward, surfaces should be less slippery because you have removed the algae and slime. If you are washing a wooden deck along with the siding, be sure to rinse it thoroughly to prevent soap scum buildup.
Q: Can I use bleach on my siding? A: Yes, but it must be diluted. A mix of 10 parts water to 1 part household bleach is effective for killing mold on vinyl. Always rinse it off thoroughly and avoid using bleach on wood unless you plan to neutralize and stain it afterwards.