Have you ever looked out your window on a freezing, rainy night and worried about the neighbourhood stray cat? Or perhaps you have a fiercely independent feline who loves spending hours on the patio, even when the temperature drops. If you have a soft spot for these adventurous little panthers, you already know why outdoor cat shelters matter so much. They are absolute lifesavers for stray, feral, or even just your own outdoor pets.
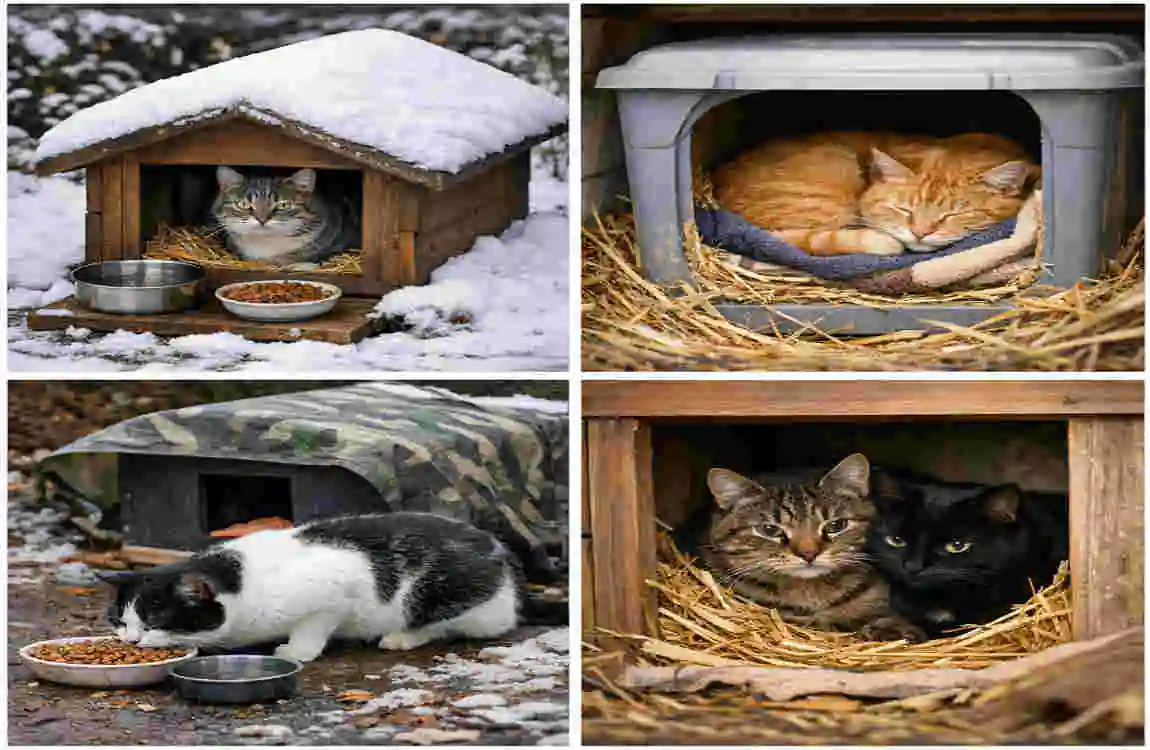
But what exactly is an “outdoor cat house”? Simply put, it is a sturdy, weather-resistant shelter designed to protect a cat from the elements. However, we are not just talking about tossing a cardboard box on your porch. A “house-style” shelter—complete with a sloped roof, an elevated base, and proper insulation—is vastly superior to a simple, flimsy box. It mimics the safety and warmth of a real home, keeping rain out and trapping precious body heat.
Why You Should Build an Outdoor Cat Shelter
When the weather turns harsh, cats are incredibly vulnerable. While their fur coats provide some natural defence, extreme cold, biting winds, and heavy rain can easily overpower them. Building an outdoor cat house is one of the kindest, most impactful things you can do for an animal in need.
Incredible Benefits for the Cats
First and foremost, a well-built shelter offers crucial protection from rain, wind, and the bitter cold. When a cat gets wet, their fur loses its insulating properties, putting them at severe risk of hypothermia. A waterproof house-style shelter keeps them completely dry.
Furthermore, proper insulation fights against dropping winter temperatures. By trapping the cat’s body heat in a small, enclosed space, the shelter becomes a cosy oven. Beyond the weather, a sturdy house provides much-needed safety from predators and heavy traffic. A shelter gives a cat a secure place to hide, sleep deeply, and recover their energy without keeping one eye open for danger.
Rewarding Benefits for You
Creating a haven outside isn’t just good for the cats; it also gives you a sense of immense peace of mind. If you have your own adventurous cat, an outdoor house keeps them off the street and safer when they refuse to come inside.
For animal lovers, it allows you to help the community or feral cats without bringing them indoors. Feral cats are often terrified of human homes, and forcing them inside can cause immense stress. An outdoor shelter respects their wild nature while still providing the care they desperately need.
When is an Outdoor Cat House Actually Needed?
You might wonder if it is truly necessary to build one of these structures. An outdoor cat shelter is highly recommended for:
- Cats who live part-time or full-time outdoors by choice.
- Neighbourhood stray cats wander into your yard in search of food.
- TNR (Trap-Neuter-Return) colonies, where dedicated caretakers manage groups of feral cats.
Ultimately, creating this space is about comfort and well-being. A proper house-style shelter drastically improves a cat’s quality of life. If you have been searching for exactly how to make cat house outdoor setups that actually work, knowing why you are building it will keep you motivated throughout the whole DIY process.
Key Features of a Good Outdoor Cat House
Before you pick up a hammer or a saw, it is vital to understand what makes a cat shelter truly effective. You cannot just build a giant wooden square and call it a day. A thoughtfully designed shelter requires specific features to keep felines comfortable and safe.
A Smart, House-Style Structure
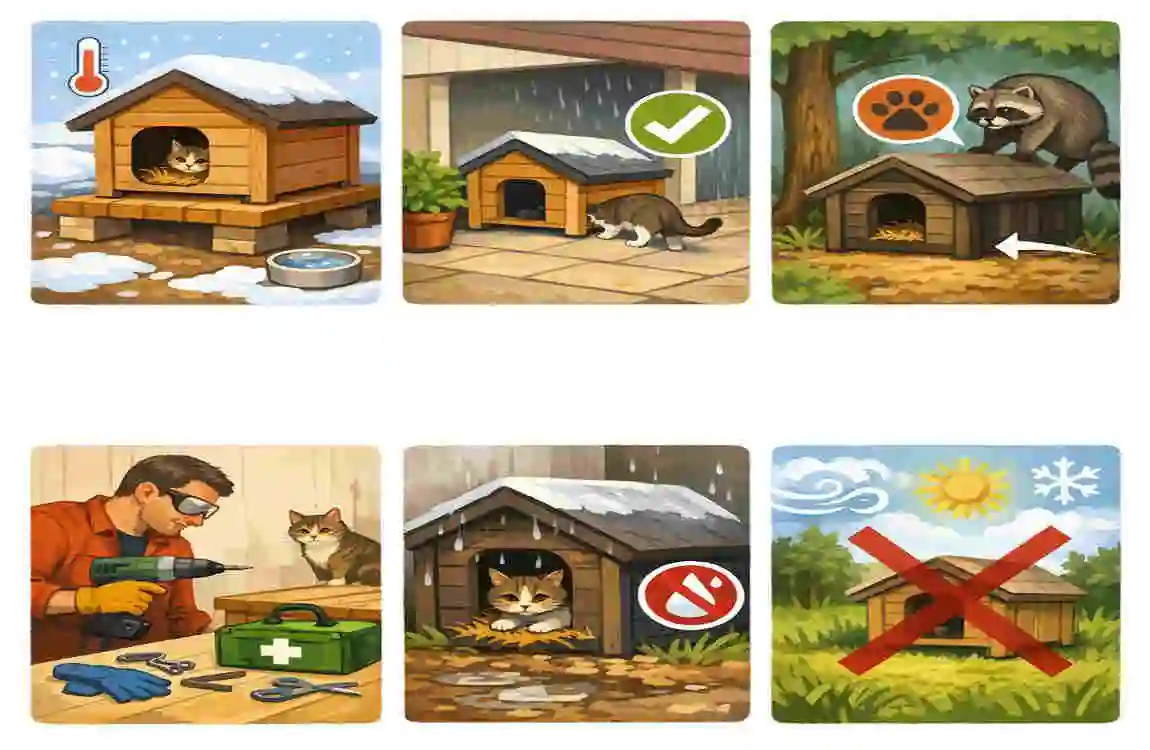
The overall structure should look and function more like a “house” than a standard shipping box. This means including a sloped roof so rain and snow can easily slide off rather than pooling on top and causing leaks. A raised base is also essential, as it keeps the floor away from the freezing, wet ground. A small front porch or overhang helps shield the entrance from driving rain.
The Goldilocks Rule of Size
When it comes to size, bigger is not better. In fact, a massive shelter is a terrible idea for a cat. Outdoor shelters are heated entirely by the cat’s own body heat. If the space is too large, the heat dissipates, and the cat stays cold.
The ideal interior dimensions for one medium-sized cat are roughly 12 inches high, 18 inches wide, and 24 inches long. If you are building for two smaller, bonded cats who like to snuggle, you can increase the size slightly, but avoid oversized shelters that are impossible to heat naturally.
Location-Friendly and Practical Design
Your design needs to be practical for the real world. The shelter should be lightweight enough for you to move if you need to clean behind it or shift it to a sunnier spot, but sturdy enough that a strong gust of wind won’t flip it over. It also needs to be exceptionally easy to clean and maintain, which is why many builders use a removable roof on hinges.
Crucial Safety Basics
Safety must be your top priority. The golden rule of cat shelters is to have only one entrance. Having a single door blocks cross-breezes and chilling drafts, and it allows the cat to easily defend the door from predators like raccoons or stray dogs. Make sure your construction has no sharp screws poking through, no jagged metal edges, and utilises absolutely no toxic materials or lead-based paints.
Cosy Comfort Features
Finally, a good shelter focuses on comfort. A dry floor, a raised doorway to stop snow from drifting in, and soft, moisture-wicking bedding are mandatory. If you want to get advanced, consider a dual-chamber design. This features a small entry tunnel or “mudroom” that leads into the main sleeping room, completely blocking the wind. Understanding these features explains exactly why the upcoming steps matter so much, keeping your goal of mastering outdoor cat house design firmly on track.
Materials and Tools You’ll Need
To build a shelter that lasts, you need the right supplies. You do not have to spend a fortune, but you do need to choose your materials wisely to ensure the house is waterproof and well-insulated.
Your Essential Materials List
You have a few options when deciding on the core structure of your cat house.
- The Main Body: You can use thick plywood, a heavy-duty plastic storage tote, or even a thick Styrofoam cooler. Wood is the most durable and looks the most like a traditional house.
- Insulation: Rigid foam boards (polystyrene) are the absolute best choice. They are affordable, easy to cut, and trap heat beautifully.
- Waterproofing: Exterior-grade paint, heavy-duty outdoor wood sealant, and roofing materials like asphalt shingles or heavy corrugated plastic.
- Hardware: Galvanised screws, nails, and durable hinges (especially if you are adding a removable roof for easy cleaning).
- Flooring: Corrugated plastic, sealed wood, or thick linoleum scraps work wonderfully to keep the bottom dry.
Here is a quick comparison table to help you decide on your main building material:
Material Type Pros Cons Best For
Plywood / Lumber: Highly durable, looks great, heavily customizable, sturdy against wind. Heavier, requires more tools (saws and drills), and takes more time to build—long-term yard placement, severe winter climates, and DIY enthusiasts.
Plastic Storage Tote: Extremely cheap, waterproof instantly, and very fast to assemble. Can crack in extreme cold, lighter weight (might blow away), and less visually appealing. Quick emergency shelters, budget-friendly builds, and hidden locations.
Styrofoam Cooler: Amazing natural insulation, pre-built shape, very easy to cut. Fragile and easily chewed by animals; must be placed inside another structure for protection—upcycling projects are placed inside a shed or covered porch.
The Tools You Need on Hand
If you are going the wooden house route, gather a hand saw or circular saw, a power drill, a reliable measuring tape, a pencil, and a sharp utility knife to cut the foam insulation. Optional but helpful tools include a jigsaw for cutting a perfectly round door, paintbrushes, and sandpaper to smooth down rough edges.
Budget-Friendly Tips
Do not feel pressured to buy everything brand new. You can easily keep costs down by reusing old plastic storage bins or sturdy wooden crates. Check local community boards or ask friends for leftover foam insulation boards from their home-improvement projects. Often, people have half a sheet of plywood sitting in their garage that they are happy to give away!
Important Safety Reminders
Whenever you are building, please always wear thick work gloves and protective eye gear. When selecting paints and sealants, ensure you buy non-toxic, pet-safe, and low-VOC options. If you want to learn how to make outdoor cat house setups effectively, doing so safely is step number one.
Planning and Design: Sketching Your Outdoor Cat House
You know what they say: measure twice, cut once! Jumping straight into cutting wood or plastic without a solid plan usually leads to frustrating mistakes. Taking just twenty minutes to plan your design will save you hours of headaches later.
Decide on Size and Shape
First, determine who will be using this house. Are you building a single-cat shelter for the lone stray in your yard, or a multi-cat shelter for a bonded pair? Remember the golden rule from earlier: keep it snug to retain body heat. Next, decide on the aesthetic. Do you want a charming “house-style” with a pitched roof, or a more minimalist, stealthy box that blends into your bushes?
Choose the Location Ahead of Time
Where you place the house dictates how you should build it. You want to choose a location that is naturally sheltered from howling winds and driving rain, like against the side of your garage or under a dense evergreen tree. Make sure the spot is near their food and water stations but far from high-traffic walkways, so the cat feels hidden and secure.
Sketch a Simple Floor plan and Elevation
Grab a piece of paper and sketch out a basic box. Mark exactly where the door will go. (Pro tip: put the door on one side rather than in the dead centre, so the cat has a deep, wind-free corner to sleep in). Indicate where your sloped roof will sit, and add an extra inch of thickness to the walls to account for where your foam insulation will go.
Decide on Construction Style
Will you do the famous wooden box-in-a-box method? This involves building a smaller wooden box, placing it inside a larger wooden box, and filling the gap with insulation. Or will you opt for a heavily insulated plastic bin shelter with a wooden facade added to the front?
Planning first is the ultimate secret weapon. It makes it significantly easier to build an outdoor structure correctly on the very first try, saving you time, money, and stress.
How to Make a Cat House Outdoor: Complete Step-By-Step Instructions
This is the main event! It is time to turn your materials into a life-saving sanctuary. Follow these steps carefully, taking your time to ensure everything is secure and tight.
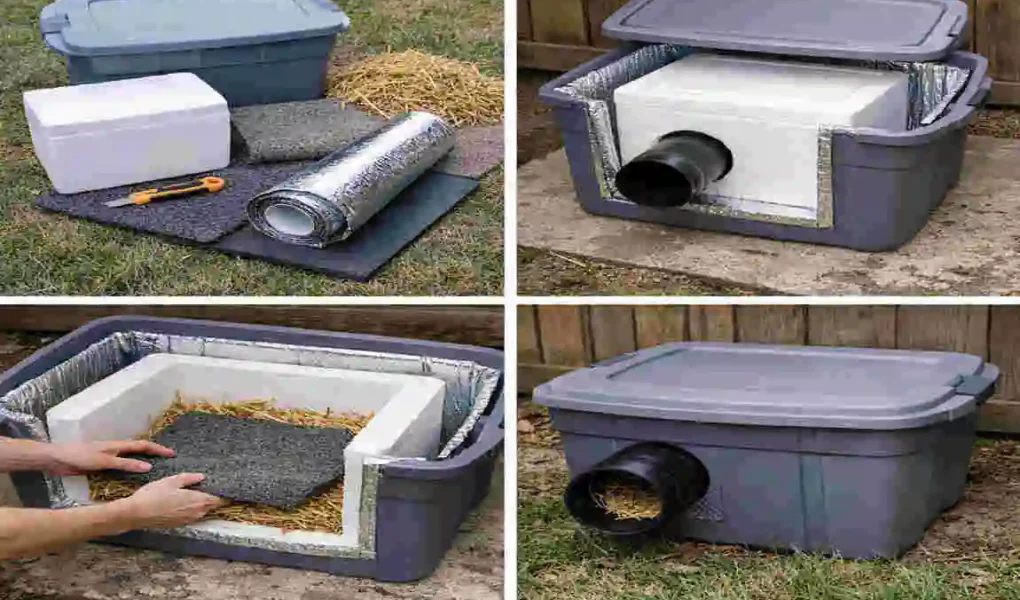
Prepare the Base and Floor
A shelter resting directly on the cold, damp earth will draw the heat right out of a sleeping cat. You must raise the floor slightly for better airflow and drainage.
First, choose and cut your base material, ideally a thick piece of treated plywood. To elevate it, screw four short wooden blocks (like 2×4 offcuts) to the bottom corners to act as “legs.” Alternatively, you can rest the entire base on a wooden shipping pallet or a few sturdy bricks. Once your base is elevated, seal or paint the exterior bottom to fiercely resist ground moisture. A dry base is the foundation of a warm shelter.
Build or Choose the Main Shelter Box
This is the core of learning how to make cat house outdoor setups that truly last.
If you are using wood, cut your four walls according to your sketches. Pre-assemble them by screwing the walls together into a sturdy square or rectangle, then attach this frame securely to your elevated base.
If you are using a plastic bin, you need to integrate it into a “house” style. Take a heavy-duty, large storage tote. Cut a hole in the front for the door. To make it a true “house,” you will later frame a wooden roof over it or build a small wooden facade to protect the plastic from harsh UV rays and heavy impacts. Whichever material you choose, ensure the main walls are incredibly sturdy.
Insulate the Shelter
Insulation is the magic ingredient that turns a cold box into a warm home. Without it, the shelter is virtually useless in freezing temperatures.
If you built the wooden box-in-a-box style, carefully insert your rigid foam insulation boards between the inner and outer walls. Cut the foam tightly so there are no gaps. Next, line the floor and the ceiling with foam boards.
A massive warning about loose materials: You might be tempted to stuff the walls or floor with newspaper, old towels, or blankets. Do not do this. Fabric and paper absorb moisture from the air and from the cat’s breath. Once damp, they freeze, turning the shelter into a refrigerator. Always use rigid foam for the walls, as it repels moisture perfectly.
Add House-Style Features
Now we give the shelter its character and practical defence mechanisms! First, build and attach a sloped roof. The roof should be higher in the front and slope downward toward the back, allowing rain to run off the back of the house. Leave a slight overhang on all sides.
Next, add a small “porch” or roof overhang directly above the front door to keep horizontal rain from blowing inside. Finally, create a cat-friendly doorway. Use your jigsaw or utility knife to cut a circular or slightly slanted door, about 6 inches in diameter. This is large enough for a cat to pass comfortably, but small enough to keep out large dogs and icy gusts of wind.
Waterproof and Weatherproof
Even the best-built house will fail if water seeps through the cracks. Use a tube of exterior-grade silicone caulk to seal every seam and joint where your wood or plastic meets. Pay special attention to the corners and the edges around the roof.
Once the caulk is completely dry, paint or coat the entire exterior wood with a waterproof, non-toxic finish. You can use exterior house paint, or tack on actual roofing paper and asphalt shingles for maximum durability.
Add Comfortable Bedding and Final Touches
The house is built, but the interior needs to be inviting! As mentioned earlier, avoid soft blankets, cotton beds, or hay, as they retain dampness.
Instead, the absolute best bedding is straw (not hay!). Straw is dry, hollow, repels moisture, and allows the cat to burrow down and effectively trap its body heat. Fill the bottom quarter of the shelter with fresh straw. If you absolutely cannot find straw, a small, specialised outdoor heated pet pad (if you have safe outdoor electrical access) is a great alternative. Finally, place a small doormat or a piece of rough rug on the ground just outside the entrance so the cat can wipe their wet paws before stepping inside.
Optional Upgrades and Creative Ideas
Once you have mastered the basics of making outdoor cat house setups, you might want to get a little fancy! Upgrading your shelter can make it even more comfortable and appealing to the felines you are trying to help.
- Add Ventilation: While you want to block wind, a tiny bit of airflow prevents condensation. You can add a very small, screened-in window near the top of the house under the roof overhang. Make sure the screen is sturdy to keep insects out.
- Make it Modular: Instead of screwing the roof down tightly, attach it with heavy-duty hinges and a hook-and-eye latch. A removable or hinged roof makes cleaning out old straw and wiping down the interior an absolute breeze.
- Custom Paint Jobs: Why not make it a beautiful addition to your yard? Paint or decorate the shelter to match your home, garden furniture, or patio aesthetic. Just remember to use pet-safe paint!
- Install a Cat-Flap: If you want to keep other wild animals out, you can install a lightweight, clear plastic cat-flap on the door. Just be aware that some feral cats are scared of flaps and may need time to learn how to push through them.
- The Mini Cat Porch: Build a tiny, elevated wooden platform right outside the front door. Cats love to sit off the muddy ground and survey their territory before going to sleep. These ideas take your knowledge of how to make a cat house outdoors to the next level.
Placing and Using the Outdoor Cat House
You have built a masterpiece. Now, where do you put it, and how do you convince a cautious cat actually to use it?
Choosing the Perfect Spot
Placement is everything. You want to choose a spot that is highly sheltered from prevailing winds. Placing the house near a sturdy brick wall, a solid wooden fence, or under a thick canopy of bushes is ideal. Ensure the entrance faces away from the prevailing wind direction in your area. Always keep the shelter off the ground and place it far from areas where puddles form or where rain gutters spill standing water.
Tips for Introducing Cats to the Shelter
Cats are naturally suspicious of new things, especially enclosed spaces. You have to make the house irresistible. Start by placing familiar-smelling items near the shelter. If it is for your own outdoor cat, rub a towel on them and place it just inside the doorway.
To encourage exploration, sprinkle a little high-quality catnip at the entrance. Put a trail of their favourite treats leading up to the door and just inside. Never force a cat inside. Let them investigate on their own terms. Once they realise it is warm and safe, they will claim it as their own.
Basic Maintenance Routines
To keep the house sanitary and warm, you need a maintenance schedule. Check the shelter once a month. How often should you replace the bedding? If you are using straw, it should be replaced twice a year—once before winter and once in the spring. If it gets wet, replace it immediately. Inspect the roof for leaks after major storms, and plan to touch up the exterior paint or sealant every couple of years to prevent rot.
Safety Tips and Common Mistakes to Avoid
Even with the best intentions, DIY projects can sometimes go awry. Keep these safety tips and common pitfalls in mind to ensure your shelter is a success.
Material Mistakes
- Avoid Toxic Paints: Never use leftover industrial paints or varnishes that off-gas dangerous fumes. Always opt for water-based, non-toxic exterior paints.
- Say No to Cardboard: Cardboard is fantastic for indoor play, but outdoors, it acts like a sponge. It will get soggy, collapse, and grow dangerous mould within days.
- Watch for Sharp Edges: If you used metal roofing or plastic bins, diligently check every inch of the doorway for sharp, jagged edges that could scrape a cat’s delicate nose or ears. Sand everything down until it is totally smooth.
Design Mistakes
- The Size Trap: We cannot stress this enough: do not make the shelter too big! A mansion-sized cat house will leave the cat shivering.
- Multiple Doors: Do not be tempted to add a “back door” for escaping. Two doors create a wind tunnel, stripping the shelter of all its heat. Stick to one entrance.
- Skipping Insulation: A plain wooden box provides shade but offers no warmth. Do not skip the foam boards.
Safety for You, the Builder
Take care of yourself while building! Secure your tools properly, always unplug power tools when changing blades, and work on a stable, flat surface. Avoid working outdoors in extreme heat or cold; set up your workshop in a garage or basement instead.
Lastly, as a gentle reminder: always supervise your own indoor/outdoor cat around the shelter at first to ensure they know how to get in and out comfortably without getting stuck.
FAQs About Building an Outdoor Cat House
You might still have a few lingering questions. Here are some of the most common questions people have when learning how to make outdoor cat house setups.
Q: How cold is too cold for an outdoor cat? A: Generally, when temperatures dip below 45°F (7°C), cats start feeling the chill. Once temperatures fall below freezing (32°F or 0°C), feral and outdoor cats are at severe risk of frostbite and hypothermia without a well-insulated shelter.
Q: Can I use a regular storage bin to make a shelter? A: Yes, absolutely! If you are figuring out how to make an outdoor cat house on a tight budget, a heavy-duty plastic storage tote is a great starting point. Just be sure to line the inside heavily with rigid foam insulation and elevate it off the ground, as plastic alone offers no thermal protection.
Q: How often should I clean the shelter? A: You should do a quick visual check every few weeks. Do a deep clean—wiping down the inside with a mild, pet-safe soap and replacing all the straw bedding—at least twice a year (Fall and Spring).
Q: Is it safe for my indoor cat to use an outdoor house? A: Yes! If your indoor cat loves lounging on the patio but refuses to come in when the wind picks up, an outdoor shelter provides a fantastic, safe resting spot for them while they enjoy their yard time.