Did you know that, according to the National Fire Protection Association, electrical failures or malfunctions are a factor in nearly 45,000 home fires every year? That is a startling statistic, and a significant portion of these terrifying incidents are triggered by one common culprit: the dreaded short circuit.
If you have ever plugged in a simple appliance, only to hear a loud pop and see half your house plunge into darkness, you have likely experienced this electrical anomaly firsthand. But what exactly is a short circuit?
To understand it, picture electricity as water flowing through a carefully laid-out system of pipes. Under normal circumstances, electrical current flows along a designated path—from your electrical panel, through the wires, into your appliance, and back again. A short circuit happens when that electrical current finds an unintended “shortcut.” It bypasses the normal path and jumps between wires that should never touch.
This rogue flow of electricity creates a massive surge of power. Because there is no appliance to absorb the energy, the wires heat up incredibly fast. If the breaker does not trip immediately, this intense heat can melt wire insulation, destroy your expensive electronics, and, in the worst-case scenario, start a devastating wall fire.
What Causes Short Circuits in House Wiring?
Before we can roll up our sleeves and tackle the repair, we need to understand the root of the problem. Electricity does not just jump tracks for no reason. There is always a physical trigger that forces the current to find a new path. Let’s explore the most common culprits lurking behind your drywall.
Frayed or Damaged Insulation
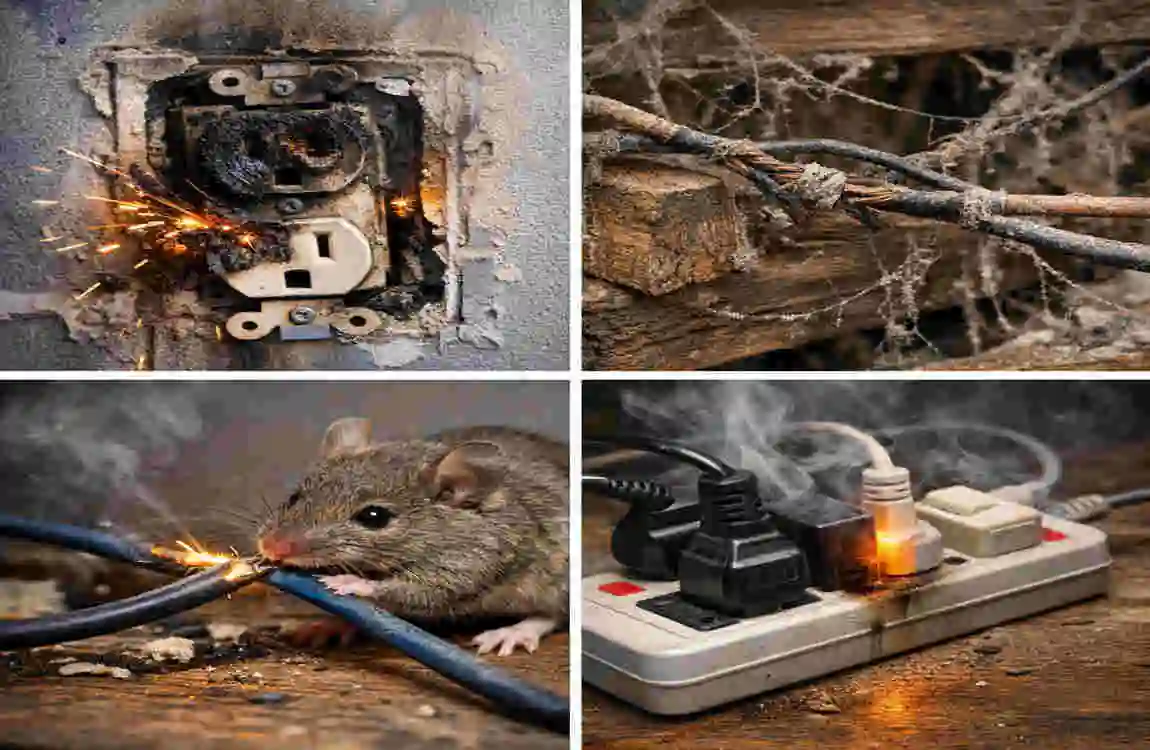
The colored plastic coating around your copper wires is not just for decoration. That insulation acts as a protective barrier, keeping the live electricity safely contained. When that insulation becomes compromised, you have a recipe for disaster.
How does this damage happen? Often, the culprits are four-legged pests. Mice, rats, and squirrels love to chew on electrical wires, stripping away the plastic and leaving bare copper exposed. Age is another factor. In older homes, wire insulation can become brittle and crack over time. Finally, simple DIY errors—like accidentally driving a nail through a wire while hanging a picture—can easily pierce the insulation and cause a direct short.
Overloaded Circuits
We ask a lot of our electrical systems today. We want to run the microwave, toaster oven, coffee maker, and space heater at the same time, often on the same kitchen counter.
When you plug too many high-wattage appliances into a single circuit, you demand more electrical current than the circuit is designed to carry safely. While an overload is technically different from a true short circuit, a severe overload causes the wires to overheat. This extreme heat can actually melt the protective insulation right off the wires inside your walls. Once that insulation melts away, the bare wires touch, and a dangerous short circuit is born.
Faulty Wiring in Outlets and Switches
Every time you plug a cord into an outlet or flip a light switch, you are putting a tiny amount of physical stress on the connections hidden behind the wall plate. Over years of daily use, the screws holding the wires to the sides of the outlet can vibrate loose.
When a connection becomes loose, the electrical current can “arc” or jump across the tiny gap. This arcing generates immense heat, melting the surrounding plastic and allowing wires to cross. Additionally, ageing electrical panels, loose wire nuts, or poorly spliced wires from a previous, rushed renovation can all create the perfect environment for a short.
Water and Moisture Exposure
You have probably heard since childhood that water and electricity are a deadly combination. Water is an excellent conductor of electricity. If moisture finds its way into your electrical boxes, it provides a highly efficient “shortcut” for the electrical current to travel from the hot wire to the neutral wire or the ground.
This is incredibly common in specific zones of your home. Kitchens, bathrooms, basements, and outdoor patios are all high-risk areas. A leaking roof, a burst pipe, or even heavy condensation can introduce enough moisture into an electrical junction box to trigger an immediate short circuit.
Here is a quick comparison table to help you understand the risks and how to prevent them:
Cause Risk Level Prevention Tip
Frayed Wires High Conduct regular visual inspections; pest control.
Overloading Medium Use heavy-duty surge protectors; spread out appliances.
Moisture: High: install. GFCI outlets in all wet areas immediately.
Loose Connections: Medium. Periodically check and tighten outlet screws (power off).
Signs of a Short Circuit in Your Home
Your electrical system will rarely fail without giving you some warning signs first. The key to preventing a catastrophic fire is to listen to what your house is telling you. If you notice any of these symptoms, act fast.
Frequent Breaker Trips
Your circuit breaker is the ultimate bodyguard for your home. Its entire job is to monitor the flow of electricity and shut down the power if things get out of hand.
If a breaker trips once, it might just be a temporary overload—like running the vacuum while the AC kicks on. But if you reset the breaker and it instantly trips again with a loud “snap,” or if it trips repeatedly over a few days without any extra appliances plugged in, you have a clear problem. This “hard trip” is the most common and obvious sign of a direct short circuit.
Burning Smell or Scorch Marks
This is a symptom you should never ignore. If you walk into a room and smell a faint, acrid odour of melting plastic or burning rubber, you need to investigate immediately. Sometimes, an electrical fire can have a strange, almost fishy smell.
Follow your nose to the outlets and switches. Look closely at the plastic faceplates. Do you see any brown or black scorch marks? Are there soot stains trailing up the wall above the outlet? These burn marks are the physical scars left behind by electrical arcing and intense, localised heat.
Buzzing Sounds from Outlets
Electricity should be silent. When your wiring is healthy, and connections are tight, you should not hear a thing.
If you put your ear near an outlet or a light switch and hear a faint crackling, sizzling, or buzzing sound, you are literally hearing the electricity jump through the air. This arcing means the current is trying to find a shortcut. The buzzing sound is a massive red flag that a short circuit is either currently happening or about to happen.
Flickering Lights or Warm Fixtures
Have you ever turned on a specific appliance and noticed the room lights suddenly dim or flicker? While a slight dimming can be normal when a large motor starts, constant flickering indicates unstable voltage.
Furthermore, gently touch the plastic faceplates of your outlets and switches. They should always feel cool to the touch. If an outlet feels warm or hot, it means dangerous resistance is building up behind the wall, often due to a loose connection that’s about to short out.
Always remember: If you experience burning smells or buzzing sounds, do not wait. Turn off the main power immediately to avoid a fire.
Tools and Safety Gear Needed
Before you even think about opening an electrical box to figure out how to fix a short circuit in house wiring, you need to arm yourself properly. Electrical work is not the time to improvise with butter knives and duct tape. Having the right tools makes the job easier, but more importantly, it keeps you alive.
Here is your essential checklist of tools:
- Multimeter: This is your electrical detective. It measures voltage, current, and resistance. It will help you pinpoint exactly where the short is hiding.
- Non-Contact Voltage Tester: This tool looks like a thick pen. It beeps and flashes red when it detects live electrical current through wire insulation. It is your ultimate safety check.
- Wire Strippers: You need a high-quality pair to cleanly strip the plastic jacket from the wires without nicking the copper underneath.
- Screwdrivers: A set of Philips and flathead screwdrivers for removing faceplates and unfastening wires from terminals.
- Needle-Nose Pliers: Essential for bending wires into perfect loops to fit around terminal screws.
- Assorted Wire Nuts: You will need these to cap off and connect wires safely.
Here is your essential safety gear:
- Insulated Rubber Gloves: Do not use gardening gloves. Invest in actual electrician’s gloves that are rated to stop electrical current.
- Sturdy Flashlight or Headlamp: You will be working with the power off, which means you will be working in the dark. A headlamp is best because it keeps both of your hands free.
- Safety Glasses: To protect your eyes from sparks or flying debris when cutting wires.
- First-Aid Kit: Always good to have on hand for minor scrapes.
A Crucial Warning Before You Begin: Electricity is unforgiving. Before touching any wire, you must turn off the power at the main breaker box. If you ever feel overwhelmed, out of your depth, or if you encounter complicated, outdated wiring, stop immediately. Consult a licensed professional electrician. Your life is worth much more than the cost of a service call.
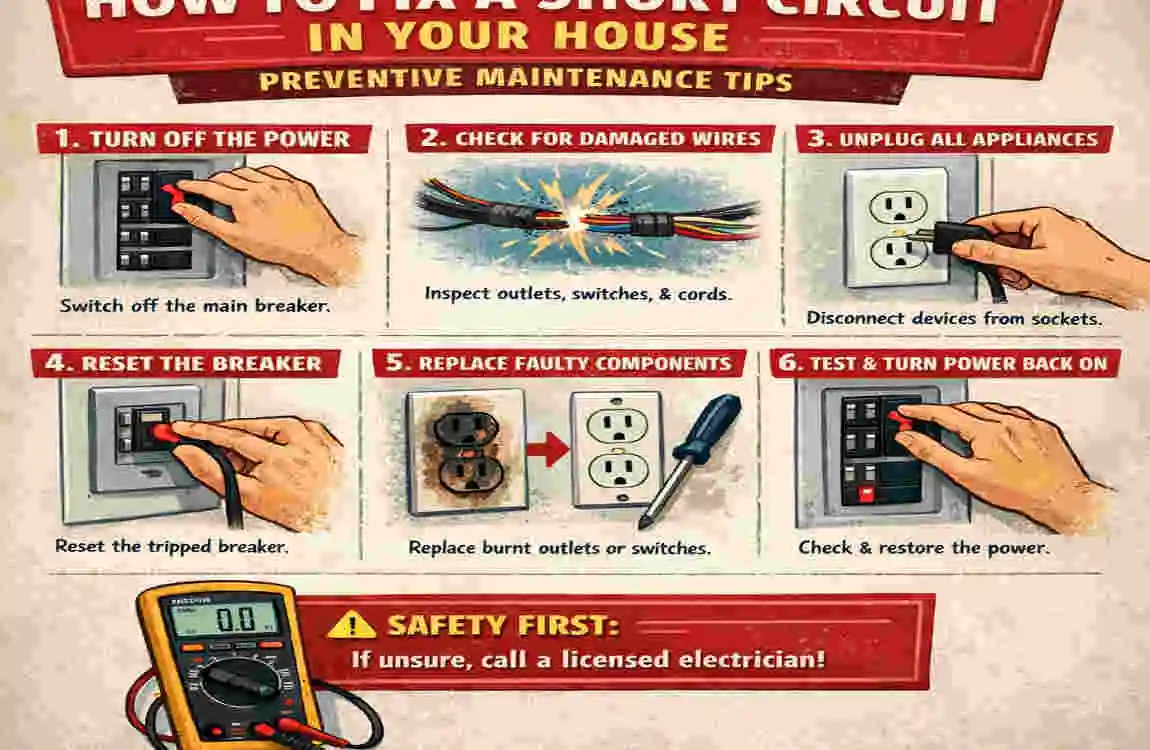
Step-by-Step Guide: How to Fix a Short Circuit in House Wiring
Now we reach the core of our journey. Fixing an electrical fault can feel intimidating, but if you break it down into manageable segments, it becomes a logical process of elimination. Follow these detailed steps to safely discover how to fix a short circuit in house electrical systems.
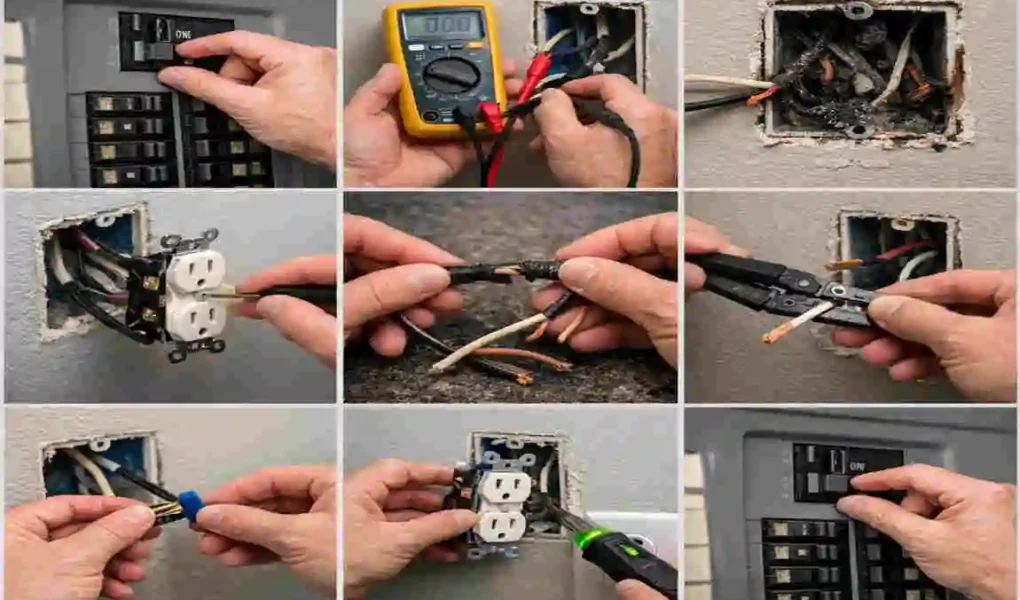
Shut Off the Power
Your absolute first step is to eliminate the danger. Grab your flashlight and head to your main electrical panel, usually located in the garage, basement, or a utility closet.
Open the metal door and look at the rows of switches. If you know exactly which circuit is shorting out (for example, the kitchen outlets), you can flip that specific breaker to the “OFF” position. However, if you are unsure or want to be completely safe, find the main breaker switch at the very top or bottom of the panel. Flip this main switch to “OFF.” This will cut power to your entire house. It is a slight inconvenience, but it guarantees you will not be shocked.
Inspect Visually
With the power securely off, you need to become an investigator. Walk through the area of your home that lost power.
Look closely at every single outlet, switch, and light fixture on that circuit. You are hunting for visual clues. Do you see any melted plastic on the faceplates? Are there black soot marks on the wall? Do you smell that tell-tale odour of burnt plastic?
Don’t forget to inspect the cords of the appliances that were plugged in. Sometimes the short circuit is not in your walls at all, but inside the frayed cord of a vacuum cleaner or an old lamp. If an appliance cord looks chewed or melted, you may have just found your culprit without opening any walls!
Test Circuits with a Multimeter
If the visual inspection doesn’t reveal an obvious problem, it is time to use your tools. This is where learning how to fix a short circuit in house wiring gets slightly technical, but we will keep it simple.
Grab your multimeter and set the dial to the “Continuity” setting or the “Ohms” (resistance) setting. The continuity setting often looks like a small sound wave icon. When you touch the red and black probes of the multimeter together, it should beep, indicating a continuous, unbroken path.
Take your multimeter to the breaker panel. (Ensure the power is STILL OFF). Touch one probe to the neutral bar (the metal bar with all the white wires connected to it) and touch the other probe to the hot wire (the black wire) of the circuit that keeps tripping.
If your multimeter beeps loudly or shows a reading of 0 ohms (or close to 0), you have confirmed a direct short circuit. The hot and neutral wires are touching somewhere in the house, creating a closed loop that shouldn’t be there.
Unplug and Isolate
Now we must isolate the shorts’ location. The easiest way to do this is through the process of elimination.
Go through the dead rooms and unplug absolutely everything from the wall: every lamp, every TV, the microwave, everything. Also, make sure all the light switches are turned to the “OFF” position.
Once everything is unplugged and turned off, go back to your electrical panel. Turn the main power back on, and then try to reset the specific breaker that was tripping.
Does it stay on? If it stays on, congratulations! The wiring inside your walls is completely fine. The short circuit is actually hiding inside one of the appliances you unplugged. To find out which one, plug them back in one at a time. When you plug in the faulty toaster and the breaker trips instantly, you know you need to throw that toaster away.
If the breaker still trips immediately even with everything unplugged, the short circuit is definitely in your house wiring, your outlets, or your switches.
Repair or Replace Wires
This is the hands-on repair phase. Once you have isolated the short to a specific outlet or switch box (often found by noticing a bad smell, scorch marks, or by using a process of elimination by disconnecting outlets one by one until the multimeter shows the short is gone), you need to open it up.
Double-check that the power is off using your non-contact voltage tester. It should not beep when waved near the wires.
Unscrew the faceplate and gently pull the outlet or switch out of the wall box. Look at the wires. You are looking for:
- A black (hot) wire touching a white (neutral) wire.
- A black (hot) wire touching the bare copper (ground) wire.
- A black wire is touching the metal side of the electrical box.
When you find the damaged wires, you must repair them. If the insulation is melted or chewed through, you cannot just wrap it in electrical tape. You must cut out the damaged section.
Use your wire strippers to cut away the bad wire. Then, strip away about 1/2 inch of the plastic insulation from the fresh ends of the wires. You want to expose clean, shiny copper.
If the wires are now too short to reach the outlet, you need to create a “pigtail.” Take a short, 6-inch piece of new wire (of the same gauge, usually 12 or 14 gauge). Strip both ends. Twist the new wire together with the old wire in the wall, and twist a wire nut tightly over the connection. Turn the wire nut clockwise until it is extremely tight. Give it a gentle “tug test” to make sure the wires won’t slip out.
Now, attach the other end of your new pigtail wire to the correct screw on the outlet (Black wire to the brass screw, White wire to the silver screw).
Reset and Test
Once you have cut away the damaged wires, spliced in clean wire, tightly secured all your wire nuts, and carefully folded the wires back into the wall box, it is time for the moment of truth.
Screw the outlet back into the wall and attach the faceplate.
Walk back to your electrical panel. Stand slightly to the side of the panel (a good safety habit in case of a rare panel spark). Flip the main breaker back on. Then, firmly push the previously tripped circuit breaker to the “OFF” position, then snap it to the “ON” position.
Did it stay on? Listen carefully. Do you hear any buzzing? Smell anything burning? If the breaker stays engaged, the room is quiet, and it smells clean, grab your multimeter or a simple lamp and plug it into the repaired outlet. If the light turns on, you have successfully fixed the short circuit!
When to Call an Electrician
While learning how to fix a short circuit in a household setup is empowering, bravery should never override common sense. You must know your limits.
You should immediately stop what you are doing and call a licensed electrician if you encounter any of the following “red flags”:
- The short is hidden deep in the wall: If you have checked all the outlets and switches, and the multimeter still shows a short, the wires may be melted together inside the ceiling or behind the drywall. This requires specialised tools to trace.
- You have aluminium wiring: If your house was built in the late 1960s or 1970s and you see dull, silver-coloured wires instead of orange copper wires, do not touch them. Aluminium wiring requires special connectors and pastes to prevent fires.
- The breaker panel looks damaged: If the inside of your main breaker box looks scorched, rusted, or if the breakers feel loose and wobbly, back away. Working inside the main panel is extremely dangerous and should be strictly reserved for professionals.
Preventive Maintenance Tips
Fixing a short circuit is satisfying, but preventing one from happening in the first place is much better. Your home’s electrical system requires routine maintenance, just like your car’s engine. Here is how you can proactively protect your home.
Schedule Annual Inspections
Think of an electrical inspection like a routine doctor’s checkup. Hiring a licensed electrician to inspect your home once a year is a fantastic investment. They have thermal imaging cameras that can detect “hot spots” behind your walls before a wire ever shorts out. They can tighten all the connections in your panel, ensuring everything is secure.
Upgrade Old Wiring
If you live in a historic home, you might have “knob-and-tube” wiring. This antique system uses ceramic knobs and lacks a modern ground wire. The insulation on these old wires crumbles easily, posing a significant risk of short circuits. If you have this type of wiring, or the aforementioned aluminium wiring, budgeting for a whole-house rewiring project is critical for your long-term safety.
Use Arc-Fault Breakers (AFCIs)
Standard circuit breakers only trip when they sense a massive overload or a direct short. Arc-Fault Circuit Interrupters (AFCIs) are much smarter. They have internal computers that constantly monitor the electrical current. If they detect the tiny, erratic electrical fluctuations caused by a loose wire sparking (arcing) inside a wall, they shut the power off instantly—long before a fire can start. Upgrading your standard breakers to AFCIs is one of the best safety upgrades you can make.
Educate Your Household
Sometimes, prevention is just about good habits. Educate everyone in your home about load limits. Make sure your family knows they shouldn’t plug the 1500-watt space heater and the hair dryer into the same cheap extension cord. Teach them not to yank cords out of the wall by the wire, which damages the internal connections. Simple awareness goes a long way.
Common Mistakes to Avoid
When attempting to figure out how to fix a short circuit in house wiring, amateurs often make a few critical errors. Avoid these common traps to ensure your repair is successful and safe.
Ignoring the Symptoms
The most dangerous mistake you can make is treating a tripped breaker as a mere nuisance. If a breaker trips, do not keep resetting it over and over. Every time you force a tripped breaker back on, you send a massive jolt of electricity through a damaged wire, increasing the heat and the risk of fire. The Fix: If it trips twice, stop. Investigate the cause immediately.
Working Live
We cannot stress this enough: never assume the power is off just because the light switch is flipped down. Wires in the box may still be hot. The Fix: Always, without exception, use your non-contact voltage tester on every single wire in the box before you touch them with your hands or metal tools.
Over-Tightening Connections
When attaching a wire to the side of an outlet, some DIYers think tighter is always better. However, if you crank the screw down too hard, you can actually crush or sever the copper wire. This creates a weak point that will heat up and eventually short out again. The Fix: Tighten the screw firmly until it is snug and the wire cannot wiggle, but do not use brute force to strip the screw threads or crush the copper.
FAQs
You likely still have a few questions bubbling up. Let’s address some of the most common questions homeowners have about electrical faults.
Can I figure out how to fix a short circuit in house wiring myself? Yes, if the short is located in a visible, accessible area like a damaged outlet or a frayed lamp cord, a confident DIYer can fix it safely by turning off the power and replacing the damaged components. However, complex issues deep within walls require an electrician.
How much does it cost to have a professional fix a short circuit? If you choose not to DIY, electricians typically charge between $75 and $150 per hour. Depending on how long it takes them to hunt down the short, a typical repair bill ranges from $150 to $300.
What does a short circuit smell like? A short circuit usually produces a very distinct, sharp, acrid odour. It smells strongly of melting plastic, burning rubber, or sometimes resembles an unpleasant, fishy smell.
Will a short circuit fix itself? Absolutely not. A short circuit is a physical breakdown of wire insulation or a loose connection. It will only degrade further over time, generating more heat and increasing the fire risk until it is physically repaired.
How long does it take to find a short circuit? If it is a faulty appliance, you can find it in 10 minutes by unplugging things. If the short is buried inside a wall behind a nail, it could take an electrician a few hours of tracing to locate the exact spot.