Did you know that over 30% of the world’s population currently wakes up every morning inside a home made of earth? It’s true. From the ancient pueblos of the Americas to the enduring villages of Punjab, mud has been humanity’s most trusted building material for millennia. Yet, somewhere along the way, we convinced ourselves that concrete boxes were the only sign of progress. But the tides are turning.
There is a massive resurgence of eco-building trends, particularly in regions like Pakistan and Lahore, where the climate swings from scorching summers to chilly winters. People are waking up to the reality that concrete is not only expensive but also terrible at regulating temperature. If you have ever wondered how to build a mud house, you are looking at a solution that offers incredible thermal efficiency, zero-waste construction, and a price tag hard to beat—often under PKR 500 per square foot.
Benefits of Mud Houses: Why Go Earthen?
Before we pick up a shovel, it is important to understand why you should invest your time and energy into this. Building with mud isn’t just about nostalgia; it is a scientifically sound choice for modern living, especially in climates that experience extreme weather shifts.
Unmatched Sustainability and Climate Control
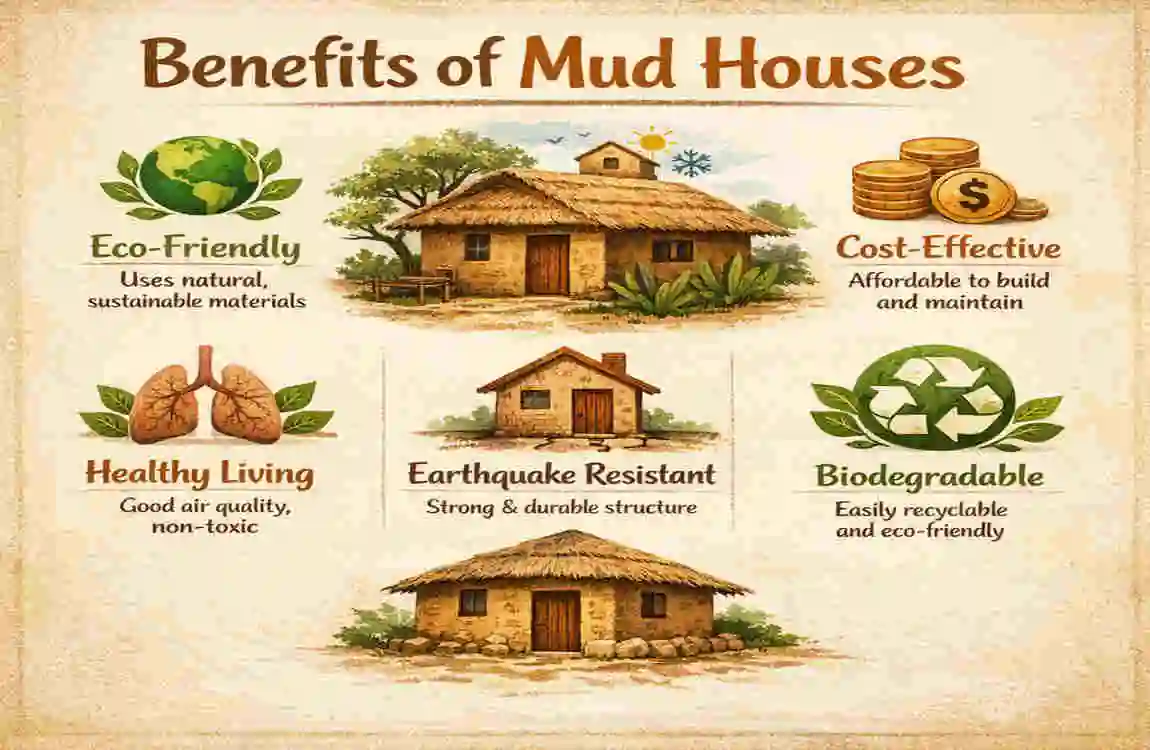
The biggest advantage of a mud home is its thermal mass. Unlike concrete, which traps heat and turns your home into an oven during a Lahore summer, mud walls breathe. They absorb heat during the day and release it slowly at night. This natural regulation keeps your home significantly cooler in the summer and warmer in the winter. In technical terms, mud regulates humidity, ensuring indoor air quality remains balanced. It acts as a natural dehumidifier, preventing that stuffy, damp feeling you often get in cemented structures.
Incredible Cost Effectiveness
Let’s talk money. Building a modern concrete home is a financial burden for many. A mud house, by comparison, can be up to 70% cheaper. Since the primary materials—earth, sand, and straw—are often free or locally sourced at a very low cost, your main investment is labor. A well-built mud house can easily last 50+ years with simple maintenance, defying the myth that dirt houses are temporary.
The Eco-Friendly Perk
If you care about the planet, this is the gold standard. Mud houses are fully biodegradable. If you were to abandon the house, it would simply melt back into the earth over time, leaving zero trace. It sequesters carbon rather than emitting it, and because materials are local, the transportation pollution is nonexistent.
Comparison: Mud vs. Concrete
To give you a clear picture of the differences, take a look at this breakdown. The numbers speak for themselves.
AspectMud HouseConcrete House
Cost per sqm PKR 300 – 500 PKR 1500+
Energy Savings 40% – 60% (Natural cooling) Minimal (Requires heavy AC/Heating)
Build Time (32sqm) 4 – 6 Weeks (DIY friendly) 8 – 12 Weeks (Requires pros)
Carbon Footprint Low (Natural materials) High (Cement production is toxic)
Maintenance : Annual plastering (Easy DIY) , Rare but costly structural repairs
Materials and Tools Needed
You cannot cook a great meal without the right ingredients, and building a house is no different. The beauty of how to build a mud house lies in the simplicity of the recipe. You don’t need industrial chemicals; you need what nature has already provided under your feet.
The Perfect Soil Mix
The structural integrity of your house depends on your mix. You generally want a ratio of 1 part clay to 3 parts sand, mixed with straw and water.
- Clay: This acts as the “glue” or binder.
- Sand: This provides the structural strength (the “bones”).
- Straw: This acts like rebar, providing tensile strength and preventing cracks.
How do you know if your soil is right? Perform the Jar Test. Take a handful of your local soil (dig down past the topsoil), put it in a glass jar, fill it with water, shake it vigorously, and let it sit for 24 hours. The layers will settle: sand at the bottom, silt in the middle, and clay at the top. You want to see about 20-30% clay. If you are in Punjab, the subsoil is often rich in clay, perfect for this.
Estimated Quantities For a 32sqm Home
To give you a rough shopping list for a small home, you are looking at:
- 5-7 tons of Clay soil (Often free if dug on-site).
- 15 tons of Sand (River sand is excellent).
- 1 ton of Straw (Rice husk or wheat straw is widely available in farming communities).
- Stabilizers: In rainy areas like Lahore, adding 5% Lime or cement to your external plaster mix is crucial to prevent water damage.
Essential Tools
You won’t need heavy machinery. Gather these basics:
- Shovels and Spades: For mixing and digging.
- Wheelbarrows: To move that heavy earth.
- Molds: Wooden frames (ladder style) to shape your bricks.
- Tarps: To cover your bricks while they dry or to protect piles of earth.
- Trowels: For laying bricks and smoothing plaster.
- Safety Gear: Always wear heavy gloves (straw can cut) and masks when mixing dry dust.
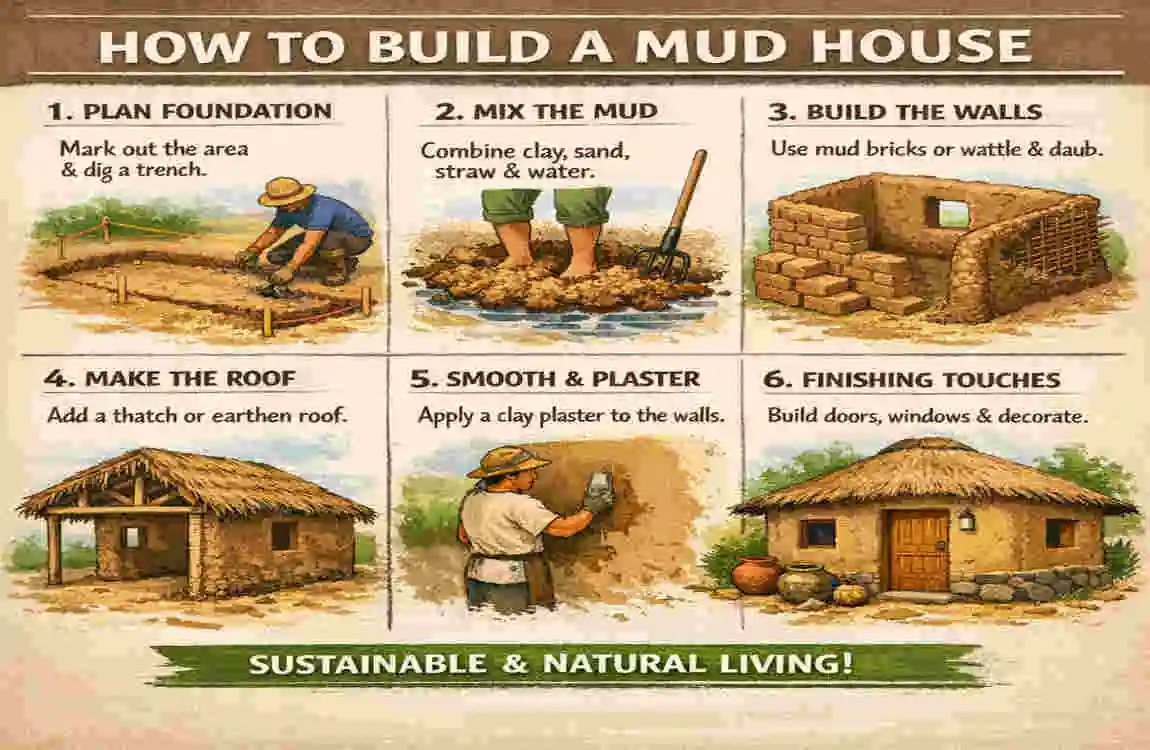
Site Preparation and Foundation
You might think that because it is a mud house, you can start building on the grass. Please don’t! A mud house needs a good pair of “boots” (a solid foundation) and a good “hat” (a wide roof) to survive.
Choosing the Right Spot
Select a piece of land that is flat and slightly elevated. You want to avoid potential flood zones. Water is the enemy of a mud wall’s base. If you are building in a low-lying area, you will need to build up the ground level first.
Clearing and Marking
First, clear all vegetation, grass, and roots. These organic materials will rot, causing your house to settle unevenly. Level the ground to about 1 meter deep if necessary to reach firm soil.
- Map it out: Use wooden stakes and string to mark the outline of your house. For our project, let’s mark a 4 x 8 meter rectangle.
- Verify corners: Ensure your corners are square (90 degrees) by measuring the diagonals; they should be of equal length.
The Foundation Trench
This is the most critical step for longevity.
- Dig: Excavate a trench along your string lines. It should be about 60cm wide and roughly 60cm deep.
- Drainage: Fill the bottom 20cm with gravel or crushed stone. This stops moisture from wicking up from the ground into your walls (rising damp).
- The Base: On top of the gravel, build a stone or concrete masonry wall up to the ground level and then at least 1-2 bricks higher than ground level.
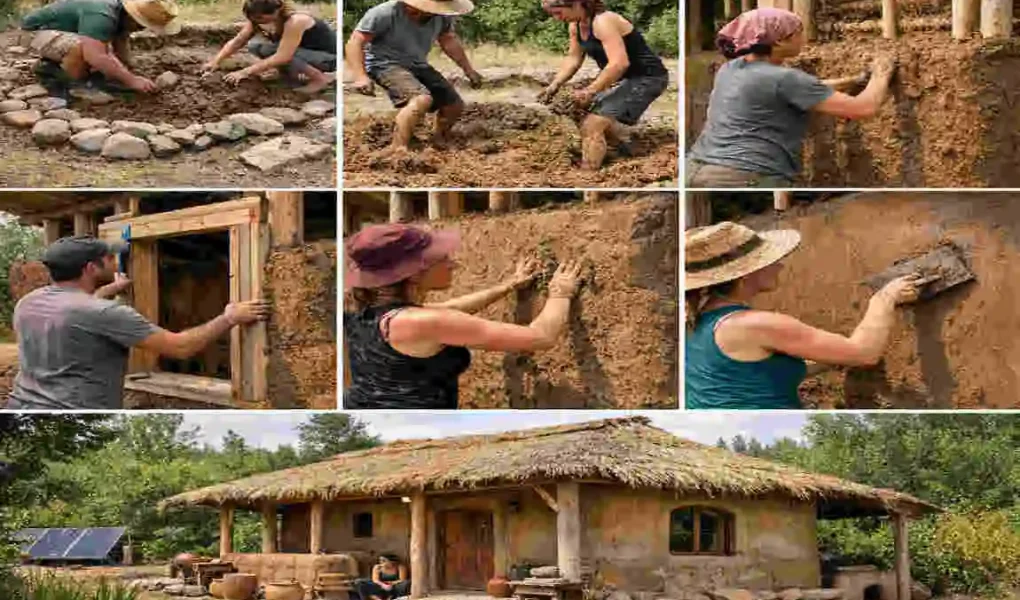
Making Mud Bricks Adobe
Now comes the labor of love. Making bricks is the central activity in building a house. For a 32 sqm structure, you will need roughly 1300 bricks. It sounds like a lot, but once you get a rhythm going, it moves fast.
Brick Recipe and Mixing
This is where you get to have fun. You need to mix your clay, sand, and straw.
- The Pit: Dig a shallow pit in the ground or use a large tarp.
- The Ratio: Combine your 1:3 clay/sand mix. Add water slowly.
- The Mix: The best way to mix is with your feet! Jump in and stomp around. It’s a great workout that helps you feel consistent.
- The Fiber: Once it’s a thick mud, stomp in the straw. You want a dough-like consistency—stiff enough to hold a shape, but wet enough to mold.
Molding and Drying
You will need a wooden mold. A standard size is 30cm x 15cm x 10cm, but you can adjust this.
- Prep: Dip your wooden mold in water to prevent the mud from sticking.
- Fill: Throw a ball of mud into the mold with some force. This removes air pockets.
- Pack: Push the mud into the corners.
- Level: Scrape the excess mud off the top with a straight stick or trowel.
- Release: Lift the mold straight up. You should have a perfect wet brick.
The Drying Process: Do not leave these in the direct scorching sun immediately, or they might crack.
- Let them sit flat for 3 days.
- Turn them on their sides (edge drying) for another 3-4 days.
- Once they are firm, stack them loosely under a shade or tarp to cure for at least 2 months before building. The drier they are, the stronger your wall will be.
Quality Checks
Before you start building walls, test your batch.
- The Drop Test: Drop a dried brick from waist height (about 1 meter). It should not shatter. If it breaks easily, you need more clay or straw.
- Visual Check: Are they uniform? Serious warping means they dried too fast.
Building the Walls
You have your foundation (“the boots”) and your cured bricks. Now, let’s go vertical. This is where your home takes shape.
Corner Leads
Never start laying bricks in the middle of a wall. You must build the corners first.
- Build your corners up about 1 meter high in a pyramid shape.
- Use a plumb bob (a weight on a string) constantly to ensure the corner is perfectly vertical. If your corners lean, your house leans.
Infill Walls
Run a string line between your two corners to guide you. This ensures your wall is straight.
- Mortar: Use the same mud mix you used for the bricks, just slightly wetter, as your mortar.
- Laying: Place a bed of mortar, set the brick, and tap it down level.
- Bonding: Use a “running bond” pattern. This means the vertical joint of the brick above should sit in the middle of the brick below. Never line up vertical joints; it creates a weak point.
- Reinforcement: Every 3 or 4 layers, lay a strip of bamboo or plastic mesh horizontally in the mortar. This ties the wall together and adds significant strength against vibrations.
Arches and Lintels
Don’t forget you need to get in and out!
- Lintels: For square doors and windows, you need a strong beam (wood or concrete) across the top of the gap to support the bricks above.
- Arches: If you want that beautiful traditional look, you can build arches. You will need a temporary wooden form to hold the bricks in place until the keystones are set.
Plastering
Once the walls are up, they will look rough.
- Scratch Coat: Apply a rough layer of mud plaster to fill gaps. Scratch the surface while wet so the next layer sticks.
- Finish Coat: This is a finer mix (more sand, less straw).
- Waterproofing: In the final layer, many builders in Pakistan mix in cow dung. Cow dung contains enzymes that act as effective natural water repellents and binders. It dries odorless and hard.
Roofing and Flooring
The roof is your “hat.” It must be wide and protective.
The Roof Structure
For a truly eco-friendly home, use timber or bamboo beams.
- Place beams across the walls, resting them on wooden wall plates to distribute the weight.
- Pitch: Ensure a slope of at least 30 degrees so rainwater runs off quickly.
- Material: You can use thatch for insulation or clay tiles for durability. If you want to be extra safe against heavy monsoons, a corrugated metal roof (hidden beneath thatch) is a practical, modern compromise (approx. 10% usage).
- Overhangs: This is crucial. Your roof should extend at least 2 feet beyond the walls. This umbrella effect prevents rain from washing away your mud plaster.
The Earthen Floor
You don’t need expensive tiles.
- Base: Fill the floor area with gravel and sand.
- Subfloor: Pour a layer of stabilized mud (mud mixed with 5-10% lime or cement).
- Finish: Once dry, seal it with multiple coats of linseed oil. It will harden into a dark, leather-like surface that is waterproof and can be swept and mopped.
Ventilation
Since mud houses are airtight, you need airflow. Install windows on opposite walls to encourage cross-ventilation. High vents near the roof allow hot air to escape, keeping the room cool.
Finishing and Protection
Your house is standing, but let’s make it a home.
Interior Finishing
For the inside walls, use a limewash.
- Mix lime putty with water and natural pigments (iron oxide for reds/yellows).
- It paints on white but acts as a mild fungicide and antiseptic. It brightens the room and keeps bugs away.
Exterior Protection
The outside needs armor against the weather.
- Apply multiple thin layers of plaster rather than a single thick layer.
- Wet Climate Hacks: If you live in a very rainy area, consider tiling the bottom 2 feet of the wall or using limestone cladding. This protects the “splash zone” where rain hits the ground and bounces back.
The Timeline
If you gather family and friends, you can complete the main structure of a 32sqm house in about 6 weeks. It is hard work, but the cost savings are massive, and the result is a home that feels organic and alive.
Maintenance for Longevity
A mud house is like a living organism; it needs to be cared for. However, the maintenance is simple and cheap.
The Golden Rule: Keep it dry.
- Annual Check: once a year, usually before the rainy season, check your exterior plaster. If you see cracks, mix up a bucket of mud and smooth it over—the new mud bonds perfectly with the old mud.
- Gutters: Keep your roof gutters clear. You do not want water overflowing and running down your walls.
- Breathability: Do not paint your walls with modern plastic or acrylic paints. This seals moisture inside the walls, causing the mud to crumble. Always use breathable lime or clay paints.
FAQs
1. How long does it essentially take to build a mud house? For a standard 32sqm unit, if you have a team of 3-4 people, it typically takes 4 to 8 weeks. This includes drying time for the bricks.
2. Is a mud house monsoon-proof in a city like Lahore? Yes, absolutely. The key is a high stone foundation (“boots”) to prevent rising damp and large roof overhangs (“hat”) to keep rain off the walls. Adding lime to the exterior plaster makes it water-resistant.
3. What is the realistic cost of materials for a small mud home? If you source soil from your land, your costs are incredibly low. You are mostly paying for sand, timber, and windows/doors. A small unit can cost between PKR 100,000 and 200,000, drastically less than brick-and-cement construction.
4. Can a beginner really learn how to build a mud house? Yes. Unlike concrete construction, which requires precise engineering, mud is forgiving. If you make a mistake, you can wet the mud and reshape it. No special high-tech skills are needed.
5. How do the eco-benefits compare to modern homes? Mud homes have near-zero carbon emissions. They offer superior insulation, meaning you use less electricity for fans or heaters. Concrete homes are major contributors to global CO2 emissions.