If you are like most homeowners, you probably dream of a sparkling, magazine-worthy bathroom. But let us face reality for a moment. You wake up, walk into your bathroom, and turn on the sink, only to be greeted by ugly, crusty, green or brown buildup around the base of your faucet. Tarnished faucets and rusty showerheads are a frustrating reality that plagues over 70% of homes today.
That stubborn buildup is corrosion, and it can make even the most expensive bathroom fixtures look incredibly worn, neglected, and dingy. Once rust and mineral deposits take over, your only option is to spend hundreds of dollars on brand-new hardware. Thankfully, that is not true. You can save your hard-earned money and rescue your current hardware with the right techniques.
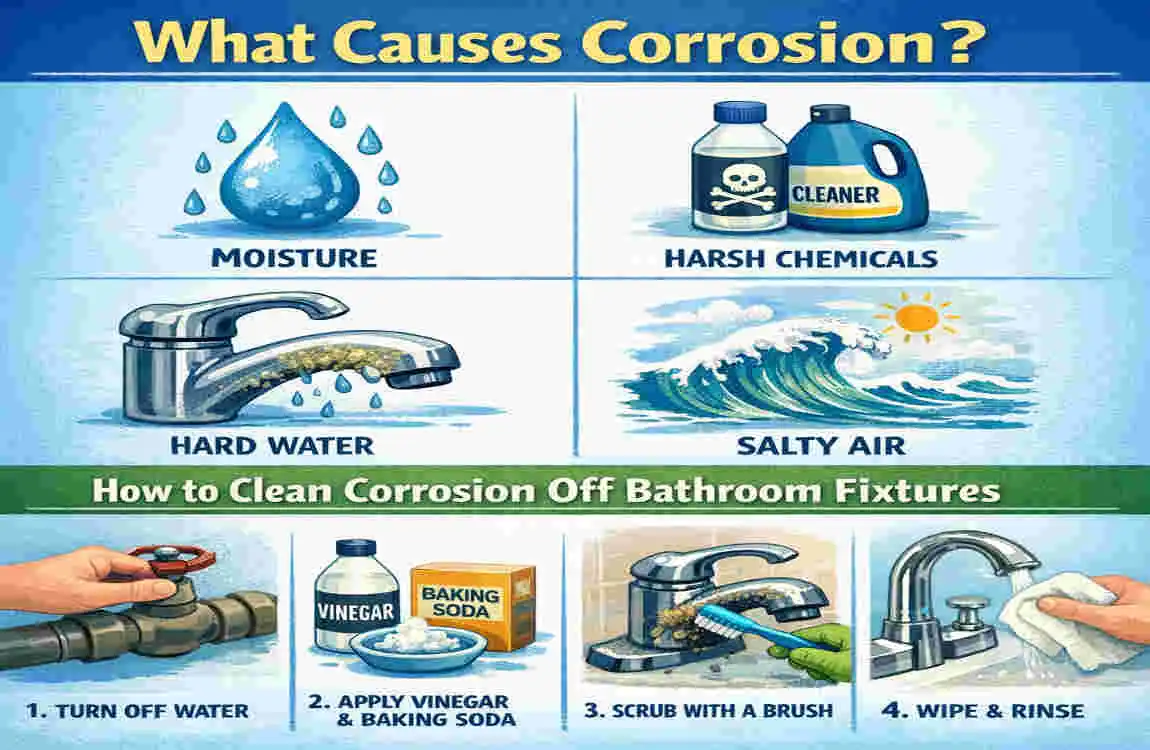
What Exactly Causes Bathroom Fixture Corrosion?
Before we can effectively tackle the buildup, it is incredibly helpful to understand what is happening on a microscopic level. Why do our shiny, beautiful metal fixtures suddenly turn dull, green, or rusty?
To put the science simply, corrosion forms when the metal of your fixtures reacts with a combination of water, minerals, and oxygen. This chemical reaction is known as oxidation. Because your bathroom is naturally the wettest room in your house, it creates the perfect storm for this reaction to occur on a daily basis.
There are three main culprits behind this frustrating bathroom battle:
First, hard water minerals are the most common offenders. If you live in an area with hard water, your tap water is packed with high levels of calcium and magnesium. Every time you use the sink or take a shower, tiny droplets of water are left behind. When that water evaporates, it leaves those microscopic minerals behind on the metal surface. Over time, these minerals build up into thick, white, or greenish-crusty layers known as limescale.
Second, high humidity and poor ventilation speed up the oxidation process significantly. Think about the thick steam that fills your bathroom during a hot shower. If you do not have a strong exhaust fan, that moisture sits directly on your metal hardware, slowly eating away at the protective finish and inviting rust to form.
Third, the type of metal dictates the type of corrosion you will see. You might spot red or brown flaky rust on stainless steel or chrome-plated fixtures. On the other hand, if you have beautiful brass, copper, or nickel hardware, you are more likely to see a dull, cloudy tarnish or a powdery green patina.
To help you identify what you are dealing with, take a look at this quick reference guide:
Table: Common Fixtures and Corrosion Risks
Fixture Type Common Material Main Cause of Corrosion Visual Signs of Damage
Sink Faucets Chrome or Brass Hard water deposits and sitting water White crust at the base, green tint
Showerheads Stainless Steel Internal mineral buildup from steam Clogged nozzles, brown rust spots
Drawer Handles Brushed Nickel Moisture exposure from wet hands Cloudy, dark, or dull discoloration
Spotting the Warning Signs
It is important to catch corrosion early. The first signs usually include a slight dullness or discoloration on the metal. You might notice tiny water spots that refuse to wipe away with a simple towel.
If ignored, this progresses into pitting. Pitting looks like tiny, dark pinholes in the metal where the corrosion has actually eaten through the top protective layer. If the plating on your faucet is actively flaking off and exposing the raw, dark metal underneath, it might be time to call a professional or consider a full replacement. However, if the metal is still intact under the grime, the eight methods below will work wonders!
The Magic of Baking Soda and Vinegar Paste
When figuring out how to clean corrosion off bathroom fixtures, it is always best to start with the classics. The combination of baking soda and white vinegar is a legendary cleaning duo for a reason.
This method utilizes a very simple chemical reaction. The vinegar provides a gentle acid to break down the hard minerals, while the baking soda acts as a soft, non-scratching abrasive to lift the grime away physically.
Supplies You Will Need:
- Baking soda
- White vinegar
- A small mixing bowl
- An old, soft-bristled toothbrush
- A clean microfiber cloth
Step-by-Step Instructions:
- Mix the Paste: In your small bowl, combine equal parts baking soda and white vinegar. Aim for a one-to-one ratio. It will immediately start to fizz and bubble—this is completely normal and shows that the ingredients are reacting! Wait a moment for the fizzing to settle into a thick, spreadable paste.
- Apply Generously: Take your soft toothbrush or your fingers and apply a thick, even layer of the paste directly onto the corroded areas of your fixture. Make sure to pack it tightly around the base of the faucet where hard water loves to hide.
- Let It Sit: This is the most crucial step. You need to give the paste time to work. Leave it on the fixture for at least a few hours, though leaving it for a full 24 hours will yield the best results for stubborn rust.
- Scrub and Rinse: After the waiting period, use the toothbrush to scrub the area in circular motions gently. The softened corrosion should lift right off. Rinse the area thoroughly with warm water.
- Dry and Buff: Always finish by drying the fixture completely with a microfiber cloth to prevent new water spots from forming.
Best for: Chrome faucets and shower hardware. Pro-Tip: This is a fantastic, non-toxic, and kid-safe method. You do not need to worry about harsh fumes while working in a small, enclosed bathroom.
The Unexpected Coca-Cola Soak
You might be surprised to learn that a popular beverage can be a powerful cleaning agent. Yes, regular Coca-Cola is highly effective at dissolving rust and hard water stains.
Why does this work? Coca-Cola contains both phosphoric acid and citric acid. These acids are aggressive enough to eat through rust and mineral corrosion without destroying the heavy metal underneath. It is an incredibly cheap and accessible trick!
Supplies You Will Need:
- A can or bottle of regular Coca-Cola (Diet Coke works too, but regular is often preferred)
- Aluminum foil
- A spray bottle (optional)
- A clean towel
- Warm soapy water
Step-by-Step Instructions:
- Apply the Cola: If you are cleaning a flat surface, you can pour a small amount of Coca-Cola directly onto the rusted spot. For vertical fixtures like shower pipes, pour the soda into a spray bottle and heavily mist the corroded area.
- The Foil Trick: Tear off a small square of aluminum foil and crumple it into a loose ball. Dip the foil ball lightly into the Coca-Cola.
- Scrub Gently: Use the wet aluminum foil ball to rub the corroded areas gently. The foil creates a very mild friction that helps scrape away the rust, while the acid in the soda breaks down the chemical bonds of the corrosion.
- Repeat if Necessary: If the rust is thick, you may need to wipe the area clean, apply more soda, and scrub again.
- Wash the Residue: This is a vital step. Coca-Cola is loaded with sugar and syrup. Once the rust is gone, you must wash the fixture thoroughly with warm, soapy water. If you skip this step, you will be left with a sticky mess that attracts ants and dirt.
- Dry Completely: Buff the fixture dry with a clean towel to reveal the shine.
Best for: Quick rust spots on durable steel or chrome. Caution: Be extremely careful to remove all sticky residue, and avoid letting the soda sit on porous bathroom surfaces like natural stone countertops for too long, as the acid can etch the stone.
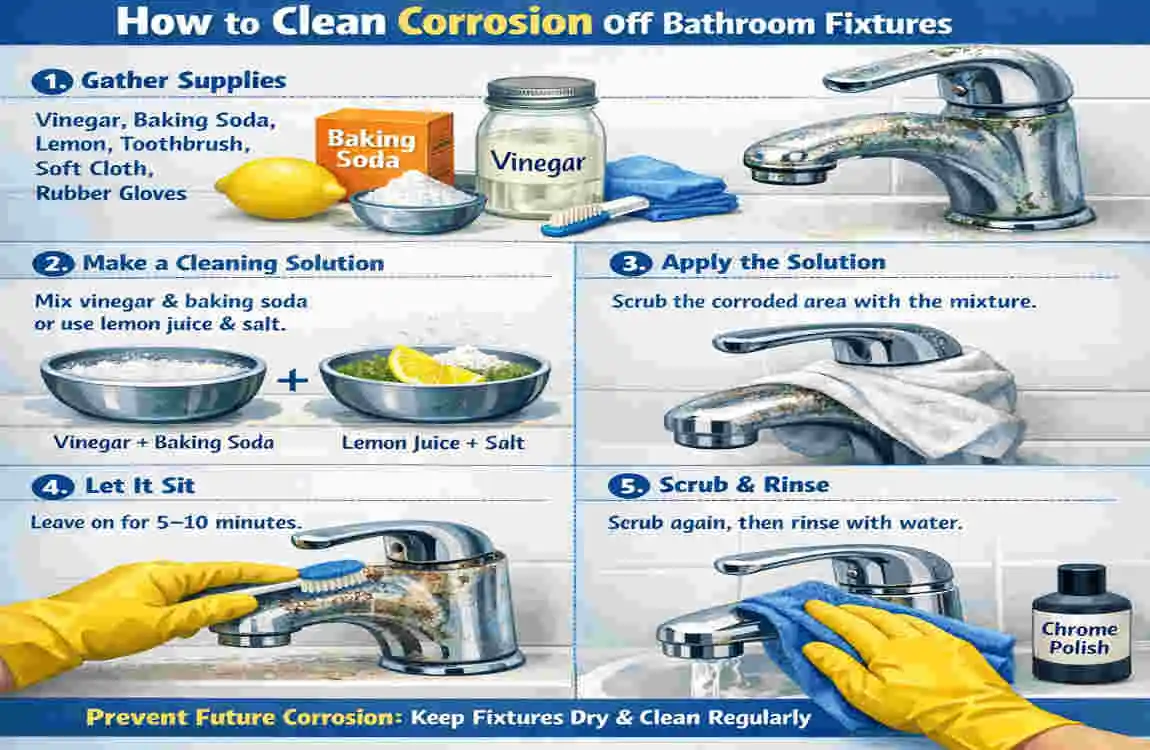
Fresh Lemon Juice and Salt Scrub
If you want to know how to clean corrosion off bathroom fixtures using 100% natural, biodegradable ingredients, this is the method for you. Mother Nature has provided us with an amazing cleaning acid in the form of lemons.
Lemons contain high levels of naturally occurring citric acid. When you pair this natural acid with the gritty texture of standard table salt, you create a powerful scrub that cuts through green tarnish and white limescale with surprising ease.
Supplies You Will Need:
- One fresh lemon
- Coarse sea salt or standard table salt
- A cutting board and knife
- A damp cloth
Step-by-Step Instructions:
- Prepare the Lemon: Take your fresh lemon and slice it straight down the middle to create two equal halves.
- Add the Salt: Take one of the lemon halves and generously sprinkle a thick layer of salt directly onto the exposed, juicy flesh of the fruit. The salt will stick to the moisture of the lemon.
- Rub the Fixture: Use the salted lemon half as if it were a natural scrubbing sponge. Press it directly onto your bathroom fixture, squeezing slightly so the acidic juice mixes with the salt. Rub vigorously in small circles over the tarnished and corroded areas.
- Let the Acid Work: Once you have scrubbed the fixture, let the lemon juice and salt mixture sit on the metal for about 5 to 10 minutes. Do not leave it much longer than this, as the strong citric acid can eventually dull some sensitive finishes.
- Rinse and Shine: Take your damp cloth and wipe away all the salt, pulp, and sticky juice. Finally, dry the fixture with a clean towel to bring out a gorgeous, bright shine.
Best for: Brass and copper fixtures, as it cuts right through green oxidation. Eco-Tip: This method is entirely biodegradable and smells fantastic, leaving your bathroom with a fresh, bright, citrus scent without any artificial chemicals!
The Classic White Vinegar Soak
Sometimes, scrubbing just is not enough. When you are dealing with thick, crusted-on calcium deposits—especially on intricate fixtures where a toothbrush cannot reach—you need a soaking method. White vinegar is a pantry staple that is tough on lime and rust but gentle on your wallet.
This method is famous for cleaning heavily clogged showerheads. The sustained contact with the acetic acid in the vinegar slowly dissolves the hardened minerals, turning them into a soft mush that easily wipes away.
Supplies You Will Need:
- Plain white vinegar
- A small plastic sandwich bag (like a Ziploc)
- A rubber band or zip tie
- A soft cloth or old toothbrush
Step-by-Step Instructions:
- Prepare the Bag: Take your plastic sandwich bag and fill it about halfway to the top with pure, undiluted white vinegar.
- Submerge the Fixture: Lift the plastic bag up and over your showerhead or sink faucet. You want to make sure the corroded part of the fixture is completely submerged in the vinegar pool inside the bag.
- Secure the Bag: Carefully take your rubber band or zip tie and wrap it tightly around the top of the bag and the neck of the fixture. Ensure it is secure so the bag will hang there on its own without slipping or spilling.
- Let It Soak: Walk away and let the vinegar do the heavy lifting! For light corrosion, one hour is plenty of time. For heavy, stubborn mineral blockages, you can safely leave the bag attached overnight.
- Remove and Scrub: Take the bag off and pour the used vinegar down the drain. Take your soft cloth or toothbrush and gently scrub the fixture. The white crust should melt away effortlessly.
- Rinse and Polish: Turn on the water to flush out the internal nozzles, then wipe the exterior completely dry to polish it.
Best for: Clogged showerheads and the very ends of sink spouts. Pro: It is a cheap, hands-off method that works while you sleep!
Gentle Cleaning with Baking Soda Alone
What if your fixtures are lightly soiled, or what if you have very delicate finishes like oil-rubbed bronze or custom-painted hardware? In these cases, you want to avoid acids like vinegar or lemon juice altogether.
Baking soda on its own acts as an incredibly mild abrasive. It is gritty enough to dislodge light surface rust and hard water spots, but it is soft enough that it will not scratch or strip delicate metal platings when used carefully.
Supplies You Will Need:
- Baking soda
- Warm water
- A small bowl
- A soft microfiber towel or sponge
Step-by-Step Instructions:
- Create a Water Paste: In your small bowl, pour a few tablespoons of baking soda. Slowly trickle in warm water, just a few drops at a time, while stirring. You want to create a thick paste that resembles the consistency of toothpaste.
- Apply Gently: Dip your microfiber towel or sponge into the paste. Apply it to the corroded parts of your delicate bathroom fixtures.
- Wait Briefly: Allow the wet baking soda to sit on the surface for about 20 to 30 minutes. As the water evaporates slightly, the baking soda will cling to the impurities on the metal.
- Wipe with Care: Do not aggressively scrub! Instead, use your soft cloth to wipe the paste away in smooth, linear motions gently. Let the slight grit of the baking soda do the work for you.
- Rinse Completely: Use a separate, clean, damp cloth to wipe down the fixture to ensure no powdery white residue is left behind. Dry thoroughly.
Best for: Delicate finishes, high-end custom hardware, and very light, early-stage tarnish. Avoid: Over-scrubbing. Even though baking soda is gentle, aggressive scrubbing on sensitive finishes like polished chrome or painted metals can still cause micro-scratches.
Tackling Heavy Rust with Commercial CLR
Sometimes, household items are not strong enough to cut through years of severe neglect. If you have just moved into an older home, or if a leaky faucet has created a mountain of hard, brown rust, it is time to bring in the big guns.
CLR stands for Calcium, Lime, and Rust. It is a powerful commercial cleaner specifically formulated with proprietary acids to break down severe bathroom buildup rapidly. When learning how to clean corrosion off bathroom fixtures that are deeply stained, this is a highly reliable option.
Supplies You Will Need:
- A bottle of commercial CLR cleaner
- Rubber cleaning gloves
- A small bowl or plastic container
- A sponge or stiff-bristled brush
- Safety glasses (recommended)
Step-by-Step Instructions:
- Safety First: Before you open the bottle, put on your rubber gloves. CLR contains strong chemicals that can irritate your skin and eyes. Ensure your bathroom exhaust fan is running to provide good ventilation.
- Dilute the Solution: In your plastic container, create a 50/50 mixture by combining equal parts CLR and warm water. Never use CLR full strength on decorative bathroom fixtures, as it can strip the finish right off.
- Apply the Mixture: Dip your sponge or brush into the diluted CLR mixture and apply it directly to the heavy rust and calcium deposits.
- Watch the Clock: This product is incredibly fast-acting. You only need to let it sit on the fixture for 2 to 3 minutes maximum. Do not walk away and forget about it! Leaving it on too long is a surefire way to damage your hardware.
- Scrub the Rust: After 2 minutes, use your stiff brush to scrub the corrosion. You will notice the rust easily lifting away and dissolving into the liquid.
- Thorough Rinse: This is crucial. Use copious amounts of cold, clean water to rinse the fixture completely. Ensure every single drop of the chemical is washed down the drain, then dry the metal with a towel.
Best for: Heavy, thick buildup and deep, dark rust stains. Warning: NEVER mix CLR with bleach or any other household cleaners. The resulting chemical reaction can create highly toxic, dangerous fumes. Always read the manufacturer label before use.
Polishing Power of Bar Keepers Friend
If you ask professional house cleaners for their secret weapon, many of them will hand you a can of Bar Keepers Friend. This classic cleaning powder is famous for making stainless steel and chrome look brand new.
The secret ingredient in Bar Keepers Friend is oxalic acid. This organic acid is naturally found in plants like rhubarb and spinach. Still, in its concentrated powder form, it is an absolute powerhouse for breaking down rust and mineral stains without heavily scratching the metal beneath.
Supplies You Will Need:
- Bar Keepers Friend (powder form)
- Water
- A soft, damp rag or sponge
- Rubber gloves
Step-by-Step Instructions:
- Prep the Surface: Wipe down the bathroom fixture with a damp rag to wet it. The powder needs moisture to activate.
- Make a Paste: Sprinkle a small amount of the Bar Keepers Friend powder onto your damp rag. Fold the rag over and squeeze it to create a thick, wet paste.
- Apply and Rub: Gently rub the paste onto the corroded areas of your bathroom fixture. Oxalic acid immediately begins chemically releasing rust from the metal surface.
- Keep it Brief: Do not let this product sit for long. It works quickly on contact. Give the rusty spots a good, firm scrub for about one minute.
- Rinse Thoroughly: Use clean water to rinse all powdery residue from the fixture thoroughly.
- Dry and Polish: Take a dry microfiber cloth and buff the fixture. You will be amazed at the mirror-like shine that Bar Keepers Friend leaves behind.
Best for: Chrome stains, stainless steel sinks, and dull shower hardware. Tip: Because this product contains mild abrasives and acids, always test it on a small, hidden area of your fixture first (like the underside of the faucet handle) to ensure it does not alter the finish.
Light Use of a Bleach Solution
We want to preface this method by stating that bleach is not a rust remover. Using raw bleach on heavy rust can actually oxidize the metal further, worsening the rust!
However, corrosion in bathrooms is rarely just rust. It is often a nasty mixture of hard water, soap scum, and dark, moldy mildew trapped around the base of the fixture. If your hardware is suffering from mildew stains mixed with early-stage tarnish, a highly diluted bleach solution can sanitize the area and lift those organic stains beautifully.
Supplies You Will Need:
- Liquid household bleach
- Water
- A bucket or spray bottle
- Rubber gloves
- An old toothbrush
Step-by-Step Instructions:
- Ventilate the Room: Open a window and turn on your bathroom exhaust fan. Bleach fumes are very strong and can be overwhelming in tight spaces.
- Dilute Heavily: Never use pure bleach on metal. In your bucket or spray bottle, mix 1 tablespoon of bleach with 1 quart of warm water. This creates a mild, safe sanitizing solution.
- Apply Carefully: Wearing your rubber gloves, use your toothbrush to dab the diluted bleach solution around the base of the faucet and over any stained areas on the fixture.
- Scrub Softly: Gently agitate the area with the toothbrush. Focus on the nooks and crannies where mold and grime like to hide. Keep the scrubbing under 10 minutes.
- Rinse Vigorously: Flush the area with plenty of clean, warm water. You want to make sure no bleach is left sitting on the metal, as lingering bleach can cause pitting over time.
- Dry Off: Wipe the fixture completely dry with a soft cloth.
Best for: Early prevention, removing moldy stains around fixture bases, and general sanitization. Caution: Ventilation is absolutely key here. Protect your clothing and eyes, and remember that bleach should only be used for organic stains, not thick, red rust.
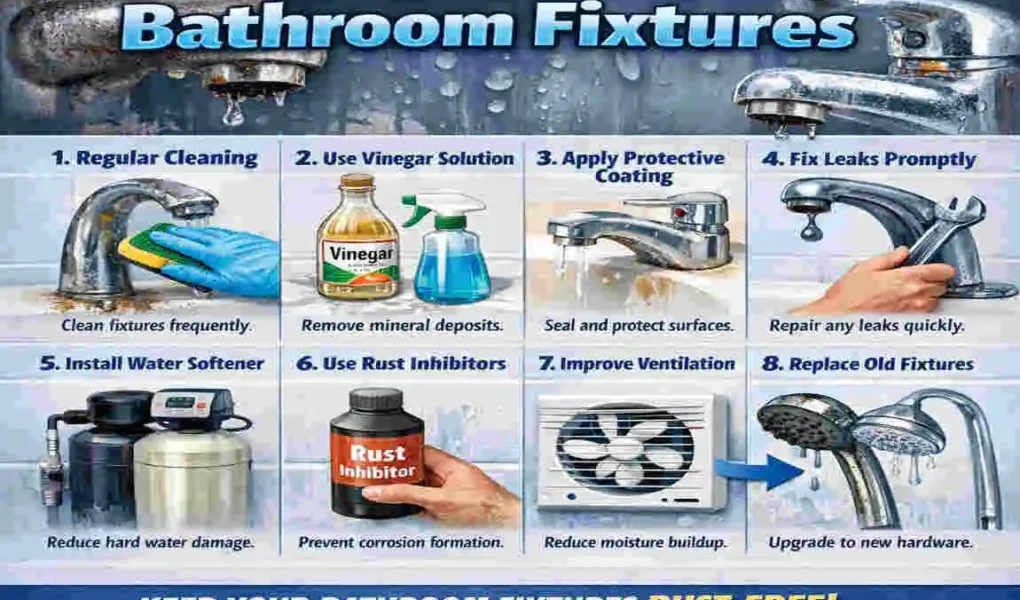
Smart Prevention Strategies to Keep Corrosion Away
You have just spent your valuable time scrubbing, soaking, and polishing. Your fixtures are gleaming, and your bathroom looks fantastic! But here is the hard truth: learning how to clean corrosion off bathroom fixtures is only half the battle. If you do not change the environment in your bathroom, those unsightly green and brown spots will inevitably return.
Corrosion prevention requires a proactive approach. It is all about controlling moisture and managing your water quality. The good news is that preventing rust and limescale is much easier than scrubbing it away! By integrating a few simple habits into your routine, you can keep your fixtures looking brand new for years to come.
First and foremost, moisture is the enemy. Dry your fixtures post-use. Keep a small, clean microfiber towel folded near your sink and shower. After you finish washing your hands or taking a shower, take five seconds to quickly wipe away the standing water droplets from the metal handles and spout. Without standing water, minerals cannot deposit onto the metal, and rust cannot form.
Second, utilize your bathroom’s ventilation system. The heavy steam from your shower sits in the air and settles on every surface. Always run your ventilation fan while showering, and leave it running for at least 15 to 20 minutes after you step out. If you do not have an exhaust fan, crack a window or leave the bathroom door open to let the humid air escape.
Third, if you find yourself constantly fighting chalky white limescale, you likely have a hard water problem in your home. Consider installing a water softener or an inline shower filter. These systems pull the heavy calcium and magnesium minerals out of the water before they ever reach your bathroom hardware. While it is an upfront investment, it protects your plumbing and fixtures in the long term.
List: Long-Term Tips for a Rust-Free Bathroom
- Choose corrosion-resistant materials: If you are remodeling or finally replacing an old fixture, opt for metals that fight back. Brushed nickel, pure brass, and high-quality stainless steel are much more rust-resistant than cheap, chrome-plated plastics.
- Schedule monthly deep cleans: Do not wait for the green crust to appear. Once a month, use the mild baking soda method (Method 5) to lift away invisible mineral layers before they harden gently.
- Apply a protective coating: Believe it or not, you can rub a tiny amount of car wax or mineral oil onto your dry fixtures. This creates an invisible, waterproof barrier that causes water droplets to bead up and roll right off!
- Professional inspections yearly: Have a local plumber check your home’s water pressure and pipes. A tiny, unseen leak inside a faucet handle is often the hidden cause of rapid external corrosion.
Frequently Asked Questions (FAQs)
Q: How to clean corrosion off bathroom fixtures quickly if I am short on time?
A: If you need rapid results—perhaps guests are arriving in half an hour—Methods 2 and 6 are your best bets. A quick 15-minute soak with Coca-Cola will break down light rust fast. Alternatively, a carefully monitored 2-minute application of diluted commercial CLR will instantly melt away heavy buildup.
Q: Are these cleaning methods safe for all metal types?
A: Not entirely, which is why caution is essential! Chrome and stainless steel are highly durable and can withstand mild acids, such as vinegar. However, if you have unlacquered brass, copper, or oil-rubbed bronze, you should avoid strong acids and commercial cleaners. For delicate finishes, always stick to the gentle baking soda paste (Method 5) and perform a small patch test first.
Q: Can I use only natural ingredients to remove rust?
A: Absolutely! You do not need harsh chemicals to keep your bathroom clean. Methods 1 through 5 in this guide use completely natural, eco-friendly household items such as baking soda, vinegar, lemon juice, and salt. These are safe for your family and safe for the environment.
Q: Why does the corrosion keep coming back so quickly?
A: If rust or green tarnish returns just a few weeks after cleaning, you have a moisture problem. This usually means your faucet has a slow, microscopic leak, or your bathroom is retaining too much humidity after showers. Check for drips and improve your room’s ventilation.
Q: What happens if I ignore the corrosion on my showerhead?
A: Ignoring the problem will eventually ruin the fixture. Mineral buildup will completely clog the internal nozzles of your showerhead, reducing your water pressure to a frustrating trickle. Furthermore, deep rust will eventually eat completely through the metal casing, causing irreparable cracks, leaks, and water damage inside your walls.