the thought of tackling DIY bathroom plumbing makes your palms a little sweaty. You are not alone. When most homeowners look at a bare-stud bathroom, they immediately envision catastrophic leaks, flooded floors, and endless frustration. Add in the reality of today’s rising renovation costs, and that stress only multiplies. Currently, the average professional installation for a full bathroom can easily hit anywhere from $4,000 to over $10,000, depending on your area. That is a massive chunk of your home improvement budget gone before you even buy a single tile or fancy faucet!
But what if I told you that mastering how to plumb a bathroom is entirely within your reach? Rising costs are making DIY bathroom plumbing not just a fun weekend project, but an absolute necessity for budget-conscious homeowners. By taking on this task yourself, you unlock incredible benefits. You will save thousands of dollars, gain invaluable hands-on skills, and have the total freedom to customize your space exactly the way you want it. Want a rainfall showerhead or a dual-sink vanity? When you do the plumbing, you call the shots.
Tools and Materials You Need to Start
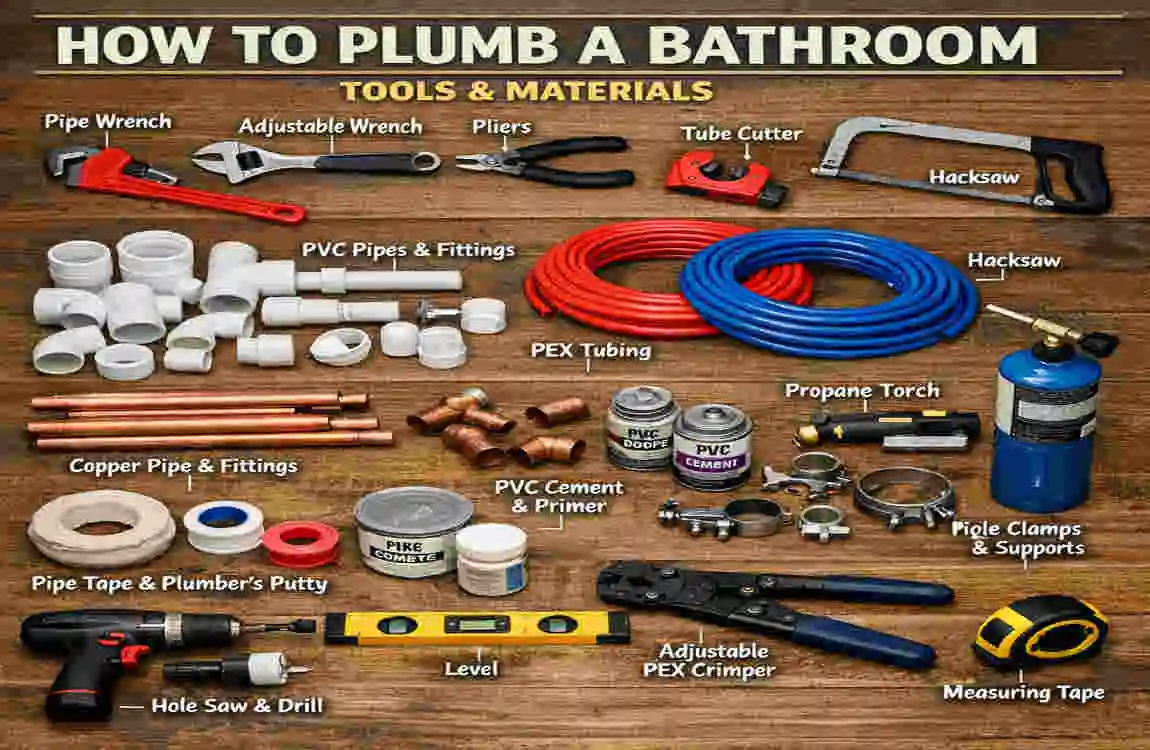
Before you even think about cutting into a pipe, you need to arm yourself with the right gear. Understanding how to plumb a bathroom means understanding your toolkit. Just as a professional plans out the scope and exact requirements of a major project before beginning, you need to gather your supplies meticulously. You don’t want to be covered in PVC glue only to realize you are missing a crucial fitting! Let’s break down the essentials in simple, everyday language.
Essential Tools for the Job
You don’t need a truck full of specialized, expensive equipment to learn how to plumb a bathroom. Here are the essential tools you will need to keep by your side:
- Adjustable Wrench: This is your best friend for tightening nuts and bolts on your fixtures.
- Pipe Cutter: A simple, handheld tool that makes clean, perfectly straight cuts on your water lines.
- Hacksaw: Perfect for cutting through thicker plastic drain pipes.
- Level: Water follows gravity. A good level ensures your drains have the exact right slope so water actually flows away instead of pooling.
- Plumber’s Tape (Teflon Tape): A thin, white tape you wrap around threaded pipe joints to create a watertight seal and prevent leaks.
- Silicone Sealant: Used for sealing gaps around fixtures to keep water from seeping into your floors or walls.
- PEX Crimper: If you are using PEX piping for your water supply lines (which we highly recommend for beginners), this tool firmly attaches the metal rings to secure the pipes.
- PVC Primer and Cement: The “glue” for your drain pipes. The purple primer cleans the plastic, and the clear cement chemically melts the pipes together for a permanent bond.
Materials Sorted by Fixture
When you plumb a bathroom step-by-step, it helps to mentally separate the materials you need based on the specific fixture you are installing.
For the Toilet:
- Wax Ring: This sticky, donut-shaped ring sits under the toilet and creates an airtight, watertight seal.
- Closet Flange: The round bracket that secures the toilet to the floor and connects it to the drain.
- 3-Inch PVC Drain Pipe: The heavy-duty pipe that carries waste away from the toilet.
For the Sink:
- P-Trap (1.5-inch): This is the U-shaped pipe under the sink. It holds a small amount of water to block gross sewer gases from rising into your bathroom.
- 1/2-Inch PEX Lines: These flexible tubes will bring both your hot and cold water to the faucet.
For the Shower/Tub:
- 2-Inch Drain Pipe: Showers require a slightly larger drain than sinks to handle the volume of water.
- Shower Valve: The heavy brass component hidden in the wall that mixes your hot and cold water.
- Overflow Assembly: If you have a tub, this prevents the water from spilling over the edge if you forget to turn off the faucet.
Expected Budget Breakdown
What will this cost you? Here is a quick breakdown to help you budget for your DIY bathroom plumbing adventure:
Item Category: Examples of Items, Estimated Cost (USD)
Tools : wrench set, pipe cutter, hacksaw, PEX crimper $100 – $200
Pipes & Fittings 2″ PVC, 3″ PVC, 1/2″ PEX, primer, cement, elbows $150
Fixtures & Hardware Basic shower valve, sink, P-traps, closet flange $300
Total Estimated Cost: $550 – $650
Crucial Safety Note: Before you begin any plumbing work, absolutely make sure you shut off the main water supply to your house. Open a faucet on the lowest floor to drain out any remaining water in the pipes. Always wear heavy-duty work gloves and safety glasses, especially when cutting pipes or working with chemical PVC cement.
Planning and Preparation for Your Bathroom Plumbing
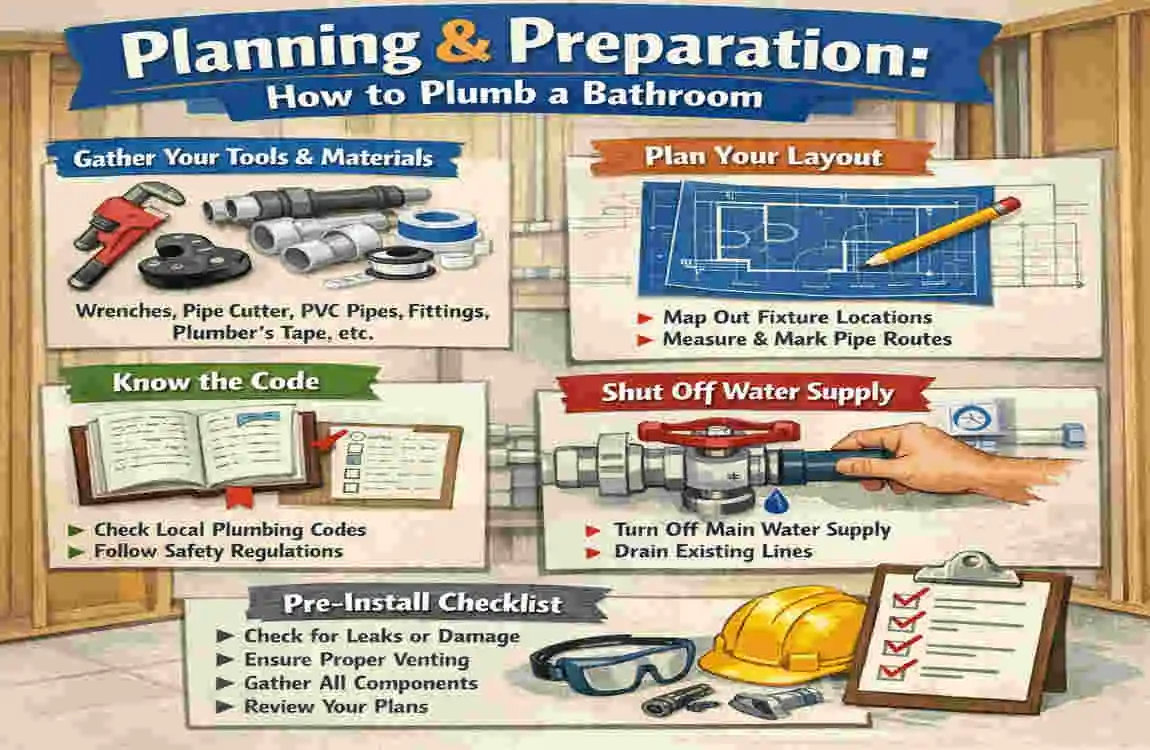
If there is one secret to learning how to plumb a bathroom, it is this: measure twice, cut once, and plan for everything. Proper planning separates the successful DIYers from those who end up having to call a very expensive emergency plumber.
Why Building Codes Matter
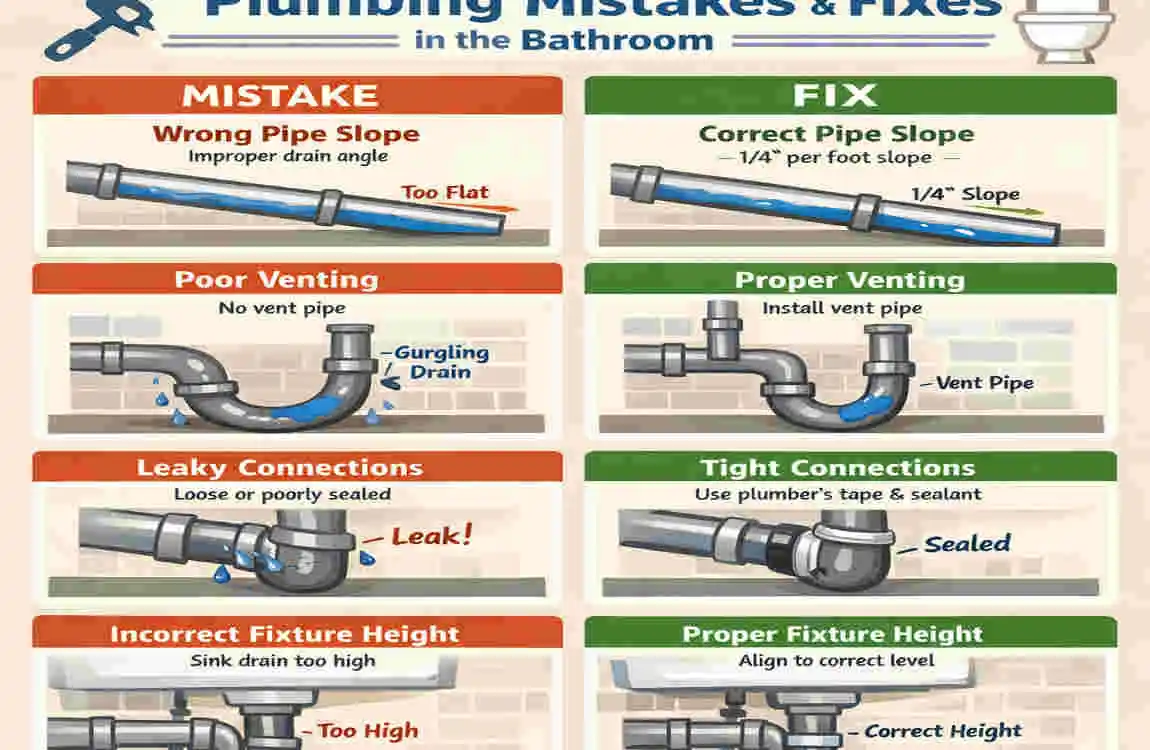
First things first, you need to respect the plumbing code. Building codes aren’t just annoying rules; they are designed to keep your home safe and sanitary. Always check your local plumbing codes before you start. For example, a universal rule in plumbing is that drain pipes must slope downward at exactly 1/4 inch per foot. If the slope is too flat, the water won’t drain, leaving you with nasty clogs. If the slope is too steep, the water will rush right past solid waste, leaving it behind to block your pipes.
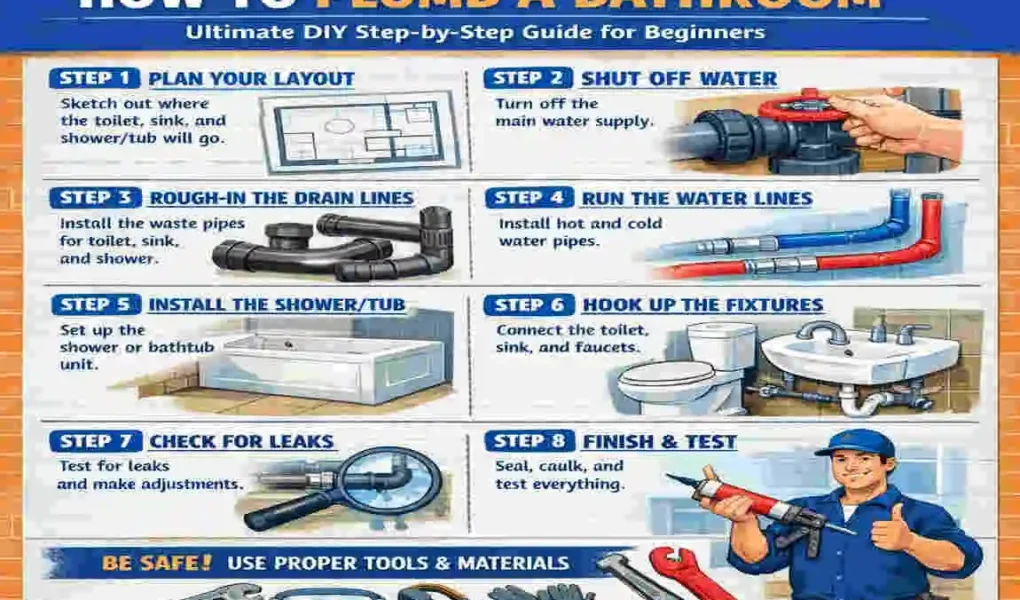
Steps to Prepare Your Layout
Sketch Your Bathroom Layout Grab some grid paper and map out exactly where your sink, toilet, and shower will go. Precision is key here. For example, the center of your toilet drain (called the rough-in) typically needs to be exactly 12 inches away from the finished back wall.
Locate Your Main Stack and Vent Your bathroom needs to connect to the home’s main soil stack (the large vertical pipe that carries waste to the sewer) and a vent system. Vents are crucial—they let air into the pipes so the water can flow smoothly, just like poking a hole in a juice box lets the liquid pour out faster. Ensure your vent connections meet the minimum height requirement, which is usually at least 42 inches above the floor, to prevent water from backing up into the vent pipe.
Mark Your Wall Studs Use a reliable stud finder to locate the wooden framing in your walls. You will need to know exactly where these studs are because you will be drilling holes through them to run your water lines. Mark them clearly with a pencil or marker.
Pro Tip: Always dry-fit everything first! “Dry-fitting” means assembling all your PVC pipes and fittings without using any glue. This allows you to check your measurements, ensure your slopes are correct, and verify that everything lines up perfectly. It is the best way to avoid costly, permanent errors when figuring out how to plumb a bathroom.
Rough-In Drains (The Core Foundation)
Whenever you ask a professional how to plumb a bathroom, they will tell you that everything starts with the drains. Your bathroom rough-in plumbing is the foundation upon which the rest of the room is built. Let’s break down this critical process.
Installing the Drain Pipes
The rough-in phase happens when your walls and floors are completely open down to the bare studs and joists. You will be dealing with three main types of drains: the toilet, the shower/tub, and the sink.
The Toilet Drain (3-Inch Pipe) The toilet handles the heaviest volume of waste, so it requires the largest pipe.
- If necessary, carefully drill or cut through your floor joists to create a path for the pipe, being mindful of structural building codes regarding how large a hole you can make in a joist.
- Run a 3-inch PVC pipe from the location of your toilet flange directly to the main soil stack.
- Ensure the pipe is supported with strapping so it doesn’t sag over time.
The Tub and Shower Drain (2-Inch Pipe). Showers output a lot of water quickly.
- Run a 2-inch PVC pipe for your shower drain.
- Remember the golden rule: maintain that 1/4 inch per foot downward slope towards the main stack.
- You must install a P-trap directly underneath the shower drain. The P-trap arm will then connect to the main drain line.
The Sink Drain (1.5-Inch Pipe) Sinks deal mostly with greywater, so they use a smaller pipe.
- Run a 1.5-inch PVC pipe through the wall framing behind where your vanity will sit.
- Connect this smaller drain into the larger drain system using a “wye” fitting (a Y-shaped connection piece that gently guides the water into the main flow).
Warnings for Drain Installation
When learning how to plumb a bathroom, mistakes during the rough-in phase are the hardest to fix later because they get buried behind drywall and tile.
- Warning 1: Avoid Sags. Make sure every horizontal run of pipe is properly supported with hangers or straps every few feet. A sagging pipe creates a “belly” where standing water and debris will collect, guaranteeing future clogs.
- Warning 2: Use the Right Fittings. Use sweeping, long-turn elbows rather than sharp 90-degree turns whenever possible to help waste flow smoothly.
- Warning 3: Don’t Forget the Primer. When gluing PVC, you must use the purple primer first. It softens the plastic so the cement can create a true chemical weld. Without it, your joints will eventually leak.
install Vents and Supply Lines
Once the waste has a way out, you need to bring the fresh water in and ensure the system can breathe. This next stage in how to plumb a bathroom focuses on venting and water supply.
Why Vents Are Absolutely Critical
As mentioned earlier, vents are the lungs of your plumbing system. Without a vent, the rush of water going down the drain can create a vacuum, sucking the water right out of your P-traps. When the P-trap is dry, dangerous and foul-smelling sewer gases will drift up through your sink and shower drains directly into your bathroom.
To prevent this, you need to run a 2-inch PVC vent pipe up through the wall framing and out through the roof of your house. Every single fixture must be vented. In many setups, the sink vent can also serve as the vent for the toilet and shower if they are clustered close enough together (known as wet venting), but always double-check your local codes.
Running the Water Supply Lines
Now for the fun part: bringing in the fresh water. For DIY bathroom plumbing, we strongly recommend using PEX (cross-linked polyethylene) tubing instead of traditional rigid copper pipes. PEX is flexible, easy to cut, color-coded (red for hot, blue for cold), and connects easily with a simple crimp tool—no dangerous blowtorches required!
- Hot and Cold PEX: Run 1/2-inch PEX lines from your home’s main water supply to your new bathroom.
- Sink Heights: Loop your PEX lines out of the wall behind the sink vanity. The standard height for sink supply lines is about 20 inches off the finished floor.
- Shower Heights: Run the lines up the wall to your shower valve. The valve is usually mounted about 38 inches from the floor for a tub/shower combo, or 48 inches for a standalone shower.
- Add Shutoffs: Always install dedicated shutoff valves on the hot and cold lines for your sink and toilet. If a faucet ever leaks in the future, you can turn off the water right there without having to shut down the whole house.
Troubleshooting Common Plumbing Issues
Even when you follow a beginner bathroom plumbing guide, things can get tricky. Here is a handy troubleshooting table for common issues encountered during this step:
Issue: Common Cause: How to Fix It
Airlock (Gurgling drains) Poor or inadequate venting. Ensure your vent pipe extends at least 6 inches above the “flood level” of your highest fixture before running horizontally.
Low Water Pressure: Undersized main supply pipe. While 1/2″ is fine for individual fixtures, make sure the main line feeding the bathroom is upgraded to a 3/4″ pipe.
PEX Leaks at Joints: The crimp ring is not seated correctly. Cut the bad section out and recrimp. Ensure the ring is placed 1/8 to 1/4 inch from the end of the pipe before crimping.
install Fixtures for a Finished Look
You have laid the groundwork, the drywall is up, the tile is laid, and the room is painted. Now it is time to install the fixtures! This is the most rewarding part of learning how to plumb a bathroom because your space finally starts to look like a real, functional room.
Installing the Toilet
Installing a toilet is surprisingly simple.
- Start by placing the wax ring directly onto the closet flange on the floor (or onto the bottom of the toilet bowl).
- Carefully lift the toilet and lower it straight down onto the flange, making sure the mounting bolts slide through the holes in the base of the toilet.
- Press down firmly using your body weight to squish the wax ring and create a tight seal.
- Tighten the nuts onto the bolts, but do so carefully! Overtightening will easily crack the porcelain.
- Finally, connect the braided supply line from the wall shutoff valve to the base of the toilet tank.
Setting Up the Sink
- Mount your faucet to the sink basin before you attach the vanity top to the cabinet—it is much easier to tighten the hardware when you have room to maneuver.
- Once the sink is in place, attach the hot and cold flexible supply lines.
- Connect the sink drain tailpiece to the 1.5-inch P-trap underneath.
- Apply a smooth bead of silicone caulk around the edge of the sink where it meets the vanity to prevent water damage.
Finishing the Shower
- By now, your shower pan and drain should be set in the floor.
- Slide the decorative valve trim plate over the shower valve protruding from the wall and screw on the handle.
- Attach your showerhead using plumber’s tape on the threaded pipe arm.
- Once everything is connected, do a quick flow test to make sure hot and cold are oriented correctly and the water pressure is adequate.
Common Mistakes and Fixes When Plumbing a Bathroom
When teaching people how to plumb a bathroom, I see the same handful of errors crop up time and time again. Knowing what not to do is just as important as knowing what to do.
Getting the Slope Wrong
As we’ve hammered home, drainage relies entirely on gravity. The most common DIY mistake is rushing the drain installation and ending up with a slope that is either too flat or too steep. This inevitably leads to severe clogs and backed-up sewage. The Fix: Do not rely on your eyes. Use a high-quality laser level or a long bubble level to verify that the exact 1/4-inch-per-foot downward slope across every single horizontal drain pipe before you glue anything.
Skipping the Pressure Test
It is incredibly tempting to seal up your walls as soon as the pipes are connected. But what happens if a joint is slightly loose? You won’t know until you turn the water on, and by then, your brand-new drywall will be soaked. The Fix: Never close your walls without doing a pressure test. Cap off all your lines and use a pressure gauge and air compressor to pump the system up to 80 PSI. Leave it for 30 minutes. If the pressure drops, you have a leak. Find it and fix it while the walls are still open.
Forgetting Plumber’s Tape
Threaded joints (like where the showerhead meets the wall pipe) need help to stay watertight. Screwing bare metal to bare metal will almost always result in a slow, frustrating drip. The Fix: Always wrap plumber’s tape clockwise around the male threads 3 to 4 times before screwing the fittings together.
Testing and Final Checks
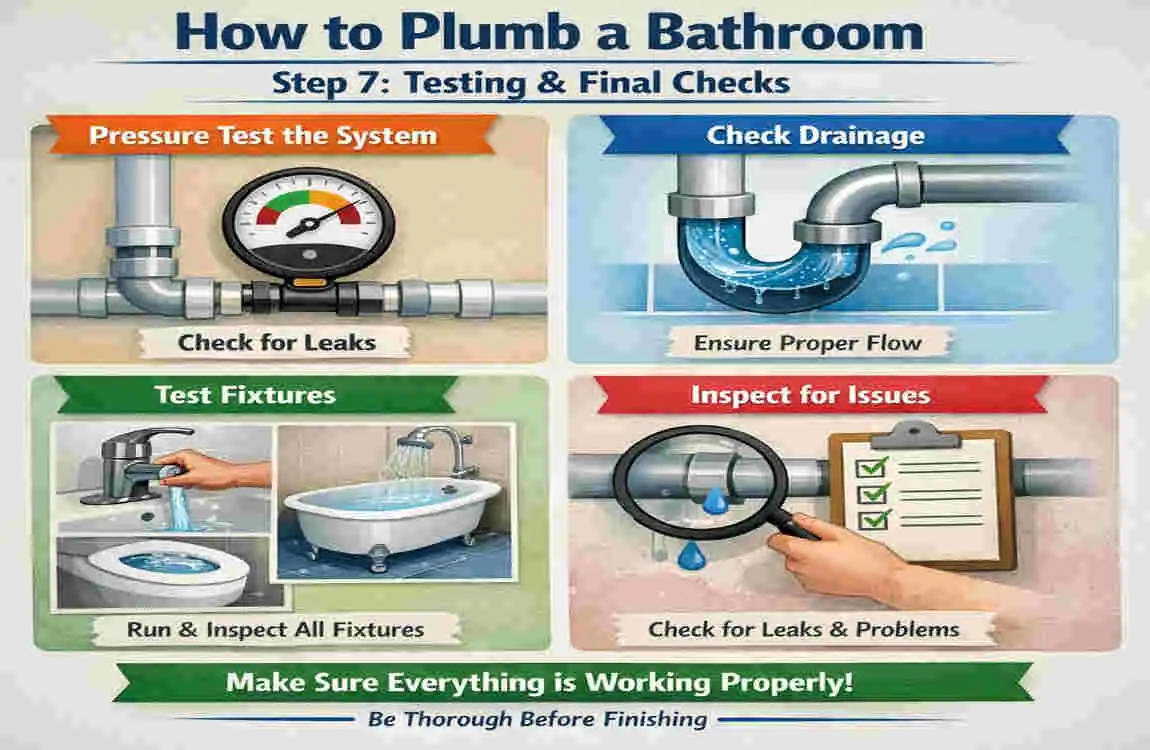
You are at the finish line! But before you break out the bubble bath, you need to test your new DIY bathroom plumbing thoroughly. This ensures that all your hard work is safe, functional, and watertight.
- Run the Water: Turn the main water supply back on slowly. Go to each fixture and turn them on full blast. Let both the hot and cold water run for several minutes. Use a flashlight to inspect every visible joint under the sink and around the toilet base for tiny drips.
- The Dye Test: To be absolutely certain your drains are secure, perform a dye test. Drop a few drops of bright red or blue food coloring into your sink and shower, run the water, and go down to the basement or crawlspace to inspect the exposed drain pipes. If you see any colored water on the outside of the pipes, you have a leak that needs addressing immediately.
- Insulate Your Pipes: If you live in a cold climate and your water lines run through an exterior wall or an unheated crawlspace, wrap them in foam pipe insulation. This simple, cheap step prevents pipes from freezing and bursting during the winter.
When to Call a Professional: While learning how to plumb a bathroom is highly rewarding, you must recognize your limits. If you uncover complex venting issues, if your home’s main sewer line is severely damaged, or if local building codes mandate that a licensed professional sign off on structural alterations, do not hesitate to call a pro.
Frequently Asked Questions
How long does it take to plumb a bathroom? If you are taking the DIY bathroom plumbing route, expect the rough-in and fixture installation to take about 2 to 4 full days of work. This timeframe can stretch over a couple of weekends for beginners as you navigate learning curves, multiple hardware store runs, and code checks.
How much does it cost to plumb a bathroom DIY? By eliminating the heavy burden of professional contractor labor fees, you can expect to spend between $800 and $2,000 in total. This cost covers all your tools, PVC pipes, PEX tubing, fittings, and basic fixtures. High-end luxury fixtures will push that budget higher.
Do I need a permit to plumb a bathroom myself? In the vast majority of municipalities, yes. Even if you are doing the work yourself, major plumbing alterations, running new drain lines, or moving a soil stack require a permit and an official inspection. Always check with your local city or county building department before starting.