Are you staring at your outdated bathroom, wondering exactly how long it will take to tile the bathroom from top to bottom? It is a question every homeowner asks when planning a renovation. Can you realistically finish this project over a single weekend, or do you need to block out an entire week of your life?
Understanding timelines is absolutely crucial for budgeting both your time and your money. If you decide to take the do-it-yourself (DIY) route, you are likely chasing the appeal of significant cost savings. However, if you choose to hire a professional, you are paying for their incredible efficiency, guaranteed quality, and unmatched speed.
Knowing the exact tile bathroom timeline helps you plan when to shut off your water, when to order fixtures, and how long you will be sharing the guest bathroom with the rest of your family.
Key Factors Affecting Tiling Time
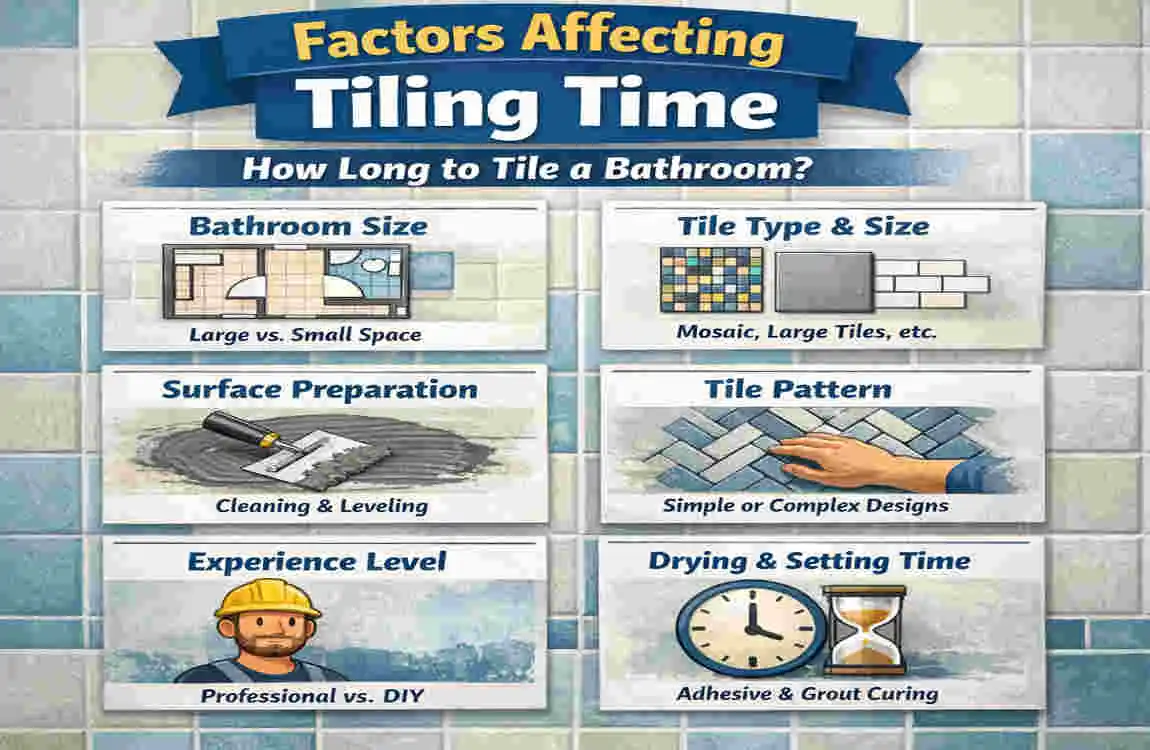
When you ask, “how long to tile bathroom,” the answer is never a simple one-size-fits-all number. Several variables dramatically impact your DIY tiling time in the bathroom or a professional’s timeline. Let’s explore the biggest factors that dictate your project’s speed.
Bathroom Size and Layout
The sheer square footage of your space is the most obvious factor. A tiny powder room with 40 square feet of floor space will go much faster than a sprawling master bath with 150+ square feet. Generally, you should add 1 to 2 full days of work for every 50 square feet you need to cover. Furthermore, a perfectly square room is easy. A room with strange angles, lots of plumbing pipes to cut around, and a built-in vanity will slow you down significantly.
Tile Type and Size
Believe it or not, the tile you choose changes everything. Large-format tiles (like 12×24-inch rectangles) cover a large area quickly. However, they require a perfectly level subfloor. On the other hand, tiny mosaic tiles on mesh sheets conform to slopes easily, but ensuring the grout lines remain perfectly straight takes extra time. Natural stone tiles require sealing before you grout, adding another step to your timeline.
Pattern Complexity
Are you laying your tiles in a simple, straight grid? That is the fastest method. Do you want a classic brick-lay or subway pattern? That adds a bit more measuring and cutting. If you dream of a complex herringbone pattern or a diagonal layout, expect to add hours—if not full days—to your project. These intricate designs require endless custom cuts and intense mathematical planning.
Surface Preparation Needs
Here is a major pro tip: Preparation will eat up 30% to 50% of your total project time. You cannot just slap new tile over old, rotting wood. You have to demolish the old floor, clean up the debris, scrape away old adhesive, and pour a self-leveling compound. If your subfloor is damaged, repairing it will delay the actual tiling process.
Experience Level
Your personal skill level changes the math entirely. If this is your very first time mixing thinset and using a wet saw, a project that takes a pro four hours might easily take you an entire weekend. First-time DIYers generally double or even triple the professional timeline.
Essential Drying Times
You cannot rush chemistry. Even the fastest workers are at the mercy of drying times. You generally have to wait 24 to 48 hours for your thinset mortar to cure before you can walk on the floors to apply grout. Waterproofing membranes also require specific curing hours. These factors affecting tiling speed mean a job is rarely finished in a single consecutive push.
- Bathroom size: Small spaces equal faster times; always add 1-2 days per additional 50 sq ft.
- Skill level: First-time DIY attempts will consistently double the time a professional takes.
- Tools used: A laser level and a high-quality wet saw drastically speed up your custom cuts.
- Prep work: Always allocate extra time for demolition and leveling.
Tools & Materials Needed for the Job
Having the right tools on hand before you begin is the ultimate time-saver. Nothing ruins your momentum quite like having to stop mid-project to drive to the hardware store. Let’s look at the essentials needed for floors, walls, and showers.
There is a big difference between DIY tools and professional equipment. DIYers often rent heavy machinery or buy budget-friendly hand tools, while professionals invest in high-end, time-saving gear.
Here is a breakdown of what you will need:
Essential Item Average DIY Cost Professional Note
Tile cutter / Wet saw $50 – $200 (Rental) essential for precise shower cuts and thick tiles.
Thinset mortar & Grout $20 – $50 (Per bag) Pros use specialized, highly flexible, waterproof formulas for walls.
Level, spacers, & trowel $30 (Basic kit) Pros use advanced laser levels and leveling clip systems.
Waterproofing membrane $100 – $300 Crucial for showers; adds 1 day to the application and drying timeline.
Cement backer board $15 (Per sheet) Replaces drywall in wet areas to prevent future rot and mold.
The Importance of Safety Gear
Do not forget your personal protective equipment. You need high-quality knee pads, because you will spend hours on the floor. Safety glasses are non-negotiable when operating a wet saw, as tile shards can easily fly upward. You also need a proper respirator mask for mixing dry thinset and grout, which release harmful silica dust into the air.
Step-by-Step Floor Tiling Timeline
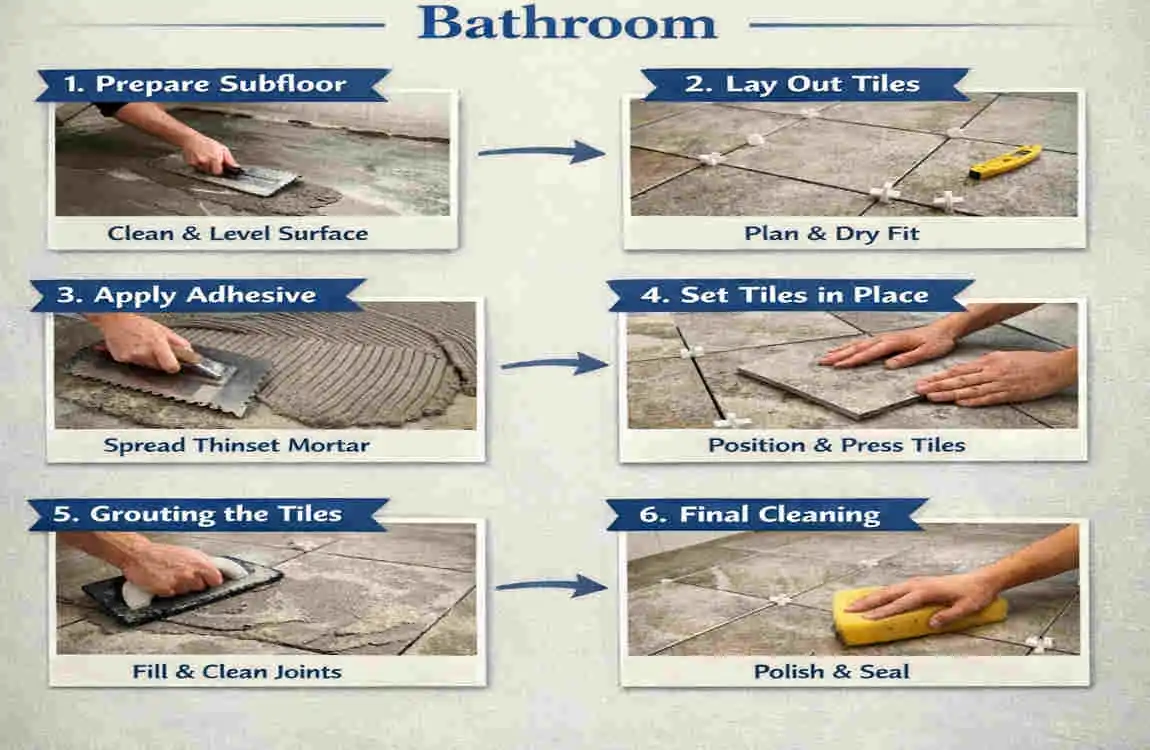
Tiling a floor is often the gateway project for many homeowners. Let’s break down the exact hours and days required for bathroom floor tiling. We will divide this into distinct phases to help you visualize the workflow.
Phase : Preparation (Demo, Clean, and Level)
You cannot build a beautiful floor on a bad foundation. First, you must remove the toilet, baseboards, and old flooring. Next, you have to thoroughly clean the subfloor. If the floor dips or sags, you will need to apply a liquid self-leveling underlayment and let it dry.
- DIY Timeline: 4 to 8 hours.
- Professional Timeline: 2 to 4 hours.
Phase : The Dry Layout
Never mix your mortar until you know exactly where your tiles will go. A dry layout involves physically placing your tiles on the floor with spacers, without any glue. This helps you find the center of the room, decide where your cuts will fall, and avoid leaving tiny, awkward slivers of tile near the bathtub or doorway.
- DIY Timeline: 1 to 2 hours.
- Professional Timeline: 1 hour.
Phase : Apply Thinset and Lay Tiles
Now the real work begins. You will mix your thinset mortar to a peanut-butter consistency. Using a notched trowel, you spread the mortar and press your tiles into place, inserting spacers as you go. For a small bathroom, a DIYer might split this over a weekend to avoid fatigue.
- DIY Timeline: 6 to 12 hours (often split over 2 days).
- Professional Timeline: 4 to 6 hours.
Phase : Grout and Seal
Once the thinset cures, you must remove all the plastic spacers. Next, you mix your grout and use a rubber float to smash it deep into the joints between the tiles. After it sets slightly, you wipe away the excess with a damp sponge. Once fully cured, you apply a liquid sealant to protect the grout from stains.
- Wait Time: 24-hour cure for thinset.
- Active Time: 2 to 4 hours.
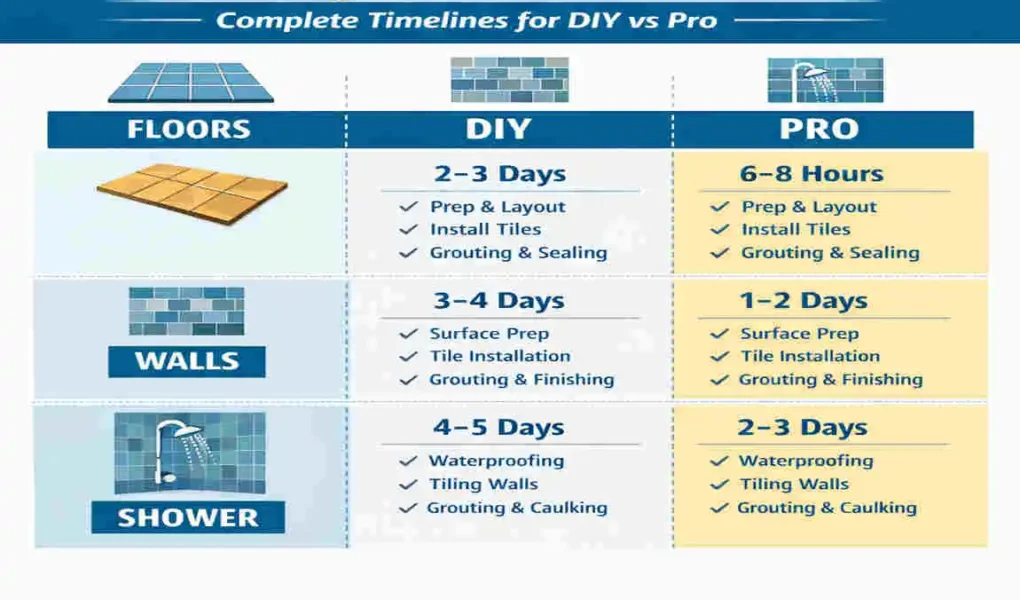
Total Floor Timeline: For a standard 40 to 80-square-foot bathroom, a DIYer should expect the project to take 2 to 3 days. A professional can usually complete the same floor in 1 full day (returning briefly the next morning just to grout).
Step-by-Step Wall Tiling Timeline
Moving up from the floor, bathroom wall tiles installation is a slightly different beast. Walls usually cover less square footage per section, but you are fighting gravity the entire time. Because wall tiles must perfectly meet the floor, wall tiling is almost always sequenced after the floor is finished.
Phase : Surface Prep and Waterproofing
Drywall is not suitable for areas that get wet. You must install cement backer board. If you are tiling a wall that is exposed to moisture (such as behind a vanity or near a tub), you must apply a liquid waterproofing membrane. This rolls on like thick paint and needs time to dry.
- DIY Timeline: 4 to 6 hours.
- Professional Timeline: 2 hours.
Phase : Layout from the Bottom Up
Because gravity pulls wet tiles downward, you cannot just start in the middle of a wall. You must find your starting point near the bottom. Many pros screw a temporary, perfectly level piece of wood (a ledger board) into the wall to support the first row of heavy tiles while they dry.
- DIY Timeline: 1 hour.
- Professional Timeline: Under 1 hour.
Phase : Tile Installation
Spreading thinset on a vertical surface is messy. You have to work in small sections so the mortar does not dry out before you place the tiles. Cutting holes for plumbing fixtures, light switches, and wall sconces takes precise measurements and special diamond hole-saw drill bits. If you are adding a decorative recessed niche for shampoo, add an extra four hours of tedious cutting and framing to your timeline.
- DIY Timeline: 8 to 16 hours (spread over 2 to 3 days).
- Professional Timeline: 6 to 8 hours.
Phase : Grouting and Caulking
Just like the floor, you must wait for the wall tiles to lock into place. After 24 hours, you can grout. Remember that corners where two walls meet—or where the wall meets the floor—should never be grouted. Houses naturally shift and settle, which will crack the hard grout. Instead, you must use a flexible, color-matched silicone caulk in these changes of plane.
- Wait Time: 24-hour cure.
- Active Time: 3 hours.
Total Wall Timeline: For a standard bathroom, a DIYer will take about 3 to 4 days to tile the walls. A professional can easily wrap this up in 1 to 2 days.
Shower Tiling Timeline
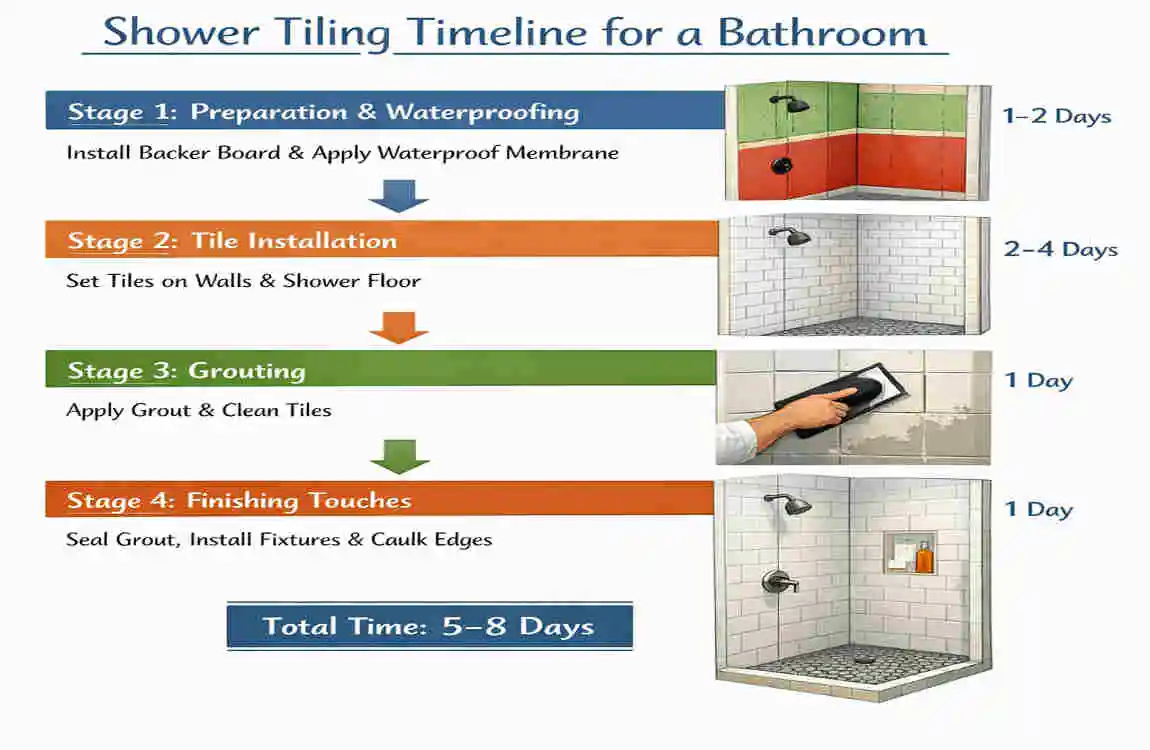
When determining how long to tile bathroom spaces, the shower is always the wild card. The shower tile project schedule is the most complex, time-consuming, and stressful part of any renovation. This is due to the intense need for perfect waterproofing, the need to slope the floor toward the drain, and the need to navigate corners and curves.
Phase 1: Build the Pan or Base
The floor of your shower (the pan) must slope exactly 1/4 inch per foot toward the drain so water doesn’t pool. You can build this from scratch using dry-pack mortar, or you can buy a pre-sloped foam base. Building a custom mud pan is highly technical.
- DIY Timeline: 1 full day (Novice DIYers should allow 2 days).
- Professional Timeline: 4 to 6 hours.
Phase 2: Waterproofing the Membrane
This is the most critical step in your entire bathroom. If your shower floor fails, water will rot the framing of your house. You must apply a sheet membrane (like Schluter Kerdi) or a thick liquid membrane over the floor and up the walls. This creates a watertight envelope.
- Active Time: 4 to 6 hours.
- Wait Time: 24-hour dry time.
Phase 3: Cement Backer Board and Wall Tiles
Once the waterproofing is secure, you install your cement boards and begin laying the tile. Showers require countless custom cuts to fit around the drain, the showerhead pipe, the mixing valve, and built-in seating or shelving.
- DIY Timeline: 8 to 12 hours.
- Professional Timeline: 4 to 8 hours.
Phase 4: Grout and Silicone Caulk
You must use a high-quality, mold-resistant grout for your shower. Once the grout cures, every single seam, corner, and fixture junction must be heavily caulked with 100% silicone to prevent water intrusion.
- Wait Time: 24 to 48 hours.
- Active Time: 2 to 4 hours.
Total Shower Timeline: Expect a pro tile shower to take 1 to 3 days, depending on the size and custom features. A DIYer should budget 2 to 4 solid days of difficult work.
A Stern Warning: Rushing a shower installation leads to disastrous leaks. A leaky shower means tearing out all your hard work and starting over. If you are going to take your time anywhere, take it here.
[Internal Link Placeholder: Read our article on the top signs your shower pan is leaking and how to fix it.]
DIY vs. Professional: Full Comparison
Now that we have explored the individual areas, let’s look at the big picture. When you ask how long it will take to tile a bathroom, you are really weighing the cost of your personal time against the cost of professional labor.
Here is a full comparison table for overall search scanability:
Renovation Aspect DIY Timeline Professional Timeline Estimated Cost Savings (DIY)
Small Bath (Full Room) 5 to 10 days 2 to 3 days $500 – $1,500
Medium Bath (Full Room) 7 to 14 days 3 to 5 days $1,000+
Adding a Custom Shower Add 2 to 3 days Add 1 to 2 days N/A (Highly Variable)
The Case for Hiring a Pro
The biggest advantage of hiring a professional contractor is speed. As you can see from the table, pros are typically two to three times faster than a DIYer. They have a team, they have muscle memory, and they don’t have to watch a YouTube tutorial before every step.
Furthermore, professionals bring peace of mind. Reputable contractors offer warranties on their work. If a tile cracks six months later, they come back and fix it. They also guarantee that your shower will not leak into your living room ceiling.
The Case for DIY
The biggest advantage of the DIY route is the incredible cost savings. By doing the labor yourself, you can save thousands of dollars, allowing you to afford luxury tiles or a high-end vanity that you otherwise couldn’t budget for.
DIY also offers ultimate flexibility. You can work for two hours after you get home from your day job, or dedicate a few weekends to the project without having strangers in your home. However, DIY is highly error-prone. One uneven subfloor or one badly mixed bucket of thinset can derail your entire timeline and cost you a fortune in wasted materials.
Common Mistakes & Time-Savers
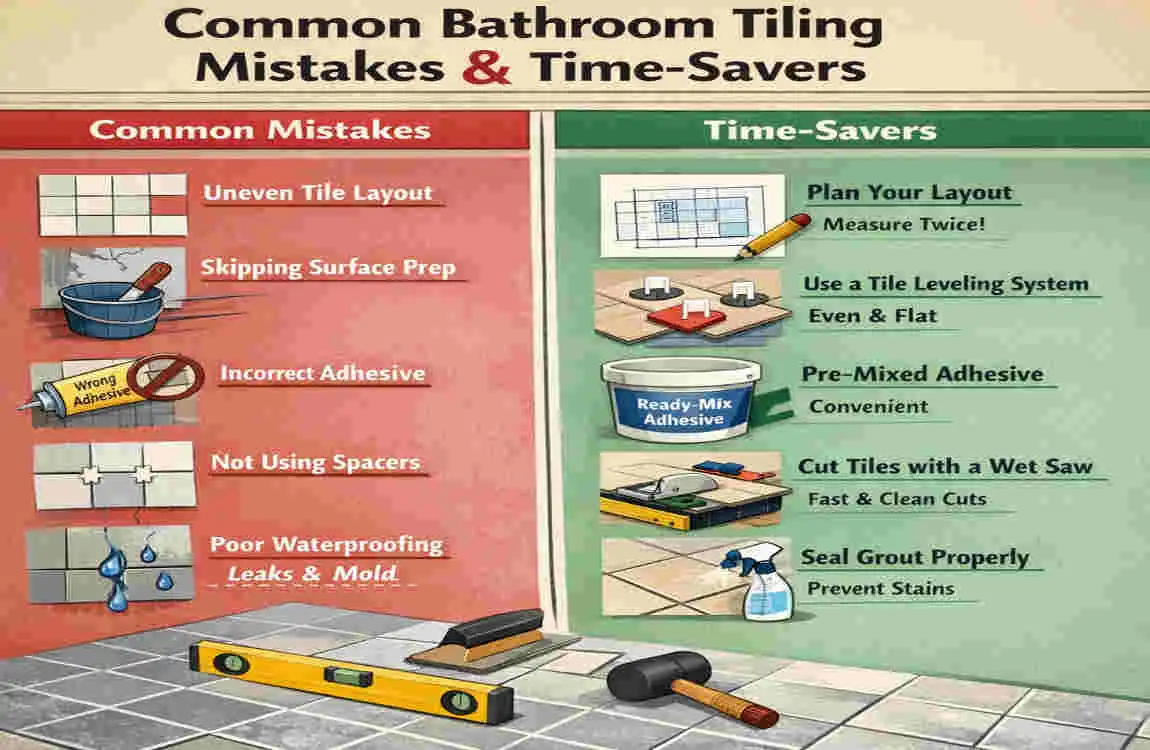
Want to speed up your timeline? Avoid the common pitfalls that trap beginners, and steal the clever tricks that professionals use every day.
The Biggest Mistakes That Add Days
- Skipping the Level Check: If you assume your floor or walls are perfectly flat, you are in for a nightmare. Laying tiles on an uneven surface causes “lippage” (where one tile sticks up higher than the next). Fixing this requires ripping up dried tiles, which adds days to your timeline.
- Using the Wrong Thinset: Buying a generic mortar for heavy, large-format tiles will result in sagging walls. Always read the bag to ensure it matches your tile type.
- Grouting Too Early: If you don’t wait for the tiles to dry, you will trap moisture beneath them, causing the thinset to fail and the grout to discolor.
Brilliant Time-Savers
- Pre-cut Your Tiles: Try to make all your difficult cuts outside first. Walking back and forth to the wet saw in the garage for every single tile wastes countless hours.
- Choose Large Format Tiles: The bigger the tile, the faster the coverage. A 12×24 tile covers the space of dozens of small mosaics in seconds.
- Enlist Team Help: DIY goes twice as fast with a partner. Have one person measure and cut on the wet saw while the other spreads mortar and sets the tile.
- Batch Mix Your Grout: Do not mix the whole bag of grout at once. It will dry out in the bucket before you can use it. Mix in small, manageable batches.
Costs Breakdown
When evaluating how long to tile bathroom, you must tie your time directly to your budget. Time is money, after all.
If you choose the DIY path, your primary cost is materials. You can expect to pay anywhere from $5 to $10 per square foot for decent tiles, thinset, grout, and tool rentals. You are trading your nights and weekends to keep this number low.
If you hire a professional, you are paying for their speed and expertise. Professional installation typically costs between $15 and $25 per square foot, including the standard materials. High-end natural stone or intricate patterns will push this price higher.
Do not forget to factor in the hidden extras regardless of who does the work. Cement backer board, waterproofing membranes, self-leveling compounds, and specialized diamond saw blades can easily add $200 to $500 to your overall budget.
Frequently Asked Questions (FAQs)
How long does it take to tile a bathroom floor only? If you are just tackling a standard-sized floor, expect it to take a DIYer 1 to 3 days. A professional can typically knock out a floor in exactly 1 day.
Can you tile an entire bathroom in one single day? Rarely, if ever. The only exception is when a professional crew tackles a very small floor-only job. Full bathrooms with walls and showers require mandatory 24-hour drying times between steps.
What is the standard tiling drying time before grouting? You should always wait at least 24 to 48 hours after laying tile before applying grout. Walking on wet thinset will shift your tiles and ruin your perfectly straight lines.
How long does it take to tear out old bathroom tile? Demolition is physically exhausting. Removing old floor and wall tile, packing it into heavy bags, and scraping the old thinset will take a DIYer a full 8 to 12 hours.
Does tile size affect the installation timeline? Absolutely. Large tiles (like 12×24 inches) cover ground incredibly fast. Small mosaic tiles take much longer because ensuring the tiny grout lines stay perfectly uniform requires slow, meticulous adjustments.
How long does a liquid waterproofing membrane take to dry? Most liquid membranes, like RedGard, require 1 to 2 hours between coats. However, you must let the final coat cure completely for 12 to 24 hours before applying any mortar over it.
Is tiling a shower wall harder than a bathroom floor? Yes. Wall tiling means you are fighting gravity. Tiles want to slide down the wall before the thinset dries. You also have to cut precise holes around complex shower plumbing fixtures.
When can I actually take a shower after tiling? Patience is key here. After the final grout and silicone caulk are applied, wait at least 48 to 72 hours before running water. If you shower too soon, the moisture can damage uncured seals.
Do I really need a wet saw, or can I use a manual snapper? For thin, basic ceramic floor tiles, a manual snap cutter works fine. But for thick porcelain, natural stone, or intricate L-shaped cuts around shower fixtures, a motorized wet saw is completely mandatory.
How long does it take a professional to tile a custom shower? A skilled professional tile setter can prep, waterproof, tile, and grout a standard custom shower in 2 to 3 consecutive working days.