If you are trying to learn how to repair rotted roof trusses, the first thing to know is this: roof truss rot is not just a small roofing issue. It can affect the strength of your whole roof. That means sagging ceilings, cracked drywall, water stains, and in serious cases, a real safety risk for your home.
Roof trusses do a big job. They carry the roof’s weight, transfer it to the walls, and keep the structure stable. When wood starts to rot, that strength drops fast. The good news is that repairing rotted roof trusses can often be handled without replacing the entire roof system if the damage is caught early and repaired correctly.
| Step | Action | Key Tips & Tools |
|---|---|---|
| Assess Damage | Inspect attic for soft/rotted wood; probe with screwdriver; measure extent. | Flashlight, moisture meter. Call pro if >30% compromised. |
| Safety Prep | Install temporary jacks/beams under truss; clear debris. | Adjustable posts, level. Wear harness/gloves. |
| Remove Rot | Cut out damaged section cleanly (don’t weaken surrounding wood). | Reciprocating saw, chisel. Dispose safely. |
| Sister/Reinforce | Attach new pressure-treated lumber alongside (sistering) or splice in replacement. | 2×4/2×6 lumber, bolts/screws, wood glue. Overlap 3-4 ft. |
| Secure Joints | Add metal gusset plates or brackets on both sides; fill gaps. | Galvanized plates, epoxy/resin, nails. Clamp while curing. |
| Finish & Check | Level truss, apply filler, reinsulate; inspect alignment. | Level, wood filler. Test load gradually. |
What Causes Roof Truss Rot?
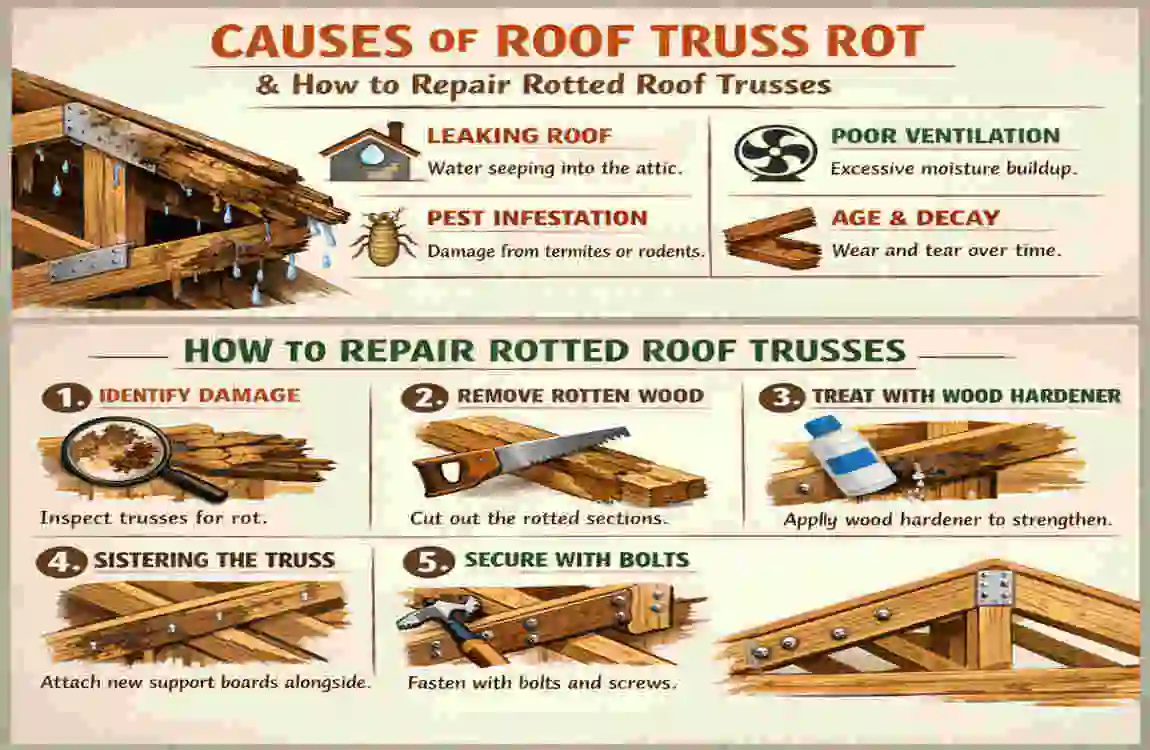
Roof truss rot does not happen by accident. It usually starts with moisture, then gets worse over time. The tricky part is that the damage often happens slowly, so many homeowners do not notice it until the signs become obvious.
Poor attic ventilation
One of the most common causes is poor attic ventilation. When warm, moist air gets trapped in the attic, it creates the perfect place for wood rot to grow. Over time, the wood absorbs moisture, weakens, and may even start to support mold growth.
A well-ventilated attic lets air move freely. That helps wood stay dry and makes it harder for rot to spread. Without good airflow, even strong timber can break down.
Leaking roofs and flashing failures
Another major cause is a roof leak. It may come from damaged shingles, cracked flashing, broken seals around vents, or even clogged gutters that force water back under the roofline.
What makes leaks so dangerous is that they do not always drip straight down. Water can move along rafters, insulation, and joints before it finally reaches the truss. By the time you see a stain, the wood may already have been damaged for a long time.
Untreated or aging wood
Some trusses were built with wood that was not properly treated for moisture, insects, or humidity. Older homes can also develop rot simply because the timber has aged and gone through repeated wet and dry cycles.
In humid climates, the problem tends to appear sooner. Heat, moisture, and poor airflow make the perfect mix for decay. A roof that has lasted 20 or 30 years may still need truss repair if water has been sneaking in for years.
Insects and pests
Pests can make the problem worse, too. Termites, carpenter ants, and other wood-boring insects weaken timber and create little channels inside the wood. Once pests damage the wood, moisture can enter more easily, and rot can spread even faster.
Why does rot spread so quickly?
Rot is not only a surface issue. Once moisture enters the wood fibers, the damage can spread inward. That is why small soft patches can become a major structural concern if you wait too long.
Here is a simple way to think about it: small leak + trapped moisture + time = serious truss damage.
Common causes, signs, and prevention
CauseSignsPrevention
Moisture buildup, soft wood, mold, and damp insulation. Improve attic ventilation
Roof leaks, water stains, peeling paint, wet insulation. seal flashing and repair roof coverings.
Pests: Tunnels, droppings, sawdust. Treat wood and control infestation
Age and wear: Cracking, brittleness, dark spots. Schedule regular inspections
How to Assess the Damage
Before you consider how to repair rotted roof trusses, you need to know how severe the damage really is. This step matters because roof trusses are load-bearing. That means they hold important structural weight. If you guess wrong, you could make the problem worse.
Start with a visual inspection.
Look for anything that seems off. You want to check the attic carefully and watch for:
- Soft, dark, or crumbly wood
- Mold or mildew growth
- Water stains on the truss or nearby wood
- Cracks near joints
- Bent or sagging truss members
- Rusted metal plates or loose fasteners
A bright flashlight is very helpful here. Shine it into corners, along joints, and around roof penetrations such as vents and chimneys.
Test the wood gently.
A simple screwdriver can tell you a lot. Press it into suspicious spots. If the wood feels firm, it may still be sound. If it sinks in too easily, the wood may be rotted or badly weakened.
Do not force the tool deeply into the timber. You are not trying to damage it more. You are just checking resistance.
Measure the extent of the damage.
The next step is to figure out whether the rot is minor or severe.
- Minor damage usually affects the surface or one small section.
- Severe damage may affect 50% or more of the wood member, or it may be close to a joint.
This matters because the repair method changes based on how much of the truss has been compromised. Minor rot may be fixed with sistering or patching. Severe rot may need partial replacement or a larger structural repair.
Use simple tools to improve assessment.
A few tools make inspection easier:
- Flashlight for tight attic corners
- Moisture meter to detect hidden dampness
- Tape measure to note sagging or movement
- A camera or a phone to document the damage
Pictures are useful if you later speak to an engineer or roofing contractor. They help explain the problem clearly and can save time during the estimate process.
Know when to call a professional
If the truss is carrying obvious weight, if the roofline is sagging, or if you see major cracking, do not treat it as a casual DIY job. A structural issue deserves expert attention.
You should call a pro or engineer if:
- The roofline has dropped or twisted
- Several trusses are damaged
- The rot is close to a connection point
- You are unsure how much weight the member carries
- You notice movement when you touch the truss
Warning signs you should never ignore
- Sagging roofline
- Cracks in the ceiling or drywall
- Musty odors in the attic
- Peeling paint near the ceiling
- Visible mold or damp insulation
If you spot more than one of these signs, assume the damage is active until proven otherwise.
Tools and Materials Needed
Before you start using tools for rotted roof truss repair, gather everything first. A repair goes much more smoothly when you have the right equipment ready.
Safety gear
Safety should always come first. You will likely need:
- Work gloves
- Safety goggles
- Dust mask or respirator
- Hard hat if overhead debris is possible
- Safety harness if you are working in a risky attic area
Do not skip the protective gear. Attics can be dusty, cramped, and full of sharp edges.
Removal tools
You will need tools that let you remove damaged wood cleanly:
- Reciprocating saw
- Hand saw
- Chisel
- Pry bar
- Hammer
- Utility knife
A clean cut matters because repairs bond better to sound wood than to torn, splintered edges.
Repair materials
Depending on the repair method, you may need:
- Pressure-treated lumber
- Matching dimensional lumber such as 2×4 or 2×6
- Screws or bolts
- Wood glue or structural epoxy
- Metal gusset plates
- Construction adhesive
- Plywood for reinforcement in some cases
Helpful extras
- Moisture meter
- Carpenter’s square
- Level
- Clamps
- Measuring tape
- Marking pencil
- Temporary support posts or beams
Budget table for a typical DIY repair
ItemPurposeCost Estimate
Lumber Sistering or replacement $50–$150
Gusset plates Reinforcing joints $20–$60
Screws and bolts Secure fastening $20–$50
Epoxy or glue Bonding and sealing $20–$40
Safety gear Protection during work $50–$150
Temporary supports Holding the truss in place $40–$100
For a small repair, many homeowners spend around $200–$500 in materials. Larger repairs can cost more, especially if you need special lumber or added reinforcement.
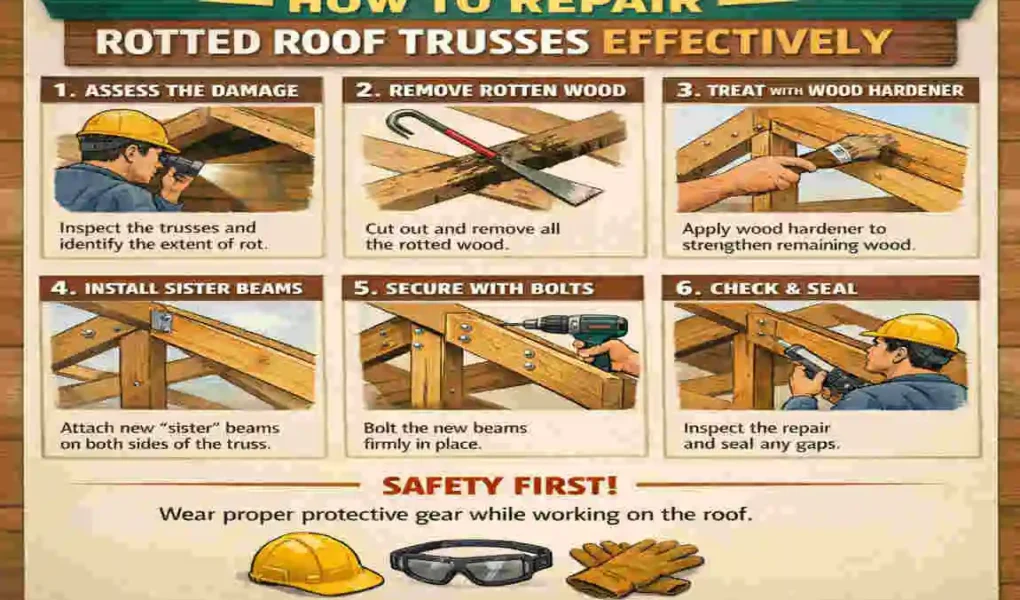
How to Repair Rotted Roof Trusses: Proven Steps
This is the core part of the guide. If you want to understand how to repair rotted roof trusses the right way, start with one simple idea: support first, cut second, repair third.
Never rush into cutting out damaged wood before the truss is supported. That is one of the biggest mistakes people make.
Prep the work area and make it safe.
Before touching the damaged wood, clear the attic space around the truss. Remove loose items, stored boxes, and anything that blocks access.
Then install temporary supports. These may be adjustable jacks, beams, or braces installed to help carry the load while you work. If you do not support the truss, removing the damaged part could shift the roof weight unexpectedly.
Make sure the area is well-lit for working. Use portable lights if needed. Wear your safety gear before entering the attic.
Also, check the weather if you are working near an open roof section. You do not want rain or wind making the situation worse.
Remove the rotten section carefully.
Once the truss is supported, mark the damaged wood clearly. Use a pencil or marker to define the area that needs to come out. Cut only the rotten or badly weakened part, and try to keep your cut as clean and straight as possible.
The goal is to remove all bad material without damaging the sound wood around it. If the cut edge is ragged, the new piece may not fit well.
A reciprocating saw can help with this stage, but use it with control. Go slow and cut only what needs to go. If the rot is near a joint, be extra careful because that area often carries more stress.
After cutting, clean the area. Remove loose debris, sawdust, and any damp insulation. Let the space dry as much as possible before moving on.
Decide if sistering is the right fix.
For many homeowners, sistering trusses is the best solution when the damage is limited. Sistering means fastening a new piece of lumber alongside the damaged one so the new wood helps carry the load.
This method works well when:
- The rot is limited to one section
- Most of the original truss is still strong
- The joint is intact
- You need extra reinforcement without full replacement
The new piece should match the original member as closely as possible in size and strength. In many cases, matching lumber is used to maintain a consistent load path.
How sistering works
You place the new lumber against the damaged member, line it up carefully, and fasten it tightly with screws, bolts, or structural fasteners. The sister piece should extend far enough beyond the damaged area to reach strong wood on both sides.
That overlap is important. If the new piece is too short, it will not spread the load properly.
Use construction adhesive or structural glue if appropriate, but do not rely solely on glue. Mechanical fastening provides the repair with real strength.
Best practices for sistering
- Use lumber that matches the original size
- Extend the sister piece beyond the damaged area
- Clamp pieces together before fastening
- Space fasteners evenly
- Check alignment with a level
- Make sure the repaired section sits flush
Use splicing when the damage is more severe.
If the rot is too extensive for sistering alone, you may need a splice or partial replacement. This means cutting out the bad section and installing a new piece to fill the gap.
Splicing is more technical than sistering because the new piece must connect cleanly and transfer load without weak points. That is why this method is often better handled by someone with building experience.
The repair usually involves:
- Removing the damaged section
- Cutting a replacement piece to the exact size
- Fitting it tightly in place
- Securing it with bolts, screws, or engineered fasteners
- Reinforcing the joint with plates or gussets
If the truss has a complex shape or the damage is near a critical joint, this is where a structural expert becomes very valuable.
Reinforce joints with gusset plates.
Many truss repairs use gusset plate reinforcement. A gusset plate is a flat connector, typically made of metal or plywood, that strengthens the joint between two pieces of wood.
This is useful where the truss members meet at an angle. The plate helps spread force across the connection and reduces stress on the repaired area.
How to install gusset plates
- Cut the plate to fit the joint
- Apply glue if the repair method allows it
- Place the plate over the connection
- Fasten it securely with nails, screws, or bolts
- Make sure it sits flat and does not rock
Check the level and finish the repair.
Once the repair is in place, step back and check the truss alignment. It should sit straight and stable. If the roofline is sagging, compare the repair area to nearby trusses to ensure everything lines up.
Then finish the repair with care:
- Fill any small gaps if needed
- Trim rough edges
- Reinstall insulation if it was removed
- Seal exposed wood if recommended
- Clean the attic area
If the rot came from a leak, do not stop at the wood repair. Fix the leak, too. Otherwise, the problem will come back.
Confirm the attic is dry.
A repair is not complete until the moisture problem is solved. Check for wet insulation, damp roof decking, or signs of hidden leaks nearby.
If the attic still feels damp, improve airflow. Add ventilation or repair roof openings to allow the area to dry properly.
Method comparison table
Method Best For Difficulty Durability
Sistering Minor rot Medium High
Splicing Severe damage Hard Very High
Gusset reinforcement, Joints and connectors, Easy to Medium, Medium
Full replacement, extensive rot, hard, very high
Important warning
If the repair affects a load-bearing member, local building codes may require a structural review. When in doubt, consult an engineer or a licensed roofing professional. That is the safest way to protect your home and avoid making a costly mistake.
DIY vs. Professional Roof Truss Repair
Once you understand the basics of fixing rotted trusses, the next question is simple: Should you do it yourself or hire a pro?
The honest answer is that it depends on the size of the problem, your skills, and how comfortable you feel working around structural wood.
When DIY can make sense
DIY may be reasonable if:
- The rot is small and easy to reach
- You can clearly see the damaged area
- The truss is still mostly stable
- You have basic carpentry skills
- You can safely support the area before the repair
The biggest benefit of DIY is cost savings. You may spend a few hundred dollars rather than pay for a full-service call.
When DIY becomes risky
Do not try to handle the repair alone if:
- The roofline is sagging
- More than one truss is damaged
- The wood is rotten near a joint
- You cannot safely access the attic
- You are unsure how the roof load is distributed
A bad repair can create a much bigger problem than the original rot. Roof framing is not the place to guess.
What a professional brings
A professional roofer or structural repair specialist can offer:
- Experience with load-bearing repairs
- Better tools and materials
- Faster diagnosis of the real cause
- Warranty on the work
- Insurance coverage in case something goes wrong
Professional jobs often cost more, but they can save money in the long run if the problem is serious. For larger repairs, the price may range from $2,000 to $10,000, and larger structural work can go higher depending on the damage.
A simple decision guide
Choose DIY if the rot is minor, easy to reach, and you know how to safely support the truss.
Choose a professional if the damage is widespread, structural, or associated with significant roof movement.
Prevention Tips That Keep Trusses Healthy
Once you learn how to repair rotted roof trusses, the next step is to keep the problem from returning. Prevention is always cheaper than repair.
Schedule yearly inspections
Check your attic and roof at least once a year. Look for new stains, damp spots, mold, or damaged flashing. It is much easier to fix a small issue early than a big one later.
Improve attic ventilation
Good airflow is one of the best defenses against rot. You can improve ventilation with:
- Soffit vents
- Ridge vents
- Attic fans
- Better air pathways through the attic
When air moves properly, moisture has less chance to settle into the wood.
Keep water out of the roof system.
Waterproofing matters. Make sure flashing around chimneys, vents, skylights, and valleys stays sealed—clean gutters so water drains properly, preventing it from backing up into the roof edge.
Control humidity inside the home
Bathrooms, kitchens, and laundry rooms can send a lot of moisture into the air. Use exhaust fans and keep indoor humidity under control. Less moisture inside the house means less moisture reaching the attic.
Treat wood when needed.
In some cases, borate treatment or wood protection products can help resist pests and moisture. This is especially useful in areas where humidity or insects are common.
Prevention checklist
- Inspect the attic yearly
- Repair roof leaks quickly
- Improve ventilation
- Clean gutters and downspouts
- Watch for pest activity
- Keep indoor humidity under control
Cost Breakdown
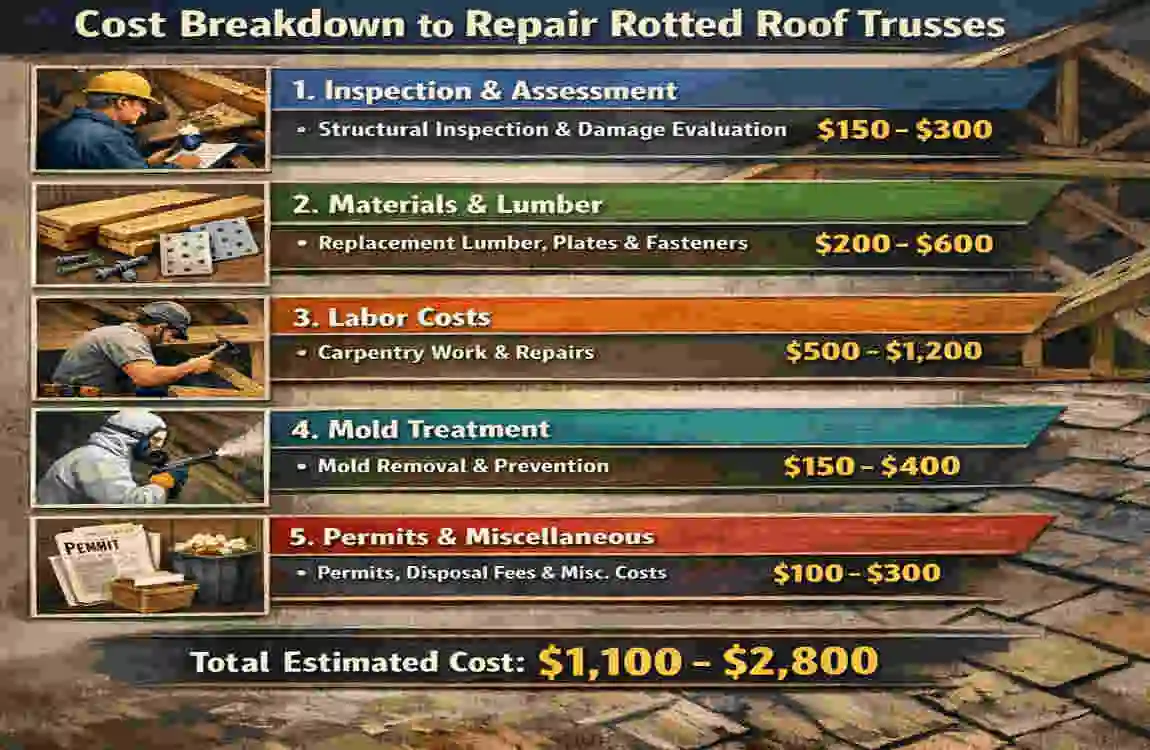
How much does it cost to fix a rotted roof truss? The answer depends on the extent of the damage.
DIY cost range
A small DIY repair may cost around $200 to $1,000. That range depends on:
- How much lumber do you need
- Whether you need sistering or splicing
- What kind of fasteners and reinforcement are required
- Whether you already own the tools
Professional cost range
Professional repair may cost around $1,000 to $15,000 or more for larger structural work. The cost changes based on:
- Location
- Number of trusses affected
- Roof pitch and attic access
- Degree of rot
- Need for engineering review
Cost factors to keep in mind
Homes in busy urban areas often cost more to service. If several trusses are damaged, the project becomes more complex and expensive. Emergency repairs can also raise the price.
Repair Type: Typical Cost Range: Notes
Minor DIY patch $200–$500 Small, accessible damage
DIY sistering repair $300–$1,000 More materials and time
Professional partial repair $1,000–$5,000 Common for localized damage
Major structural repair $5,000–$15,000+ Large or widespread rot
The most important thing is not to focus only on price. Focus on whether the repair will make the roof safe, stable, and dry.
Frequently Asked Questions
How much does it cost to repair rotted roof trusses?
The cost can vary widely, but many repairs fall between $500 and $5,000 for smaller to medium-sized problems. Larger structural repairs can cost more depending on the amount of damage and the number of trusses affected.
Can I repair rotted roof trusses myself?
Yes, minor damage may be repairable by a confident DIY homeowner. But you should only do it if you can safely support the truss and clearly understand the extent of the rot. If the issue is structural, it is better to hire a professional.
How long do roof truss repairs last?
A properly done repair can last 20 years or more if the moisture problem is fixed and the repair was made with the right materials and methods. The key is not just patching the wood, but also stopping the cause of the rot.
What if the rot is widespread?
If the rot affects many parts of the truss system, a full replacement or major structural repair may be necessary. At that point, a roofing contractor or structural engineer should inspect the roof and recommend the safest solution.
What is the best repair method for minor rot?
For small areas of damage, sistering is often the best choice. It is strong, practical, and allows you to reinforce the damaged member without replacing the whole truss.