A heavy storm has just swept through your neighborhood, leaving behind a trail of damage. You step outside to inspect your home and notice that some of your roofing shingles are cracked, curled, or even missing altogether. If this sounds familiar, you’re not alone—storm damage to roofs is more common than you might think, especially in regions prone to harsh weather like Punjab during the monsoon season.
According to a roofing industry report, 80% of roof leaks originate from damaged shingles. Fixing these issues promptly can save you from costly repairs down the line, such as leaks, water damage, or even structural problems in your home.
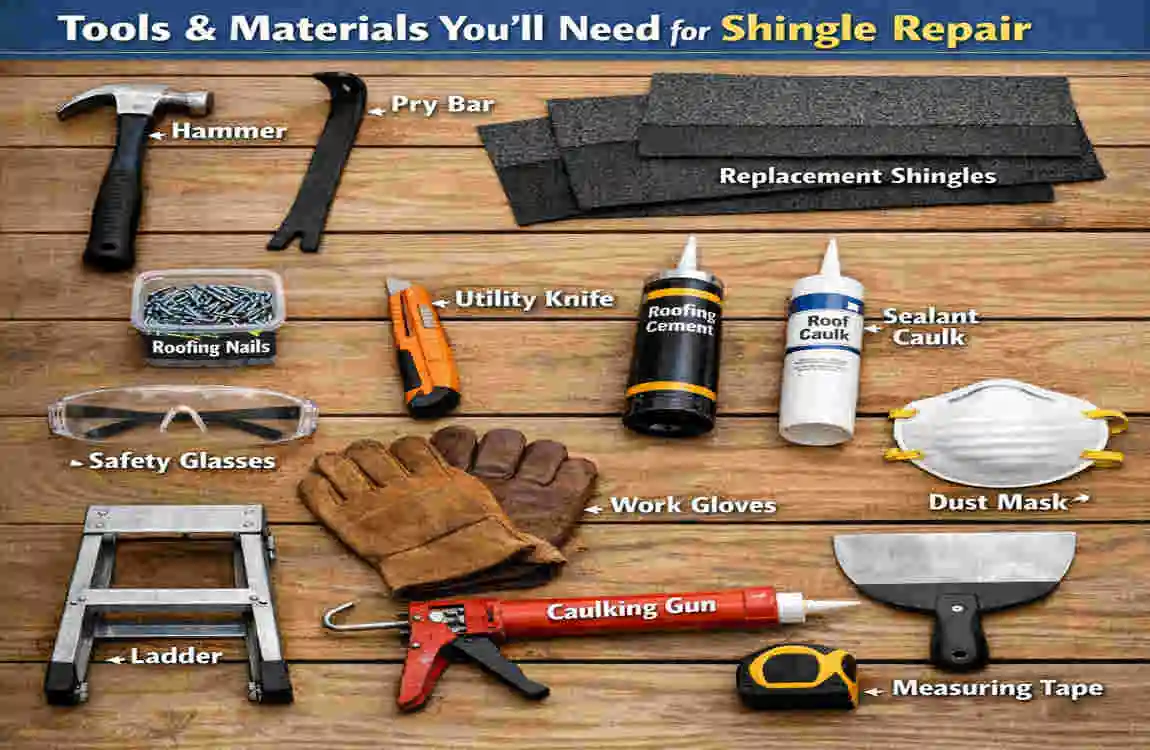
Tools and Materials You’ll Need for Shingle Repair
Before you climb onto your roof, gather all the necessary tools and materials. Having everything on hand will make the process smoother and safer.
Here’s what you’ll need:
- Roofing hammer or pry bar: To remove nails and lift shingles.
- Roofing nails (1.25-inch galvanized): Prevent rust and ensure durability.
- Shingle sealant or roofing cement: For waterproofing and securing shingles.
- Replacement shingles: Match your roof type and color for a seamless look.
- Utility knife: To cut shingles to the right size.
- Chalk line: Helps maintain straight rows.
- Ladder (extendable and stabilized): Essential for safe roof access.
- Safety harness, gloves, and non-slip shoes: Prioritize your safety at all times.
Safety Precautions Before You Start DIY Shingle Repair
Repairing roofing shingles is a rewarding DIY project, but safety should always come first. Roofing work can be dangerous, especially if you’re not adequately prepared.
Key safety tips:
- Inspect the weather forecast: Never work on your roof during rain, strong winds, or extreme heat.
- Set up your ladder properly: Use a ladder stabilizer or have someone hold it for added support.
- Wear appropriate gear: A safety harness, gloves, and non-slip shoes are non-negotiable.
- Know your limits: If your roof is steep or more than 2 stories high, it’s best to call a professional roofer.
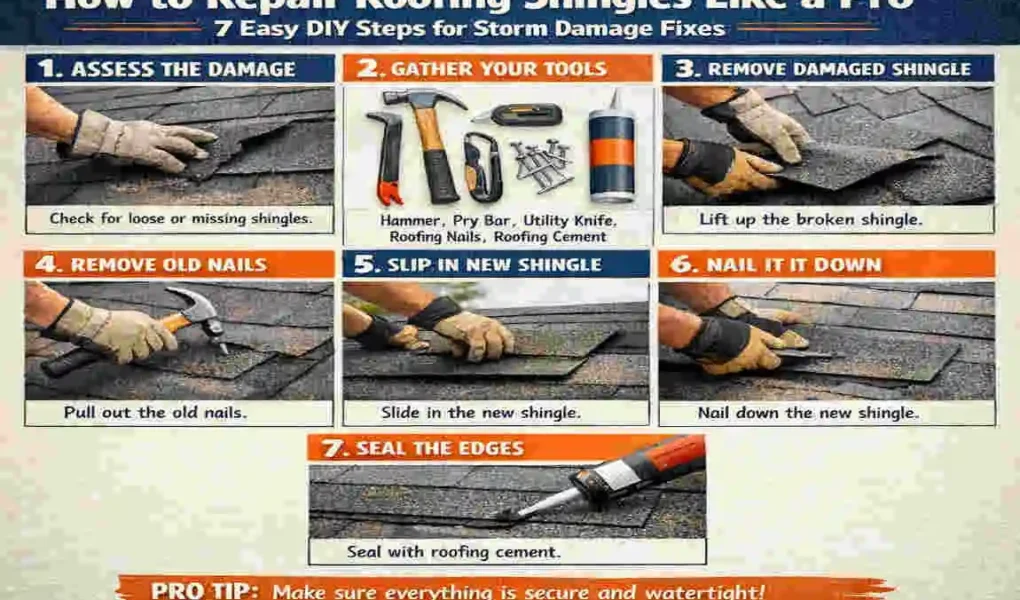
Inspect and Assess Storm Damage
The first step in fixing your roof is to assess the extent of the damage. This will help you determine whether the repair is manageable on your own or requires professional assistance.
What to look for:
- Cracks or tears: These are often caused by hail or falling debris.
- Missing granules: Check for bare spots on the shingles where protective granules have worn away.
- Lifted or curled edges: Wind can cause shingles to lift or curl, exposing the underlayment.
- Soft spots: These may indicate underlying rot or water damage.
Checklist for inspection:
- Start by scanning your roof from the ground using binoculars.
- Climb onto the roof (if safe) and examine each shingle closely.
- Use chalk to mark areas with visible damage.
- Take photos of the damage for reference or insurance purposes.
Prepare Your Work Area and Gather debris
A clean and organized work area is key to an efficient repair process. Clearing debris will also help you avoid accidental slips or falls.
Steps to prepare:
- Secure your ladder: Ensure it’s stable and positioned correctly.
- Remove loose debris: Use a broom or shop vacuum to clear granules, leaves, and dirt from the damaged area.
- Protect your surroundings: Lay tarps over plants and gutters to catch falling debris.
- Cut away damaged sections: Use a utility knife to remove any torn or loose material carefully.
Remove the Damaged Roofing Shingles
Removing damaged shingles is a delicate process that requires patience. Rushing this step can cause additional damage to neighboring shingles.
Here’s how to do it:
- Lift the tabs: Gently lift the tabs of the shingles above the damaged one. Use a roofing hammer or pry bar to loosen the nails.
- Remove nails: Slide the pry bar under the shingle and rock it back and forth to pop the nails out. If nails are stubborn, cut them with a utility knife.
- Clear old sealant: Scrape away any remaining adhesive to prepare the area for the new shingle.
Common mistake: Pulling too hard on the shingles can tear adjacent ones, increasing your workload.
Clean and Prep the Exposed Area
Before installing replacement shingles, the exposed area must be clean and free of debris. This ensures proper adhesion and a long-lasting repair.
Steps to clean and prep:
- Scrape old adhesive: Use a putty knife to remove any leftover sealant or debris.
- Inspect the underlayment: Check for tears or damage. Patch any holes with roofing tape or underlayment material.
- Apply primer (if needed): If the wood decking is exposed, coat it with a primer to protect against moisture.
Taking the time to prep the area properly will result in a more durable repair.
install Replacement Roofing Shingles
This is the most important step in the process. Installing new shingles correctly will restore your roof’s functionality and appearance.
Step-by-step guide:
- Cut the replacement shingle: Trim the new shingle to match the size of the one you removed.
- Apply roofing cement: Spread a generous layer of cement under the edges of the new shingle.
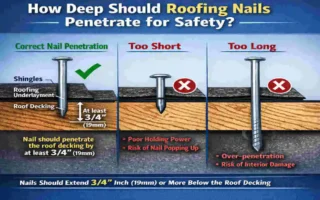
- Nail the shingle in place: Drive 4-6 nails per shingle, 1 inch from the edges. Use a chalk line to ensure straight rows.
- Press firmly: Secure the shingle by pressing it into place and sealing the nail heads with roofing cement.
Alignment trick: For 3-tab shingles, align the slots for a uniform look. For architectural shingles, match the pattern for a seamless finish.
Seal and Waterproof the Repair
Sealing the repaired area is crucial to prevent future leaks and enhance durability.
Waterproofing steps:
- Apply sealant: Use a color-matched sealant to blend the repair with the existing roof.
- Check for gaps: Inspect the area for any exposed edges or nail heads and seal them thoroughly.
- Feather the edges: Smooth the sealant edges for a clean, professional look.
Final Inspection and Roof Maintenance Tips
Once the repair is complete, it’s time for a final inspection to ensure everything is secure and properly sealed.
Final inspection checklist:
- Walk the roof carefully and tug-test the new shingles.
- Clean out gutters to prevent water buildup.
- Check flashing and chimney seals for additional damage.
Maintenance tips:
- Trim overhanging branches to prevent debris accumulation.
- Clean gutters twice a year, especially before and after the monsoon season.
- Re-seal your roof annually to maintain its waterproofing.
Common Mistakes to Avoid in Roofing Shingle Repairs
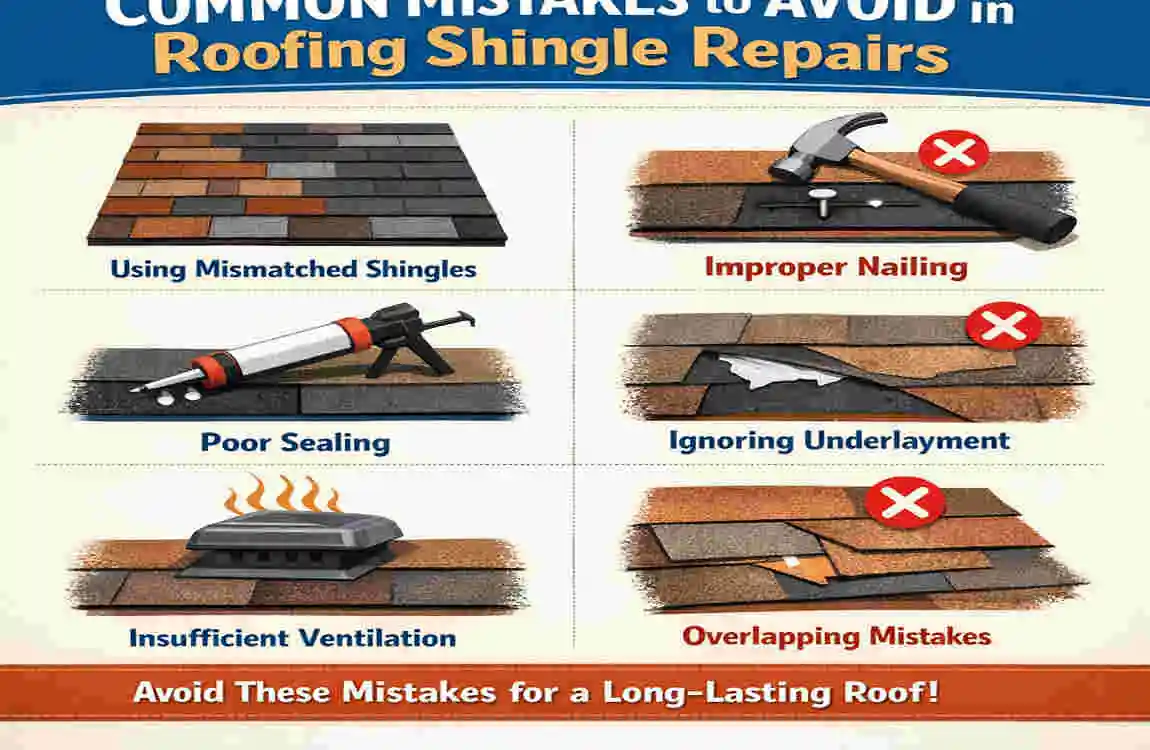
Learning from others’ mistakes can save you time and frustration. Here are some common pitfalls to avoid:
- Using the wrong nails: Non-galvanized nails rust quickly and compromise the repair.
- Skipping safety precautions: Falls are one of the leading causes of roofing injuries.
- Over-nailing shingles: This can crack the shingles and lead to leaks.
When to Call a Professional Roofer
While DIY repairs are great for small issues, some situations require professional expertise. Call a roofer if:
- Your roof has a steep pitch or is more than 2 stories high.
- The damaged area covers more than 20 shingles.
- You’re dealing with warranty-related repairs.
FAQs: How to Repair Roofing Shingles
How much does it cost to repair roofing shingles?
DIY repairs typically cost $5-15 per shingle, depending on the materials.
Can I repair roofing shingles in the rain?
No. Always wait at least 48 hours for the roof to dry completely.
How long do shingle repairs last?
With proper sealing, repairs can last 5-15 years.
What’s the best sealant for roofing shingles?
Asphalt-based roofing cement is highly recommended for durability.