Have you ever looked up at your aging asphalt roof and felt a knot in your stomach? You know it needs replacing, but the thought of tearing off thousands of pounds of old shingles is exhausting. Did you know that a high-quality metal roof can easily last 50 years or more.
Even better, you can often save 20% to 30% on your total installation costs by utilizing a simple overlay method. That means you keep your old roof right where it is and put the shiny, durable new one right on top of it.
We completely understand the pain points of a traditional roof replacement. The process usually involves a massive dumpster sitting in your driveway, thousands of nails scattered across your lawn, and endless hours of backbreaking labor. By choosing an overlay, you avoid sending all that heavy, toxic asphalt waste to your local landfill. You also drastically reduce the amount of labor time required to get the job done.
| Step | Description | Key Tips |
|---|---|---|
| Install Drip Edge | Secure drip edge along eaves and rakes to direct water into gutters. | Overlap pieces by 2 inches; fasten every 10 inches . |
| Add Underlayment | Lay synthetic underlayment or #30 felt over shingles, overlapping seams by 6 inches. | Staple securely; this prevents shingle wear on metal from thermal expansion . |
| Optional Furring Strips | Install 1×4 wood strips perpendicular to rafters over underlayment for ventilation and even surface. | Space 24 inches apart; ideal for uneven shingles but adds cost . |
| Lay Metal Panels | Start at eaves, overlap panels 1-2 inches per manufacturer specs, and work upward. | Align carefully; cut with tin snips or nibbler . |
| Secure Panels | Fasten screws into flat areas or ridges (avoid valleys), spacing 12-18 inches apart. | Use 1.5-inch corrosion-resistant screws; check alignment before full fastening . |
| Add Flashing & Trim | Install valley flashing, pipe boots, ridge cap, and gable trim; seal overlaps. | Overlap 6 inches; caulk sparingly with butyl sealant . |
The Incredible Benefits of Metal Roofing Over Shingles
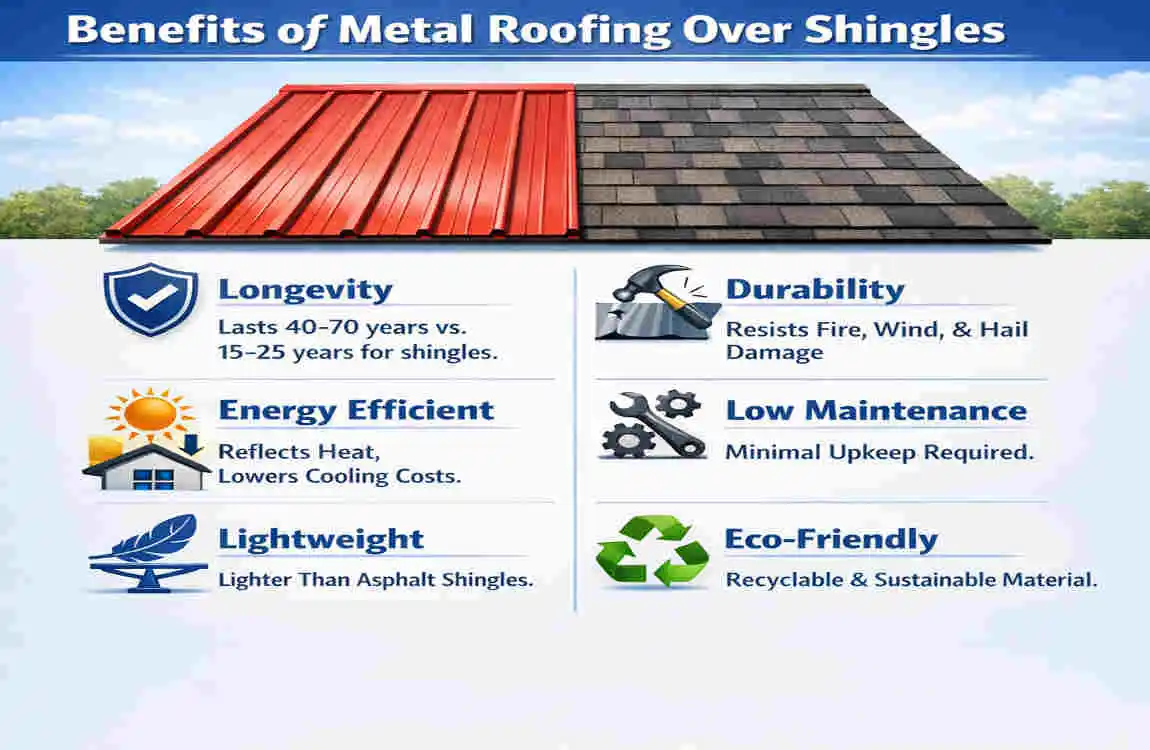
When you decide to upgrade your home with a metal roof, you are making a brilliant long-term investment. But when you choose to install that metal roof directly over your existing shingles, you unlock a whole new level of advantages. Let’s break down exactly why this method is gaining so much popularity among smart homeowners and savvy DIY enthusiasts.
Massive Cost Savings
The most immediate benefit you will notice is the money you keep in your pocket. A traditional roof replacement requires a complete tear-off. You have to pay for the grueling labor to rip up the old shingles, plus the costly fees to rent a commercial dumpster. Then, you have to pay the landfill fees to dispose of the heavy waste. By choosing an overlay, you skip the demolition fees entirely. This simple choice usually saves you between $1 and $2 per square foot. For an average-sized home, that translates to thousands of dollars saved before you even drive the first screw.
Unbeatable Durability and Energy Efficiency
Metal roofs are incredibly tough. They effortlessly resist damage from severe hail storms, heavy snowfall, and high winds that would easily rip asphalt shingles right off your roof deck. Furthermore, metal is highly fire-resistant, providing an extra layer of safety for your family.
Beyond sheer strength, metal roofs are masters of energy efficiency. Instead of absorbing the summer sun’s blistering heat like dark asphalt does, a metal surface reflects those solar rays away from your attic. This simple reflection can lead to savings of 10% to 20% on your monthly cooling bills.
A Big Win for the Environment (Eco-Friendly)
We all want to do our part for the planet, and roof overlays are a surprisingly effective way to help out. Did you know that the average asphalt roof replacement generates up to 10 to 20 tons of toxic, non-biodegradable waste? By leaving your old shingles in place, you are directly diverting tons of garbage from local landfills. It is one of the most eco-friendly home improvement projects you can take on.
Lightning-Fast Installation Speed
Time is money, and your weekends are valuable. A traditional roof tear-off and replacement can drag on for weeks, leaving your home vulnerable to sudden rainstorms. In contrast, the overlay method is remarkably fast. A dedicated DIY team can often complete a metal roof over shingles project in just 2 to 4 days. You get a brand-new roof in a fraction of the time.
To help you visualize the differences, take a look at this quick comparison table:
BenefitTraditional Shingles OnlyMetal Roof Over Shingles
Lifespan 15 to 25 years max 40 to 70+ years
Install Cost $5 to $7 per square foot $4 to $6 per square foot
Energy Efficiency Standard (Absorbs heat) 20% better heat reflection
Maintenance High (Missing shingles, moss) Low ( Occasional washing)
Quick Pros and Cons List
To keep things balanced, let’s look at a quick list of the pros and cons of this specific installation method.
The Pros:
- Saves significant time and labor effort.
- Keeps debris out of your yard and out of landfills.
- Adds an extra layer of insulation over your home.
- Creates a sleek, modern aesthetic.
The Cons:
- Adds extra weight to your home’s framing.
- Requires careful attention to ventilation to prevent moisture from becoming trapped. If you don’t properly vent the space between the old shingles and the new metal, you risk trapping condensation that can rot your roof deck.
Your Essential Tools and Materials Checklist
You cannot build a sturdy house on a weak foundation, and you certainly cannot install a beautiful metal roof without the right equipment. Before you ever climb a ladder, you need to gather your supplies. This is your essential checklist for a successful “DIY metal roofing over shingles” project.
Non-Negotiable Safety Gear
Your safety is the absolute highest priority. Never compromise on these items:
- Roofing Harness and Safety Rope: A sudden slip can be disastrous. Always tie off to a secure anchor point.
- Heavy-Duty Work Gloves: Metal panel edges are razor-sharp. Protect your hands at all times.
- Sturdy Extension Ladder: Make sure it is tall enough to extend at least three feet above your roof’s edge for safe mounting and dismounting.
- Slip-Resistant Footwear: Soft-soled shoes with excellent grip are a must for walking on steep, slippery surfaces.
The Required Tools
Grab your toolbox and make sure you have these reliable items ready to go:
- Circular Saw: Equipped with a specialized metal-cutting blade to smoothly slice through thick steel panels.
- Cordless Impact Drill: You will be driving thousands of screws. Have extra batteries fully charged and ready.
- Tin Snips and Metal Nibblers: Perfect for making small, detailed cuts around pipes, vents, and tricky corners.
- Chalk Line and Measuring Tape: Precision is everything. You need these to keep your rows perfectly straight.
The Core Materials
Here is what actually goes onto your roof:
- Metal Roofing Panels: Choose high-quality steel or aluminum. For residential homes, a 29-gauge or slightly thicker 26-gauge panel is ideal.
- Furring Strips (1×4 Wooden Boards): These are the backbone of your project. They create the crucial gap between your old shingles and the new metal.
- Synthetic Underlayment: A tough, waterproof fabric that adds an extra layer of protection.
- Roofing Screws: You absolutely must use special metal roofing screws (usually 1.5 inches long) that feature neoprene rubber washers. These washers compress to create a watertight seal.
- Custom Flashing: You need metal trim pieces for the edges, ridges, and valleys of your roof.
Cost Estimate: If you handle the labor yourself, expect to spend roughly $8 to $12 per square foot for all the materials combined.
Pro Tip: Always buy 10% more metal panels than your exact measurements dictate. You will inevitably make a bad cut or need extra material for overlapping sections. Having spare panels saves you a frustrating trip back to the supply store!
Crucial Preparation Steps Before You Begin
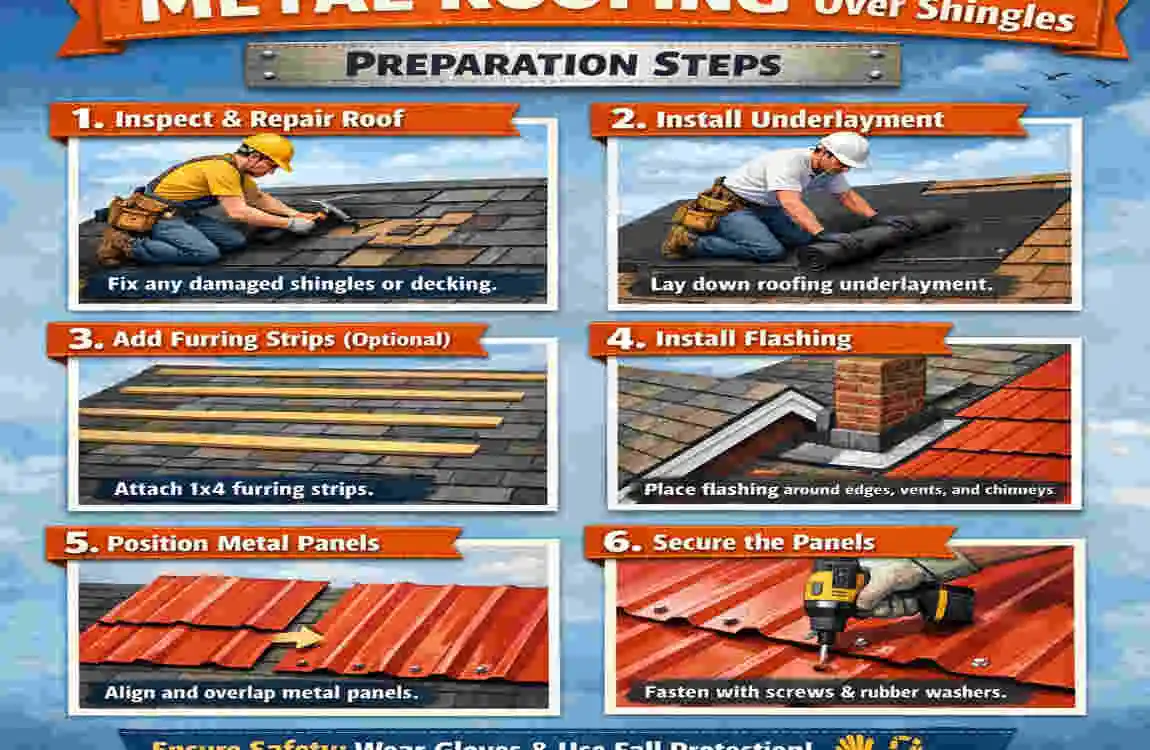
Preparation is the secret ingredient to a flawless roofing project. If you skip these preliminary steps, you will run into major headaches later. Let’s break down exactly how you need to prep your house and your team.
Conduct a Thorough Roof Inspection
Before you order a single piece of metal, you need to know exactly what lies beneath your current shingles. Grab your ladder and carefully inspect your entire roof. You are looking for signs of a failing roof deck.
Walk gently across the surface. Do any spots feel spongy, soft, or bouncy under your feet? If so, you have rotting wood underneath that must be replaced before you proceed. Furthermore, check how many layers of shingles are currently on your roof. The golden rule is that you can only install a metal overlay if there is no more than one existing shingle layer. If you already have two layers of asphalt up there, you cannot add metal on top; the weight will be too much for your trusses to bear.
Perform a Strict Code Check
Never assume that what works in one town works in yours. You must verify your local building codes. Head down to your local permit office or check their website. Some municipalities have strict rules prohibiting double layers of roofing materials, regardless of weight. Getting a permit now saves you from heavy fines—or having to rip the new roof off—later on.
Precise Measurements and Ordering
Measuring a roof isn’t just about finding the square footage of your floor plan; you have to account for the pitch (the steepness) of the roof. Measure every single rectangular plane of your roof. Multiply the length by the width for each section, then add them all together.
Roofers use a term called a “square,” which equals exactly 100 square feet. Divide your total square footage by 100 to determine how many square feet of metal panels you need to order. Double-check your numbers before hitting the purchase button!
Safety and Weather Preparation
Roofing is a team sport. Never attempt to haul 12-foot metal sheets up a ladder by yourself. Gather a reliable crew of friends or family members to assist you. Ensure your ladder is tied off securely at the top and resting on level, solid ground at the bottom.
Finally, become obsessed with the local weather forecast. You need a stretch of dry, calm days to complete this project. High winds turn metal panels into dangerous sails, and rain makes the roof deck incredibly slick. Wait for the perfect window of clear weather.
Step-by-Step Installation Guide
This is the core of our “how to install metal roofing over shingles” tutorial. Follow these numbered steps meticulously to ensure a watertight, beautiful finish.
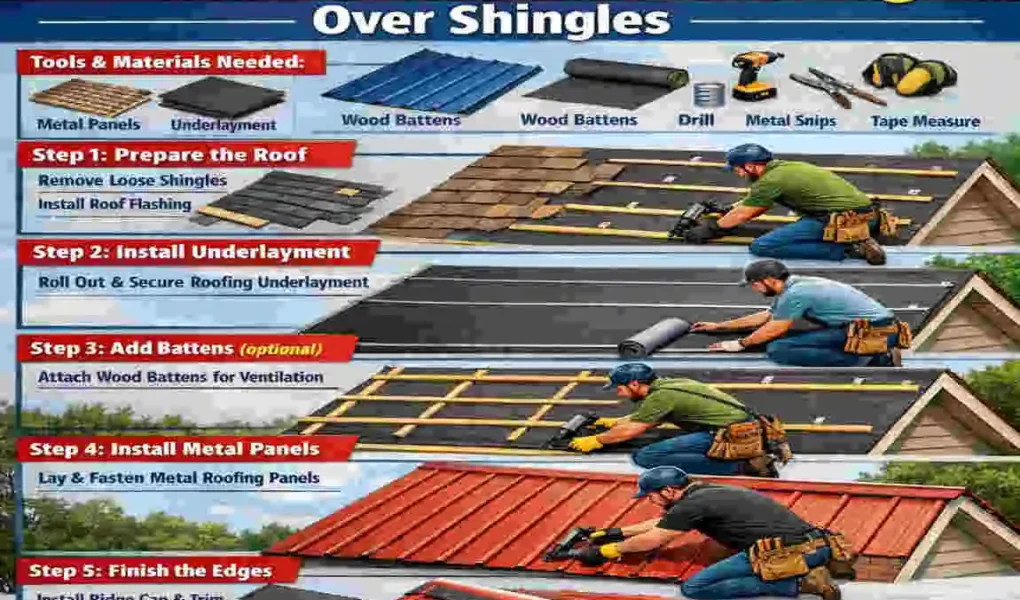
Clean and Repair the Existing Roof
You wouldn’t paint over a wall covered in dirt, so don’t put a new roof over a messy one. Start by thoroughly sweeping the existing shingles to remove all loose dirt, pine needles, leaves, and twigs.
Next, you need to create a relatively flat surface. Remove any bulky ridge caps running along the peak of your roof. If you spot any shingles that are severely curled, buckled, or completely missing, take the time to replace them or nail them down flat. You want your starting canvas to be as smooth and uniform as possible.
Install the Protective Underlayment
Even though you are leaving the old shingles in place, adding a fresh layer of underlayment is an excellent insurance policy against hidden leaks. Roll out a high-quality, synthetic ice-and-water shield directly over the old shingles.
Start at the bottom edge (the eave) of the roof and roll it horizontally across the roof. Work your way up toward the peak, making sure each new row overlaps the previous one by at least 4 to 6 inches. This overlapping method ensures that if water ever does get under the metal, it flows smoothly down the synthetic barrier and off the roof, rather than seeping into the wood. Secure the underlayment tightly with cap nails.
Add the Essential Furring Strips
This step is arguably the most critical part of the entire project. You cannot simply screw metal panels directly flat against the old asphalt shingles. The coarse grit of the shingles will eventually scratch the protective coating off the underside of the metal, leading to rust. Plus, trapped heat will bake the asphalt and cause rot.
To solve this, we use a furring strips installation method. Furring strips are simply 1×4 wooden boards.
- Locate the Rafters: Use a stud finder or look for the existing nail lines to find the solid wooden rafters beneath your roof deck.
- Run the Strips Horizontally: Lay your 1×4 furring strips horizontally across the roof.
- Space Them Out: Space the strips precisely 24 inches apart on center.
- Screw Them Down Securely: Drive long, heavy-duty screws through the furring strips, completely through the old shingles and decking, and deeply into the solid rafters below.
By adding these strips, you create a magical 1- to 2-inch ventilation gap between the old roof and the new one. This continuous airflow prevents the old asphalt from melting in the summer. It stops moisture condensation from rotting the wood in the winter.
Install Drip Edge and Custom Flashing
Before the main panels go on, you must protect the vulnerable edges of your roof. Start by installing your metal drip edge along the bottom eaves. The drip edge directs rainwater directly into your gutters rather than allowing it to curl back under the wood.
Next, tackle the valleys (where two roof slopes meet inward). Lay down your pre-formed metal valley flashing. Anywhere the metal meets a chimney, a vent pipe, or a wall, you must install specialized flashing. Apply generous beads of high-quality butyl tape beneath all flashing edges to create an impenetrable, waterproof seal.
Lay the Metal Panels
It is finally time for the main event! Handling metal panels requires patience and a steady hand.
- Start at the Bottom Corner: Begin at the bottom eave on the side of your roof furthest from the prevailing winds. This ensures the wind blows over the overlapping seams, rather than catching under them.
- Create an Overhang: Let the bottom edge of the metal panel overhang the eaves by about 1 inch. This helps water clear the house entirely.
- Ensure a Perfect Overlap: As you place the second panel next to the first, overlap the edges. Depending on the specific panel profile, you will overlap them by 6 to 12 inches. Check your manufacturer’s instructions for the exact overlap requirement.
- Drive the Screws Correctly: Grab your cordless drill and your special screws with the neoprene rubber washers. Drive the screws into the metal panels at the precise points where they intersect with your wooden furring strips. Crucial Rule: Do not over-tighten! If the rubber washer squishes out flat like a pancake, it is too tight and will deteriorate quickly. If you can spin the washer with your fingers, it is too loose and will leak. You want a firm, snug fit.
- Cut Carefully for Hips and Valleys: When you reach the edges, cut the panels at an angle. Use an electric metal nibbler for clean, cool cuts. Abrasive saw blades generate excessive heat, which can melt the protective galvanized coating off the steel, leading to premature rust.
Install Ridge Caps and Foam Closures
You are almost at the finish line. The top peak of your roof where the two sides meet needs to be sealed.
Before you screw down the final metal ridge cap piece, insert specialized foam closure strips along the top edge of your metal panels. These foam strips are cut to perfectly match the wavy profile of your metal roof. They act as a barrier, preventing wind-blown rain, snow, and small nesting birds from sneaking under the ridge cap.
Once the foam closures are snugly in place, place your metal ridge cap over the peak and screw it securely into the top row of furring strips. Seal any exposed screw heads or joints with roofing-grade silicone sealant.
Common Errors to Avoid (And How to Fix Them)
Even the best DIYers make mistakes. Keep an eye out for these common blunders:
The Common MistakeThe Immediate Fix
No ventilation gap (Panels screwed directly flat against shingles) Add furring strips. You must create that 1-inch air gap to prevent intense heat buildup and moisture rot.
Using the wrong type of screws Use rubber-washer type screws. Standard deck screws will leak instantly. You need neoprene washers to seal the holes.
Crooked starter rows Snap a chalk line. Always use a level and a chalk line before setting your first panel to ensure the entire roof is perfectly square.
Vital Safety Tips and Common Mistakes
Let’s pause and talk seriously about safety and technique. Putting a metal roof over shingles is deeply rewarding, but it is not without its hazards.
Fall Protection is Mandatory: We cannot stress this enough. A steep, dusty roof is incredibly slippery. Once the metal panels are down, the surface becomes as slick as ice, especially if there is even a hint of morning dew. You must invest in a proper roofing harness kit. Secure the anchor bracket deeply into the structural rafters, put on the harness, and stay clipped in 100% of the time.
Avoid Direct Shingle Attachment: We mentioned this earlier, but it is the number one mistake DIYers make. Do not be tempted to save time by screwing the metal right into the old asphalt. Without the furring strips, your roof will suffer from trapped condensation, and the granules on the old shingles will act like sandpaper against the back of your new metal roof.
Respect Heat Expansion: Metals expand when heated and contract when cooled. If you install your roof tightly on a freezing winter morning, those panels are going to expand and buckle when the blazing summer sun hits them. Allow your panels to sit in the shade and acclimate to the ambient outdoor temperature before you lock them down with screws.
Detailed Cost Breakdown and Expected ROI
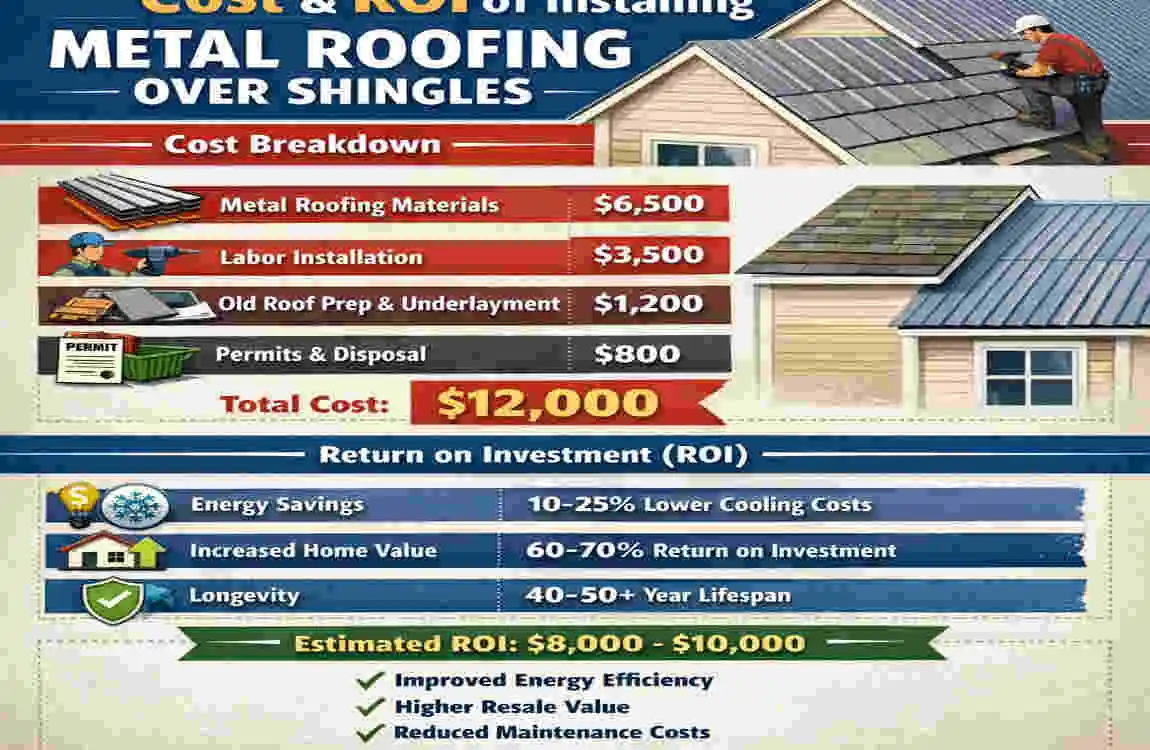
Let’s talk dollars and cents. How much should you expect to spend, and what do you get back in return?
If you hire a professional contractor for a standard tear-off and new metal roof installation, you could easily spend between $15,000 and $30,000 depending on your location. However, by embracing the DIY overlay method, you slash those numbers drastically.
For a typical 2,000-square-foot home, completing this project yourself will generally cost between $10,000 and $20,000 in total material costs. You are saving thousands by acting as your own labor force and skipping the dumpster fees.
The Return on Investment (ROI) is staggering. Homebuyers highly covet metal roofs. When you eventually decide to sell your home, you can typically recoup between 60% to 70% of the project’s cost added directly to your home’s resale value.
Additionally, because metal is highly rated for fire and hail damage, you should immediately call your homeowner’s insurance provider once the project is complete. Many insurance companies offer substantial annual premium discounts (sometimes up to 20%) simply because a steel shell now protects your home.
Frequently Asked Questions (FAQs)
You likely still have a few burning questions. Here are the answers to the most common inquiries we hear from homeowners.
Can I realistically do this DIY? Absolutely, yes. However, it requires a moderate to high level of DIY experience. You need to be comfortable working on steep ladders, handling heavy power tools, and performing precise measurements. If you have tackled a backyard deck or a large shed build, you likely have the skills required for a simple, gable-style roof.
Are there major weight limit concerns? This is an important question. Metal panels are actually quite lightweight, typically adding only 1 to 2 pounds per square foot to your roof structure. Most modern roof trusses can easily handle this minor additional load. However, if your roof is already sagging, or if you live in an area with massive winter snow loads, consult a structural engineer first to ensure your framing can support the combined weight of the old shingles, the new wood strips, the metal, and heavy snow.
Can I install metal over multiple layers of old shingles? Rarely, if ever. The industry standard and most local building codes explicitly state that you can only overlay metal if there is a maximum of one single layer of existing asphalt shingles. If you already have two or more layers up there, the total weight is too immense. In that scenario, you have no choice but to bite the bullet, tear it all off down to the bare wood deck, and start fresh.