Imagine pulling into your driveway after a long day. You look up at your home, ready to relax, but your eyes go straight to that one spot on the front wall. You know the one—the brick that is cracked, crumbling, or maybe completely missing a corner. It is like a missing tooth in a perfect smile. It drives you crazy, doesn’t it?
If you have been staring at that eyesore and wondering if you can fix it yourself, the answer is a resounding yes. You do not need to be a master mason to restore your home’s beauty. Learning how to replace bricks on the front of the house is a manageable DIY project that can save you thousands of rupees while significantly boosting your home’s curb appeal.
When and Why Replace Bricks on Your House Front?

Before you grab a hammer, you need to play detective. Not every crack means a brick needs to be replaced. Sometimes, a simple repair is enough. But how do you know the difference?
Signs You Need a Replacement
Go outside and inspect your front wall closely. Here is what you are looking for:
- Spalling: This is when the face of the brick peels or pops off, leaving a rough, inner surface exposed. This is common after freeze-thaw cycles or heavy monsoons.
- Deep Cracks: If a crack goes all the way through the brick, it is compromised.
- Crumbling: If the brick turns to dust when you poke it with a screwdriver, it has lost its structural integrity.
- Loose Bricks: If you can wiggle the brick with your hand, the mortar has failed, and the brick might need resetting or replacing.
The Causes of Damage
Why is this happening? In Pakistan, specifically in the Punjab region, we deal with shifting soil and seismic activity. Small tremors can crack rigid masonry. Additionally, water infiltration is the biggest enemy. If your gutters are leaking onto the brickwork, that water gets absorbed, expands, and breaks the brick from the inside out.
Repair vs Replacement: The ROI
You have two main options: Tuckpointing (fixing the mortar) or Brick Replacement (removing the whole unit).
If the brick itself is solid but the white lines between them are cracking, you need tuckpointing. But if the red clay unit is damaged, you must learn how to replace the brick on the front of the house entirely. Doing this prevents water from rotting the wood framing behind the wall.
Table: Cost and Effort Comparison
IssueEstimated Cost (PKR/sqft)DIY Time EstimateDifficulty Level
Mortar Repoint Rs. 50 – 100 1 Day Beginner
Brick Replacement Rs. 200 – 400 2 – 4 Days Intermediate
Complete Rebuild Rs. 1000+ 2 Weeks+ Pro Only
Tools and Materials: What You Need to Replace Brick on Front of House
You cannot do a professional job with amateur tools. However, you don’t need to buy out the whole hardware store. Most of these tools are likely already in your garage, or you can pick them up cheaply at places like Hafeez Centre’s tool markets or hardware stores on Ferozepur Road.
Essential Tools List
To successfully learn how to replace a brick on the front of the house, gather these items:
- Angle Grinder: Equipped with a diamond masonry blade. This is your MVP for cutting out old mortar.
- Cold Chisel and Club Hammer: For manually chipping out the stubborn bits.
- Trowel: A “pointing trowel” (the small, narrow one) is best for this detail work.
- Jointing Tool: To smooth the mortar joints to match the existing style.
- Safety Gear: This is non-negotiable—safety goggles, heavy-duty gloves, and an N95 dust mask. Brick dust contains silica, which is very bad for your lungs.
- Wire Brush: For cleaning the cavity.
- Spray Bottle or Hose: For wetting the area.
Sourcing Materials in Lahore and Pakistan
Finding the right materials is half the battle.
- Matching Bricks: This is the hardest part. New bricks look… new. You want “A-grade” red clay bricks. Visit local kilns (Bhattas) near Raiwind or Burki Road. Bring a piece of your old, broken brick to match the colour and size. If your house is older, look for “reclaimed bricks” at demolition yards.
- Mortar Mix: Do not use pure cement! It is too hard and will crack the bricks. You need a mix of sand and cement, usually in a 1:4 ratio, or buy a pre-mixed bag of “Type N” mortar.
- Bonding Agent: A milky liquid you add to the mix to help the new mortar stick to the old dusty hole.
Budget Estimation: For a standard facade repair involving about 20-30 bricks, expect to spend between Rs. 20,000 and Rs. 50,000 on materials and tool rentals. This is a fraction of what a contractor would charge.
Safety First: Prepping to Replace Brick on Front of House
Masonry work is messy and physically demanding. Before you start swinging that hammer, take a moment to prep your site.
Check the Weather
In Lahore, timing is everything. Do not attempt this during a rainy week in July (Monsoon season) or the freezing fog of January. The mortar needs mild weather to cure properly. Ideally, pick a dry spring or autumn weekend.
Protect Your Surroundings
Brick removal creates a massive cloud of red dust.
- Close all windows and doors.
- Cover your landscaping, flower beds, and porch furniture with tarps.
- If you are working near a driveway, move your car. That dust is abrasive and scratches paint.
Personal Protective Equipment (PPE)
When you use an angle grinder on brick, chips fly at the speed of a bullet. Always wear your goggles. The noise is deafening, so earplugs are a smart idea. And remember, that dust mask isn’t just for comfort; it protects your long-term health.
Step-by-Step DIY Guide: How to Replace Brick on Front of House
This is the core of our guide. Follow these steps carefully to master replacing a brick on the front of the house. Take your time—rushing leads to messy work.
Assess and Mark the Damage
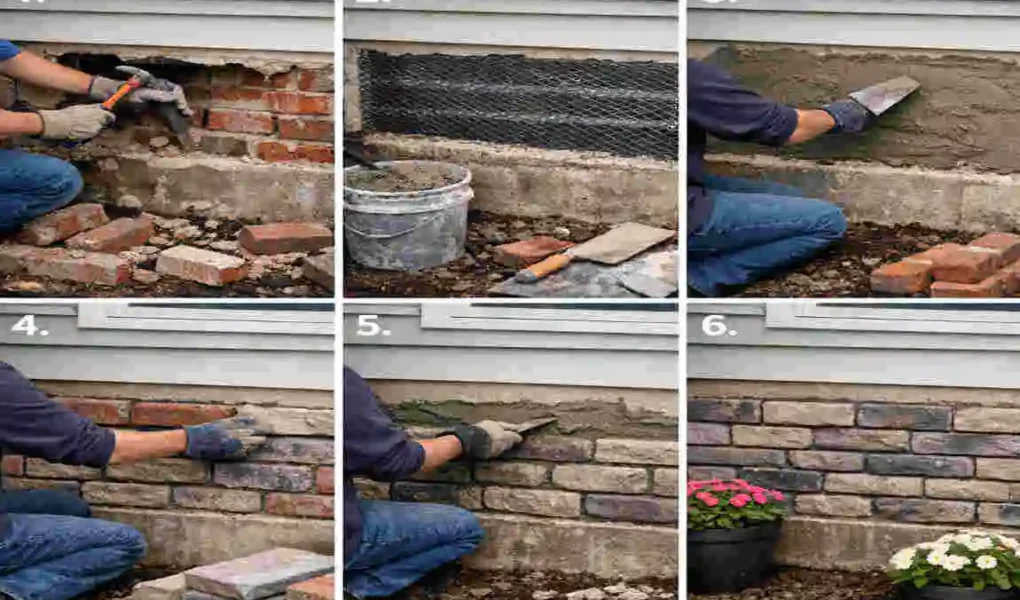
Start by using a piece of chalk to mark every brick that needs replacing. Tap them lightly with your hammer. If they sound hollow, the bond is broken. Marking them helps you plan your work and ensures you don’t accidentally cut into a good brick.
Remove the Old Brick
This is the destructive part.
- Grinding: Take your angle grinder with the diamond blade. Cut into the mortar joints surrounding the bad brick. Go as deep as you can safely without hitting the bricks you want to keep.
- Chiselling: Once the joints are cut, switch to your hammer and cold chisel. Place the chisel in the cut and strike it firmly. Break the bad brick into pieces. It is easier to remove it in chunks than as a whole block.
- Clean Up: Chisel away all the old mortar from the hole. You want a clean, square box of space.
Clean the Cavity
Use a wire brush to scrub the inside of the hole. Remove all loose dust and debris. Then, use a hose or a spray bottle to flush it out with water.
Prep the New Bricks
Here is a secret that pros use: Soak your new bricks. Dry clay bricks act like sponges. If you put dry brick into wet mortar, the brick will suck all the moisture out of the mortar instantly. This makes the mortar weak and crumbly. Place your new bricks in a bucket of water for about 30 minutes before you install them. Let them surface dry (so they are damp, not dripping) before using.
Mix the Mortar
Mix your sand and cement (or pre-mix bag) with water in a bucket.
- Consistency: You are looking for the consistency of peanut butter or thick frosting. It should stick to your trowel when turned upside down, but still be spreadable.
- Colour Check: If your luxury house uses coloured mortar, mix a small batch and let it dry to check the colour match before committing to the whole wall.
install the New Brick
Now for the artistry.
- Butter the Hole: Apply a layer of mortar to the bottom and sides of the empty cavity in the wall.
- Butter the Brick: Apply mortar to the top and ends of your new brick, which is damp.
- Insert: Slide the brick into the hole. You might need to wiggle it or tap it gently with the handle of your trowel to get it flush with the surrounding wall.
- Level: Use a small spirit level or a string line to make sure the brick is perfectly aligned with its neighbours.
Point the Joints
Once the brick is in, the mortar will squish out of the sides. Let it sit for about 20-30 minutes until it is “thumbprint hard” (you can press it, but it doesn’t smear). Use your jointing tool to scrape away the excess and shape the joint to match the rest of the wall. Most houses in Pakistan use a concave joint (curved inward), which sheds water best.
Cure and Clean
Use a damp sponge to wipe away any mortar smears from the brick’s face. Do this now; if it dries, it is a nightmare to remove. Curing: Keep the wall misted with water for the next 48 hours. This slows down the drying process and makes the mortar stronger.
Common Mistakes to Avoid When Replacing Front House Bricks
Even with the best intentions, things can go wrong. Here are the pitfalls to avoid when learning how to replace the brick on the front of the house.
- Using the Wrong Mortar: Never use pure Portland cement. It is too hard. When the house settles (and all houses settle), the hard cement won’t flex—it will crack the bricks. Always use a sand-lime-cement mix.
- Poor Colour Matching: Nothing looks worse than a “patchwork quilt” house. If you cannot find an exact colour match, consider staining the bricks later or mixing brick dust into your mortar to blend it in.
- Skipping the Wetting Step: We mentioned this before, but it bears repeating. Dry bricks = weak walls. Especially in Lahore’s dry heat, soaking your bricks is mandatory.
- Working in Direct Sunlight: If the sun is blazing on the wall, the mortar will “flash set” (dry too fast) and crumble. Work in the early morning or evening, or set up a shade tarp.
Cost Breakdown: DIY vs Pro Brick Replacement in Pakistan
Is it worth the sweat? Let’s look at the numbers.
Option 1: The DIY Route
- Materials: Rs. 5,000 – 10,000
- Tools: Rs. 15,000 (assuming you buy a grinder and safety gear)
- Labour: Free (just your weekend)
- Total: Rs. 20,000 – 25,000
Option 2: Hiring a Professional Mason
- Labour & Materials: Contractors typically charge per square foot plus a daily rate for specialised labour.
- Standard Job: For a similar scope of work (50 sqft area), quotes can range from Rs. 60,000 to Rs. 1,00,000.
The Verdict: By doing it yourself, you can save roughly 50% to 70% of the cost. That is money you can reinvest into landscaping or new outdoor lighting.
Enhancing Curb Appeal: Post-Replacement Tips for Your House Front
Once you have successfully learned how to replace a brick on the front of the house and finished the job, take a step back. The repair should be invisible. But why stop there? Now that the structure is sound, boost the curb appeal even further.
Pressure Wash the Facade After the new mortar has cured for 30 days, give the whole wall a gentle pressure wash. This removes years of dirt and pollution, making the old bricks look as bright as the new ones.
Seal the Brick Apply a silane-siloxane sealer. This is a clear liquid that soaks into the brick, making it waterproof without altering its appearance. It protects your hard work from future rain damage.
Upgrade Lighting: New sconces or uplights can highlight the texture of your restored brick wall at night, making your home look luxurious.
Real Lahore Homeowner Stories: Brick Replacement Wins

Take Mr Bilal from DHA Phase 5, for example. He was trying to sell his house, but buyers kept pointing out the spalling bricks near the entrance. They worried about structural issues. Instead of lowering his asking price by Lakhs, Bilal spent a weekend following this guide. He spent about Rs. 25,000 on materials and fixed the 15 damaged bricks himself. The result? The house looked well-maintained. He sold the property two weeks later for his full asking price. The small effort yielded a massive return on investment.
When to Call a Pro for Brick Replacement
While we champion DIY, know your limits. You should call a professional if:
- The Damage is Extensive: If entire sections of the wall are bowing or bulging.
- Lintels are Failing: If the bricks above a window or door are sagging (the metal support beam might be rusted).
- It is Structural: If the cracks are stair-stepping through the wall from the home foundation to the roof, this could be a foundation issue, not just a brick issue.
FAQs: How to Replace Brick on Front of House Answered
Here are answers to the most common questions homeowners ask about this project.
1. How to replace a brick on the front of the house DIY style? The basic process is: Grind out the old mortar, chisel out the damaged brick, clean the hole, wet the new brick, apply fresh mortar, insert the brick, and tool the joints to match.
2. What is the cost to replace bricks on the house front in Pakistan? For a DIY project, expect to spend between Rs. 20,000 and Rs. 40,000 for materials and tools. If hiring a professional, the cost can range from Rs. 60,000 to Rs. 1,00,000, depending on the area size.
3. What tools are needed to replace front house bricks? You need an angle grinder with a diamond blade, a cold chisel, a club hammer, a pointing trowel, a jointing tool, a wire brush, and safety gear (gloves, goggles, mask).
4. How long does brick replacement take? For a beginner replacing 10-20 bricks, plan for a full weekend (2 days)—one day for removal and prep, and the second day for installation and cleanup.
5. What is the best mortar for exterior brick in Lahore? Use a Type N mortar mix. It has a medium strength that allows for flexibility during thermal expansion (hot/cold cycles), which prevents cracks. Avoid high-strength concrete.
6. Can I replace just a few bricks? Yes! This is called “spot replacement.” It is the most common repair and is much cheaper than re-facing the entire wall.
7. How do I match the brick colour for my house front? Take a piece of the broken brick to a local kiln (Bhatta) or a building material supplier. If you can’t find an exact match, choose a slightly lighter brick and stain it later, or use reclaimed bricks from demolition sites for an aged look.