A strong kitchen counter frame is the base of a kitchen that works well every day. If the frame is solid, your countertop stays level, your storage feels stable, and the whole space becomes easier to use. That is why learning how to build a kitchen counter frame is such a useful DIY skill.
| DIY Stage | Key Action | Pro Tip | |
|---|---|---|---|
| Planning | Measure kitchen space accurately | Always double-check dimensions before cutting | |
| Material Selection | Choose wood or metal frame materials | Use strong, moisture-resistant materials | |
| Cutting | Cut beams according to design | Use a power saw for clean and precise cuts | |
| Frame Assembly | Build rectangular base structure | Keep corners perfectly square | |
| Support Installation | Add vertical and horizontal supports | Maintain equal spacing for strength | |
| Wall/Floor Fixing | Secure frame to surface | Use heavy-duty anchors for stability | |
| Countertop Base | Install plywood or MDF sheet | Ensure a smooth and level surface | |
| Final Check | Inspect alignment and strength | Use a spirit level for accuracy |
More homeowners are choosing DIY projects because they want more control over cost, size, and style. When you build the frame yourself, you can shape it around your kitchen rather than adjusting your kitchen to a fixed store-bought setup.
Understanding Kitchen Counter Frames
A kitchen counter frame is the support structure that holds your countertop in place. Think of it as the hidden backbone of the kitchen counter. It must carry weight, stay level, and remain strong through daily use.
Why the Frame Matters
The frame does more than support the surface. It helps keep the counter steady when you place dishes, appliances, or heavy cookware on it. A weak frame can lead to sagging, movement, or damage over time.
Common Materials
Most DIY builders use wood or metal for the frame.
- Wood is easy to cut, measure, and fasten
- Metal framing can offer strong support in modern layouts
Base cabinets and counter frames are not the same thing. Base cabinets are built for storage, while the frame supports the work surface. A good frame gives the countertop the strength it needs for daily kitchen use.
Tools and Materials Required
Before you begin, gather everything you need. Having your tools ready makes the work go more smoothly and helps you avoid mistakes.
Essential Tools
You will usually need:
- Measuring tape
- Power drill
- Saw, such as a circular saw or mitre saw
- Level tool
- Screwdriver set
Materials You May Need
For a typical DIY frame, use:
- 2×4 wooden beams or metal studs
- Screws and brackets
- Wood glue
- Plywood or MDF board for countertop support
Safety Gear
Do not skip protection.
- Gloves
- Goggles
Choosing Good Materials
Pick straight wood without cracks or warping. If you use metal, make sure it is sturdy and free from rust. Strong materials give you a frame that lasts longer and supports more weight.
Planning Your Kitchen Counter Frame Design
Good planning makes the whole project easier. In fact, building a kitchen counter frame begins with proper planning because measurement mistakes can cause problems later.
Measure the Space Carefully
Start by measuring the wall area where the counter will sit. Check the length, depth, and height of the space. Also look at the floor, because an uneven floor can affect the final fit.
Think About Kitchen Layout
Before cutting anything, decide where the sink, appliances, and outlets will go. This helps you avoid blockages and wasted space. If your kitchen is small, choose a layout that gives you more room to move and work.
Avoid Common Planning Mistakes
Do not guess measurements. Do not forget plumbing or electrical lines. And do not build the frame until you check whether the floor is level. Small planning steps can save a lot of stress later.
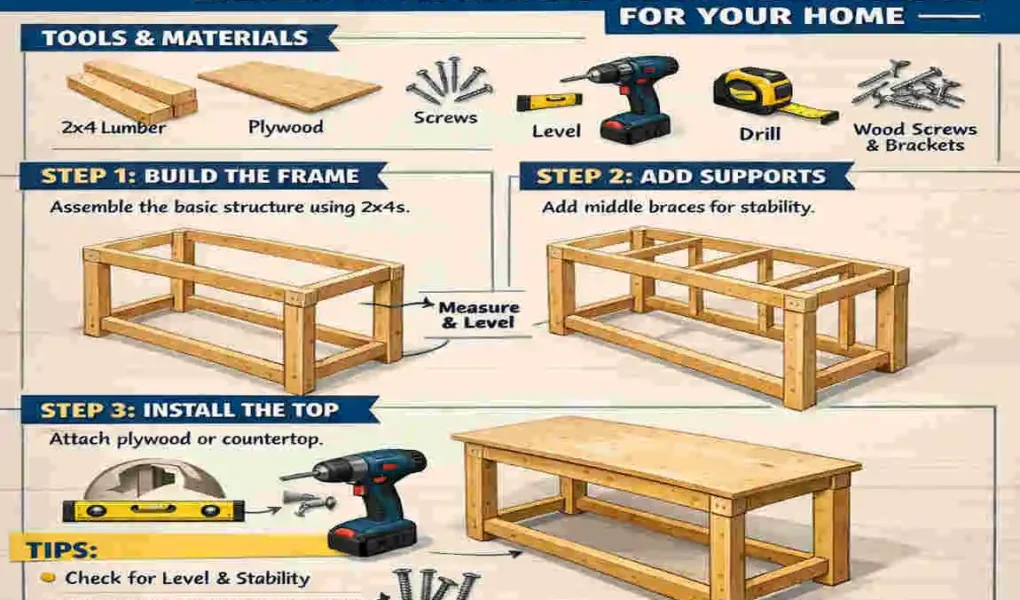
Step-by-Step Guide: How to Build a Kitchen Counter Frame
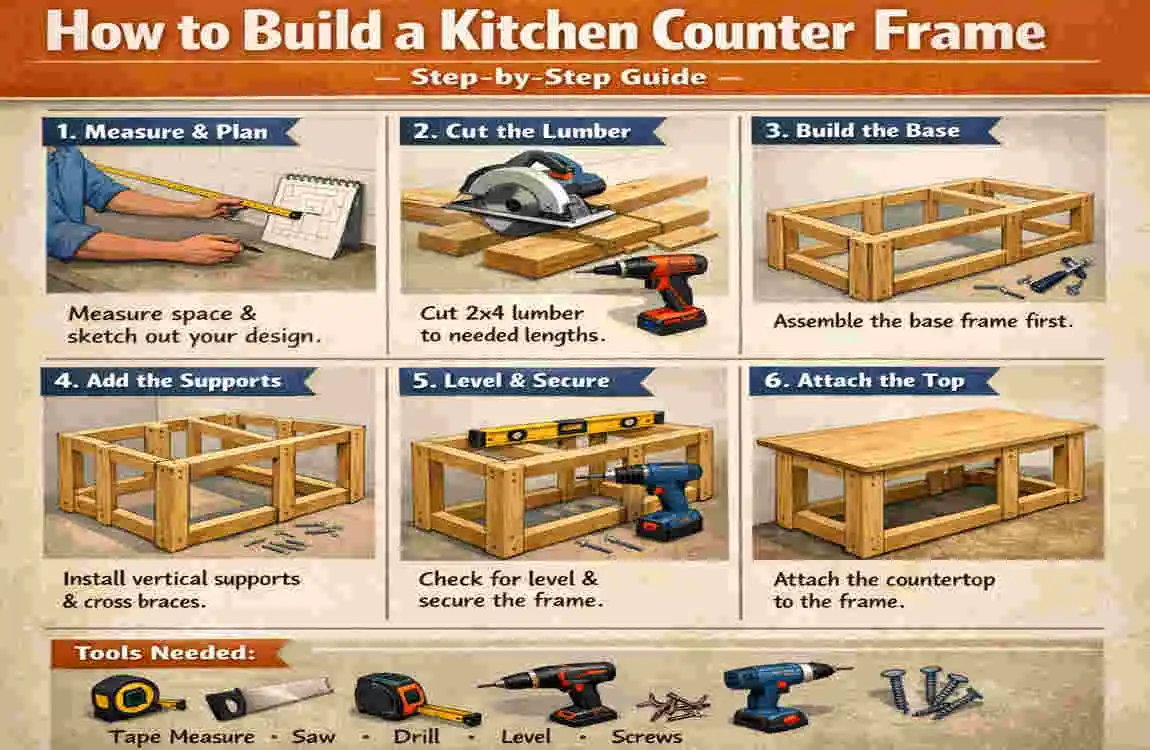
Measure and Mark the Area
First, measure the wall and mark where the frame will go. Use a pencil so you can adjust if needed. Check the floor level in several places. If the floor slopes, you may need to make small adjustments during installation.
Cut the Frame Materials
Cut your wood or metal pieces according to your measurements. Work slowly and double-check each cut. Accurate cutting helps the pieces fit together properly and makes the frame stronger.
Build the Base Structure
Next, assemble the main rectangular frame. Connect the pieces with screws and brackets to keep the structure firm. Use glue if you are working with wood and want extra grip.
Install Vertical Supports
Add vertical supports inside the frame where needed. These supports help carry the weight of the countertop. Place them evenly so the frame can handle pressure without bending.
Secure Frame to Wall and Floor
Once the frame is standing correctly, anchor it to the wall and floor. This step is important because it keeps the frame from moving when pressure is applied. A secure frame is safer and lasts longer.
Add Countertop Support Layer
Now place plywood or MDF on top of the frame. This creates a smooth support layer for the countertop. Make sure it sits flat across the whole structure. If the countertop is heavy, add extra reinforcement beneath weak spots.
Level and Adjust the Frame
Use a spirit level to check the surface. If one part is too high or too low, adjust it before moving on. A level frame helps the countertop sit properly and look neat.
Final Reinforcement
Add extra screws, brackets, or support beams where needed. Then check the frame from all sides. Press lightly on different areas to see if anything shifts. If the frame feels firm, you are on the right track.
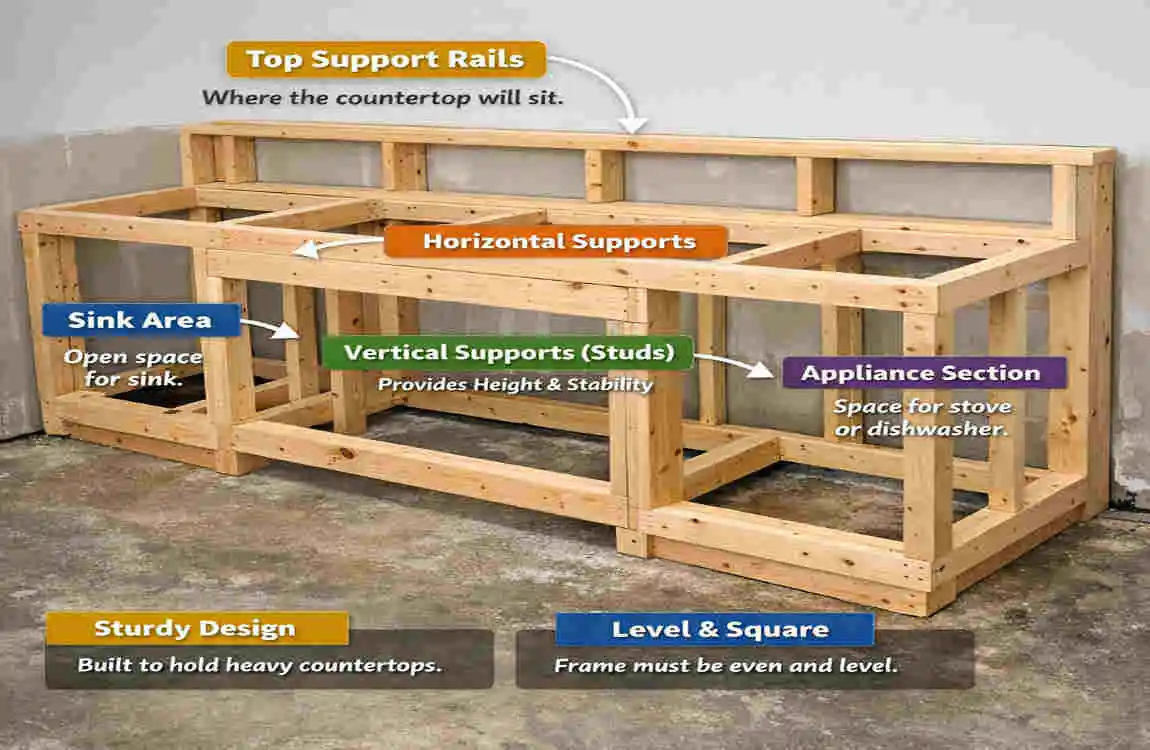
Part of the Frame Purpose
Base structure forms the main shape and support
Vertical supports carry weight and strengthen the frame
Support board creates a flat surface for the countertop
Wall and floor anchors keep the frame stable
Common Mistakes to Avoid
Many DIY projects run into trouble due to minor oversights. To get better results, avoid these common problems.
- Measuring too quickly
- Choosing weak or poor-quality material
- Ignoring uneven flooring
- Failing to anchor the frame well
- Leaving unsupported areas under heavy sections
- Forgetting space for plumbing or wiring
A careful approach saves time and helps your frame stay strong for years.
Expert DIY Tips for a Professional Finish
If you want your project to look polished, a few simple habits can help a lot.
Use Durable Materials
Treated wood is a smart choice if moisture is a concern. It holds up better in a kitchen environment and can reduce long-term damage.
Reinforce the Corners
Corners carry a lot of stress. Add brackets or extra screws there for better strength, especially if you plan to install a heavy countertop.
Plan for the Future
Leave room for upgrades later. You may want to change appliances, add storage, or update the counter surface in the future. A flexible frame makes those changes easier.
Keep the Look Balanced
Symmetry matters. A neat, even frame not only works better but also gives the kitchen a cleaner appearance.
Cost Breakdown and Budget Planning
DIY can save a lot of money compared to hiring a professional. In many cases, you may spend less on labour and still get a solid result.
What Affects the Budget
Your total cost depends on:
- The type of wood or metal you choose
- The size of the counter frame
- Whether you already own the tools
- Any extra support materials you need
Save More With Smart Choices
You can save by using budget-friendly materials, borrowing tools, or renting equipment instead of buying them all. A DIY project often cuts overall costs while giving you more control over the final design.
Maintenance Tips for Kitchen Counter Frames
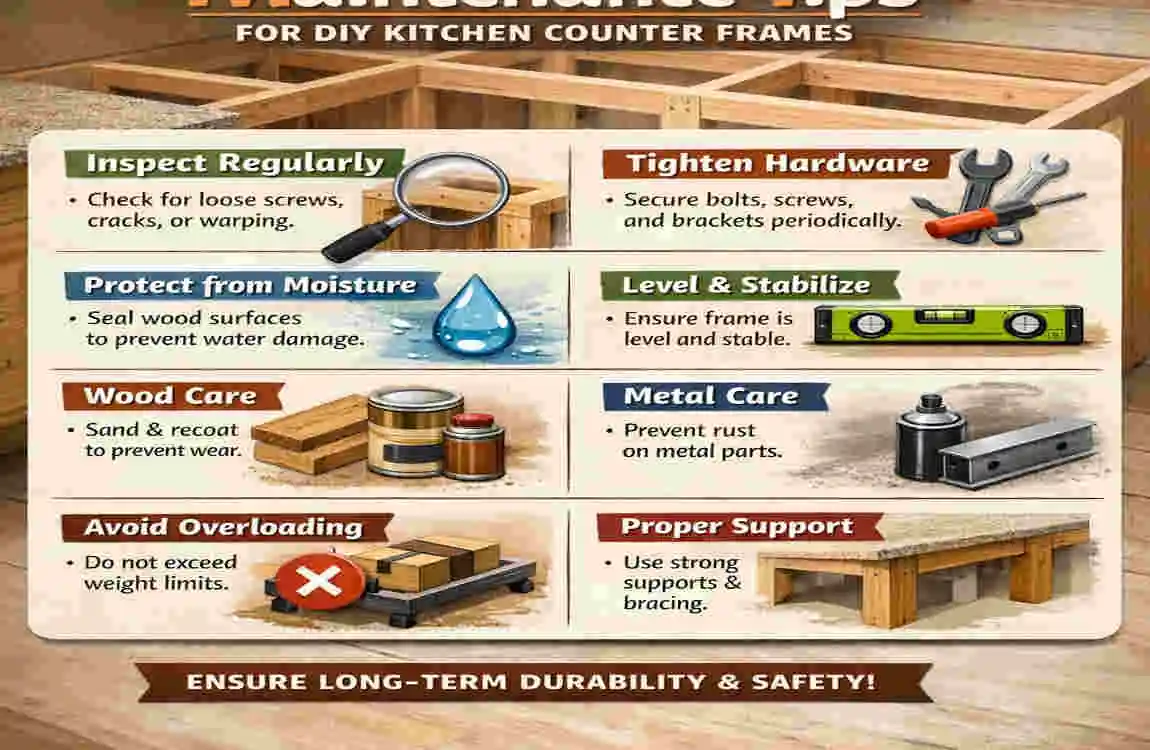
A kitchen counter frame does not need heavy maintenance, but regular care helps it last longer.
Check It Often
Look for loose screws, small shifts, or signs of wear. Catching problems early makes repairs easier.
Protect It From Moisture
Water is one of the biggest risks in a kitchen. Wipe spills quickly and seal wood surfaces if needed.
Keep It Clean
Dust and dirt can build up under the counter. A quick cleaning routine helps you spot issues sooner and keeps the area in good shape.
FAQ: How to Build Kitchen Counter Frame
What is a kitchen counter frame?
A kitchen counter frame is the support structure under the countertop. It holds the surface in place and keeps it stable.
What materials should I use?
You can use 2×4 wood beams, metal studs, screws, brackets, and a plywood or MDF support board.
Do I need special tools?
No, just basic tools like a measuring tape, drill, saw, level, and screwdriver.
How do I make sure the frame is level?
Use a spirit level while building. Check the floor first, because an uneven floor can affect the frame.
Can I build it myself?
Yes, if you measure carefully and work step by step. It is a very doable DIY project for beginners.
What is the biggest mistake to avoid?
The most common mistake is wrong measurements. Also avoid weak materials and poor wall anchoring.
How do I make the frame stronger?
Add extra supports, use good-quality screws, and secure the frame to both the wall and floor.
Why is the frame so important?
Because it supports the countertop and helps your kitchen stay safe, strong, and long-lasting.