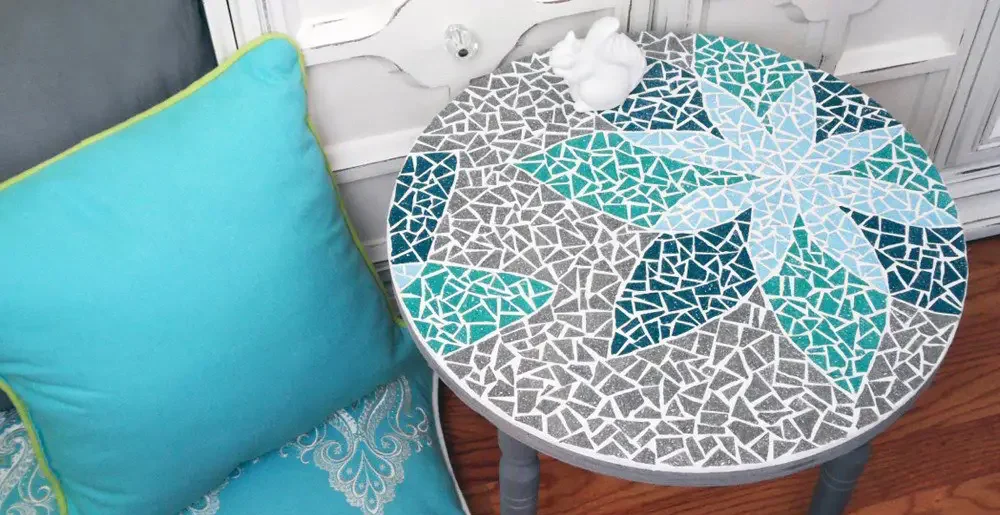
Mosaic table tops have been celebrated for centuries for their intricate designs and vibrant colors. They bring a piece of artistry into our homes, allowing us to express creativity functionally. These table tops are a collection of small tiles, meticulously arranged to form a pattern or image, which are then adhered to a surface.
Sealing your mosaic tabletop is as important as creating it. This process protects you’ve crafted and enhances its beauty and functionality. With the right materials and techniques, you can enjoy a stunning, durable mosaic tabletop for years that is susceptible to moisture, stains, and wear and tear
Let’s explore how you can make a mosaic tabletop that’s beautiful but also well-protected and durable.
Understanding Mosaic Table Tops

Definition and Characteristics
A mosaic table top is a surface adorned with small pieces of materials, usually tiles, arranged to create a decorative pattern or picture. What sets mosaic apart is its unique combination of colors, shapes, and textures, which can transform a simple table into a stunning centerpiece.
Benefits of Creating a Mosaic Table Top
Creating a mosaic table top has multiple benefits. It allows you to:
- Express Creativity: The limitless design possibilities mean you can create something truly unique.
- Enhance Aesthetics: Mosaics add visual interest and can complement any decor style.
- Boost Durability: When properly sealed, mosaic surfaces are resistant to scratches and stains.
Overview of Materials
To create a mosaic table top, you’ll need several materials:
- Tiles: These can be ceramic, glass, or stone. Each type offers different textures and colors.
- Adhesives: Used to glue the tiles to the table surface. Choose an adhesive suitable for both the tile and base material.
- Sealants: Essential for protecting the tiles and grout from moisture and dirt.
Steps to Make a Mosaic Table Top

Preparing the Base
Selecting a Suitable Table Base
Choosing the right base is the first step in your mosaic journey. Your base will dictate the overall look and durability of your table. Common choices include:
- Wood: Offers a natural, warm aesthetic and is easy to work with.
- Metal: Provides a sleek, modern look and is very durable.
- Concrete: Ideal for outdoor tables due to its weather resistance.
Preparing the Surface for Tiling
Once you’ve selected your base, it’s time to prepare it:
- Clean the Surface: Ensure it’s free from dust and grease.
- Sand if Needed: Roughen the surface slightly to help the adhesive bond better.
- Prime: Apply a primer to ensure a good grip for the adhesive.
Designing Your Mosaic
Tips for Sketching a Design
Before you start laying tiles, sketch your design. This helps you visualize the final product and ensures all elements fit together. Some tips include:
- Start with a simple pattern if you’re a beginner.
- Use graph paper to maintain proportions.
- Consider symmetry and focal points in your design.
Choosing Tile Colors and Patterns
The colors and patterns you choose will define the aesthetic of your table. Here are some tips:
- Harmonize with Your Decor: Ensure the colors complement your existing space.
- Mix Textures: Combine matte and glossy tiles for added depth.
- Limit Your Palette: Stick to three or four colors to avoid overwhelming the design.
Laying the Tiles
Step-by-Step Guide
Laying tiles is where your design starts to come to life:
- Apply Adhesive: Use a notched trowel to spread adhesive evenly over a small section of the table.
- Place the Tiles: Begin at the center and work outward, pressing each tile firmly into the adhesive.
- Leave Gaps for Grout: Ensure there are even spaces between tiles for grout.
Importance of Leaving Gaps
Leaving gaps, known as grout lines, is essential for a couple of reasons:
- Structural Integrity: Grout helps hold the tiles in place.
- Aesthetic Finish: Grout lines add definition to your design.
Grouting the Mosaic
Mixing and Applying Grout
Grout is the finishing touch that fills the spaces between tiles:
- Mix the Grout: Follow the manufacturer’s instructions for the right consistency.
- Apply Grout: Use a rubber float to push grout into the gaps, working diagonally to avoid dislodging tiles.
Techniques for Cleaning Excess Grout
After grouting, excess material will need to be cleaned off:
- Wipe with a Damp Sponge: Once the grout has set slightly, use a damp sponge to remove any residue from the tiles.
- Polish with a Dry Cloth: After the grout has fully cured, buff the tiles with a dry cloth to enhance their shine.
The Importance of Sealing
Why Sealing is Crucial
Sealing a mosaic table top is an essential step to protect your hard work. Here’s why it’s important:
- Prevents Moisture Damage: Unsealed grout and tiles can absorb moisture, leading to mold and mildew.
- Enhances Longevity: A good sealant will increase the lifespan of your mosaic.
- Maintains Aesthetic Appeal: Sealing prevents stains and keeps your table looking fresh.
Types of Sealants
Choosing the right sealant depends on your specific needs. Here’s a quick overview:
- Water-Based Sealants: These are easy to apply and clean up. They are ideal for indoor tables.
- Solvent-Based Sealants: Offer better protection against moisture, making them suitable for outdoor use.
Benefits of Sealing
The benefits of sealing extend beyond protection:
- Weather Resistance: Essential for outdoor tables exposed to the elements.
- Ease of Cleaning: Sealed surfaces are easier to wipe clean.
- Enhanced Appearance: Sealants can give your tiles a glossy finish, enhancing their colors.
How to Seal a Mosaic Table Top

Choosing the Right Sealant
Overview of Sealant Types
When selecting a sealant, consider the following options:
- Penetrating Sealants: These soak into the grout and tiles, providing protection from within.
- Topical Sealants: Form a protective layer on the surface, offering a glossy finish.
Factors to Consider
When deciding on a sealant, think about:
- Location of the Table: Indoor or outdoor?
- Type of Tiles Used: Porous tiles require a different sealant than non-porous ones.
- Desired Finish: High gloss, satin, or matte?
Preparing the Surface for Sealing
Cleaning the Table Top
Before sealing, ensure the surface is clean:
- Remove Dust and Debris: Use a soft brush or vacuum.
- Wipe with a Damp Cloth: Remove any grease or stains.
Ensuring Grout is Fully Cured
Allow the grout to cure completely before sealing. This usually takes about 72 hours but check the grout manufacturer’s instructions for precise times.
Applying the Sealant
Step-by-Step Instructions
Applying sealant is straightforward if you follow these steps:
- Read Manufacturer’s Instructions: Not all sealants are applied the same way.
- Apply with a Brush or Roller: Use a brush for precision or a roller for larger areas.
- Ensure Even Coverage: Apply in thin layers, covering all tiles and grout.
Tips for Achieving an Even Coat
To ensure the best results:
- Work in Sections: This prevents the sealant from drying too quickly.
- Avoid Overlapping: Overlapping can cause streaks or uneven gloss.
Curing and Maintenance
Recommended Curing Times
Different sealants have varying curing times, typically ranging from 24 to 48 hours. Avoid using the table during this period to allow the sealant to set properly.
Maintenance Tips
To keep your mosaic table top in excellent condition:
- Regular Cleaning: Use a mild detergent and a soft cloth.
- Re-Seal Periodically: Depending on use, reseal every 1-2 years to maintain protection.
Frequently Asked Questions (FAQ)
How often should I reseal my mosaic table top?
It depends on usage and exposure to elements. Generally, every 1-2 years is recommended.
Can I use my mosaic table top outdoors?
Yes, with the right sealant, your table can withstand the elements.
What if a tile comes loose?
Simply reapply adhesive and grout. Ensure it’s dry before resealing.
Answers to Concerns
Longevity
A well-sealed mosaic table top can last for decades with proper care.
Weather Resistance
Using a high-quality, solvent-based sealant will provide the best protection for outdoor use.
Repair
Minor repairs are straightforward with the right tools and materials. Ensure repairs are dry before resealing.


